

Printer-friendly version. Use your browser's Print command to print this version.
This tutorial explains how to use the ZipPrint functions of Host On-Demand.
This tutorial covers the following topics:
To benefit from this tutorial you should already know:
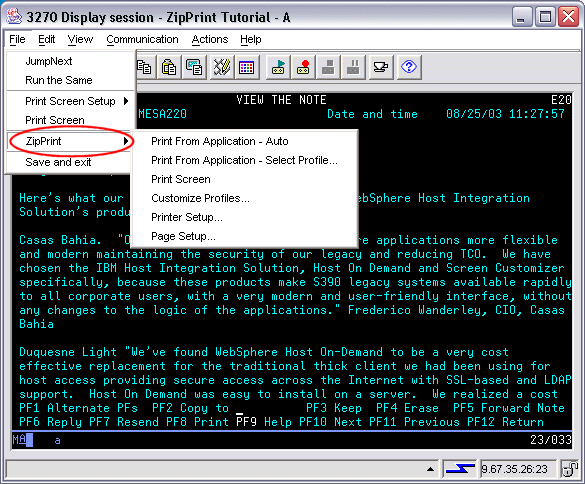
The ZipPrint functions are displayed on the ZipPrint submenu. To display this submenu click File > ZipPrint.
Shown below is a 3270 Display session with the ZipPrint submenu displayed. NOTE: The ZipPrint functions are available only in a 3270 Display session.
ZipPrint is a popular feature of the IBM Personal Communications program product that has now been added to Host On-Demand Version 8.0, with some improvements.
ZipPrint allows you to print a displayed 3270 Display document in its entirety by making just a few mouse clicks.
ZipPrint is available only in 3270 Display sessions.
To understand what ZipPrint does, we can compare ZipPrint with the old-style Print Screen function.
You probably already know how Print Screen works in a 3270 Display Session. It sends the contents of one screen (the currently displayed screen) to the printer. To use Print Screen, follow these steps:
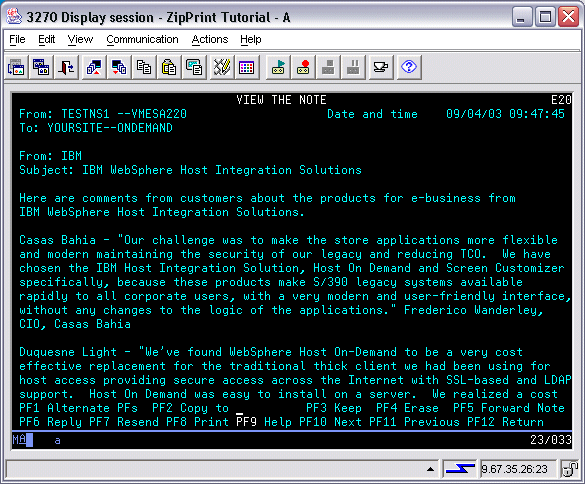
As an example, suppose that you are running a 3270 Display session and that you have opened an OfficeVision note log and are viewing a note, so that the first page of the note is displayed in the session area. Click here to view the session window.
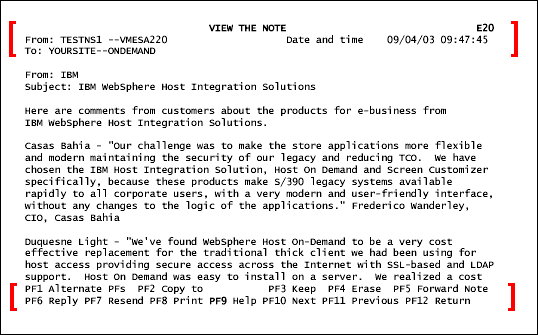
If you used File > Print Screen to print this session screen, the printed output would look something like the image shown below. Notice that:
|
In contrast to Print Screen, ZipPrint:
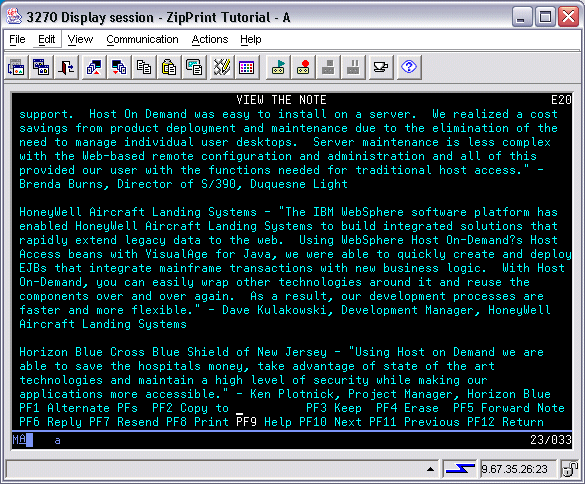
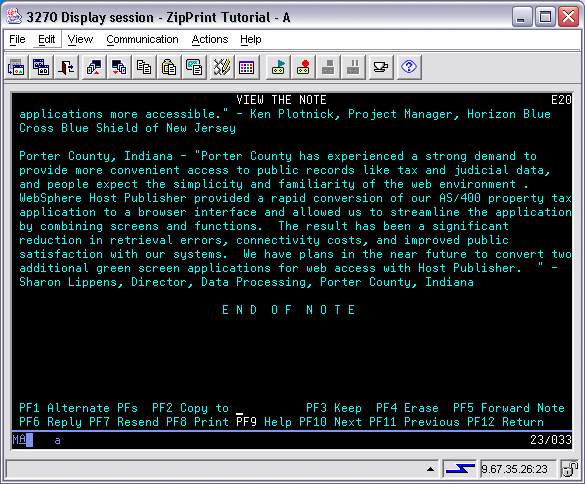
As an example, suppose again that you are running a 3270 Display Session and that you have opened an OfficeVision note log and are viewing a note, so that the first page of the note is displayed in the session area. Click here to view the three session windows that are required to display the entire note.
To print the entire contents of the note using ZipPrint, follow these steps:
However, the steps above do not include two other activities that this tutorial describes in more detail later on:
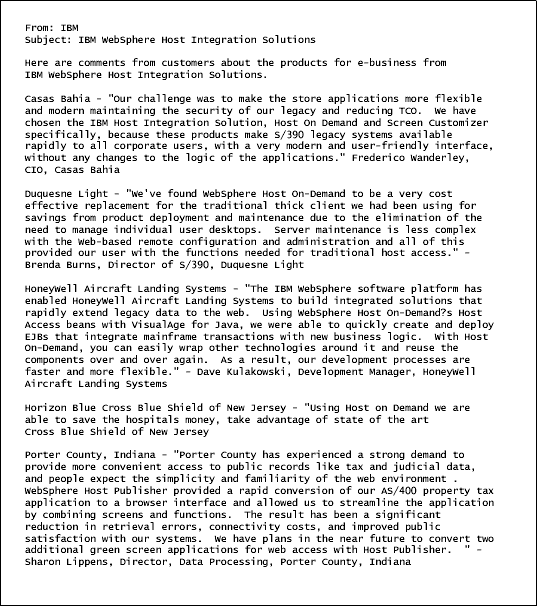
Suppose that the output configuration has been set to send ZipPrint output to an Adobe PDF file, with 12 characters per inch and the LucidaConsole font. The output file, when viewed in Adobe Reader, would look like the image shown below. Notice that:
|

The remainder of this tutorial contains the following sections:
This section of the tutorial describes how to configure an application profile for ZipPrint.
Click Back to return to the page showing the Sections in this tutorial.
You can jump directly to a topic by clicking one of the numbered icons below, or you can click Next at any time to advance to the next topic.
ZipPrint does not have access to a separate LU1 or LU3 print data stream. Like the old-style Print Screen, ZipPrint must extract the data to be printed from the existing LU2 display session.
You may be interested to know that ZipPrint is implemented as a Host On-Demand macro. To repeat: when you do a ZipPrint, you are playing back the Host On-Demand ZipPrint macro. As a macro, ZipPrint can take advantage of the macro runtime's ability to simulate keystrokes and to read data from the session screen.
Here are the steps that ZipPrint follows when it prints a document. As an example, suppose that you are viewing page 4 of a 10-page document and that you click File > ZipPrint > Print From Application - Auto.
You can see ZipPrint processing the pages when you print a document with it. You see ZipPrint quickly paging back to the first page, quickly paging forward to the last page, and (if this option is set) finally paging back to the page that was displayed when the ZipPrint was initiated.
ZipPrint can process up to 10,000 pages (session screens) in one printing.
To print a document, ZipPrint needs answers to the following questions:
An application profile is a collection of all the information that ZipPrint needs to print a document. You must create an application profile for every type of document that you want ZipPrint to process.
An application profile includes:
To edit an application profile, open a 3270 Display session and click File > ZipPrint > Customize Profiles.
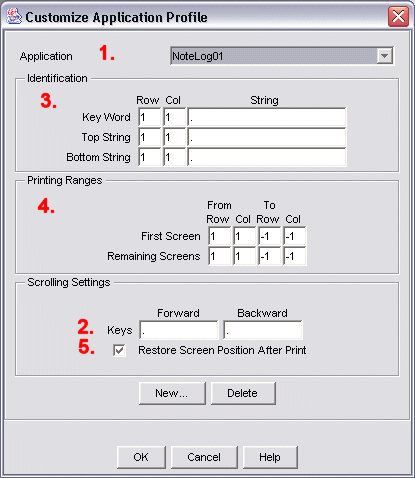
The Customize Application Profile window appears.
As you can see from the image below, this window contains fields for specifying all the information required in an application profile.
To select an existing application profile to edit:
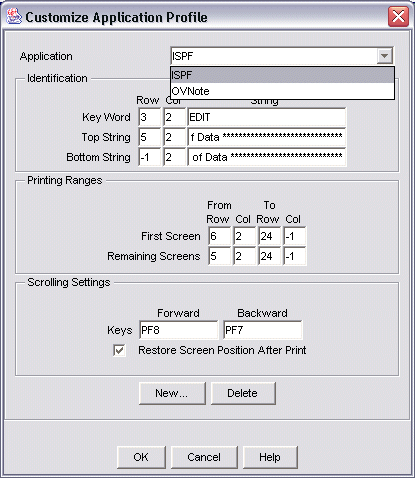
In the image below, the Application listbox is expanded to show the two sample application profiles, ISPF and OVNote. ZipPrint provides these sample profiles as examples of working application profiles.
Initially, as in the image below, the ISPF entry is selected, and the window's fields display the values for the ISPF application profile.
If you select the OVNote entry, the window's fields display the values for the OVNote application profile.
When the Custom Application Window is displayed, you can work on one profile or on many. Suppose that you have two application profiles named DocType1 and DocType2.
However, the Custom Application Profile window does not permanently save any changes until you click OK to close the window. In the example above, the changes that you made to the application profiles DocType1 and DocType2 are not permanently saved until you click OK to close the window.
If you want to discard your changes, click Cancel to close the Custom Application Profile window. In the example above, the changes that you made to the application profiles DocType1 and DocType2 are discarded if you click Cancel.
To delete an existing application profile in the Custom Application Profile window, follow these steps:
The name of the application profile disappears from the listbox immediately when you click Delete. However, the profile is not actually deleted until you click OK to close the Custom Application Profile window.
If, after you click Delete, you decide that you do not want to delete the profile, then click Cancel to close the Custom Application Profile window.
Click here to read about deleting the two sample profiles, OVNote and ISPF.
You can delete the two sample profiles, ISPF and OVNote, if you like. Although these are working profiles, they are provided for illustration purposes only.
However, you should retain one or both of the sample profiles until you understand how to create a new application profile.
To delete the sample profiles, follow the same steps that you would follow to delete any other profile.
To recover the sample application profiles after you have deleted them, do one of the following actions:
Application profiles are stored in the session profile.
When you copy a session profile, any ZipPrint application profiles inside the session profile are also copied.
Therefore, a system administrator can create a session profile, create ZipPrint application profiles inside the session profile, and distribute the session profile to end users. End users can then use the ZipPrint application profiles stored in the session profile.
When you delete an application profile, Host On-Demand erases the application profile from the session profile.
The remainder of this section of the tutorial describes step-by-step how to configure a sample application profile with the name NoteView.
The NoteView application profile is written to print a note that is being displayed by the OfficeVision note viewer application. Yes, this is same note viewer application for which the sample application profile OVNote (provided by ZipPrint) was written. Nevertheless, this tutorial re-uses the note viewer as an application for a sample profile because the note viewer is one of the very few 3270 Display applications to which all customers are likely to have access. Also, the Printing Range parameters of the NoteView application profile are different from those of the OVNote application profile.
To understand the steps in creating the NoteView application profile, you do not have to actually run the note viewer itself. However, to test the NoteView application profile, you must be able to run the note viewer. Click here for instructions on running the note viewer.
Follow these steps to run the note viewer:
profs.
(Your installation may have a different way of starting OfficeVision).
If the note log is empty, you can add a note to the note log by sending a note. Follow these steps to send a note:
Send to: type a valid address such as host(user).
The address does not have to be an actually existing address. For example,
the address host(user) works.
Click here to view a sample note.


To create a new application profile follow these steps:

When you click OK, Host On-Demand creates a new ZipPrint application profile.
1. NoteView application profile with the initial parameters set to the values from the profile that was selected when the user clicked New (the ISPF profile):
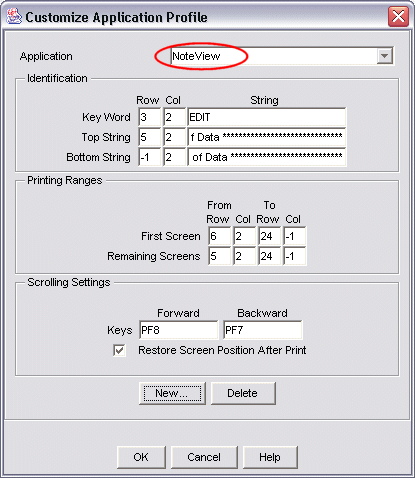
|
2. NoteView application profile with the parameters initialized to default values.
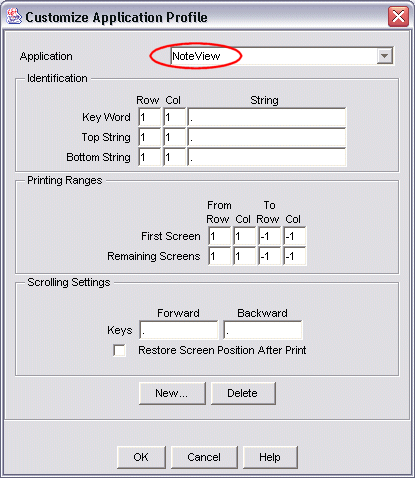
|
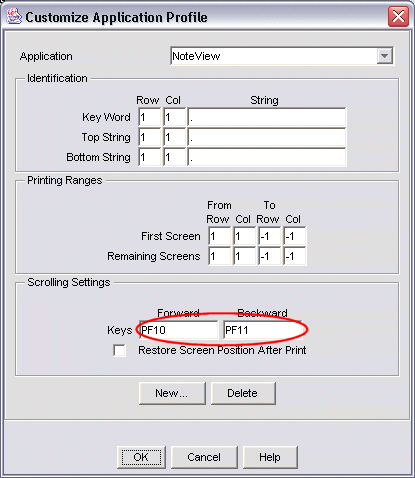
The easiest parameter to set is the scrolling keys.
To determine which keys the application uses for paging forward and backward, look at any page of the application. Many 3270 applications list the names of commonly used keys on each page.
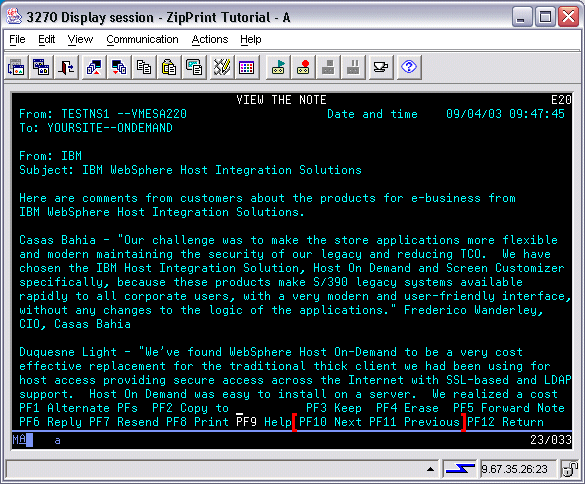
For example, the note viewer lists the paging keys together with other commonly used keys in the last two rows of the text area of each page. PF10 is for paging forward, PF11 is for paging back. Click here to see a page from a sample note with the names of paging keys highlighted.
Therefore you would type PF10 and PF11
into the Forward and Backward fields of the Custom Application Profile window,
as shown in the image below.
PF10)
you must use the key names that are defined by the Macro facility.
For a list of these names, see Appendix A of the Host On-Demand
Macro Programming Guide.
PF10)
or lower case (pf10)
|
The note viewer lists the commonly used function keys on the last two rows (rows 23-24 of a 25-line session screen) of every page. Red bracket characters [ ] have been added to highlight the paging keys.
To restore the screen position after printing, select the checkbox
Restore Screen Position After Print.
Selecting this checkbox causes ZipPrint, after it has processed all the pages of the document,
to re-position the document to the same page that was displayed when the user initiated
the ZipPrint action.
The default setting is to not restore the screen position after printing. You probably do not want the screen position restored if you normally close the document after you print it with ZipPrint.
In contrast, you probably want the screen position restored if you normally continue using the document after you print it with ZipPrint.
The parameters in the Identification group of the Customize Application Profile window enable ZipPrint to determine whether an application profile should be used to print a particular document. The parameters in Identification group are:
Before using an application profile to print a document, ZipPrint compares the values specified in the Key Word, Top String, and Bottom String parameters to the values in the document.
ZipPrint checks for these parameters as described below. Suppose that you have opened a 10-page document and are viewing page 6, and that you initiate a ZipPrint:
The Key Word parameter is a word or phrase that occurs on every page of the document in the same location.
Therefore, when you are setting the Key Word parameter, you must choose a sequence of characters that:
Many 3270 Display applications display an identifying title
at the same location on every page.
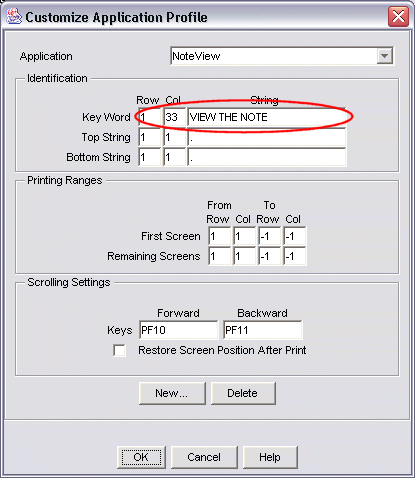
The note viewer displays the string VIEW THE NOTE
at row 1, column 33 of every page.
Click here to view a
page from a sample note
with this identifying string highlighted
.
Therefore you would enter the values
1, 33, and VIEW THE NOTE
in the input fields of the Key Word parameter
of the Customize Application Profile window, as shown below.
|
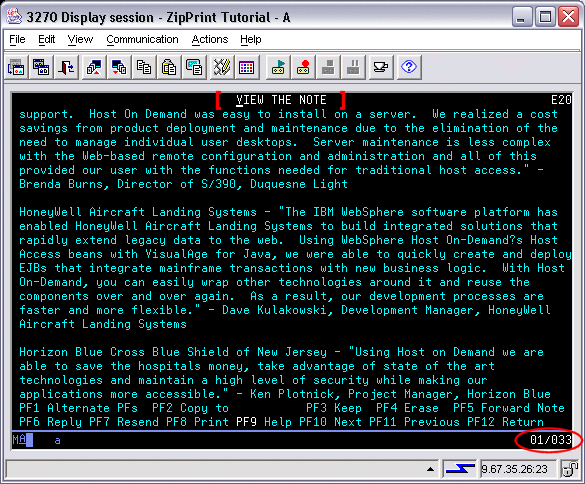
The note viewer displays the key word string VIEW THE NOTE
at row 1, column 33
of every page of the note.
In the image below, red bracket characters
[ ]
have been added to highlight the key word string.
To determine the row and column location of an identifying string, move the text cursor to the first character of the string. The row and column location of the cursor appears at the right of the Operator Information Area (OIA) on the last row of the screen.
|
When you specify the String value for the Key Word parameter:
When you specify the row and column values for the Key Word parameter:
For example, you might specify a row of -1, a column of -1, and a string of "." (period). To match this identification, the document would have to have at least one "." at some row and column location on every single page. The "." could appear in a different location on each page of the document.
The Top String parameter is a word or phrase whose content and placement enable ZipPrint to identify the first page of the document.
The requirements of the Top String are that:
Many 3270 Display applications display a particular string
on the first page of a document.
With the note viewer there are several such strings.
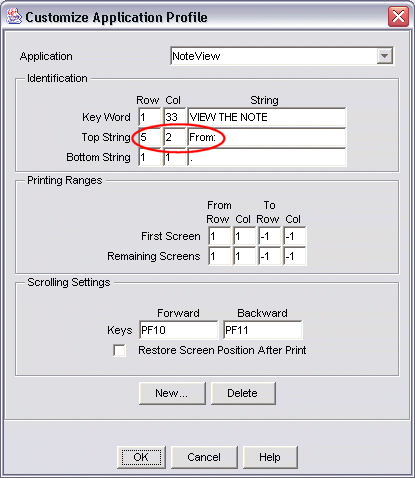
One is the string From:
displayed on row 5, column 2 of the first page.
Click here to view a
page from a sample note
with this Top String highlighted
.
Therefore you would enter the values
5, 2, and From:
in the input fields of the Top String parameter,
as shown below.
|
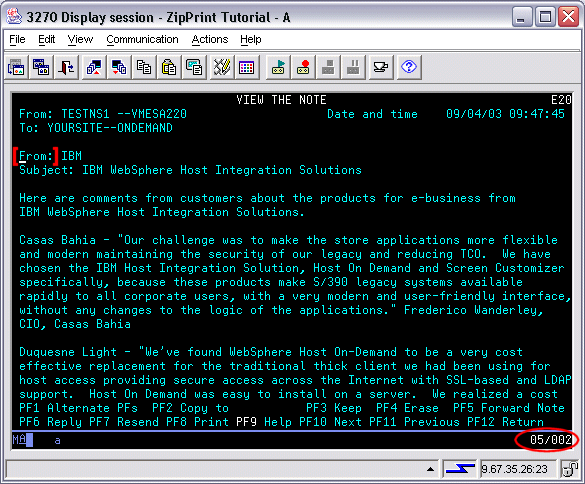
The note viewer displays the string From:
at row 5, column 2
of the first page of every note.
In the image below, red bracket characters
[ ]
have been added to highlight the string "From:".
To determine the row and column location of a string, move the text cursor to the first character of the string. The row and column location of the cursor appears at the right of the Operator Information Area (OIA) on the last row of the screen.
|
When you specify the String value for the Top String parameter:
When you specify the row and column values for the Top String parameter:
If your document could contain the Top String not only on page 1 but also on some other page (that is, the same string could appear in the same row and column location on some other page), then you should consider going to page 1 of the document before starting a ZipPrint. The next paragraph explains why this is a good idea.
When you start a ZipPrint, ZipPrint checks for the Top String by paging backward through the document from the current location until it finds a page that contains the specified string in the specified position. For example, suppose that you are viewing page 7 of a 10-page document:
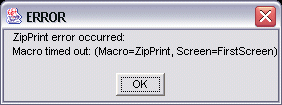
If you make an error in specifying a Top String (for example, if one of the characters you specify is incorrect) then when you try to print the document with ZipPrint, ZipPrint can page backward all the way to page 1 of the document without ever finding the Top String. At this point, the ZipPrint macro becomes stuck in the following loop:
|
In this situation, you should wait until ZipPrint times out, clear the error message, and then correct the problem in the application profile.
The Bottom String parameter is a word or phrase whose content and placement enable ZipPrint to identify the last page of the document
The requirements of the Bottom String are that:
Many 3270 Display applications display a particular string
on the last page of a document.
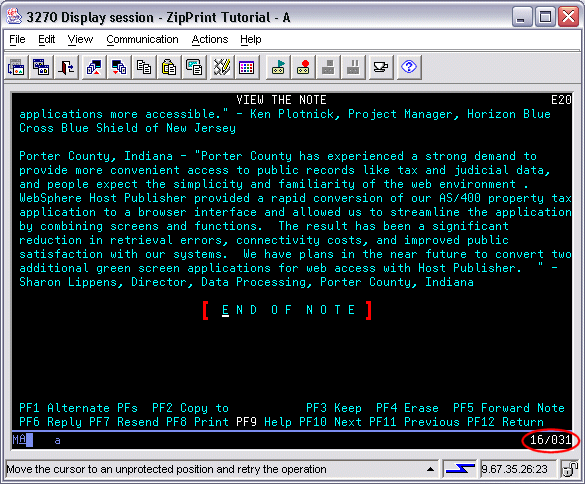
The note viewer displays the string
E N D

O F

N O T E
at column 31 of some row on the last page.
(There are 2 spaces after the D
and after the F).
The row varies depending on the number of lines
of text on the last page.
Click here to view a
page from a sample note
with this Bottom String highlighted.
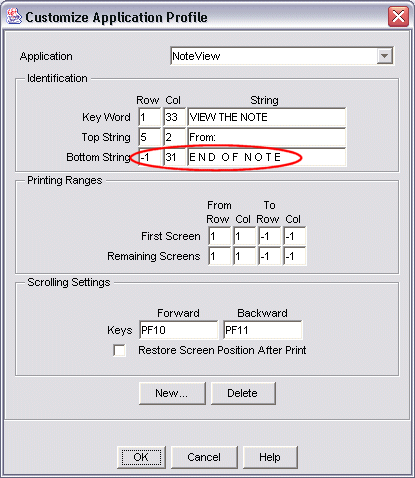
Therefore you would enter the values
-1, 31, and E N D O F N O T E
in the input fields of the Bottom String parameter
of the Customize Application Profile window, as shown below.
The -1 in the row field indicates that the string can
occur in any row of the last page.
|
The note viewer displays the string
E N D
O F
N O T E
at column 31 of some row
of the last page of the note.
The row number depends on the number of lines
of text on the last page.
In the image below,
red bracket characters
[ ]
have been added to highlight the string E N D
O F
N O T E.
To determine the row and column location of a string, move the text cursor to the first character of the string. The row and column location of the cursor appears at the right of the Operator Information Area (OIA) on the last row of the screen.
|
When you specify the String value for the Bottom String parameter:
When you specify the row and column values for the Bottom String parameter:
When ZipPrint has found the first page of the document, ZipPrint processes the document as follows:
Therefore, if your document contains the Bottom String at the proper row and column location not only on the last page (for example, on page 10) but also on some other page (for example, on page 9), then ZipPrint does not print the entire document. Instead, ZipPrint stops printing the document as soon as it processes the first page on which it finds the Bottom String in the proper row and column location (page 9 in this example).
To avoid this problem, you can:
If you make an error in specifying a Bottom String (for example, if one of the characters you specify is incorrect) then when you try to print the document with ZipPrint, ZipPrint can possibly page forward all the way to the last page of the document without ever finding the Bottom String. At this point, the ZipPrint macro becomes stuck in the following loop:

|
In this situation, you should wait until ZipPrint times out, clear the error message, and then correct the problem in the application profile.
The last part of configuring a new profile is setting the printing ranges for the first page of the document and for subsequent pages.
The print range is the rectangular area of text on the screen that you want to be printed.
Recall that the old-style Print Screen function sends the entire contents of the screen to the printer, including such probably unwanted items as the application title at the top of the screen and function key definitions at the bottom of the screen. Click here to view an example of old-style Print Screen output.
Defining print ranges allows you to exclude these unwanted items.
ZipPrint provides printing ranges for both the first screen and the remaining screens because in many situations the first screen has extra header information that does not appear on the remaining screens.
The image below shows an example of old-style Print Screen output. The old-style Print Screen sends the entire contents of the currently displayed page to the printer.
The printed output includes all the information that appears in the session screen. Notice that some of this information is information that you probably would not want to be printed as part of the document.
This unwanted information includes:

|
The printing range for the first screen specifies the row and column coordinates of the rectangular block of text to be printed from the first page of the document.
The From fields specify
the row and column of the first character
of the rectangular area of text to be printed (upper left corner of rectangle).
From field.
The To fields specify
the row and column of the last character
of the rectangular area of text to be printed (lower right corner of rectangle).
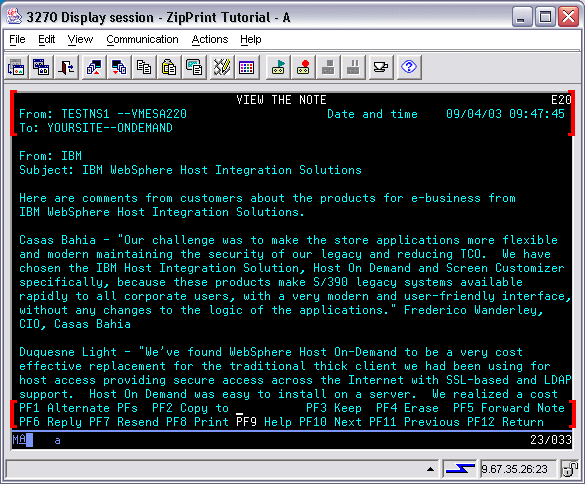
On the first page of the note viewer, the first four rows (rows 1-4) and the last two rows (rows 23-24 of a 25-line session screen) can be excluded as not part of the text of the document. Click here to view the first page of a sample note with these excludable areas highlighted.
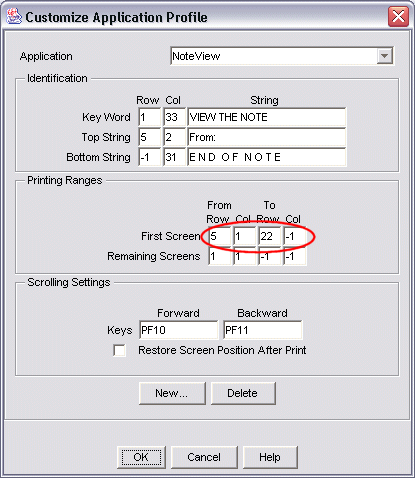
Therefore, as shown in the image below, you would enter the following locations for the first screen:
From: 5, 1, to start printing at row 5, column 1.
To: 22, -1, to stop printing at the last column of row 22.
|
On the first page of the note viewer, the first four rows (rows 1-4) and the last two rows (rows 23-24 of a 25-line session screen) can be excluded as not part of the text of the document. In the image below, red bracket characters [ ] have been added at the top and bottom of the screen to highlight these areas.
|
The printing range for the remaining screens specifies the row and column coordinates of the rectangular block of text to be printed from the remaining screens of the document.
The From fields specify
the row and column of the first character
of the rectangular area of text to be printed (upper left corner of rectangle).
From field.
The To fields specify
the row and column of the last character
of the rectangular area of text to be printed (lower right corner of rectangle).
However, please note that ZipPrint does not print any rows of text that occur on or after the row containing the Bottom String.
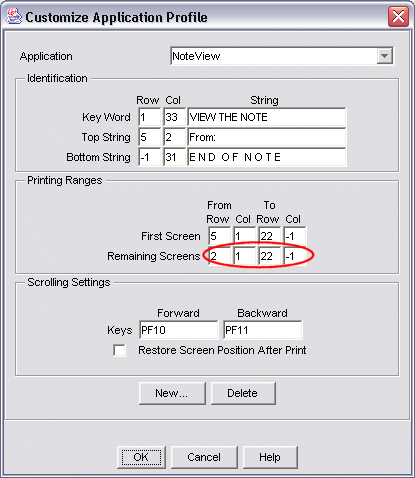
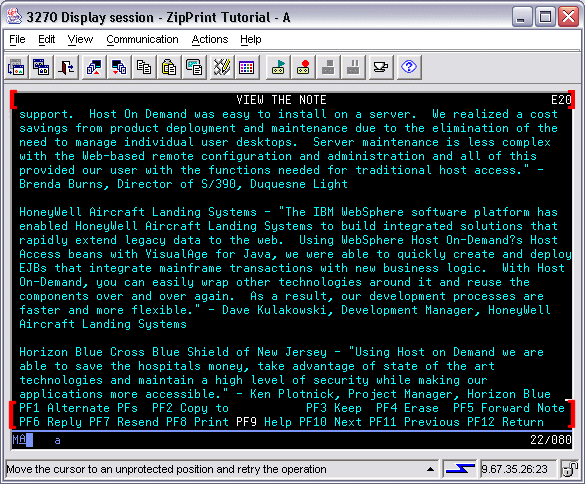
On the remaining pages of the note viewer, the first row (row 1) and the last two rows (rows 23-24 of a 25-line session screen) can be excluded as not part of the text of the document. Click here to view a page of a sample note with these excludable areas highlighted.
Therefore, as shown in the image below, you would enter the following locations for the first screen:
From: 2, 1, to start printing at row 2, column 1.
To: 22, -1, to stop printing at the last column of row 22.
|
On the remaining pages of the note viewer (that is, after the first page), the first row (row 1) and the last two rows (rows 23-24 of a 25-line session screen) can be excluded as not part of the text of the document. In the image below, red bracket characters [ ] have been added at the top and bottom of the screen to highlight these areas.
|
This page summarizes the steps in configuring an application profile. Click Next to return to the topics page of this section.
In configuring an application profile you should:
This section of the tutorial describes how to change the printer setup and page setup options for ZipPrint.
Click Back to return to the page showing the Sections in this tutorial.
|
|
|
|
|
|
|
|
The ZipPrint printer setup options and page setup options are stored in the 3270 Display session profile. For example, suppose that you have started a 3270 Display session from a session profile named My3270Host and that you modify the ZipPrint printer setup options or page setup options. The modified printer setup options and page setup options are stored in the My3270Host session profile.
Because ZipPrint options are stored in the 3270 Display session profile, they do not affect the printer setup options and page setup options for:
To change the printer setup options for ZipPrint click File > ZipPrint > Printer Setup.
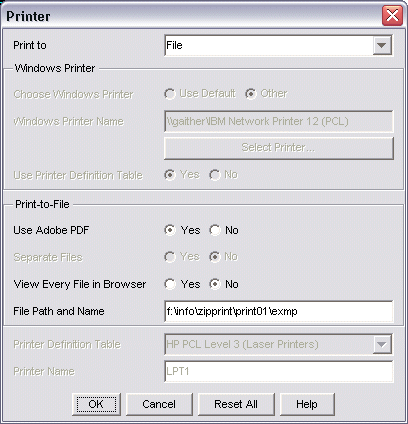
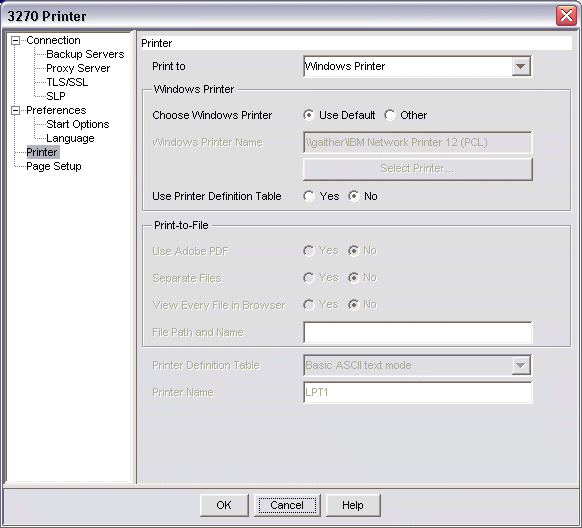
The printer setup options for ZipPrint are exactly the same types of printer setup options that are available for a 3270 Printer session. However, with ZipPrint you set these options after a starting a session. In contrast, with a 3270 Printer session, you configure the printer setup options in the session profile before starting a session. Click here to see the printer setup options for a 3270 Printer session.
The image below shows the Printer Setup options for ZipPrint. Notice in this example that:
File.
Yes
f:\info\zipprint\print01\exmp.
|
The image below shows the default printer setup options for a 3270 Printer session.
|
To change the page setup options for ZipPrint click File > ZipPrint > Page Setup.
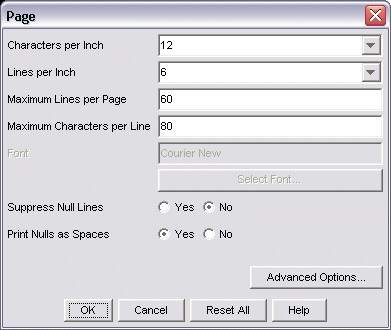
The page setup options for ZipPrint are exactly the same types of page setup options that are available for a 3270 Printer session, with a few exceptions. The exceptions are that ZipPrint does not include options that are not appropriate for a 3270 Display data stream (LU2).
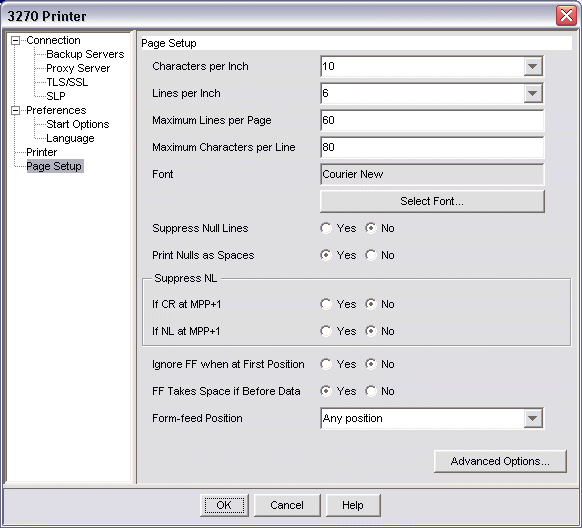
With ZipPrint, you set the page setup options after a starting a session. In contrast, with a 3270 Printer session, you configure the page setup options in the session profile before starting a session. Click here to see the page setup options for a 3270 Printer session.
The image below shows the Page Setup options for ZipPrint. Notice in this example that:
12.
|
The image below shows the default page setup options for a 3270 Printer session.
|
This page summarizes the information about printer setup options and page setup options. Click Next to return to the topics page of this section.
This section of the tutorial describes how to print a document or a single screen with ZipPrint.
Click Back to return to the page showing the Sections in this tutorial.
|
|
|
|
|
|
|
|
To print a 3270 display session document automatically (that is, without having to manually select an application profile) click File > ZipPrint > Print from Application - Auto.
Use this option when the session contains only one application profile that could match the currently displayed document. For example, if the currently displayed document is a 3270 note displayed by the note viewer application, and you have only one application profile that matches a document of this type, then you can use Print from Application - Auto to print this document.
When you select Print from Application - Auto, ZipPrint automatically compares each application profile stored in the session profile with the currently displayed document, until it finds a match.
To specify the application profile that you want ZipPrint to use, click File > ZipPrint > Print from Application - Select Profile. ZipPrint displays a list of the available application profiles. You select the application profile that you want ZipPrint to use.
Use this option when the session contains more than one application profile that matches the currently displayed document. Suppose that you have two application profiles that match a particular document:
When you select Print from Application - Select Profile, ZipPrint compares the application profile that you select with the currently displayed document:
To print the current 3270 Display session screen using the printer setup options and the page setup options configured for ZipPrint, click File > ZipPrint > Print Screen.
Like File > Print Screen (the old-style Print Screen), File > ZipPrint > Print Screen prints only the contents of the currently displayed page, and prints the entire contents of the page. However, File > Print Screen sends its output directly to the printer. In contrast, File > ZipPrint > Print Screen prints the page using the currently configured printer setup options and page setup options for ZipPrint.
This page summarizes the information about printing a document or a single screen with ZipPrint. Click Next to return to the topics page of this section.
This tutorial has covered the following topics:
Remember that ZipPrint: