Business Intelligence Tutorial
In this lesson, you will define how the Data Warehouse
Center is to move and transform data into its format for the data
warehouse. First, you will define a process, which contains
a series of steps in the transformation and movement process. Next, you
will specify the source tables that are to be transformed for the
warehouse. Finally, you will define data transformation steps that use
two different methods of transformation:
- You will load data into the warehouse database with a program.
- You will select source data and join tables with SQL statements.
Specifically, you will define the Tutorial Market process, which performs
the following processing:
- Loading the Demographics file into the warehouse database.
- Selecting data from the GEOGRAPHIES table and creating a target
table.
- Joining the data in the Demographics table and the GEOGRAPHIES target
table.
The end result is the LOOKUP_MARKET target table.
In this exercise, you will define the process object for
the Tutorial Market process.
To define the process object:
- From the Data Warehouse Center window, expand the Subject Areas
tree.
- Expand the TBC Tutorial subject area, which you defined in Lesson 5, Defining a subject area.
- Right-click the Processes folder, and click
Define.
The Define Process notebook opens.
- In the Name field, type the name of the process:
Tutorial Market
The name can be up to 80 characters long and is case-sensitive. The
first character of the name must be alphanumeric. You cannot use &
as the first character in English. This field is required.
- In the Administrator field, type your name as the contact for
the process definition.
- In the Description field, type the description of the
process:
Process to create the LOOKUP_MARKET table
- Click the Security tab.
- In the Available Security Groups list, click the Tutorial
Warehouse Group, which you defined in Defining the warehouse group.
Adding the process to the security group authorizes the users in the group
(in this case, you) to open and add objects to the process.
- Click >.
The Tutorial Warehouse Group moves to the Selected Security
Groups list.
- Click OK.
The Define Process notebook closes.
In this exercise, you will open the process so that you
can graphically define the flow of data in the process in the next
exercise.
To open the Tutorial Market process:
- Right-click the Tutorial Market process.
- Click Open.
To define the flow of data, you need to add each source
that the steps transform and the target tables that result from the
transformation.
In the Tutorial Market process, you are to load the Demographics file into
the target database, so you need to add the source file and the
DEMOGRAPHICS_TARGET target table for the step to the process. The
Demographics source file is part of the Tutorial File Source warehouse source,
which you defined in Lesson 6, Defining warehouse sources. The DEMOGRAPHICS_TARGET target table is part of the
Tutorial Targets warehouse target, which you defined in Lesson 7, Defining warehouse targets.
To add the Demographics file:
- Click the Add Data icon:

Click the canvas at the spot that you want to place the table. The
Add Data window opens.
- In the Available source and target tables list, expand the
Warehouse Sources tree.
A list of the warehouse sources defined in the warehouse is
displayed.
- Expand the tree for the Tutorial File Source warehouse source.
- Expand the Files tree.
In the tree, you should see
X:\sqllib\samples\db2sampl\dwc\demographics.txt,
where X is the drive on which you installed the sample.
- Select the Demographics file.
- Click > to add the Demographics file to the Selected
source and target tables list.
To add the DEMOGRAPHICS_TARGET target table:
- In the Available source and target tables list, expand the
Warehouse Targets tree.
A list of the warehouse targets defined in the warehouse is
displayed.
- Expand the Tutorial Targets warehouse target tree.
- Expand the Tables tree.
You should see the DEMOGRAPHICS_TARGET target table in the list.
- Select the DEMOGRAPHICS_TARGET target table.
- Click > to add the DEMOGRAPHICS_TARGET target table to the
Selected source and target tables list.
In the next part of this exercise, you need to add the GEOGRAPHIES source
table. When you define a step that selects data from the GEOGRAPHIES
table, you can specify that the Data Warehouse Center automatically generate a
target table, so you do not need to add a target table.
To add the GEOGRAPHIES source table:
- From the Add Data window, select the GEOGRAPHIES table.
- Click > to add the GEOGRAPHIES table to the Selected
source and target tables list.
- Click OK to add the file and tables that you selected to the
process.
The file and tables that you selected are displayed on the Process Model
window.
The last step will use the Demographics table and the Geographies table as
sources, so you do not need to specify sources for the step. You can
specify that the Data Warehouse Center automatically generate the resulting
target table, LOOKUP_MARKET, so you do not need to specify a target table for
the step.
Now, you need to add the steps that define how the source data is to be
transformed into the target data. You must define three steps:
- Load Demographics Data
- A DB2 program step that loads data from the Demographics file into a table
in the TBC Warehouse database, which you created in Lesson 2, Creating a warehouse database.
- Select Geographies Data
- An SQL step that selects columns from the Geographies source table.
- Join Market Data
- An SQL step that joins the Geographies and Demographics tables and writes
the joined table into the Tutorial Warehouse database.
In this exercise, you will define the Load Demographics step:
- From the palette (the toolbar on the left side of the window), click the
DB2 Programs icon, which is the second icon from the bottom:

Each program icon represents a program group, which is a
grouping of similar programs.
- Click DB2 UDB --> Load.
The programs in a program group cascade from the program icon.
- Click the spot on the canvas (the empty area on the right side of the
window) where you want to place the step.
An icon for the step is added to the window.
- Right-click the step.
- Click Properties.
The Step notebook opens.
- In the Name field, type the name of the step:
Load Demographics Data
- In the Administrator field, type your name as the contact for
this step.
- In the Description field, type the description of the
step:
Loads demographics data into the warehouse.
- Click OK.
The Step Properties notebook closes.
- Click the Task Flow icon:

- Click the Data Link icon:

You will use the Data Link icon to define the flow of data from the source
file, through transformation by a step, to the target table.
- Click the middle of the Demographics source file and drag the mouse to the
Load Demographics Data step.
The Data Warehouse Center draws a line between the file and the
step.
This indicates that the Demographics source file contains the source data
for the step.
- Click the middle of the Load Demographics Data step and drag the mouse to
the Demographics Table target table.

This indicates that the Demographics Table target table contains the target
data for the step.
- Right-click the step.
- Click Properties.
The Step notebook opens.
- Click the Parameters tab.
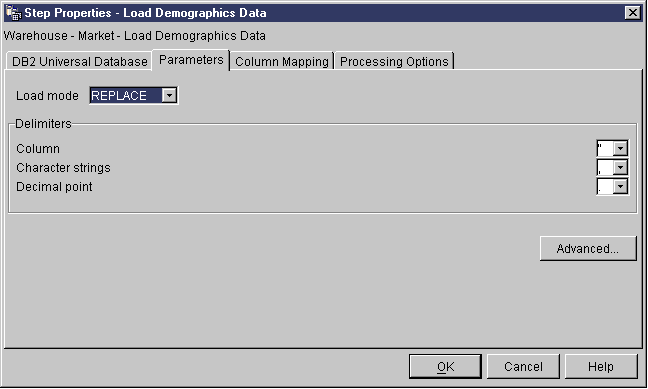
- From the Load mode list, click REPLACE.
Accept the rest of the default values on the page.
You can skip the Column Mapping page because the Load program does not use
the column mapping to generate the target table. It generates the
target table based on the source file.
- Accept the default values on the Processing Options page.
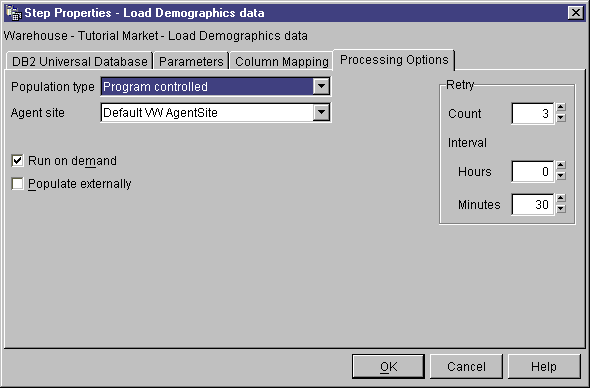
For more information about the values on this page, see "Loading data
into a table" the online help.
- Click OK.
The Step notebook closes.
In this exercise, you will define the Select Geographies
step:
- From the palette, click the SQL icon:

- Click the spot on the canvas where you want to place the step.
An icon for the step is added to the window.
- Right-click the step.
- Click Properties.
The Step notebook opens.
- In the Name field, type the name of the step:
Select Geographies Data
- In the Administrator field, type your name as the name of the
contact for the step.
- In the Description field, type the description of the
step:
Selects Geographies data from the warehouse source
- Click OK.
The Step notebook closes.
- Click the Task Flow icon:
- Click the Data Link icon:
- Click the middle of the Geographies source table and drag the mouse to the
middle of the Select Geographies Data step.
The Data Warehouse Center draws a line that indicates that the Geographies
source table contains the source data for the step.
Because you will specify that the Data Warehouse Center is to create the
target table, you do not need to link a target table to the step.
- Right-click the Select Geographies Data step.
- Click Properties.
The Step notebook opens.
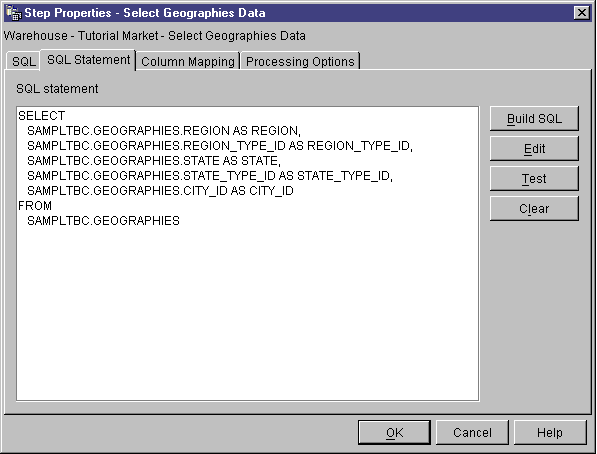
- Click the SQL Statement tab.
- Click Build SQL to build SQL using the SQL Assist wizard, which
generates SQL based on the selections that you make in the wizard.
SQL Assist opens.
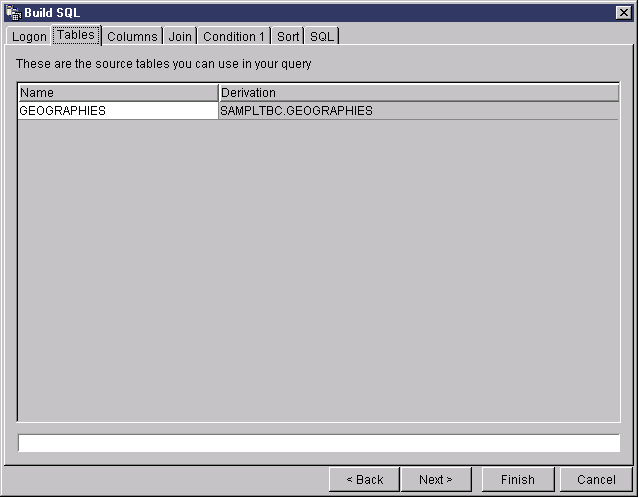
- Click the Tables tab.
- Verify that GEOGRAPHIES is listed.
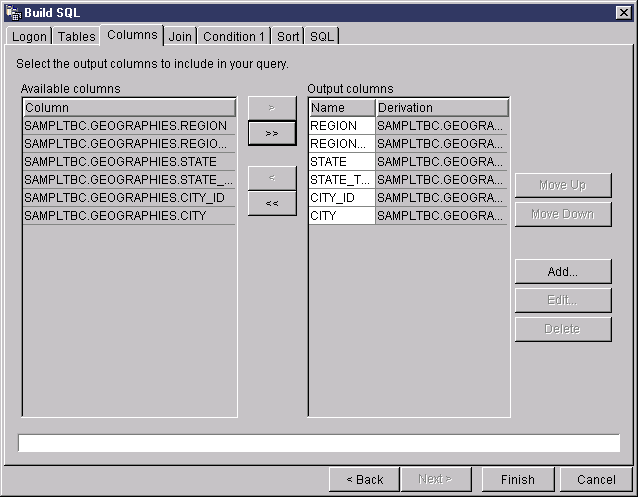
- Click the Columns tab.
- Click >> to add all the columns from the Geographies
table to the Output list.
- Click the Review tab to view the SQL statement that you just
built.
- Click OK.
SQL Assist closes. The SQL statement that you just built is
displayed on the SQL Statement page.
- Click Test to test the SQL that you just generated.
The Data Warehouse Center returns sample results of your SELECT
statement. These results should be the same as the results that you got
in Lesson 3, Browsing the source data when you browsed the sample data for the Geographies source
table.
- Click Close to close the window.
- Select the Create Warehouse Target Table based on Parameters
check box.
Selecting this check box specifies that the Data Warehouse Center is to
create the target table, based on the values that are specified on the Column
Mapping page.
- From the Warehouse Target list, click Tutorial
Targets.
The warehouse target is the database or file system in which the target
table is to be created.
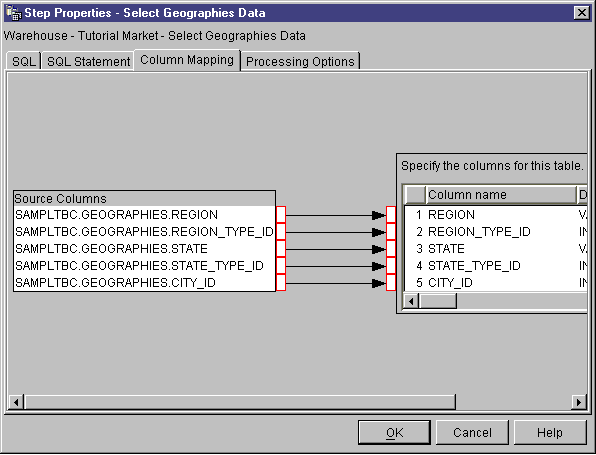
- Click the Column Mapping tab.
- Verify that the source columns map to the correct target columns.
- Click the Processing Options tab.
- In the Population Type list, click Replace.
- Verify that the Run on demand check box is selected.
Accept the rest of the default values on this page. For more
information about the values on this page, see the online help.
- Click OK.
The Step notebook closes. The Data Warehouse Center generates a
target table called "Select_Geog_T". The target table name is in
quotation marks because it is in mixed case.
- Change the name of the target table:
- Right-click the "Select_Geog_T" target table.
- Click Properties.
The Table notebook opens.
- In the Table schema field, type IWH.
- In the Table name field, type the new name for the table:
GEOGRAPHIES_TARGET
- In the Description field, type a description of the
table:
Autogenerated target table for the Select Geographies Data step.
- In the Business Name field, type a descriptive name for the table:
Geographies Target
- Clear the Part of an OLAP schema check box.
- Click the Columns tab to view the column definitions.
- Click OK. The Table notebook closes.
To define the Join Market Data step:
- From the palette, click the SQL icon.
- Click the spot on the canvas where you want to place the step.
An icon for the step is added to the window.
- Right-click the step.
- Click Properties.
The Step notebook opens.
- In the Name field, type the name of the step:
Join Market Data
- In the Administrator field, type your name as the contact for
the step.
- In the Description field, type the description of the
step:
Joins the Geographies table with the Demographics table
- Click OK.
The Step notebook closes.
- Click the Task Flow icon:
- Click the Data Link icon:
- Click the middle of the Geographies Target table and drag the mouse to the
Join Market Data step. Repeat this step with the Demographics Target
table and the Join Market Data Step.
The Data Warehouse Center draws lines that indicate that the Geographies
Target table and Demographics Target tables contain the source data for the
step.
Because you will specify that the Data Warehouse Center is to create the
target table, you do not need to link a target table to the step.
- Right-click the Join Market Data step.
- Click Properties.
The Step notebook opens.
- Click the SQL Statement tab.
- Click Build SQL to have the Data Warehouse Center generate
SQL. (Otherwise, you can type in your own SQL.)
SQL Assist opens.
- Click the Tables tab.
- Verify that the DEMOGRAPHICS_TARGET and GEOGRAPHIES_TARGET tables are
selected.
- Click the Columns tab.
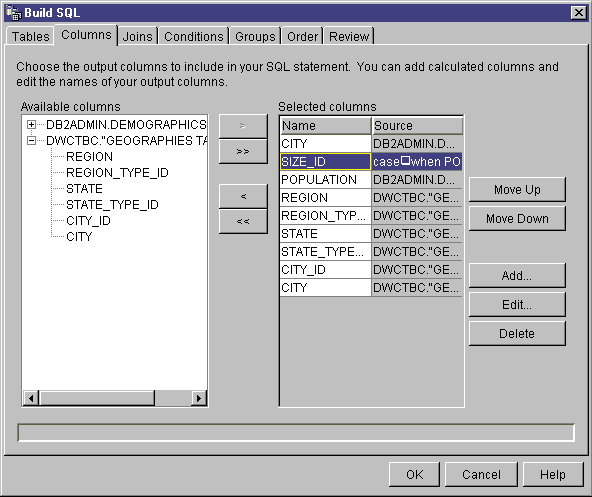
- Click >> to add all the columns from the Geographies
table and the Demographics table to the Output columns list.
- From the Output columns list, click
DEMOGRAPHICS_TARGET.STATE.
- Click <.
The DEMOGRAPHICS_TARGET.STATE column moves to the Available
columns list.
- Click DEMOGRAPHICS_TARGET.CITY.
- Click <.
The DEMOGRAPHICS_TARGET.CITY column moves to the Available
columns list.
-
You do not need the DEMOGRAPHICS_TARGET.STATE and
DEMOGRAPHICS_TARGET.CITY columns because it is already defined in the
GEOGRAPHIES_TARGET table. You will join the tables using the CITY
column in both tables, which is unique.
- Click Add.
The Expression Builder window opens.
- In the Expression field, type the following CASE
statement:
case
when POPULATION < 9000000   then 1
when POPULATION < 15000000  then 2
Else				 3
end
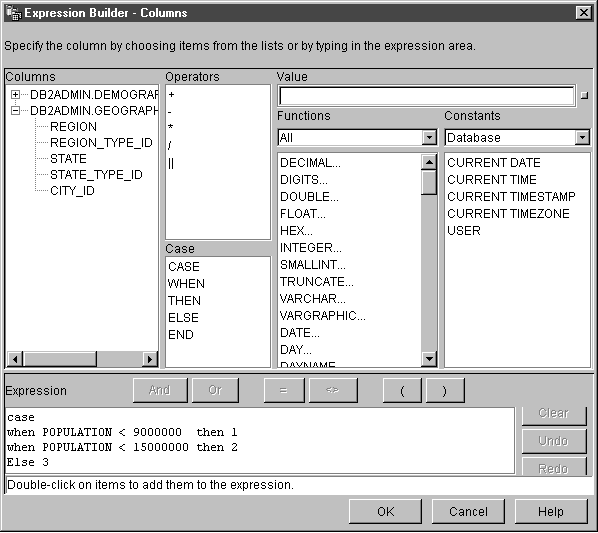
- Click OK.
A new column is added to the Selected Columns list.
- Click the Name field of the new column and type the name of the
column:
SIZE_ID
- Press Enter.
- Click Move Up to move the SIZE_ID column up above the
POPULATION column.
- Click the Joins tab.
- In the GEOGRAPHIES table, select the CITY column.
- In the DEMOGRAPHICS table, select the CITY column.
- Click Join.
SQL Assist draws a line between the CITY columns, which indicates that the
tables are joined on that column.
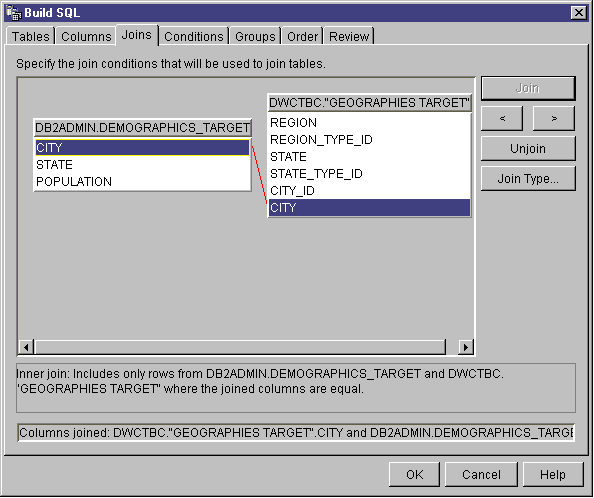
- Click the Review tab to view the SQL statement that you just
built.
- Click OK.
SQL Assist closes.
- Select the Create Warehouse Target Table based on Parameters
check box.
Selecting this check box specifies that the Data Warehouse Center is to
create the target table, based on the values that are specified on the SQL
Statement and Column Mapping pages.
- From the Warehouse Target list, click Tutorial
Targets.
- Click the Column Mapping tab.
- Verify that the source columns map to the correct target columns.
- Click the Processing Options tab.
- In the Population Type list, click Replace.
- Select the Run on demand check box to run the step on
demand.
Accept the rest of the default values on this page. For more
information about the values on this page, see the online help.
- Click OK.
The Step notebook closes.
- Change the name of the target table:
- Right-click the "Join_Market_T" target table.
- Click Properties.
The Table notebook opens.
- In the Table schema field, type IWH.
- In the Table name field, type the new name for the table:
LOOKUP_MARKET
- In the Description field, type a description of the
table:
Market dimension data
- Verify that the Part of an OLAP schema check box and
Dimension table radio button are selected.
This table is one of the dimension tables that you will include in a star
schema in Lesson 16, Creating a star schema from within the Data Warehouse Center.
- Click the Columns tab to view the column definitions.
- Clear the Nullable check box for the CITY ID column because you
will define this column as the primary key for the table in Lesson 11, Defining keys on target tables
- Click OK. The Table notebook closes.

You defined the LOOKUP_MARKET dimension table in the Tutorial Market
process, which contains three steps:
- Load Demographics Data
- Select Geographies Data
- Join Market Data
The sources and targets for each of the steps are:
| Step
| Sources
| Target
|
| Load Demographics Data
| Demographics file
| Demographics Target table
|
| Select Geographies Data
| Geographies table
| Geographies Target table
|
| Join Market Data
| Demographics Target table and Geographies Target table
| Lookup Market table
|
For this tutorial, you added the data links for each step while you were
defining the properties of each step. Another way you can accomplish
this task is to add all the steps in the process at one time, link the steps
to their sources and targets, and then define the properties of each
step. The Data Warehouse Center assigns default names to the steps that
you can change in the Step notebook.
The table that you created in the previous section,
LOOKUP_MARKET, is one of the dimension tables in the example in Tutorial business problem. This section covers the steps for building the rest
of the dimension tables and the fact table for the star schema.
This section is optional, but if you do not complete the steps in this
section, you will not be able to do the following lessons:
If you want to skip this section, go to Lesson 9, Testing warehouse steps.
When you define each table, you must define a new process for the
table. Instead of defining your own step for the process, however, you
will copy the step that is defined in the sample. The definition of the
step is in the Data Warehouse Center that you are using. When you copy
the step, the Data Warehouse Center copies the sources that the step uses and
generates a target table.
To define the Product dimension table:
- Define a new process by following the steps in Defining a process. Name the process Tutorial Product.
- From the main Data Warehouse Center window, expand the tree until you see
the Sample Product process.
- Right-click the Sample Product process.
- Click Open.
The Process Model window opens.
- Right-click the Select Product step.
- Click Copy.
The Copy Step window opens.
- In the Name field, type the name for the copy of the
step:
Tutorial Select Product
- In the New process field, select or type the name of the
process to which you want to copy the step:
Tutorial Product
- Verify that the Copy Target Table check box is selected.
- In the Warehouse target field, select the Tutorial
Targets warehouse target from the list.
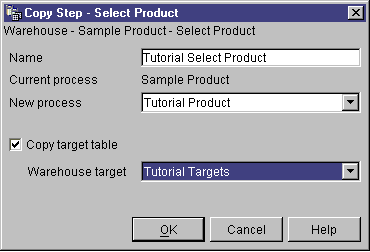
- Click OK.
The step and its sources are copied to the Tutorial Product process.
The Data Warehouse Center generates the corresponding target table.
- Open the Tutorial Product process by following the steps in Opening the process.
- Verify that the process includes the following objects:
- The PRODUCT source tables
- The Tutorial Select Product step
- The TARGET_PRODUCT target table
- Rename the TARGET_PRODUCT target table to
LOOKUP_PRODUCT.
Repeat this procedure for the rest of the dimension tables and the fact
table.
| Dimension
| Tutorial Process
| Sample Process
| Sample Step
| Tutorial Step
| Warehouse Target
| Source tables
| Target Table
| New Target Table Name
|
| Time
| Tutorial Time
| Sample Time
| Select Time
| Tutorial Select Time
| Tutorial Targets
| TIME
|
TARGET_
TIME
|
LOOKUP_
TIME
|
| Scenario
| Tutorial Scenario
| Sample Scenario
| Select Scenario
| Tutorial Select Scenario
| Tutorial Targets
| SCENARIO
|
TARGET
_SCENARIO
|
LOOKUP_
SCENARIO
|
| Fact Table
| Tutorial Fact Table
| Sample Fact Table
| Fact Table Join
| Tutorial Fact Table Join
| Tutorial Targets
|
SALES,
INVENTORY,
and
PRODUCT
_COSTS
|
TARGET_
FACT_
TABLE
|
FACT_
TABLE
|
You now have five processes, and their associated sources, targets, and
steps, defined in the Data Warehouse Center:
- Tutorial Market
- Tutorial Product
- Tutorial Scenario
- Tutorial Time
- Tutorial Fact Table
[ Top of Page | Previous Page | Next Page ]