Business Intelligence Tutorial
For this lesson, you must have the Warehouse Manager
package to install the Information Catalog Manager, which runs on Windows NT,
Windows 95, and Windows 98. You also must have defined the dimension
tables and fact table in Defining the rest of the star schema (optional).
In this lesson, you will view your published metadata in the information
catalog and customize the catalog. In the information catalog, the
metadata is in the form of objects, which are items that represent
units or distinct groupings of information, but do not contain the actual
information. You will create a collection of objects in the
catalog. A collection is a container for objects that you
define to gather objects for easy access. You will launch a program
from an object that represent a file to view the actual file data.
To open the information catalog:
- Click Start.
- Click Programs --> IBM DB2 --> Information Catalog Manager
-->TBC_MD User.
TBC_MD User represents the information catalog to which you
added metadata in Lesson 14, Cataloging data in the warehouse for end users.
- In the User ID field, type the user ID that you used to create
the information catalog.
- In the Password field, type the password for the user ID you
entered in the User ID field.
The password is case-sensitive.
- Click Open.
The Information Catalog window opens.
To browse subjects in an information catalog:
- Double-click the Subjects icon in the Information Catalog
window.
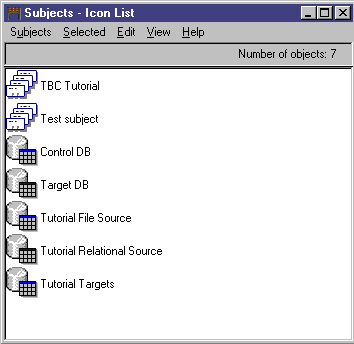
The Subjects window opens, displaying a list of objects in your information
catalog. These objects contain other objects, but are not contained by
any other object. The Subjects window opens in an icon view by default,
but it can also open as a list view.
- To view information that is contained in an object, right-click on the
object, and click Open as --> Tree.
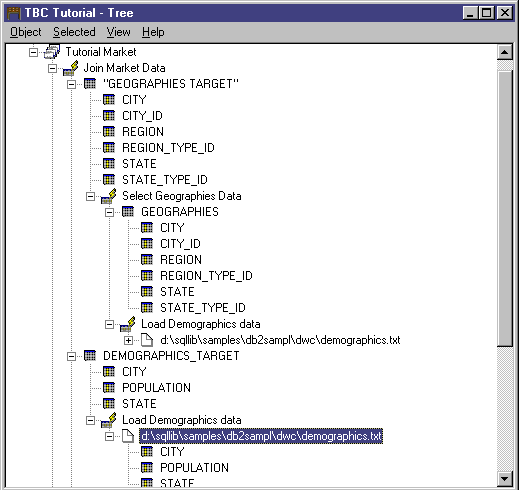
The tree view shows you the relationship of the objects that belong to a
particular grouping. The objects in the tree view have plus signs (+)
next to them to show that all objects in this view are grouping objects that
contain other objects.
In this exercise, you will search for the objects that correspond to
the dimension tables that you specified in Lesson 8, Defining data transformation and movement.
To search for objects in an information catalog:
- Double-click the New search icon in the Information Catalog
window.
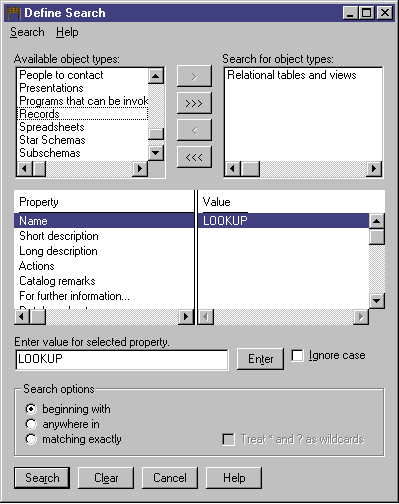
The Define Search window opens.
- Scroll through the Available object types list. This
list displays all of the object types that are defined in your information
catalog.
- Select the Relational tables and views object type.
- Click > to add the selected object type to the Search for
object types list.
- From the Properties/Values list, click Name.
- In the Enter value for selected property field, type the
following value:
LOOKUP
- Click Enter. The value is displayed in the
Value column of the Properties/Values list.
- Select the Ignore case check box to search all occurrences of
the value, regardless of case.
- From the Search options list, click beginning
with.
The Information Catalog Manager will search for objects that begin with the
value that you specified in the Value column.
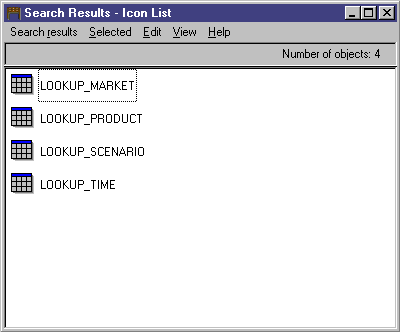
- Click Search. The Information Catalog Manager searches
for objects of the type that you specified and displays the results in the
Search Results window.
You can create a collection that groups different objects together so
that you can access them easily. A collection is represented by an icon
that is displayed in the Information Catalog window. In this exercise,
you will create a collection for the objects that correspond to the dimension
tables that you specified in Lesson 8, Defining data transformation and movement.
To create a collection:
- Click Catalog --> Create collection from the Information
Catalog window. The Create Collection window opens.
- In the Collection name field, type a name for your new
collection:
Tutorial Star Schema
Accept the default icon to represent your collection.
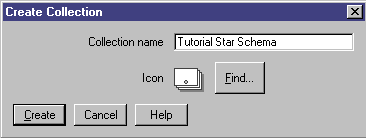
- Click Create. The new collection icon is
displayed. You can now add and delete objects to and from your
collection.
- From the Search Results window, right-click on the
LOOKUP_MARKET object.
- Click Copy to collection.
The Copy to Collection window opens.
- From the Select a collection list, select the Tutorial Star
Schema collection.
- Click Copy. The object is copied to the
collection of objects that you selected.
- Repeat steps 4 through 7 for the LOOKUP_PRODUCT, LOOKUP_SCENARIO,
and LOOKUP_TIME objects.
After you complete these steps, if you double-click the Tutorial Star
Schema collection in the Information catalog window, you see the same list of
tables that were displayed in the Search Results window.
The Information Catalog Manager makes it easy to start a program that
can retrieve the actual data that an object describes. For example, if
you have objects describing graphic charts, you can set up a graphic program,
such as CorelDRAW!, so that you can retrieve the actual charts for editing,
copying, or printing.
The Information Catalog Manager can start any program that runs on the
Windows platform you are using, or that can be started from an MS-DOS command
prompt. The program must be installed on the client workstation.
A single object type can start more than one program (for example, the
object type Spreadsheet can have both Lotus 1-2-3(R) and Microsoft Excel
associated with it).
To enable an object to start a program, you create an association between a
Programs object and any object type not categorized as Program. In this
exercise, you will define a Programs object for Microsoft Notepad. You
will create an association between the Notepad Programs object and the Files
object type.
To create a Programs object, you will define the properties of the
object and specify the properties to be used as program parameters.
In this exercise, you will create a Programs object.
- Click Start --> Programs --> IBM DB2 -->
Information Catalog Manager -->TBC_MD Administrator.
- From the Information Catalog window, right-click the Object
types icon.
- Click Open as --> Icon list.
- Right-click the icon of the Files object type.
- Click Associate programs.
The Programs window displays a list of programs currently associated with
the selected object type.
- Click Add.
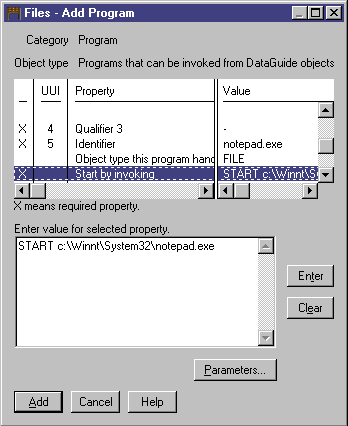
The Files-Add Program window opens. The Name property is
selected.
- In the Enter value for selected property field, type a
description of the program:
View files using Microsoft Notepad
- Click on the Enter push button to move the value to the
Value column in the Properties/Values list box.
If you want to erase what you entered in the Enter value for selected
property field, click on the Clear push button.
- From the Properties/Values list box, click the Class
property.
- In the Enter value for selected property field, type a
classification for the program:
Word processor
- Click on the Enter push button to move the value to the
Value column in the Properties/Values list box.
- From the Properties/Values list box, click the Qualifier
1 property.
- In the Enter value for selected property field, type a
qualifier for the program:
Notepad
- Click on the Enter push button to move the value to the
Value column in the Properties/Values list box.
- From the Properties/Values list box, click the Qualifier
2 property.
- In the Enter value for selected property field, type a
qualifier for the program:
Windows
- Click on the Enter push button to move the value to the
Value column in the Properties/Values list box.
- From the Properties/Values list box, click the Qualifier
3 property.
- In the Enter value for selected property field, type a
qualifier for the program:
-
A hyphen is the default not-applicable symbol.
- Click on the Enter push button to move the value to the
Value column in the Properties/Values list box.
- From the Properties/Values list box, click the
Identifier property.
- In the Enter value for selected property field, type an
identifier for the program:
notepad.exe
- Click on the Enter push button to move the value to the
Value column in the Properties/Values list box.
The Files object is already defined for the Object type that this
program handles property.
- From the Properties/Values list box, click the Start by
invoking property.
- In the Enter value for selected property field, type the
command to start the program:
START X:\path\notepad.exe
where X:\path is the path in which Microsoft Notepad is
installed, such as C:\WINNT\system32.
| Tip: | The combination of the Class, Qualifiers 1, 2, and 3, and the Identifier
properties must be unique across all objects in the information
catalog. Each instance of an object type must be different.
|
In this exercise, you will specify the properties whose values you want to
be used as program parameters.
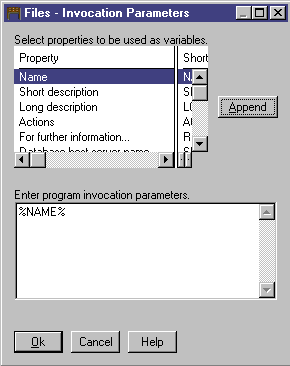
- From the Files-Add Program window, click on the Parameters push
button. The Files-Invocation Parameters window opens, listing the
properties of the File object type.
- From the Property list box, click Name.
- Click Append.
%NAME% appears in the Enter program invocation parameters list
box.
- Click OK.
- From the Files-Add Program window, click the Add push
button.
- Close the Files-Programs window.
In this exercise, you will start Microsoft Notepad from the Files
object for the demographics file. You will search for the object and
then start the program.
To start the program from the Files object:
- From TBC_MD User, double-click the New search icon in the
Information Catalog window.
The Define Search window opens.
- Scroll through the Available object types list. This
list displays all of the object types that are defined in your information
catalog.
- Select the Files object type.
- Click > to add the selected object type to the Search for
object types list.
- From the Properties/Values list, click Name.
- In the Enter value for selected property field, type the
following value:
demographics.txt
- Click Enter. The value is displayed in the
Value column of the Properties/Values list.
- Select the Ignore case check box to search all occurrences of
the value, regardless of case.
- From the Search options list, click anywhere
in.
The Information Catalog Manager will search for objects that contain the
value that you specified in the Value column.
- Click Search. The Information Catalog Manager searches
for objects of the type that you specified and displays the results in the
Search Results window.
- From the Search Results window, right-click the
X:\sqllib\samples\db2sampl\dwc\demographics.txt
object, where X is the drive on which you installed the
sample.
- Select Start program.
The Microsoft Notepad program is launched. You see the same data
that you viewed with Microsoft Notepad in Lesson 3, Browsing the source data.
In this lesson, you opened the information catalog and browsed the
metadata that you transferred from the Data Warehouse Center. You
searched for the objects corresponding to the LOOKUP* tables and grouped them
together in a collection. In Lesson 16, Creating a star schema from within the Data Warehouse Center, you will create a star schema from the LOOKUP*
tables. You defined a Programs object for Microsoft Notepad, and
started Microsoft Notepad from the object for the demographics.txt
file.
[ Top of Page | Previous Page | Next Page ]


