Business Intelligence Tutorial
In this lesson, you will define warehouse targets.
Warehouse targets identify the database and tables that the Data
Warehouse Center is to use for your data warehouse. Generally, the
target tables that are defined in the warehouse target are the dimension and
fact tables in the star schema. However, the warehouse target might
also include interim target tables that are used for data
transformation.
In this lesson, you will define the Tutorial Targets warehouse target,
which is a logical definition for the warehouse database you created in Lesson 2, Creating a warehouse database. Within the warehouse target, you will define the
DEMOGRAPHICS_TARGET target table. This target table is the result of
loading the Demographics file into the warehouse database.
In some cases, you can use the Data Warehouse Center to generate a target
table based on SQL, rather than defining the target table yourself. The
Market dimension requires a target table for the GEOGRAPHIES table, which you
will join with the DEMOGRAPHICS_TARGET target table to produce the Market
dimension table, called LOOKUP_MARKET. The Data Warehouse Center will
generate the GEOGRAPHIES target table and LOOKUP_MARKET table in the next
lesson.
In this exercise, you will define the Tutorial Targets warehouse
target, which is a logical definition for the TUTWHS database that you created
in Lesson 2, Creating a warehouse database.
To define the warehouse target:
- Right-click the Warehouse Targets folder.
- Click Define.
The Warehouse Target notebook opens.
- In the Warehouse target name field, type the business name for
the warehouse target:
Tutorial Targets
- In the Administrator field, type your name as the contact for
the warehouse target.
- In the Description field, type a short description of the
data:
Warehouse for the TBC company
- In the Warehouse target type list, select DB2 Universal
Database for your operating system.
- Click the Database tab.
- In the Database name field, type the name of the
database:
TUTWHS
- In the User ID field, type your user ID as the user ID that
will access the database from the agent site.
- In the Password field, type your password as the password for
the user ID that will access the database.
- In the Verify Password field, type the password again.
Accept the default values for the rest of the controls on the page.
For more information about the controls, see "Warehouse Target--Fields
and Controls, Database page" in the online help.
- Click the Security tab.
- Select the Tutorial Warehouse Group to grant your user ID the
ability to create steps that use this warehouse target.
- Click >.
The Tutorial Warehouse Group moves to the Selected security
groups list.
Skip the Retry page. For more information about the options on the
page, see "Warehouse Target--Fields and Controls, Retry page" in the
online help.
- Click OK to save your changes and close the Warehouse Target
notebook.
- Expand the tree until you see the Tables folder under the
Tutorial Targets warehouse target.
- Right-click the Tables folder and click
Define.
The Define Warehouse Target Table notebook opens, and you can define the
DEMOGRAPHICS_TARGET target table.
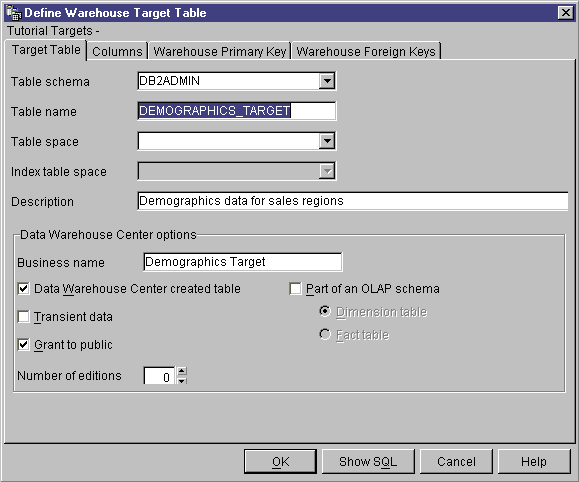
- In the Table schema field, type the user ID under which you
created the warehouse database in Lesson 2, Creating a warehouse database.
- In the Table name field, type the name of the target table:
DEMOGRAPHICS_TARGET
Because you are creating the tables in the default tablespace, you can skip
the Table space and Index table space fields.
- In the Description field, type the description of the
table:
Demographics information for sales regions
- In the Business Name field, type the business name (a
descriptive name that users will understand) for the table:
Demographics Table
- Verify that the Data Warehouse Center created table check box
is selected.
The Data Warehouse Center will create this table when the step that loads
the Demographic data is run.
You use this option when you want the Data Warehouse Center to create the
target table, such as when the target table is the result of an SQL
step. Clear this check box if you are using a target table that is
already defined.
- Verify that the Grant to Public check box is selected.
This check box specifies that anyone who has access to the database will
have access to the table.
- Clear the Part of an OLAP schema check box.
The Part of an OLAP schema check box indicates that the table is
a dimension table or fact table that is to be exported to OLAP Integration
Server. For more information about exporting to OLAP Integration
Server, see Lesson 16, Creating a star schema from within the Data Warehouse Center.
Skip the rest of the controls on the page. For more information
about them, see "Defining a warehouse target table" in the online
help.
- Click the Columns tab.
- Right-click the empty space in the list.
- Click Add.
A row is added to the list, and you can define the City column, which is a
key value for the table.
- Click the Name column, and type CITY.
- In the Data type column, verify that CHAR is
selected.
- Click the Length column and type 50.
Skip the Precision and Scale columns because they
apply to decimal data only.
- Clear the Nullable column because each row must have this key
value.
- Verify that the Is text check box is selected.
Skip the Replication before and Replication after
columns. For more information about these columns, see "Defining a
warehouse target table" in the online help.
- In the Business Name field, type
City.
- Repeat steps 26 through 33 to define the rest of the columns in the
table:
| Name
| Data type
| Length
| Allow nulls
| Business name
|
| STATE
| CHAR
| 50
| Yes
| State
|
| POPULATION
| INTEGER
| N/A
| No
| Population
|
Skip the rest of the notebook. You will use the DB2 Control Center
to define primary and foreign keys on the physical target tables, so that end
users of the warehouse can use the keys for joins.
- Click OK.
The Table notebook closes. The Demographics table is added under the
Tables folder in the Selected tables list.
In this lesson, you defined a warehouse target with one target table,
DEMOGRAPHICS_TARGET. In Lesson 8, Defining data transformation and movement, you will generate target tables for this warehouse target,
including the LOOKUP_MARKET dimension table for the star schema.
[ Top of Page | Previous Page | Next Page ]