
The Add Data window opens.
In this lesson, you will create a star schema from the warehouse tables that you created in this tutorial. You can use this star schema for queries in the warehouse database. You can also export the star schema to OLAP Integration Server to create an OLAP database. In this lesson, you will export the star schema to OLAP Integration Server.
To do this lesson, you must have installed the OLAP Starter Kit. You also must have defined the dimension tables and fact table in Defining the rest of the star schema (optional).
In this exercise, you will define the star schema that is to contain the dimension and fact tables that you have defined in this tutorial.
To define a star schema:
The Define Warehouse Schema notebook opens.
Tutorial Schema
This is the TBC star schema
Accept the rest of the values. For more information about the fields on this page, see the "Defining a warehouse schema" in the online help.
The star schema is added to the tree underneath the Warehouse Schemas folder.
In this exercise, you will open the star schema so that you can add the dimension tables and fact table to the schema in the next exercise.
To open the Tutorial Schema warehouse schema:
In this exercise, you will add the dimension tables and fact tables that you defined in this tutorial--the LOOKUP_PRODUCT, LOOKUP_SCENARIO, LOOKUP_TIME, and FACT_TABLE tables--to the star schema.
To add the dimension tables and fact table to the star schema:
The Add Data window opens.
In this exercise, you will use the primary and foreign keys that you defined in Lesson 11, Defining keys on target tables to automatically join the dimension tables and the fact tables.
To autojoin the tables:
The Data Warehouse Center draws green lines between the primary keys in the dimension tables and the foreign keys in the fact table. You can change these lines until you save. (To remove these lines, multiple-select them, right-click, and click Remove.

The green autojoin lines become black.
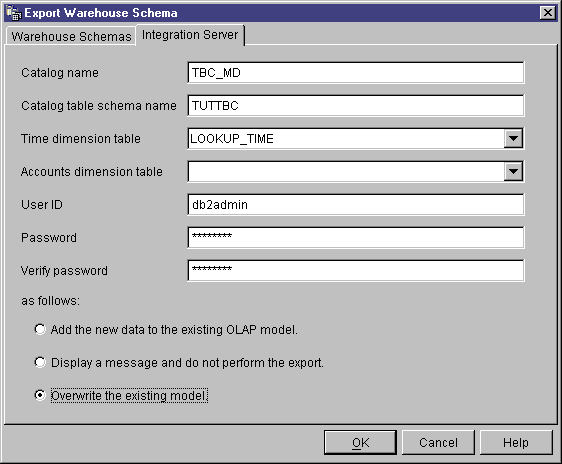
In this exercise, you will export the star schema for use in OLAP Integration Server.
To export the star schema:
The Export Warehouse Schema notebook opens.
The Tutorial Schema moves to the Selected list.
TBC_MD
You cannot change the dimension type after the schema is stored in the OLAP Integration Server catalog.
Accept the default values on the rest of this page. For more
information about the controls on this page, see "Exporting warehouse
schemas to OLAP Integration Server" in the online help.
The notebook closes, and a progress indicator is displayed until the export is complete. When all the specified warehouse schemas are exported, the Export Information window opens, displaying success information or failure information about the export. Click OK to close this window.
In this lesson, you created a star schema that consists of the LOOKUP_MARKET, LOOKUP_PRODUCT, LOOKUP_SCENARIO, LOOKUP_TIME, and FACT_TABLE tables. You exported the star schema to OLAP Integration Server.