Business Intelligence Tutorial
In this lesson, you will populate the LOOKUP_MARKET table
by running the steps that you created in Lesson 8, Defining data transformation and movement:
- Load Demographics Data
- Select Geographies Data
- Join Market Data
You will then verify the results of running them.
Before you run the steps, you must promote them to test mode. Up to
this point, the steps you created were in development mode. In
development mode, you can change any of the specifications for the
step. When you promote the step to test mode, the Data Warehouse Center
creates the target table for the step. Therefore, after you promote a
step to test mode, you can make only those changes that are not destructive to
the target table. For example, you can add columns to a target table
when its associated step is in test mode, but you cannot remove columns from
the target table.
After you promote the steps to test mode, you will run each step
individually. In a later lesson, you will specify that the steps run in
sequence.
In this exercise, you will promote and run the Load Demographics Data
step. Then you will promote the rest of the steps in the
process.
To promote the Load Demographics Data step:
- From the Process Model window for the Tutorial Market process,
right-click the Load Demographics Data step.
- Click Mode--> Test.
A confirmation window asks whether you want to save the process.
Click Yes.
The Data Warehouse Center starts to create the target table, and displays a
progress window. Wait until the Data Warehouse Center finishes
processing before you start the next procedure.
To verify that the Demographics target table was created:
- If the Control Center is not open, click Tools -> Control
Center to open the DB2 Control Center from the main Data Warehouse
Center window.
- Expand the object tree until you see TUTWHS, the warehouse database that
you created in Lesson 2, Creating a warehouse database.
- Expand the TUTWHS database.
- Expand the Tables folder.
You should see a list of tables in the Contents pane of the window.
- Verify that the DEMOGRAPHICS_TARGET table is there.
To test the Load Demographics Data step:
- From the Process Model, right-click the Load Demographics Data
step.
- Click Test.
- From the main Data Warehouse Center window, click Data Warehouse
Center -->Work in Progress.
The Work in Progress window opens. You use the Work in Progress
window to monitor the progress of all steps in the Data Warehouse Center that
are running or scheduled. You should see an entry for the step that is
running. While the step is running, it has a status of
Populating. When it finishes running, it should have a status of
Successful.
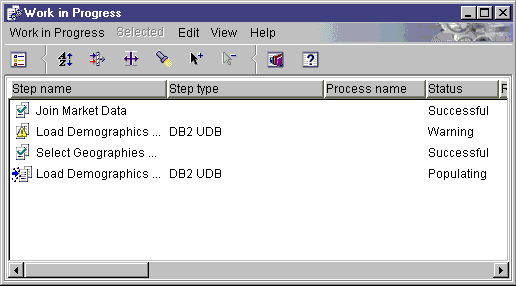
For more information about the Work in Progress window, see "Work in
Progress--Overview" in the online help.
A confirmation window is displayed after the step stops running.
To verify the results of the step's processing:
- From the DB2 Control Center, right-click the DEMOGRAPHICS table.
- Click Sample Contents.
The DB2 Control Center displays a subset of the data in the table.
Repeat the steps in this lesson for the Select Geographies Data step and
the Join Market Data step. The target table for the Select Geographies
Data step is GEOGRAPHIES_TABLE. The target table for the Join Market
Data step is LOOKUP_MARKET.
To create the rest of the tables in the star schema, you must promote
the steps that you created in Defining the rest of the star schema (optional). This section is optional, but if you do not complete
the steps in this section, you will not be able to do the following
lessons:
If you want to skip this section, go to Lesson 10, Scheduling warehouse processes.
To promote the steps, open the process that contains the steps, and follow
the procedure in step 1 through 5. You do not have to test the steps
as well. However, you can test the steps if you want to test
them.
Promote the following steps:
| Tutorial Process
| Tutorial Step
| Warehouse Database
| Target Table
|
| Tutorial Product
| Tutorial Select Product
| TUTWHS
| LOOKUP_PRODUCT
|
| Tutorial Time
| Tutorial Select Time
| TUTWHS
| LOOKUP_TIME
|
| Tutorial Scenario
| Tutorial Select Scenario
| TUTWHS
| LOOKUP_SCENARIO
|
| Tutorial Fact Table
| Tutorial Fact Table Join
| TUTWHS
| FACT_TABLE
|
In this lesson, you promoted the Load Demographics Data, Select
Geographies Data, and Join Market Data steps to test mode. Then you ran
them to test them. In Lesson 10, Scheduling warehouse processes, you will schedule these steps to run automatically.
[ Top of Page | Previous Page | Next Page ]