Exercise 6.3 Changing user subscriptions

In this exercise you will learn how to remove and add subscriptions.

Overview

Administrators can edit basic user account information, including user name, language, role and department. They can also easily enable or disable Integrated Apps as seen in a prior exercise, Enabling integrated apps.

Changing user subscriptions requires more care and attention. To prevent data loss when removing a collaboration service, collaboration assets can be assigned to another user. Refer to Preparing to Add a User to see a side-by-side comparison of collaboration service features.

Objectives

After completing this exercise, you should be able to:

Procedure

Step
Action
1
Log in and navigate to the Administration panel. For detailed steps, see the procedure document: Accessing the Administration Panel.
2
From the navigation pane, click User Accounts.
User Accounts link
3
Click the arrow next to the user account and select Edit User Account.
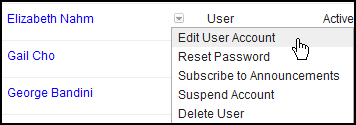
The Edit User Account option is highlighted in the user popup menu.
4
To remove a Collaboration subscription, under the Subscriptions section click change.
The Collaboration change link is highlighted.
5
Under the Subscriptions section, select None selected from the Collaboration pull-down menu.
The None selected option in the Collaboration popup menu is highlighted.
6
(Optional) To assign the users collaboration assets to another user, enter the log in e-mail address of another user at your company.
To prevent loss of data,assign the Collaboration files to another user by entering their email address.
7
Click The Save Changes button.. If the user has not yet registered their account, click Resend button instead.
8
Initially, the subscription status may display as Pending.

If the user is currently logged into the system, changes will not be applied until the user logs out.

9
To add the subscription back, edit the user and select the service.
Important: Data cannot be restored to the account.

Procedure B: Remove and Add a Mail subscription

Step
Action
1
Log in and navigate to the Administration panel if you are not already there. For detailed steps, see the procedure document: Accessing the Administration Panel.
2
From the navigation pane, click User Accounts.
User Accounts link
3
Click the arrow next to the user account and select Edit User Account.
The Edit User Account option is highlighted in the user popup menu.
4
To remove a Mail subscription, under the Subscriptions section click change.
The Mail change link is highlighted.
5
On the User Account page, under the Subscriptions section, select None selected from the Mail pull-down menu.
The None selected option in the Mail popup menu is highlighted.
6
Click The Save Changes button.. If the user has not yet registered their account, click Resend button instead.
7
Initially, the subscription status may display as Pending.

If the user is currently logged into the system, changes will not be applied until the user logs out.

8
Once the subscription removal is complete, the user will no longer be able to receive notifications at their SmartCloud iNotes® address. Edit the user account to change their Account Identity e-mail address from their old SmartCloud iNotes address to an external address.
  1. Click change.
    The Account Identity email and change link
  2. Enter a new e-mail address.
    The New email address text field is displayed
  3. Click Save Changes.
    The Save Changes button.
9
To add the Mail service back, edit the user account and select the service.
10
Under the Subscriptions section, enter in an iNotes address. If not being used by another user, you can enter in the same address the user had previously.
Important: Data cannot be restored to the account.
The iNotes Email text field is displayed.
11
Click Save Changes.
The Save Changes button.

Resources