Exercise 5.4 Enabling integrated apps

In this exercise you will learn how to configure integrated apps for your organization.

Overview

If integrated apps are available for your company, an administrator can enable them for user accounts. Questions about the availability of integrated apps for your organization can be directed to your Customer Service representative.

To enable an integrated application for each user, select the appropriate application from the Integrated Apps section. Each time an integrated application is enabled for a user account, the user will receive a notification e-mail. The next time they log into the service, they will be prompted to accept the terms of use. Additional configuration may be required for each application before it becomes available for use.

Objectives

After completing this exercise, you should be able to:

Glossary

Term Definition
Integrated Apps Integrated Apps are third-party applications that help you work smarter. For more information on available applications, visit the Integrated Applications page.
Integrated Apps will display as a choice on the Add User Account page only after they have been enabled by an administrator.

Procedure A: Enabling and Disabling an Integrated App

Step
Action
1
Log in and navigate to the Administration panel. For detailed steps, see the procedure document: Accessing the Administration Panel.
2
From the navigation pane, click Integrated Third-Party Apps.
3
To learn about a specific app, click More... link or visit the Integrated Applications page.
4
To enable an app, click Enable.
Enable link
5
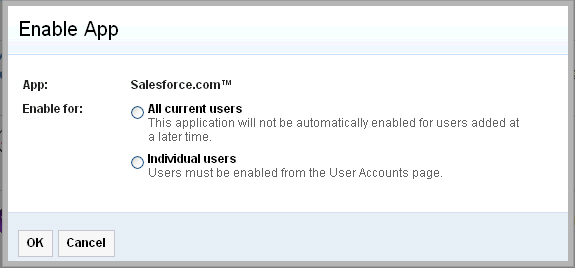
Select how you want to enable the app and click OK.
Option 1: All current users
The application will be enabled for all current users. New users will need to have the app enabled at the time their account is created.
Option 2: Individual users
All users must have the app enabled through their account page.
The Enable App dialog displays the name of the app and the two enablement options.
6
To disable the app:
  1. From the Integrated Third-Party Apps page, scroll to the app listing.
  2. Click Disable.
  3. On the confirmation dialog, click OK.
    Important: This will disable the app for all users, including accounts for which the app had been enabled. The app will no longer be displayed on the Edit User page.
    The Disable link for the SmartCloud for Social Business API Explorer app is highlighted.
7
To change from enabling the app for individual users to enabling for all current users:
  1. From the Integrated Third-Party Apps page, scroll to the app listing.
  2. Click Enable for All Current Users.
    Important: This will enable the app for all users, including accounts for which the app had been disabled.
    The Enable for All Current Users link for the SmartCloud for Social Business API Explorer app is highlighted.
8
To change from enabling the app for all current users to enabling for individual users:
  1. Disable the app (see Step 6).
  2. Re-enable the app and select the option to enable for individual users.
    Important: This will disable the app for all users, including accounts for which the app had been enabled. The app will appear on the Edit User page, but it will not be selected.

Procedure B: Enabling and disabling integrated apps for an existing user account

Step
Action
1
Log in and navigate to the Administration panel. For detailed steps, see the procedure document: Accessing the Administration Panel.
2
From the navigation pane, click User Accounts.
User Accounts link.
3
Select a user account by clicking the user name or selecting Edit User Account from the popup menu.
A popup menu is activated by clicking the arrow to the right of the user name.
4
In the Integrated Apps section, check the boxes next to the apps you want enabled for the user.
The checkbox next to the SmartCloud for Social Business API explorer app is checked.
5
Uncheck the boxes next to the apps you want disabled for the user.
The checkbox next to the SmartCloud for Social Business API explorer app is unchecked.
6
Click Save Changes. If the user has not yet registered their account, click the Resend button instead.
7
Verify the account update message appears.
The message "SmartCloud for Social Business is updating the account for..... This process may take a moment to complete." is displayed.
8
Each time an integrated application is enabled for a user account, that user will receive a notification e-mail.

The user must accept the terms of use before the application becomes available to them.

Certain apps may require additional configuration steps. Refer to the documentation for the integrated app available in the IBM SmartCloud™ for Social Business Wiki.

Once the app is configured, users can access it from the Apps menu.

The available apps are displayed in the Apps popup menu.

Test Yourself

Question Answer
What happens if I make apps available for a user that isn't registered? On the User Account page, you will see Resend rather than Save Changes. If automatic notification is enabled, clicking Resend will resend the registration invitation to the user.

When the user registers, the Terms and Conditions for the selected apps will appear along with the SmartCloud for Social Business Terms and Conditions. The user must accept the Terms of Use or else their account will be set to pending status.

Resources