Business Intelligence Tutorial
In this lesson, you will specify that the steps in the
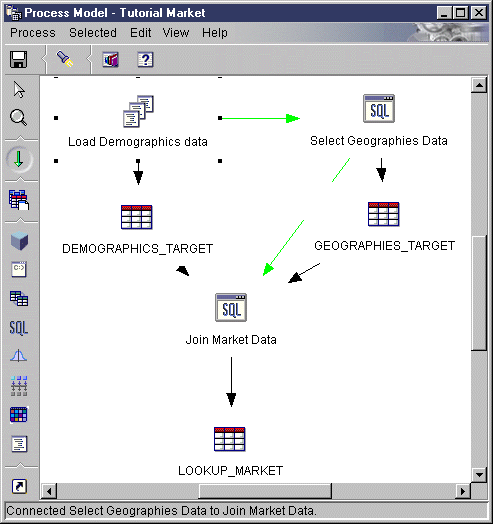
Tutorial Market process are to run in the following sequence:
- Load Demographics Data
- Select Geographies Data
- Join Market Data
Then you will specify that the Load Demographics Data step is to run at a
scheduled time. You will activate the schedule by promoting the steps
in the process to production mode.
To specify that the steps are to run in sequence:
- From the Process Model window, click the Task Flow icon:

- Click the On Success icon (the green arrow).
On Success indicates that a step is to be started only if the
step before it ran successfully. You can also select the following
states:
- On Completion
- Indicates that a step is to be started when the step before it runs
successfully or fails.
- On Failure
- Indicates that a step is to be started only if the step before it
failed.
For more information, see "Scheduling a step" in the online
help.
- Click the Load Demographics Data step, which is the step that
is to run first.
- Hold down the mouse button and drag the mouse to the Select Geographies
Data step, which is to run after the Load Demographics step.
- Release the mouse button.
A green arrow that represents the task flow is displayed on the canvas
between the two steps.
- Repeat steps 3 to 5 with the Select Geographies Data step and the
Join Market Data step. Specify the Select Geographies Data step as the
first step, and the Join Market Data step as the second step.

The steps will now run in the order that is listed in the introduction to
this lesson.
Now, you will schedule the Load Demographics Data step, to start at a
specified date and time. The Data Warehouse Center will start the step
at the time you specify. When the Load Demographics Data step finishes
running, the Data Warehouse Center starts the next step in the sequence that
you defined in the previous section.
When you schedule a step, you can specify one or more dates and time on
which the step is to run. You can also specify the step is to run once
or is to run at a specified interval, such as every Saturday.
To schedule the Load Demographics Data step:
- Right-click the Load Demographics Data step, and click
Schedule.
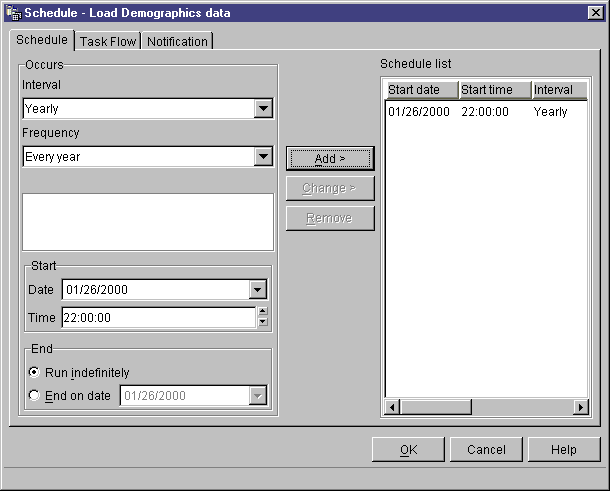
The Schedule notebook opens.
- Click the Schedule tab.
- From the Interval list, click Yearly.
- In the Start date and time field, accept the default of the
current date, and specify a time that is a few minutes from the current
time.
The step will run at the time you select.
- In the End field, accept the default that the schedule is to
run indefinitely.
- Click Add.
The schedule is added to the Schedule list.

- Click OK.
The specified schedule is created.
To activate the schedule and the task flow links that you created, you
must promote the steps to production mode. Production mode indicates
that the steps are in their final format. In production mode, you can
change only those settings that will not affect the step's processing,
such as changing the description of the step. For more information, see
the Data Warehouse Center Administration Guide.
To promote the steps to production mode:
- Right-click the Load Demographics data step.
- Click Mode> Production.
The Data Warehouse Center displays a progress window. Wait until the
Data Warehouse Center finishes processing before continuing with this
lesson.
- Repeat the previous steps for the Select Demographics Data step and Join
Market Data steps, in order.
In this lesson, you scheduled the steps that you created to once a year
at the current date and time in the following order:
- Load Demographics Data
- Select Geographies Data
- Join Market Data
Then you promoted the steps to production mode to implement the
schedule.
[ Top of Page | Previous Page | Next Page ]


