Data Warehouse Center Administration Guide
This chapter describes the methods of transforming data that the Data
Warehouse Center provides. It describes how to use SQL steps and
warehouse transformers to transform data.
In many cases, there are multiple ways that you can transform data.
For example, if you want to clean data, you have the following choices:
Table 16. Methods of cleaning data
| Method
| Description
| For more information, see:
|
| WHERE clause
| Build an SQL WHERE clause to limit the rows that you extract from the
source table.
| Filtering data
|
| Formulas and expressions
| Use formulas and expressions to eliminate the data that you do not need
and to create the data that you do need. Use the Expression window in
SQL Assist to specify formulas, constants, and tokens.
| Adding calculated columns
|
| Clean Data transformer
| Use the Clean Data transformer to perform rules-based find and replace
operations on a table.
| Cleaning data
|
| Warehouse programs
| Use warehouse programs to perform any functions on the source data that
are not available from the previous methods.
| Chapter 11, Extending the Data Warehouse Center with user-defined programs
|
If you select multiple sources, you also need to specify how the rows of
these columns will be associated in the join of the tables. You can use
SQL Assist to define the join.
You must link the sources to the step before you define the join.
To join source tables:
- Define an SQL step. (See Selecting and inserting data.)
- Open the step.
- Click the SQL Statement tab.
- Click Build SQL to have automatically generate SQL.
(Otherwise, you can type your own SQL.)
SQL Assist opens.
- Click the Tables tab and verify that the sources are
listed.
- Click the Columns tab.
- From the Available columns list, select a column, and click
>.
The column moves from the Available columns list to the
Selected columns list.
Click >> to add all the columns from the Available
columns list to the Selected columns list.
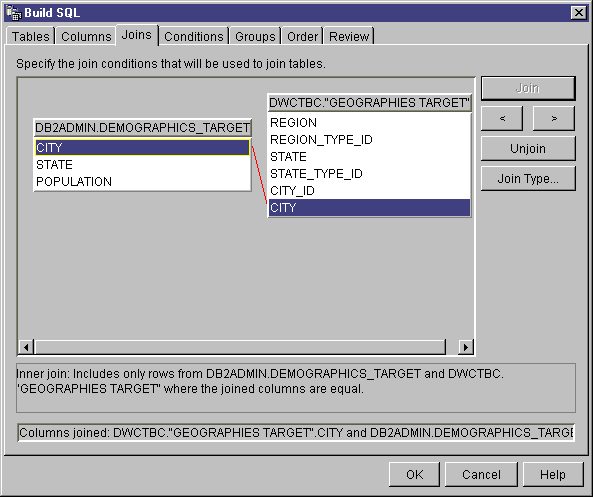
- Click the Joins tab.
- Select a column in one of the tables. The tables are displayed in
the order that they are shown in the Selected tables list on the
Tables page.
- Select a column in another table.
If the columns have compatible data types, a gray line is displayed,
connecting the columns, and the Join button is available.
If the columns do not have compatible data types, an error message is
displayed in the status area at the bottom of the window.
- Click the Join Type push button to create the join.
SQL Assist draws a red line between the selected columns, which indicates
that the tables are joined on that column.
- To request additional joins, repeat the previous steps.
To remove a join:
- Select the joined columns, or navigate to the join that you want to remove
by clicking > or <. A red line indicates
the currently selected join. Other joins are indicated by blue
lines.
- Click Unjoin. The join line is removed.
- Click the Review tab to view the SQL statement that you just
built.
- Click OK.
SQL Assist closes.
| Tip: | The source tables must exist for you to use the Test push button
on the SQL Statement page. If you specified that the Data Warehouse
Center is to create the tables, you must promote to test mode the steps that
link to those tables as target tables to create the tables.
|
- Click OK.
The Step Properties notebook closes.
In many production environments, the source data includes encoded
information. For example, you might use codes to refer to part numbers
throughout your database. You also have a table that relates the part
numbers to serial numbers and descriptions of each part. In these
situations, you want the information in your warehouse to include the name and
description of each part. To do this, you must combine the decoding
table with the source data that contains the encoded part numbers.
First, you need to define the decoding table and the encoded part numbers
table as part of a warehouse source. Then, select those tables as
source tables for a step. You then click Join on the Joins
page of SQL Assist to join the tables.
Another approach is to use a CASE statement to decode the data.
For example, data in a month column is coded numerically, and you want to
transform the data to character strings that contain the abbreviation of the
month. You issue the following statement:
CASE TBC.ORDER_HISTORY.ORDERMONTH WHEN 1 THEN 'Jan'
WHEN 2 THEN 'Feb' WHEN 3 THEN 'Mar' WHEN 4 THEN 'Apr'
WHEN 5 THEN 'May' WHEN 6 THEN 'Jun' WHEN 7 THEN 'Jul'
WHEN 8 THEN 'Aug' WHEN 9 THEN 'Sep' WHEN 10 THEN 'Oct'
WHEN 11 THEN 'Nov' WHEN 12 THEN 'Dec'
END
By default, a join is assumed to be an inner join. You can also
request other types of joins by clicking Join Type on the Joins
page of SQL Assist. The following types of joins are available:
- Inner join
- Left outer join
- Right outer join
- Full outer join
If your database supports the OUTER JOIN keywords, you can extend the inner
join to add rows from one table that have no matching rows in the other
table.
For example, you want to join two tables to get the last name of the
manager for each department. The first table is a Department table that
lists the employee number of each department manager. The second table
is an Employee table that lists the employee number and last name of each
employee.
However, some departments do not have a manager; in these cases, the
employee number of the department manager is null. To include all
departments regardless of whether they have a manager, and the last name of
the manager, if one exists, you generate a left outer join.
The left outer join includes rows in the first table that match the second
table or are null. The resulting SQL statement is as
follows:
SELECT DEPTNO, DEPTNAME, EMPNO, LASTNAME
   FROM DEPARTMENT LEFT OUTER JOIN EMPLOYEE
      ON MGRNO = EMPNO
A right outer join is the same as a left outer join, except that
it includes rows in the second table that match the first table or are
null.
A full outer join includes matching rows and null rows from both
tables.
For example, you have two tables, Table 1 and Table 2, with the following
data:
| Table 1
|
| Column A
| Column B
|
| 1
| A
|
| 2
| B
|
| 3
| C
|
| Table 2
|
| Column C
| Column D
|
| 2
| X
|
| 4
| 2
|
You specify a join condition of Column A = Column C. The result
tables for the different types of joins are as follows:
- Inner join
-
| Column A
| Column B
| Column C
| Column D
|
| 2
| B
| 2
| X
|
- Left outer join
-
| Column A
| Column B
| Column C
| Column D
|
| 1
| A
| null
| null
|
| 2
| B
| 2
| X
|
| 3
| C
| null
| null
|
- Right outer join
-
| Column A
| Column B
| Column C
| Column D
|
| 2
| B
| 2
| X
|
| null
| null
| 4
| 2
|
- Full outer join
-
| Column A
| Column B
| Column C
| Column D
|
| 1
| A
| null
| null
|
| 2
| B
| 2
| X
|
| 3
| C
| null
| null
|
| null
| null
| 4
| 2
|
If you specify value (a,c), you obtain the following result:
You can generate a star join, which is a join of source tables
that are defined in a star schema.
A star schema is a specialized design that consists of the
following types of tables:
- Dimension tables, which describe aspects of a business
- A fact table, which contains the facts about the business
For example, if you have a mail-order business that sells books, some
dimension tables are Customers, Books, Catalogs, and Fiscal_Years.
The fact table contains information about the books that were ordered from
each catalog by each customer during the fiscal year.
Each dimension table contains a primary key, which is one or
more columns that you select to identify a row in the table.
The fact table contains foreign keys that correspond to the primary
keys in the dimension table.
A foreign key is a column in a table whose allowable values must exist as the
primary key for another table.
When you request a star join, the Data Warehouse Center joins the primary
keys of the dimension tables with the foreign keys of the fact table.
In the previous example, the Customers table has a primary key of Customer
Number, and each book has a primary key of its Book Number (ISBN). Each
order in each table contains foreign keys of Customer Number and Book
Number. The star join combines information about the customers and
books with the orders.
For information about defining primary and foreign keys in the Data
Warehouse Center, see Defining a warehouse target. For information about defining a star schema and
exporting it to OLAP Integration Server, see Chapter 13, Creating a star schema from within the Data Warehouse Center.
In most cases, when you create a step, you want only a subset of the source
data. You might want to extract only the rows that meet certain
criteria. You can use the Data Warehouse Center to build an SQL WHERE
clause to limit the rows that you extract from the source table.
For example, you can define a step that selects rows from the most recent
edition of the source table:
WHERE TBC.ORDER_HISTORY.RUN_ID = &cur_edtn.IWHDATA.TBC.ORDER_HISTORY
The RUN_ID column contains information about the step
edition. The &cur_edtn token represents the current step
edition. Therefore, this WHERE clause selects rows in which the step
edition equals the current edition.
To build the WHERE clause, use the Conditions page of SQL
Assist.
To exclude duplicate rows, select the Exclude duplicate rows (SELECT
DISTINCT) check box. This action eliminates all but one of each
set of duplicate rows in the result set.
To specify search conditions:
- From the SQL Statement page of the Step Properties notebook, click
Build SQL.
SQL Assist opens.
- Click the Conditions tab.
- Select the column for the search from the Available columns
list.
- Select an operator from the Operators list.
- Type one or more values in the Values list. Enter one
value per line. Click Clear to remove all of the values from
the Values list.
If you selected the Between operator in the Operators list, you
must enter two values per line in the Values list. The
values are separated by an ampersand (&).
You can search for appropriate values by clicking Find.
You can specify host variables in the Values list. To do
this, click on a line in the Values list, then click Add
Variable. The Add Variable window opens. Type
the variable name, then click OK. The Add Variables window
closes, and the variable is added to the Values list on the
Conditions page.
You can specify parameters in the Values list. If a
parameter is specified, its value is used in the search condition. A
parameter is specified in the format :parm, where
parm is the parameter name. For example,
:empid is a valid specification for a parameter named
empid.
- Click Add to add the condition to the Conditions
field.
- To specify additional search conditions for your statement, click
And or Or. Then, build the second search
condition as described in the previous steps. When you click
Add, the subsequent conditions are appended to those that already
are displayed in the Conditions field.
You can edit the text in the Conditions field. You can
remove search conditions by highlighting the portion of the condition that you
want to remove in the Conditions field, and pressing the
Delete key on your keyboard.
To build complex conditions, click Advanced Expression.
The Expression Builder - Conditions window opens. For help on using the
Expression Builder, see "Building expressions" in the online
help.
You also define some columns that are calculated from values of other
columns. For example, you need only the month in which an item was
ordered. You can use the SQL DATE function to convert the order date to
the DATE data type format. Then, you use the MONTH function to return
the month part of the date. The SQL statement for the calculated column
is as follows:
MONTH(DATE(TBC.ORDERS_MONTH.OrderDate))
You can also use calculated columns to summarize data. In many
situations, your source data contains far more detail than you want to
replicate into your warehouse. All you need from the source data is a
summary of some kind. You might need an average, a summary, or a count
of the elements in the source database, but you do not need all the
data.
The Data Warehouse Center lets you easily and accurately define steps that
are summaries of source data. You can use standard SQL aggregation
functions (AVG, COUNT, MAX, MIN, and SUM) and the SQL GROUP BY clause to
create steps that summarize the source data.
Summary steps reduce the load on the network. They perform the
aggregations on the source data before replicating the data across the
network. You can also create composite steps that use summary
techniques to summarize other steps. Summarizing reduces the size of
the target warehouse that you create.
To create a step with this type of summary, click the SUM
function in the Functions field of the Expression Builder window of
SQL Assist.
For example, a step summarizes all the items that are sold in a month and
expresses the amount in thousands of dollars:
SUM(TBC.ITEMS_MONTH.Amount)/1000
To define a calculated column:
- From the SQL Statement page of the Step Properties notebook, click
Build SQL.
SQL Assist opens.
- Click the Columns tab.
- Click Add.
The Expression Builder window opens.
You can type your expression in the Expression field, or you can
use the fields and controls in the Expression Builder to build your
expression. To build an expression:
- Use the Columns, Operators, and Case
lists to select the components of the expression. Double-click on a
particular column, operator, or case keyword to add it to the
Expression field. Each item that you double-click is
appended to the expression in the Expression field, so be sure to
select items in the order that you want them displayed.
- Add specific values to your expression. Type a value in the
Value field, then click the check mark to add the value to the
Expression field.
- To add a function to your expression:
- Select a category from the Functions list. The list
below the Functions field changes to display functions in the
specified category.
- Double-click on a function in the list below the Functions
field.
- The Function Parameters window opens. Select the format of the
function and specify the parameter values.
- Click OK. The Function Parameters window closes.
The function and its parameters are displayed in the Expression
field of the Expression Builder.
- To add a constant to your expression:
- Select a category from the Constants list. The list
below the Constants field changes to display constants in the
specified category.
- Double-click on a constant in the list below the Constants
field. The constant is added to the expression in the
Expression field.
- Use the following buttons to work with your expression:
- Click And, Or, =, <>,
(, and ) as needed to add those operators to your
expression.
- Click Clear to remove all input from the Expression
field.
- Click Undo to remove the last change that you made from the
Expression field.
- Click Redo to reverse the last change that you made in the
Expression field.
- After you complete your expression, click OK. The
Expression Builder window closes, and the column expression is added to the
Selected columns list on the Columns page.
- Click the Name field of the new column, and type the name of
the column.
- Press Enter.
- Click Move Up and Move Down to move the column to
the appropriate position in the table.
Use warehouse transformers to perform the following basic data
transformations:
- Cleaning data
- Generating key columns
- Generating period tables
- Inverting data
- Pivoting data
Use the Clean Data transformer to perform rules-based find and replace
operations on a table. The transformer finds values that you specify in
the data columns of the source table that your step accesses. Then the
transformer updates corresponding columns with replacement values that you
specify in the table to which your step writes. You can select multiple
columns from the input table to carry over to the output table. The
Clean Data transformer does not define rules or parameters for the carry over
columns.
Use the Clean Data transformer to clean and standardize data values after
load or import, as part of a process. Do not use this transformer as a
general-purpose data column editor.
You can use the Clean Data transformer to perform the following
tasks:
- Replace values in selected data columns that are missing, not valid, or
inconsistent with appropriate substitute values
- Remove unsuitable data rows
- Clip numeric values
- Perform numeric discretization
- Remove excess white space from text
- Copy columns from the source table to the target table
You can use the Clean Data transformer only if your source table and target
table are in the same database. The source table must be a single
warehouse table. The target table is the default target table.
You can choose to ignore case and white space when locating strings, and
you can specify a tolerance value for numeric data.
You can make changes to the step only when the step is in development
mode.
Each clean transformation that you specify uses one of four clean
types:
- Find and replace
- Performs basic find and replace functions.
- Discretize
- Performs find and replace functions within a range of values.
- Clip
- Performs find and replace functions within a range of values or outside of
a range of values.
- Carry over
- Specifies columns in the input table to copy to the output table.
Prerequisite: Before you can use the Clean Data
transformer, you must create a rules table for your clean type. A rules
table designates the values that the Clean Data transformer will use during
the find and replace process. The rules table must be in the same
database as the source table and target table.
At a minimum, a rules table must contain at least two
columns. One column contains find values. The other column
contains replace values. The rows in each column correspond to each
other.
For example, Column 1 and Column 2 in a rules table have the values shown
here:
| Column 1
| Column 2
|
| Desk
| Chair
|
| Table
| Lamp
|
Suppose that Column 1 contains the find values, and Column 2 contains the
replace values. When you run the step, the Clean Data transformer
searches your source column for the value Desk. Wherever it finds the
value Desk, it writes the value Chair in the corresponding field of the target
column.
The Clean Data transformer copies values that are not listed in the find
column directly to the target table. In the example, the value Stool is
not listed in the column that contains the find values. If the selected
source column contains the value Stool, the Clean transformer will write Stool
to the corresponding field in the target column.
The following table describes the columns that must be included in the
rules table for each clean type:
| Clean type
| Minimum number of columns in rules table
| Purpose of columns
|
| Find and replace
| 2 - 3
|
The first column contains find values.
The second column contains replace values.
The third column, if specified, contains rule-ordering information and is
not required.
|
| Discretize
| 3 - 4
|
The first column contains the low end of the find value range.
The second column contains the high end of the find value range.
The third column contains the replacement value.
The forth column, if specified, contains rule-ordering information and is
not required.
|
| Clip
| 3 - 5
|
The first column contains the low end of the find value range.
The second column contains the high end of the find value range.
The third column contains the low end of the replacement value.
The fourth column contains the high end of the replacement value.
The fifth column, if specified, contains rule-ordering information and is
not required.
Tip: When you use the Clip clean type, you can run a find
and replace procedure that searches outside of value ranges.
|
| Carry over
| None allowed
| Rule table not used.
|
You can reorder the output columns using the Step notebook. You
can change column names on the Column Mapping page of the Step
notebook.
To define a Clean Data transformer:
- Open the step notebook.
- Specify general information about the transformer. For more
information, see Providing general information about a step.
- On the Parameters page, define the clean transformations that you want
performed when the step runs. Right-click anywhere on the Transformer
definition table, and click Add. A row is added to the
table.
- Under the Input column heading in the row that you just added, click and
select the name of the column that contains the data that will be
cleaned.
- In the Clean type list, select the type of clean transformation
that will be performed on the input column when the step runs.
To copy your input column to the target table without making any changes,
click Carry Over. The Rules list and Parameter list are not
available. Proceed to step 7.
- In the Rules list, click ... to specify
the rules table that the step will use for the clean type that you
selected. A window opens. The fields on the window vary
depending on the selection you made. Use this window to define rules
for the clean type that you selected:
- To define rules for Find and replace:
- Select a rules table from the Rules table list.
- Select a column that contains find values. Click a column in the
Available columns list, then click > next to the
Find column field.
- Select a column that contains replace values. Click a column in the
Available columns list, then click > next to the
Replace column field.
- Optional: Select a column that contains the sequence in which to
read rows in the rules table. Click a column in the Available
columns list, then click > next to the Order by
column field.
- Click OK to save your changes and close the window.
Restrictions:
- The specification of the find value depends on the data type of the input
column in your warehouse source. The data type of the find column must
match the data type of the input column.
- Only numbers are allowed in numeric find columns.
- Pattern strings are allowed only for character columns. Pattern
strings can contain _ for any single character or % for zero or more
characters. Use the rule escape character if _ or % is contained in the
pattern string. For example, assume the escape character is \.
To specify the character %, type \% in the find column of the rules
table. For either numeric or character data, the database null value
can be used as the find or replacement value.
- To define rules for Discretize:
- Select a rules table from the Rules table list.
- Select a column in the rules table that contains lower bound values to
search for. In the Available columns list, select a column,
then click > next to the Lower bound column
field.
- Select a column in the rules table that contains upper bound values to
search for. In the Available columns list, select a column,
then click > next to the Upper bound column
field.
- Select a column in the rules table that contains a replacement
value. In the Available columns list, select a column, then
click > next to the Replacement value column
field.
- Optional: Select a column that contains the sequence in which to
read rows in the rules table. Click a column in the Available
columns list, then click > next to the Order by
column field. The column that you select should be of type
Integer.
- Click OK to save your changes and close the window.
Note: You can use character string or numeric data
types. The comparison is performed in the locale specific order for the
character set that you are using.
- To define rules for Clip:
- Select a rules table from the Rules table list.
- Select a column from the rules table that contains the lower bound values
to search for. Click a column in the Available columns list,
then click > next to the Lower bound column
field.
- Select a column from the rules table that contains the upper bound values
to search for. Click a column in the Available columns list,
then click > next to the Upper bound column
field.
- Select a column from the rules table that contains the lower bound
replacement values. Click a column in the Available columns
list, then click > next to the Lower replace value
column field.
- Select a column from the rules table that contains the upper bound
replacement values. Click a column in the Available columns
list, then click > next to the Upper replace value
column field.
- Optional: Select a column that contains the sequence in which to
read rows in the rules table. Click a column in the Available
columns list, then click > next to the Order by
column field. The column that you select should be of type
Integer.
- Click OK to save your changes and close the window.
Note: You can use the Clip clean type for numeric data
types only. To avoid lower or upper bound clipping, specify the
database null value in the rules table. The database null value can
also be used as the replacement value.
- In the Parameters column, click
.... Depending on the data type of the
column that you specified in the Input column field, either the
String Parameters window or the Numeric Parameters window opens.
Use the controls in the String Parameters window to customize how the Clean
Data transformer performs the find and replace tasks. To specify
information about string parameters:
- In the Specify string settings area, select the applicable check box
to:
- Compress white space. Leading and trailing spaces are
removed. Two or more consecutive interior spaces are compressed into
one.
- Ignore white space during matching. White space is removed from the
input column, find, upper bound, and lower bound columns.
- Ignore case. Case is ignored when the Clean transformer performs
match processing.
- Not copy a value if it matches a column in the rule table. A value
is not copied if it matches a column in the rule table.
- In the Escape character field, type an escape character. For
example, you can specify \. You cannot use the characters % or
_. An empty field does not suggest that a blank character is an escape
character.
- Click OK to save your changes and close the window.
Use the controls in the Numeric Parameters window to specify a numeric
tolerance for your transformation. The default value is
0.0. A numeric tolerance is a number that you apply to numeric
find values. The numeric tolerance allows the replacement of a value
that is just outside a find value or a range of find values. For
example, you use the Discretize clean type to replace the find value numeric
ranges in the following manner: 23.50 -24.50 replaced by
1000. If you specify a tolerance of 0.10, then input data of
23.40 and 24.60 would also be replaced by 1000.
To specify a numeric tolerance:
- In the Numeric tolerance field, type a numeric tolerance.
- If you do not want the Clean Data transformer to copy a value if it
matches a column in the rule table, select the Do not copy record to
output if rule match is found check box.
- Click OK to save your changes and close the window.
- Define as many clean types as you want to. When you are finished,
click the Column Mappings tab. If you want to modify your
column mappings, see Defining column mapping information.
- On the Processing Options page, provide information about how your step
processes. For more information, see Defining processing options.
- Click OK to save your changes and close the step
notebook.
Use the Generate Key Table transformer to add a unique key to a warehouse
table.
You can change values in the key column in two ways:
- You can change values based on a column of data type INT or SMALLINT in
the target table or another table in the warehouse target.
- You can replace all the key values in the key column of the target
table.
The Generate Key Table transformer uses a warehouse target table as a
source. The transformer writes to a table on the warehouse
target. Before you define this step, link the warehouse target to the
step in the Process Model window, with the arrow pointing towards the
step. You can make changes to the step only when the step is in
development mode.
Column mapping is not available for this step.
To define a Generate Key table transformer:
- Open the step notebook.
- Specify general information about the transformer. For more
information, see Providing general information about a step.
- On the Parameters page, click the column from the Available
columns list that you want to assign key values to. Then, click
>. The selected column does not need to be a primary key
column.
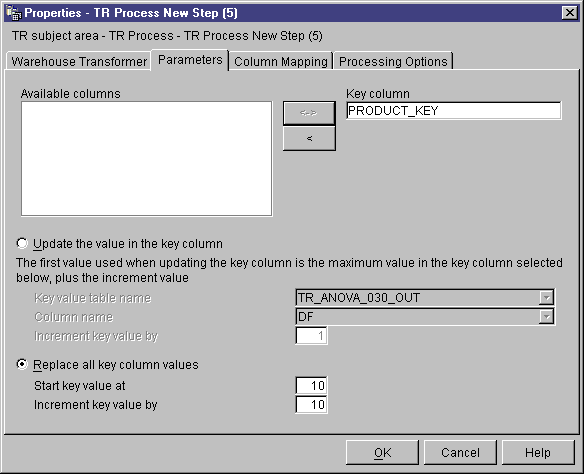
- Specify whether you want to update values in the key column based on a
column in the selected step or replace all key column values in the existing
key column.
To update values in the key column based on a column in a selected
step:
- Click Update the values in the key column.
- In the Key value table name list, select a table in the
warehouse target that contains the target table. The table that you
select must contain the column on which to base the generated key
values.
- In the Column name list, click a column in the table that you
just specified on which to base the generated key values.
- In the Increment key value by field, type a numeric increment
value.
To replace all key column values in the existing key column:
- Click Replace all key column values.
- Type a starting key value in the Start key value at
field.
- Type a numeric increment value in the Increment key value by
field.
- On the Processing Options page, provide information about how your step
processes. For more information, see Defining processing options.
- Click OK to save your changes and close the step
notebook.
Use the Generate Period Table transformer to create a period table that
contains columns of date information that you can use when evaluating other
data, such as determining sales volume within certain period of time.
You can use a period table in the following ways:
- Analyze trends by creating one or more output columns that are based on
the generated date/time value for each row.
- Join a period table to other data tables. You can use the resulting
table for simpler SQL SELECT statements that are based on user
requirements.
- As a starting point for creating a more complex data table after the
transformer adds other columns to the generated period table.
The Generate Period Table transformer works only on target tables.
To use the transformer successfully, you must connect the transformer to a
target.

You can make changes to the step definition only when the step is in
development mode.
To define a Generate Period Table transformer:
- Open the step notebook.
- Specify general information about the transformer. For more
information, see Providing general information about a step.
- On the Parameters page, in the Resolution list, click the
resolution for the date, time, or timestamp column for the period
table.
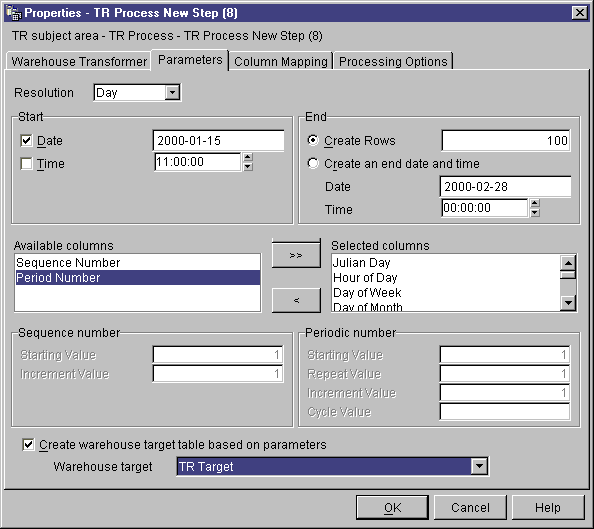
- Specify the starting period value by selecting either the date or the time
check box, or both. Then, set your starting date or time (or
both):
- To create a period table with a column that has type Date, select the
Date check box. Then, click
.... A calendar is displayed.
Use the << and >> buttons to scroll through the months on the
calendar. After you find your start month, click a date in the
calendar.
- To create a period table with a column that has type Time, select the
Time check box. Then, click either the hours, minutes, or
seconds in Time field, and use the arrow buttons to specify your
time.
- To create a period table with a column that has type TimeStamp, select
both check boxes, and specify a start date and a start time.
- Specify the ending period value using the number of rows, or using an
ending date and time, or both:
- To specify the total number of period rows to generate, click Create
rows, and type the number of period rows in the Create Row
field.
Use the Create Rows field as an alternative to setting an end
date or time for your period table. In this field, you enter the number
of period rows that the transformer will generate in the Period Table.
This field is optional.
If you decide not to use this field, then the following conditions are
true:
- If the Generate Period Table transformer is writing to a Date column, you
must select an end date in the Date field. The end date must
be greater than the start date.
- If the Generate Period Table transformer is writing to a Time column, you
must select an end time in the Time field. The end time must
be greater than the start time.
- If the Generate Period Table transformer is writing to a TimeStamp column,
you must select a date in the Date field and a time in the
Time field. The end date and time must be greater than the
start date and time.
- To specify the ending period using a date and time or both, click
Create end date or time, and select a date or time or both in the
Date and Time fields.
If you do not enter a value in the Create Rows field, you must
enter a value or values in the Date and Time fields in the End
section.
In these fields, you either specify the date or time (or both) that you
want to be last date/time value entered into the period table, based on the
following conditions:
- If the Generate Period Table transformer is writing to a Date column, you
must select an end date in the Date field. The end date must
be greater than the start date.
- If the Generate Period Table transformer is writing to a Time column, you
must select an end time in the Time field. The end time must
be greater than the start time.
- If the Generate Period Table transformer is writing to a TimeStamp column,
you must select an date in the Date field and a time in the
Time field. The end date and time must be greater than the
start date and time.
- Optional: In the Available Columns list, click one or
more columns to be populated in the period table. Then, click
>. The columns are moved to the Selected
columns list. The following table describes the available
columns:
| Column
| Data Type
| Notes
|
| Julian Day
| Integer
| Dates start January 1, 4712 B.C.
|
| Hour in Day
| Integer
| 1 - 24
|
| Day in Week
| Integer
| 1 - 7 (varies by locale, default locale used)
|
| Day in Month
| Integer
| 1 - 31
|
| Day in Year
| Integer
| 1 - 366
|
| Week in Month
| Integer
| 1 - 5 (weeks in the month begin on Sundays)
|
| Week in Year
| Integer
| 1 - 53
|
| Month in Year
| Integer
| 1 - 12
|
| Quarter in Year
| Integer
| 1 - 4
|
| Year
| Integer
| Nnnn
|
| Day Name
| Varchar
| Default locale used
|
| Month Name
| Varchar
| Default locale used
|
| Sequence Number
| Integer
| This column requires your input in the Sequence number section. If
you select this option, the Sequence number controls become available.
|
| Periodic Number
| Integer
| This column requires your input in the Periodic number section. If
you select this option, the Period number controls become available.
|
- If you placed Sequence Number in the Selected
columns list, type a numeric starting sequence value in the
Starting value field. Then, type a numeric increment value
in the Increment value field.
- If you placed Period number in the Selected columns
list, type a numeric starting period value in the Starting value
field. Type a numeric repeat value in the Repeat value
field. Type a numeric increment value in the Increment value
field. Type a numeric cycle value in the Cycle value
field.
- If your step is not already linked to a target and you want to
automatically create a target table for this transformer, click Create
warehouse target table based on parameters.
- If you clicked Create warehouse target table based on
parameters, from the Warehouse target list, select the name
of the warehouse target where you want the Data Warehouse Center to create the
table.
- Optional: On the Column Mapping page, view or change your column
mappings. For more information, see Defining column mapping information.
- On the Processing Options page, provide information about how your step
processes. For more information, see Defining processing options.
- Click OK to save your changes and close the step
notebook.
Use the Invert Data transformer to invert the order of the rows and columns
in a table. When you use the Invert Data transformer, the rows in the
source table become columns in the output table, and the columns in the input
table become rows in the output table. The order of data among the
columns, from top to bottom, is maintained and placed in rows, from left to
right.
For example, consider the input table as a matrix. This transformer
swaps the data in the table around a diagonal line that extends from the upper
left of the table to the lower right. Then the transformer writes the
transformed data to the target table.
You can specify an additional column that contains ordinal data that starts
at the number 1. This column helps you identify the rows after the
transformer inverts the table.
You can also specify a column in the source table to be used as column
names in the output table. This column is called the pivot
column.
Columnar data in each pivot group must be either the same data type or data
types that are related to each other through automatic promotion. For
more information about automatic promotion of data types, see the IBM DB2
Universal Database: SQL Reference.
Prerequisite: Before you begin this task, you must connect
a source table from the warehouse database to the step. You can also
specify a target table that the step will write to, or you can designate that
the step creates the target table.
The Invert Data transformer drops the existing database table and recreates
it during each run. Each time that you run a step using this
transformer, the existing data is replaced, but the table space and table
index names are preserved.
A step that uses the Invert Data transformer must be promoted to production
mode before you can see the actual data that is produced.
This step does not use the Column Mapping page.
To define an Invert Data transformer:
- Open the step notebook.
- Specify general information about the transformer. For more
information, see Providing general information about a step.
- On the Parameters page, click the name of the column that contains target
table column names in the Available columns list. Then,
click > to move the selected column to the Pivot
column field. The data in this column must have one or more of
the following data types:
- CHAR
- DATE
- TIME
- TIMESTAMP
- SMALLINT
- INTEGER
- NUMERIC
- DECIMAL
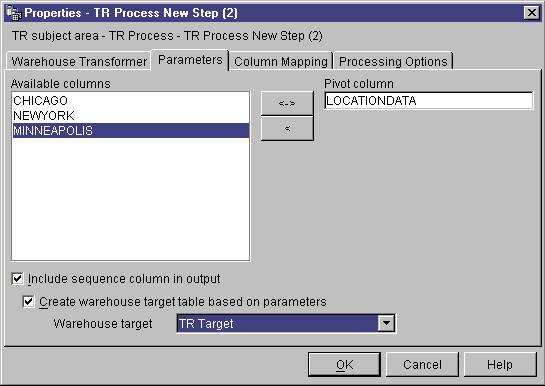
All data in the pivot column must be fewer than 18 characters.
Alphabetic characters are changed to uppercase on DB2 systems that require
object names in uppercase.
If you don't select a column, the transformer assumes that the table
contains raw data only, all of which it should invert. Then, the
transformer creates column names for the target table based on the column
number. The first column will be named 1, the second column will be
named 2, and so on.
- Optional: Select the Include sequence column in
output check box to create a column in the output table that
contains an ordered list of numbers. The list of numbers starts at 1
and increments by 1.
- If your step is not connected to a target table, select Create
warehouse target table based on parameters.
- If you selected Create warehouse target table based on
parameters, select a warehouse target from the Warehouse
target list.
- On the Processing Options page, provide information about how your step
processes. For more information, see Defining processing options.
- Click OK to save your changes and close the step
notebook.
Use the Pivot data transformer to group related data from selected columns
in the source table, which are called pivot columns, into a single column,
called a pivot group column, in the target table. You can create more
than one pivot group column.
You can select multiple columns from the source table to carry over to the
output table. The data in these columns is not changed by the Pivot
Data transformer.
You can specify an additional column that contains ordinal data that starts
at the number 1. This column helps you identify the rows after the
transformer inverts the table.
Columnar data in each pivot group must have be the same data type or data
types that are related to each other through automatic promotion. For
more information about automatic promotion of data types, see the IBM DB2
Universal Database: SQL Reference.
Before you begin this task, connect a warehouse source table to the step in
the Process Model window. The Pivot Data transformer uses an existing
target table in the same database or creates a target table in the same
database that contains the warehouse source. You can change the step
definition only when the step is in development mode.
To define a transformer:
- Open the step notebook.
- Specify general information about the transformer. For more
information, see Providing general information about a step.
- Click the Parameters tab.
- Optional: In the Available columns list, click the column
that you want to carry over to the target table without making any
changes. Then, click > next to the Carry-over
columns list. To select multiple columns, press Ctrl while you
click columns.
- In the Available columns list, click the columns that you want
to use as pivot columns. Then, click > next to the
Pivot columns list.
- In the Number of pivot groups field, type the number of pivot
groups that you want to create. The number of groups that you type must
be a divisor of the number of pivot columns that you selected. For
example, if you selected 6 pivot columns, you can type the number 1, 2, 3, or
6. If you selected 5 pivot columns, you can type 1 or 5 in this
field.
- If you selected pivot columns, specify the data group and pivot groups for
each pivot column:
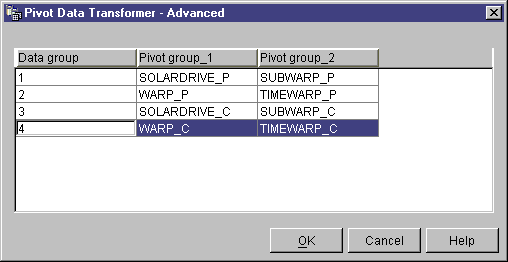
- On the Parameters page of the Pivot Data transformer notebook, click
Advanced. The Pivot Data Transformer - Advanced window
opens.
Use the table in this window to define your pivot groups. The number
of rows that are displayed in this table depend on the number of pivot columns
that you selected and the number of pivot groups that you specified on the
Parameters page. For example, If you selected 6 pivot columns and 2
pivot groups, 3 rows are displayed.
- Click the Data group field. Then, type a name for a data
group. A data group is a column in the target table. This column
is used to describe or label information that is collected into pivot group
columns so that the original meaning of the data as expressed by the column
labels in the input table is preserved in the output table. If you
leave this field blank, and there is only one pivot group, the names of the
pivot columns are pivoted into the data fields of the output column that
results when the step is run.
- Select a pivot column for each pivot group. The number of pivot
groups that are displayed in this table is the same number of pivot groups
that you specified on the Parameters page. To select a pivot column,
double-click the Pivot group field and select a column. You
cannot select a column for more than one pivot group. You must select a
column for each field in a pivot group.
- Click OK. The Pivot Data Transformer - Advanced window
closes.
If you make changes to the selected pivot columns in the Pivot Data
Transformer window, the data group and pivot group values that you specified
in this window will be reset to blank.
- If you want to include an ordered column of numbers in the output table,
select the Include sequence column in output check box.
- Optional: On the Column Mapping page, view or modify your column
mappings. For more information, see Defining column mapping information.
- On the Processing Options page, provide information about how your step
processes. For more information, see Defining processing options.
- Click OK to save your changes and close the step
notebook.
Use the FormatDate transformer to change the format of a date field in your
source table that your step is copying to the default target table. You
can run this transformer with any other transformer or warehouse
program.
The FormatDate transformer provides several standard date formats that you
can specify for the input and output columns. If a date in the input
column does not match the specified format, the transformer writes a null
value to the output table.
If the format that you want to use is not displayed in the
Format list, you can type a format in the Format string
field of the transformer window. For example, type MMM D, YY
if the dates in your input column have a structure like Mar 2, 96
or Jul 15, 83.
The data type of the column that is selected in the Input column
field determines the data type for the output column. For
example:
- Input columns of Date type will become Date types in the output
columns.
- Input columns of Time type will become Time types in the output
columns.
- Input columns of Timestamp type will become Timestamp, Date, or Time types
in the output columns, depending on the category that you select for the
output.
To use the FormatDate transformer:
- Create a step that generates a default target table in a warehouse target
where the transformers are installed.
- Link to the source table.
- From the SQL Statement page, click Build SQL.
- Click the Columns tab.
- Click Add.
The Expression Builder opens.
- In the Expression Builder, double-click FormatDate in the list
of function names.
The Function Arguments - FormatDate window opens.
- Click the column in the Available columns list that contains
date or time information that you want to reformat, then click >
to place the selected field in the Input column.
- Specify the input format in the Input Format area of the
window:
- Select a category for the input column data from the Category
list.
- Select a date, time, or timestamp format from the Format
list. The Example list shows an example of the format that
you select. The Format string field confirms your
selection. You can also specify a format by typing it in the
Format string field.
- Specify the output format in the Output format area of the
window:
- Select a category for the output column data from the Category
list.
- Select a date, time, or timestamp format from the Format
list. The Example list shows an example of the format that
you select. The Format string field confirms your
selection. You can also specify a format by typing it in the
Format string field.
- Click OK.
The Function Arguments - FormatDate window closes, and the expression is
displayed in the Expression Builder window.
[ Top of Page | Previous Page | Next Page ]