This chapter describes how to use the Data Warehouse Center to create a star schema. You can use the star schema in the DB2 OLAP Integration Server to define the multidimensional cubes necessary to support OLAP customers. A multidimensional cube is a set of data and metadata that defines a multidimensional database.
You would populate a star schema within the Data Warehouse Center with cleansed data before you use the data to build a multidimensional cube.
An OLAP model is a logical structure that describes how you plan to measure your business. The model takes the form of a star schema. A star schema is a specialized design that consists of multiple dimension tables, which describe aspects of a business, and one fact table, which contains the facts about the business. For example, if you have a mail-order business selling books, some dimension tables are customers, books, catalogs, and fiscal years. The fact table contains information about the books that are ordered from each catalog by each customer during the fiscal year. A star schema that is defined within the Data Warehouse Center is called a warehouse schema.
Table 19 describes the tasks involved in creating the warehouse
schema and loading the resulting multidimensional cube with data using the
Data Warehouse Center and the DB2 OLAP Integration Server. The table
lists a task and tells you which product or component you use to perform each
task. Each task is described in this chapter.
Table 19. Tasks to create a star schema and populate a multidimensional cube
| Task | Complete task from | |
|---|---|---|
| Data Warehouse Center | DB2 OLAP Integration Server | |
| Define warehouse targets of relational data that you will use as sources for an OLAP multidimensional cube. | X |
|
| Define the warehouse schema. | X |
|
| Export the warehouse schema to the DB2 OLAP Integration Server. The warehouse schema will be used as a model in the DB2 OLAP Integration Server. | X |
|
| Use the model (warehouse schema) to define hierarchies for the model. |
| X |
| Use the model to define a metaoutline on which your multidimensional cube will be based. |
| X |
| Create a command script that will be used to load the multidimensional cube with data. |
| X |
| Create a batch file that runs the command script. |
| X |
| Export metadata that defines the batch file to be run from the Data Warehouse Center. Objects that make it possible to schedule the loading and testing of the multidimensional cube from the Data Warehouse Center are automatically generated. |
| X |
| Schedule the step that was created by the export process so that you can populate the multidimensional cube. | X |
|
Use the Warehouse Schema Model window to generate and store warehouse schema models that are associated with a warehouse. The warehouse schema models can be easily exported as metadata to the DB2 OLAP Integration Server (as an OLAP model).
Before you define the warehouse schema you must define the warehouse target tables that you will use as source tables for your warehouse schema:
See Chapter 4, Setting up access to a warehouse for more information about defining a warehouse target.
Any warehouse user can define a table in a schema, but only warehouse users who belong to a warehouse group that has access to the warehouse target that contains the tables can change the tables. See Data Warehouse Center security for more information.
To define a warehouse schema:
The Define Warehouse Schema notebook opens.
Only those warehouse schemas that are made up of tables from one database can be exported to the DB2 OLAP Integration Server.
The new warehouse schema is added to the tree under the Warehouse Schemas folder.
After you define your warehouse schema, you can update it by opening the Warehouse Schema Modeler window.
Use the Add Data window to add warehouse target tables, source tables, or source views to the selected warehouse schema. You do not define the tables for the accounts and time dimensions until you export the warehouse schema to the DB2 OLAP Integration Server as described in Exporting a warehouse schema to the DB2 OLAP Integration Server.
To add the dimension tables and fact table to the warehouse schema:
Click >> to move all the tables to the Selected Tables list. To remove tables from the Selected Tables, click <. To remove all tables from the Selected Tables, click <<.
Use the Warehouse Schema Model window to autojoin tables. Selected tables are autojoined if the warehouse primary key and warehouse foreign key are defined and if you click Autojoin. For more information about defining keys on target tables, see Defining a warehouse target.
The primary key for each table is shown with an icon for the columns that are part of the key. Use the View menu to hide or show columns on the tables. Columns must be visible in both tables to create the link. All tables do not need to be in the same state when you select them in a group.
Use the Warehouse Schema Model window to add join relationships between non-keyed columns in tables that are displayed on the canvas. You can join any two columns (multi-column joins are not allowed).
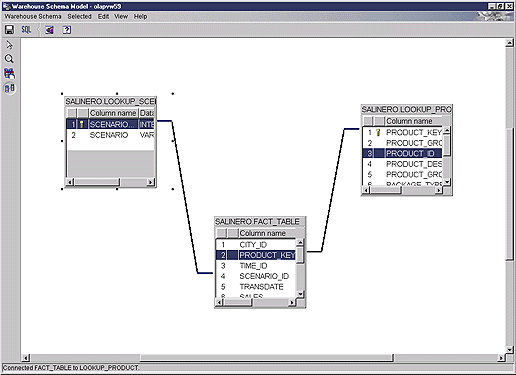
Figure 17 shows what your warehouse schema might look like after you have defined it.
Figure 17. Warehouse Schema Model window
|
Use the Export Warehouse Schema notebook to export warehouse schemas to the DB2 OLAP Integration Server (as OLAP models).
To export the warehouse schema:
The Export Warehouse Schema notebook opens.
The selected schemas move to the Selected list.
You cannot change the dimension type after the schema is stored in the DB2 OLAP Integration Server catalog.
You cannot change the dimension type after the schema is stored in the DB2 OLAP Integration Server catalog.
If you select this option, only new information from the warehouse schema is added to the existing OLAP model. Existing information is not modified. For example, the fact table remains the same and you cannot change any dimensions if you select this option. You can add new dimensions.
If you select this option, an error message is displayed and the existing model is not modified. This option is selected by default.
If you select this option, all the existing metadata about the OLAP model is deleted and replaced with the new metadata from the warehouse schema.
The notebook closes, and a progress indicator is displayed until the export is complete. When all the specified warehouse schemas are exported, the Export Information window opens, displaying success information or failure information about the export. Click OK to close this window.
You can view the log file that stores trace information about the export process. The file is located in the directory specified by the VWS_LOGGING environment variable. The default value of the VWS_LOGGING variable for Windows NT is \sqllib\logging, where x is the drive where the DB2 Universal Database is installed. The name of the log file is FLGNXHIS.LOG.
After you export the warehouse schema that you designed in the Data Warehouse Center, use the DB2 OLAP Integration Server to complete the design for your multidimensional cube.
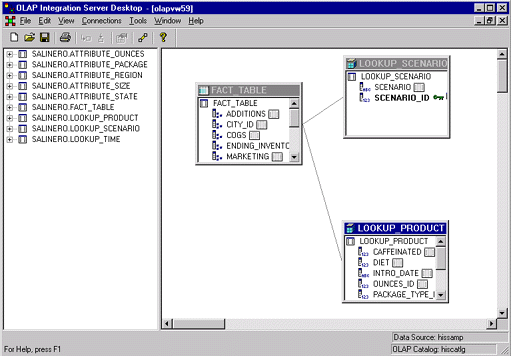
To view the warehouse schema that you exported, open the OLAP model (warehouse schema) using the warehouse schema name that you used in the Data Warehouse Center. Make sure that you specify the warehouse target that you used to define the warehouse schema as the data source for the model. Figure 18 shows what your model looks like when you open it on the DB2 OLAP Integration Server desktop. The join relationships that you defined between the fact table and dimension tables are displayed.
Figure 18. Warehouse schema displayed as an OLAP model
 |
From the DB2 OLAP Integration Server, you must complete the following tasks:
This section describes how to create an outline and associate it with a script that loads data into the multidimensional cube. After the outline is loaded with data, the resulting cube can be accessed through a spreadsheet program (such as Lotus(R) 1-2-3(R) or Microsoft Excel), so you can do analysis on the data.
See the online help for the DB2 OLAP Integration Server for detailed information on fields and controls in a window.
To create a database outline from the DB2 OLAP Integration Server desktop:
The OLAP outline is created. Next, you must create the load script.
To create the load script:
The new command script that loads the multidimensional cube with data is created in the ..\IS\Batch\ directory. The command script contains the following items:
Figure 19. OLAP command script: my_script.script
LOGIN oisserv SETSOURCE "DSN=tbc;UID=user;PWD=passwd;" SETTARGET "DSN=essserv;UID=user;PWD=passwd" SETCATALOG "DSN=TBC_MD;UID=user;PWD=passwd;" LOADALL "APP=app1;DBN=db1;OTL=TBC Metaoutline;FLT_ID=1;OTL_CLEAR=N; CALC_SCRIPT=#DEFAULT#;" STATUS |
After you create the outline and command script, you must create a batch file that invokes the script. The batch file is used as a parameter for the Data Warehouse Center step that runs the script to load the multidimensional cube.
To create the batch file, use a text editor and enter commands to invoke the script. You might create a file similar to the one in Figure 20 to run my_script.script. Do not enter the line break in this example.
Figure 20. Bat file that invokes command script: my_script.bat
C:\IS\bin\olapicmd < "C:\IS\Batch\my_script.script" > "C:\IS\Batch\my_script.log" |
The my_script.log log file shows information about the metadata that is exported to the Data Warehouse Center. It also shows if the export process was successful.
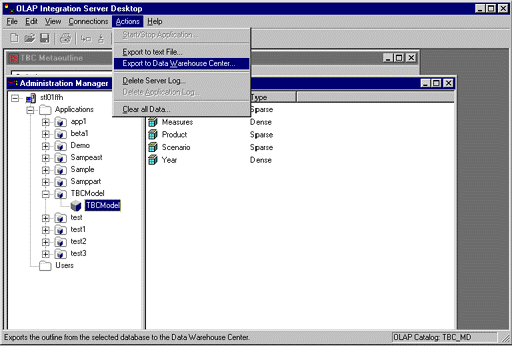
Use the DB2 OLAP Integration Server Administration Manager to export the metadata for the batch file (that loads the multidimensional cube) to the Data Warehouse Center. The export process creates objects in the Data Warehouse Center that make it possible load and test the cube.
Before you export the metadata, make certain you have already defined the tables for your warehouse schema as described in Designing the warehouse schema in the Data Warehouse Center.
To export metadata to the Data Warehouse Center, start from the DB2 OLAP Integration Server desktop:
Figure 21. Administration Manager window
 |
For example, type c:\is\batch\my_script.bat.
The metadata for the batch file is exported to the Data Warehouse Center.
See the log file for information about the metadata that is exported to the Data Warehouse Center.
See Loading the multidimensional cube from the Data Warehouse Center for information about the objects that are created in the Data Warehouse Center.
When you export metadata from the DB2 OLAP Integration Server, the following Data Warehouse Center objects are created and associated with the target tables in the warehouse schema:
servername.applicationname.databasename.outlinename
The step uses the batch file (whose metadata you exported) as a parameter. When you click the Parameters tab in the step's Properties notebook, the Parameter value column displays the fully qualified name of the batch program that calls the command script you created in the DB2 OLAP Integration Server. The value in the Parameter value column matches the batch file you specified in the Batch file to invoke OLAP Integration Server script field of the DB2 OLAP Integration Server Export to Data Warehouse Center window. For example, the Parameter value column, might show c:\is\batch\my_script.bat.
When you run the step, the batch file invokes the script to load the multidimensional cube.
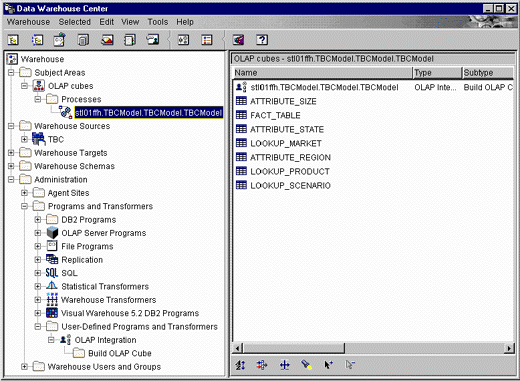
When you select the process, the tables that comprise the warehouse schema are displayed in the right pane of the Data Warehouse Center. When the step is run, the warehouse schema tables are used as source tables to build and populate the multidimensional cube. The dimension tables are used as sources for the members of the OLAP model and the fact table is the source for the measures (data in the multidimensional cube). Figure 22 shows the objects that are created displayed in the Data Warehouse Center.
Figure 22. Objects created when metadata is exported from the DB2 OLAP Integration Server
 |
See Metadata mappings between the DB2 OLAP Integration Server and the Data Warehouse Center for detailed information on how DB2 OLAP Integration Server metadata maps to Data Warehouse Center metadata.
You can schedule the step that loads the multidimensional cube, and you can promote it so that it runs on a regular basis. To schedule and promote the step:
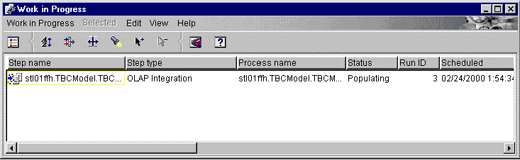
After you successfully schedule and test the step, the multidimensional cube that was built using your warehouse schema is populated. Figure 23 shows the Work in Progress window as a multidimensional cube is being populated.
Figure 23. Work in Progress window with a step that is populating a cube
 |
You can use the Publish Data Warehouse Center Metadata notebook to publish to the information catalog the metadata that describes the tables in your warehouse schema. See Publishing Data Warehouse Center metadata for more information.
A warehouse schema maps to a star schema in the Information Catalog Manager. You use a command line interface to publish DB2 OLAP Integration Server metadata to the information catalog. When you publish DB2 OLAP Integration Server metadata objects, a linked relationship is created between a "dimensions within a multi-dimensional database" object type and a table object in the information catalog. If you publish your warehouse schema to the information catalog and publish the DB2 OLAP Integration Server metadata, you will have a complete depiction of the metadata for the OLAP model. See the Information Catalog Manager Administration Guide for more information about publishing DB2 OLAP Integration Server metadata.