The Subject Area Properties notebook opens.
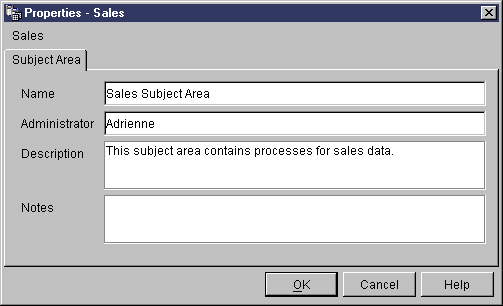
The name can be 80 characters, including spaces.
You can type up to 254 characters.
You can type up to 32,000 characters.
After you define a warehouse, you need to populate the warehouse with useful information. To do this, you need to understand what the users need, what source data is available, and how the Data Warehouse Center can transform the source data into information.
To identify and group processes that relate to a logical area of the business, you first define a subject area.
For example, if you are building a warehouse of sales and marketing data, you define a Sales subject area and a Marketing subject area. You then add the processes that relate to sales under the Sales subject area. Similarly, you add the definitions that relate to the marketing data under the Marketing subject area.
To define how data is to be moved and transformed for the data warehouse, you define a process, which contains a series of steps in the transformation and movement process, within the subject area.
Within the process, you define data transformation steps that specify how the data is to be transformed from its source format to its target format. Each step defines a transformation of data from a source format to a target format, by including the following specifications:
You must define these sources as part of a warehouse source before you can use the source tables in a step. (See Chapter 3, Setting up warehouse sources.)
You can specify that the Data Warehouse Center is to create the table in a warehouse database, according to your specifications in the step, or you can specify that the Data Warehouse Center is to update an existing table.
For example, the SQL statement can select data from multiple source tables, join the tables, and write the joined data to a target table.
For example, you might want to use the DB2 bulk load and unload utilities to transfer data to your warehouse. Or you might want to use the Clean transformer to clean your data. You can also define an external program to the Data Warehouse Center as a user-defined program.
This chapter describes how to perform these tasks.
You must define a subject area before you create a process. Any user can define or edit a subject area.
To define a subject area:
The Subject Area Properties notebook opens.

The name can be 80 characters, including spaces.
You can type up to 254 characters.
You can type up to 32,000 characters.
See Defining a process to learn how to define processes under this subject area.
You define a process object to identify a sequence of steps. The sequence might be a sequence of transformations of the data, the sequence in which the steps are to start, or both.
To define a process object:
The Define Process notebook opens.
The name can be up to 80 characters long and is case-sensitive. The first character of the name must be alphanumeric. You cannot use & as the first character in English
You can type up to 254 characters.
You can type up to 32,000 characters.
If you want to select all the warehouse groups in the Available warehouse groups list, click >>.
The warehouse groups that you select are moved to the Selected warehouse groups list.
The Define Process notebook closes. Your new process is displayed when you expand the Processes folder.
You open a process so that you can graphically define the flow of data in the process.
To open a process:
To define the flow of data, you need to add each source that the steps transform and the target tables that result from the transformation.
To add a source or target to a process:

Click the canvas at the spot that you want to place the table. The Add Data window opens.
A list of the warehouse sources or warehouse targets defined in the warehouse is displayed.
To add all the tables, views, or files for a warehouse source or warehouse target to the process, select the Tables, Views, or Files folder, and click >>.
The tables, views, and files that you selected are displayed on the Process Model window.
You need to add the steps that define how the source data is to be moved and transformed into the target data. There are four main types of steps:
An SQL step uses an SQL SELECT statement to extract data from a warehouse source and generates an INSERT statement to insert the data into the warehouse target table.
Warehouse program steps run predefined programs and utilities. There are several types of warehouse program steps:
The warehouse programs for a particular operating system are packaged with the agent for that operating system. You install the warehouse programs when you install the agent code.
The definition of each warehouse program is added during initialization. To see a list of the definitions, expand the Programs and Transformers folder in the main Data Warehouse Center window.
Transformer steps are stored procedures and user-defined functions that specify statistical or warehouse transformers that you can use to transform data. You can use transformers to clean, invert, and pivot data; generate primary keys and period tables; and calculate various statistics.
In a transformer step, you specify one of the statistical or warehouse transformers. When you run the process, the transformer step writes data to one or more warehouse targets.
There are several types of transformer steps:
In addition to the transformer steps, there is a transformer that is a user-defined function. You can use the transformer with an SQL step.
The transformers for a particular operating system are packaged with the agent for that operating system. You install the warehouse programs when you install the agent code.
Restriction: The Data Warehouse Center transformers are not supported with a DataJoiner target database.
The definition of each transformer is added during initialization. To see a list of the definitions, expand the Programs and Transformers folder in the main Data Warehouse Center window.
Before you use the transformers:
Replication steps copy designated changes in any DB2 relational databases from one location (a source) to another (a target), synchronizing the data in both locations. The source and target can be in logical servers (such as a DB2 database or a DB2 for OS/390 subsystem or data-sharing group) that are on the same machine or on different machines in a distributed network.
You can use replication steps to keep a warehouse table synchronized with an operational table without having to fully load the table each time the operational table is updated. With replication, you can use incremental updates to keep your data current.
If you require a function that is not supplied in one of these types of steps, you can write your own warehouse programs or transformers and define steps that use those programs or transformers. For information about writing your own warehouse program, see Writing your own program for use with the Data Warehouse Center.
Each group of steps (except the SQL group) has a number of step subtypes. In all cases other than the SQL group, you choose a specific step subtype to move or transform data. For example, the ANOVA transformer is a subtype of the Statistical transformer group. In the case of the SQL group, there is only one type of SQL step. You use this step to perform SQL select operations on your warehouse sources and targets.
Tables Table 7 through Table 13 list the step subtypes by program group. A program group is a logical grouping of related programs. For example, all the supplied warehouse programs that manipulate files are in the File warehouse program group. The program groups for the supplied warehouse programs and transformers correspond to the icons on the left side of the Process Model window.
Table 7 lists file warehouse programs.
Table 7. File warehouse programs
|
|
| Agent sites |
| |||||
|---|---|---|---|---|---|---|---|---|
| Name | Description | Windows NT or 2000 | AIX | Solaris Op. Env. | OS/2 | AS/400 | OS/390 | See... |
| Copy file using FTP (VWPRCPY) | Copies files on the agent site to and from a remote host. | X | X | X | X | X | X | Defining values for the Copy File using FTP (VWPRCPY) program |
| Run FTP command file (VWPFTP) | Runs any FTP command file that you specify. | X | X | X | X | X | X | Defining values for a Run FTP Command File program (VWPFTP) |
| Data export with ODBC to file (VWPEXPT2) | Selects data in a table that is contained in a database registered in ODBC, and writes the data to a delimited file. | X | X | X | X |
|
| Defining values for the Data export with ODBC to file (VWPEXPT2) warehouse program |
| Submit OS/390 JCL Jobstream (VWPMVS) | Submits a JCL jobstream to an OS/390 system for processing. | X | X | X | X |
| X | Defining values for a Submit OS/390 JCL jobstream (VWPMVS) program |
Table 8 lists DB2 warehouse programs.
Table 8. DB2 warehouse programs
|
|
| Agent sites |
| |||||
|---|---|---|---|---|---|---|---|---|
| Name | Description | Windows NT or 2000 | AIX | Solaris Op. Env. | OS/2 | AS/400 | OS/390 | See... |
| DB2 UDB load | Loads data from a delimited file into a DB2 UDB database, either replacing or appending to existing data in the database. | X | X | X | X |
|
| Defining values for a DB2 Universal Database load program |
| DB2 for AS/400 load replace (VWPLOADR) | Loads data from a delimited file into a DB2 for AS/400 database, replacing existing data in the database with new data. |
|
|
|
| X |
| Defining values for a DB2 UDB for AS/400 Data Load Replace (VWPLOADR) program |
| DB2 for AS/400 load insert (VWPLOADI) | Loads data from a delimited file into a DB2 for AS/400 table, appending new data to the existing data in the database. |
|
|
|
| X |
| Defining values for a DB2 UDB for AS/400 Data Load Insert (VWPLOADI) program |
| DB2 for OS/390 load | Loads records into one or more tables in a table space. |
|
|
|
|
| X | Defining values for a DB2 for OS/390 Load program |
| DB2 data export (VWPEXPT1) | Exports data from a local DB2 database to a delimited file. | X | X | X | X |
|
| Defining values for a DB2 UDB export (VWPEXPT1) warehouse program |
| DB2 runstats (VWPSTATS) | Runs the DB2 RUNSTATS utility on the specified table. | X | X | X | X |
| X | Defining values for a DB2 UDB RUNSTATS program |
| DB2 reorg (VWPREORG) | Runs the DB2 REORG and RUNSTATS utilities on the specified table. | X | X | X | X |
| X | Defining values for a DB2 Universal Database REORG program
Defining values for a DB2 UDB for OS/390 Reorganize Table Space program |
Table 9 lists OLAP Server(TM) warehouse programs.
Table 9. DB2 OLAP Server programs
|
|
| Agent sites |
| |||||
|---|---|---|---|---|---|---|---|---|
| Name | Description | Windows NT or 2000 | AIX | Solaris Op. Env. | OS/2 | AS/400 | OS/390 | See... |
| OLAP Server: Free text data load (ESSDATA1) | Loads data from a comma-delimited flat file into a multidimensional DB2 OLAP Server database using free-form data loading. | X | X | X |
| X |
| Defining values for the OLAP Server: Free text data load (ESSDATA1) warehouse program |
| OLAP Server: Load data from file with load rules (ESSDATA2) | Loads data from a source flat file into a multidimensional DB2 OLAP Server database using load rules. | X | X | X |
| X |
| Defining values for the OLAP Server: Load data from file with load rules (ESSDATA2) warehouse program |
| OLAP Server: Load data from SQL table with load rules (ESSDATA3) | Loads data from an SQL table into a multidimensional DB2 OLAP Server database using load rules. | X | X | X |
| X |
| Defining values for an OLAP Server: Load data from SQL table with load rules (ESSDATA3) warehouse program |
| OLAP Server: Load data from a file without using load rules (ESSDATA4) | Loads data from a flat file into a multidimensional OLAP Server database without using load rules. | X | X | X |
| X |
| Defining values for an OLAP Server: Load data from a file without using load rules (ESSDATA4) warehouse program |
| OLAP Server: Update outline from file (ESSOTL1) | Updates a DB2 OLAP Server outline from a source file using load rules. | X | X | X |
| X |
| Defining values for an OLAP Server: Update outline from file (ESSOTL1) warehouse program |
| OLAP Server: Update outline from SQL table (ESSOTL2) | Updates a DB2 OLAP Server outline from an SQL table using load rules. | X | X | X |
| X |
| Defining values for an OLAP Server: Update outline from SQL table (ESSOTL2) program |
| OLAP Server: Default calc (ESSCALC1) | Calls the default DB2 OLAP Server calculation script associated with the target database. | X | X | X |
| X |
| Defining values for the OLAP Server: Default calc (ESSCALC1) warehouse program |
| OLAP Server: Calc with calc rules (ESSCALC2) | Applies the specified calculation script to a DB2 OLAP Server database. | X | X | X |
| X |
| Defining values for the OLAP Server: Calc with calc rules (ESSCALC2) warehouse program |
Table 10 lists replication programs.
Table 10. Replication programs
|
|
| Agent sites |
| |||||
|---|---|---|---|---|---|---|---|---|
| Name | Description | Windows NT or 2000 | AIX | Solaris Op. Env. | OS/2 | AS/400 | OS/390 | See... |
| Base aggregate | Creates a target table that contains the aggregated data for a user table appended at specified intervals. | X | X | X | X |
| X | Defining a user copy, point-in-time, or base aggregate replication step |
| Change aggregate | Creates a target table that contains aggregated data based on changes recorded for a source table. | X | X | X | X |
| X | Defining a change aggregate replication step |
| Point-in-time | Creates a target table that matches the source table, with a timestamp column added. | X | X | X | X |
| X | Defining a user copy, point-in-time, or base aggregate replication step |
| Staging table | Creates a consistent-change-data table that can be used as the source for updating data to multiple target tables. | X | X | X | X |
| X | Defining a staging table replication step |
| User copy | Creates a target table that matches the source table exactly at the time of the copy. | X | X | X | X |
| X | Defining a user copy, point-in-time, or base aggregate replication step |
Because the command-line interface to some of the DB2 warehouse programs
has changed from Visual Warehouse Version 5.2, the DB2 warehouse
programs from Visual Warehouse Version 5.2 are supported
separately. Table 11 lists the Version 5.2 warehouse
programs.
Table 11. Visual Warehouse Version 5.2 warehouse programs
|
|
| Agent sites |
| |||||
|---|---|---|---|---|---|---|---|---|
| Name | Description | Windows NT or 2000 | AIX | Solaris Op. Env. | OS/2 | AS/400 | OS/390 | See... |
| DB2 load replace (VWPLOADR) | Loads data from a delimited file into a DB2 UDB database, replacing existing data in the database with new data. | X | X | X | X |
|
| Defining values for a Visual Warehouse DB2 UDB Data Load Replace (VWPLOADR) program |
| DB2 load insert (VWPLOADI) | Loads data from a delimited file into a DB2 table, appending new data to the existing data in the database. | X | X | X | X |
|
| Defining values for a Visual Warehouse DB2 UDB Data Load Insert (VWPLOADI) program |
| Load flat file into DB2 UDB EEE (AIX only) (VWPLDPR) | Loads data from a delimited file into a DB2 EEE database, replacing existing data in the database with new data. |
| X |
|
|
|
| Defining values for a Visual Warehouse 5.2 Load flat file into DB2 UDB EEE (VWPLDPR) program (AIX only) |
| DB2 data export (VWPEXPT1) | Exports data from a local DB2 database to a delimited file. | X | X | X | X |
|
| Defining values for a Visual Warehouse 5.2 DB2 UDB Data Export (VWPEXPT1) program |
| DB2 runstats (VWPSTATS) | Runs the DB2 RUNSTATS utility on the specified table. | X | X | X | X |
|
| Define values for a Visual Warehouse 5.2 DB2 UDB RUNSTATS (VWPSTATS) program |
| DB2 reorg (VWPREORG) | Runs the DB2 REORG and RUNSTATS utilities on the specified table. | X | X | X | X |
|
| Defining values for a Visual Warehouse 5.2 DB2 UDB REORG (VWPREORG) program |
For detailed information about the supplied warehouse programs, see the online help.
Table 12 lists the warehouse transformers.
Table 12. Warehouse transformers
|
|
| Agent sites |
| |||||
|---|---|---|---|---|---|---|---|---|
| Name | Description | Windows NT or 2000 | AIX | Solaris Op. Env. | OS/2 | AS/400 | OS/390 | See... |
| Clean data | Replaces data values, removes data rows, clips numeric values, performs numeric discretization, and removes white space. | X | X | X | X |
|
| Cleaning data |
| Generate key table | Generates or modifies a sequence of unique key values in an existing table. | X | X | X | X |
|
| Generating key columns |
| Generate period table | Creates a table with generated date, time, or timestamp values, and optional columns based on specified parameters, or on the date or time value, or both, for the row. | X | X | X | X |
|
| Generating period data |
| Invert data | Inverts the rows and columns of a table, making rows become columns and columns become rows. | X | X | X | X |
|
| Inverting data |
| Pivot data | Groups related data from selected columns in a source table into a single column in a target table. The data from the source table is assigned a particular data group in the output table. | X | X | X | X |
|
| Pivoting data |
Table 13 lists the statistical transformers.
Table 13. Statistical transformers
|
|
| Agent sites |
| |||||
|---|---|---|---|---|---|---|---|---|
| Name | Description | Windows NT or 2000 | AIX | Solaris Op. Env. | OS/2 | AS/400 | OS/390 | See... |
| ANOVA | Computes one-way, two-way, and three-way analysis of variance; estimates variability between and within groups and calculates the ratio of the estimates; and calculates the p-value. | X | X | X | X |
|
| ANOVA transformer |
| Calculate statistics | Calculates count, sum, average, variance, standard deviation, standard error, minimum, maximum, range, and coefficient of variation on data columns from a single table. | X | X | X | X |
|
| Calculate Statistics transformer |
| Calculate subtotals | Uses a table with a primary key to calculate the running subtotal for numeric values grouped by a period of time, either weekly, semimonthly, monthly, quarterly, or annually. | X | X | X | X |
|
| Calculate Subtotals transformer |
| Chi-square | Performs the chi-square and chi-square goodness-of-fit tests to determine the relationship between values of two variables, and whether the distribution of values meets expectations. | X | X | X | X |
|
| Chi-square transformer |
| Correlation | Computes the association between changes in two attributes by calculating correlation coefficient r, covariance, T-value, and P-value on any number of input column pairs. | X | X | X | X |
|
| Correlation transformer |
| Moving average | Calculates a simple moving average, an exponential moving average, or a rolling sum, redistributing events to remove noise, random occurrences, and large peaks or valleys from the data. | X | X | X | X |
|
| Moving Average transformer |
| Regression | Shows the relationships between two different variables and shows how closely the variables are correlated by performing a backward, full-model regression. | X | X | X | X |
|
| Regression transformer |
Table 14 lists the transformer that is a user-defined
function.
Table 14. User-defined function transformer
|
|
| Agent sites |
| |||||
|---|---|---|---|---|---|---|---|---|
| Name | Description | Windows NT or 2000 | AIX | Solaris Op. Env. | OS/2 | AS/400 | OS/390 | See... |
| Format date and time | Changes the format in a source table date field. | X | X | X | X |
|
| Changing the format of a date field |
The rest of this chapter provides general information about using steps. Subsequent chapters provide more detail about defining and using each step subtype.
Before you define values for your step, you can use data links to connect your step to applicable warehouse sources and targets. In some cases, the Data Warehouse Center can generate a target table for you. You link a step to sources and targets to define the flow of data from the sources, through transformation by a step, to the targets.
To set up a step to work with a data source, use the Process Model window:
You can link the steps to its sources and targets.
To link a step:


The Data Warehouse Center draws a line between the source and the step.
The line indicates that the source contains the source data for the step.
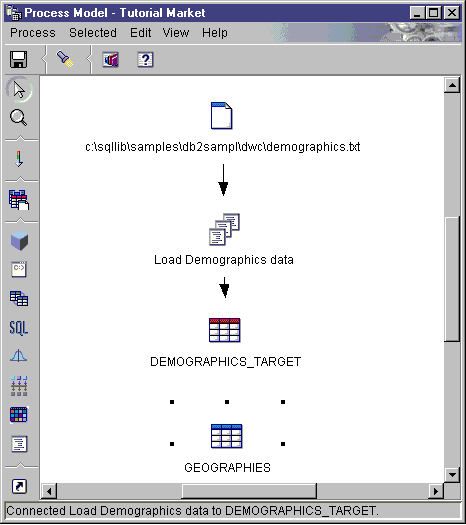
The line indicates that the target table will contain the target data for the step.
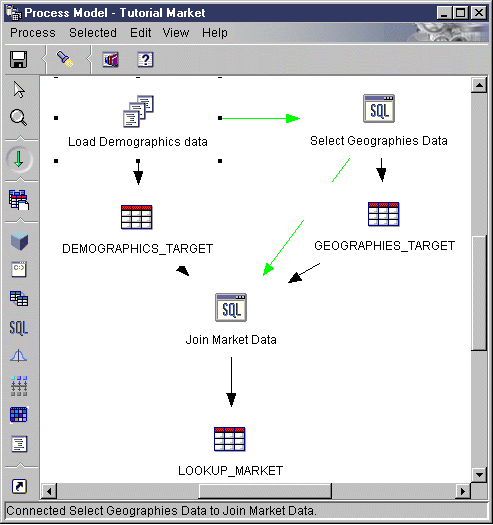
In the following example, there are two original sources. The
demographics.txt file contains demographics data about certain
cities. The GEOGRAPHIES table contains information about which products
sold in which regions. The Load Demographics Data step loads the
demographics data into the DEMOGRAPHICS_TARGET target table. The Select
Geographies Data step selects the GEOGRAPHIES data and writes it to the
GEOGRAPHIES_TARGET target table. The Join Market Data step joins the
data in the two target tables, and writes the data to the LOOKUP_MARKET target
table. You can use the resulting data to analyze sales by
population.
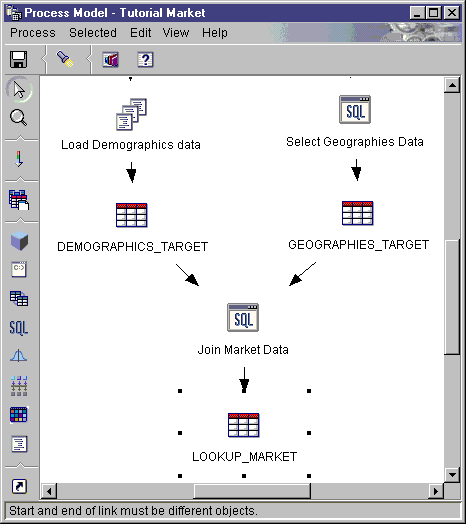
For more information about the previous example, including the procedure for defining the sources, steps, and targets, see the Business Intelligence Tutorial.
The following sections tell you how to define the values for your step. They also provide basic information about the step, including the types of data sources that the step subtypes work with. For example, some step subtypes work only with warehouse target tables, while others work only with warehouse source or target files.
To define the values for your step, you first must open the step. Right-click the step, and click Properties.
Each step subtype notebook consists of four pages:
The first page of a step subtype notebook is named after the step type. For example, the first page of the ANOVA transformer is called Statistical Transformer. All fields on the first page of a step subtype notebook are the same for all step subtypes.
To define values for the first page of a step subtype notebook:
See the step subtype descriptions that follow for information about defining parameter values for a step subtype.
When you use the Data Warehouse Center, it is easy to manipulate the data. You decide which rows and columns (or fields) in the source database that you will use in your warehouse database. Then, you define those rows and columns in your step.
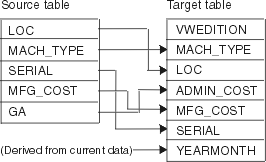
For example, you want to create some steps that are related to manufacturing data. Each manufacturing site maintains a relational database that describes the products that are manufactured at that site. You create one step for each of the four sites. Figure 13 shows the initial mapping between a source table and a warehouse table.
Figure 13. A mapping of source data to a warehouse table
 |
Only certain steps use column mapping. If the column mapping page is blank after you define parameter values for your step, and these values result in more than one column, your step does not use column mapping. Providing column mapping information is optional.
On the Column Mapping page, map the output columns that result from the transformations that you defined on the Parameters page to columns on your target table. On this page, output columns from the Parameters page are referred to as source columns. Source columns are listed on the left side of the page. Target columns from the output table linked to the step are listed on the right side of the page. Use the Column Mapping page to perform the following tasks:
To create a mapping, click a source column and drag it to a target column. An arrow is drawn between the source column and the target column.
To delete a mapping, right-click an arrow, and click Remove.
To rename a target column, double-click the column name and type the new name. You can also change any other attributes of the target column by double-clicking the attribute.
For certain step subtypes, the actions that you can perform on this page are limited. For other step subtypes, the column outputs from the Parameters page may follow certain rules. This information is described, where applicable, in the step subtype descriptions that follow.
This section describes the values that you need to define for the Processing Options fields and controls that are common to all notebooks.
To provide values for processing options:
| Population type | Description |
|---|---|
| Normal | Appends data for a set number of editions, then replaces data one set at time thereafter. For example, your step appends data once a month for 12 months. On the 13th month, the step replaces the data that was written in the first month with the data that results from the run on the 13th month. |
| Append | Appends data. |
| Replace | Replaces data. |
| Program controlled | Population is managed by the program. |
| Drop | Table is dropped, recreated, and populated. |
| Replication | Population is managed by replication. |
The Data Warehouse Center retries the step when one of the following problems occurs:
The Data Warehouse Center also retries data extracts when one of the following return codes is returned:
The Data Warehouse Center lets you manage the development of your steps by classifying steps in one of three modes: development, test, or production. The mode determines whether you can make changes to the step and whether the Data Warehouse Center will run the step according to its schedule.
When you first create a step, it is in development mode. You can change any of the step properties in this mode. The Data Warehouse Center has not created a table for the step in the target warehouse. You cannot run the step to test it, and the Data Warehouse Center will not run the step according to its automated schedule.
You run steps to populate their targets with data. You can then verify whether the results were as you expected them to be.
Before you run the steps, you must promote them to test mode.
In the step properties, you can specify that the Data Warehouse Center is to create a target table for the step. When you promote the step to test mode, the Data Warehouse Center creates the target table. Therefore, after you promote a step to test mode, you can make only those changes that are not destructive to the target table. For example, you can add columns to a target table when its associated step is in test mode, but you cannot remove columns from the target table.
After you promote the steps to test mode, you run each step individually. The Data Warehouse Center will not run the step according to its automated schedule.
To promote a step:
A confirmation window asks whether you want to save the process. Click Yes.
The Data Warehouse Center starts to create the target table, and opens a progress window.
To verify that the target table was created:
A list of tables is displayed in the Contents pane of the window.
To test a step:
The step begins to run. The Data Warehouse Center issues the SQL statements for the step, or starts the warehouse program or transformer. A confirmation window opens after the step stops running.
The Work in Progress window opens.
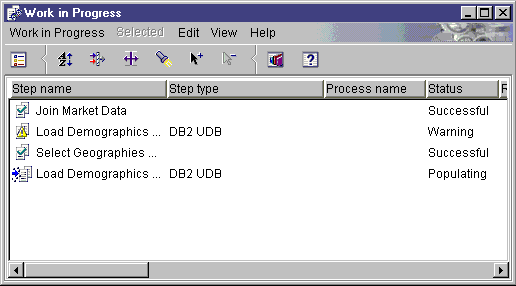
You use the Work in Progress window to monitor the progress of all steps in the Data Warehouse Center that are running or scheduled. You should see an entry for the step that is running. While the step is running, it has a status of Populating. The processing should complete successfully. However, if the processing fails:
For more information about the Work in Progress window, see "Work in Progress--Overview" in the online help.
The Log Viewer window opens.
The Log Viewer Details window opens.
If the Error RC1 field has a value of 8410, then the program failed during processing. Look up the value of the Error RC2 field, which is the value returned from the program, in the Return Codes section of the online help for the program.
Transformer error messages are different than other messages in the Data Warehouse Center:
Recommendation: Periodically clean up the output log tables so that they will not contain obsolete log data.
The value of VWS_LOGGING is the default value of the Trace Log Directory field in the Configuration notebook. If you change the value of the Trace Log Directory field, the Data Warehouse Center writes the log files to the new directory you specified, but the value of VWS_LOGGING does not change.
Look in the trcppp.log file first. For some errors, this document indicates additional log files to use for problem determination.
One common problem is caused by running Windows NT warehouse agents as a system process rather than a user process. When the warehouse agent runs as a system process, it is not authorized to connect to network drives or products because the process does not have a user ID. Symptoms of this problem include the warehouse agent being unable to find the warehouse program (Error RC2 = 128 or Error RC2 = 1 in the Log Viewer Details window) or being unable to initialize the program.
If the warehouse agent runs as a user process, the warehouse agent has the characteristics of the user, including the ability to access network drives or programs to which the user is authorized.
To avoid these problems, perform the following steps:
The user ID must have administration authority in Windows NT and authorization to any required network drive.
To verify the results of the step's processing:
The Data Warehouse Center displays a subset of the data in the table.
You can also view a sample of the data from the DB2 Control Center. Right-click the target table and click Sample Contents.
To schedule data movement and transformation, you can use the Data Warehouse Center scheduling capabilities, or you can use the Data Warehouse Center with another product that provides scheduling functions.
In the Data Warehouse Center, there are two ways that you can start a step. You can specify that a step is to start after another step has run. Or you can schedule the step to start at a specified date and time. You can combine these methods to run the steps in a process. You can schedule the first step to run at a specified date and time. Then, you can specify that another step is to start after the first step has run, and specify that a third step is to start after the second step has run, and so forth.
If a step uses data that is transformed by another step, you can schedule the step to start after the other step finishes processing.
To specify that steps are to run in sequence:

For more information, see "Scheduling a step" in the online help.
An arrow that represents the task flow is displayed on the canvas between the two steps.
The steps will now run in the order that you specified.
For example, in the following figure, the Load Demographics Data step runs
first. When it finishes running, the Select Geographies data step
runs. When the Select Geographies Data step finishes running, the Join
Market Data step runs.
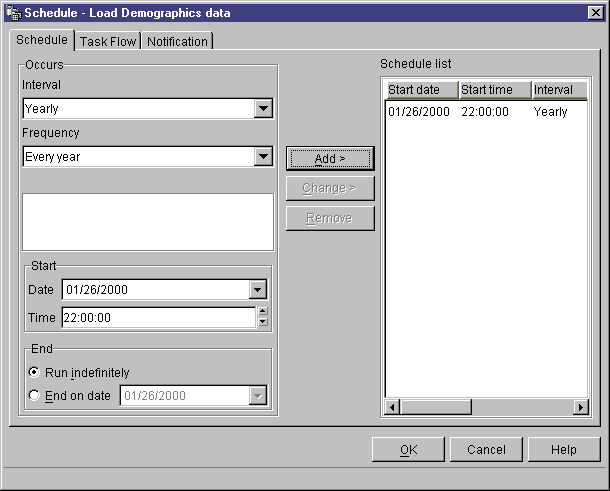
You can schedule a step to start at a specified date and time. When you schedule a step, you can specify one or more dates and times on which the step is to run. You can also specify that the step is to run once or at a specified interval, such as every Saturday.
To schedule a step to start at a specified date and time:
The Schedule notebook opens.
The default selection is Weekly.
The default selection is Every Friday.
The default selection is the current date, at 10:00 in the evening.
The default selection is that the schedule is to run indefinitely.
The schedule is added to the Schedule list.
The specified schedule is created.
In the following example, the Load Demographics Data step is to run once a
year, starting on January 26, 2000. The schedule is to run
indefinitely.
When you define a step, you specify how it is to be populated. You can define a step as externally populated, which means that the Data Warehouse Center create the target table, but another program will populate it. The other program is scheduled and runs outside of the Data Warehouse Center.
For example, you define your step as externally populated. You can then use the scheduling capabilities of DPropR to populate the target table.
To activate the schedule and the task flow links that you created, you must promote the steps to production mode. Production mode indicates that the steps are in their final format. In production mode, you can change only the settings that will not affect the data produced by the step. You can change schedules, processing options (except population type), or descriptive data about the step. You cannot change the step's parameters.
To promote a step to production mode:
The Data Warehouse Center opens a progress window.
You can start a step independently of the Data Warehouse Center administrative interface by using an external trigger program. An external trigger program is a warehouse program that calls the Data Warehouse Center.
You cannot run a process from the external trigger program.
The external trigger program consists of two components: XTServer and XTClient. XTServer is installed with the warehouse server. XTClient is installed with the warehouse agent for all agent types.
To use the external trigger program, you must have JDK 1.1.7 or later installed on the warehouse server workstation and the agent site.
You must start the external trigger server before you issue commands to the external trigger client.
The syntax for starting the external trigger client is as follows:
XTServer

>>-java--XTServer--TriggerClientPort---------------------------><
This value is usually 11004.
The syntax for starting the external trigger client is as follows:
XTClient

>>-java--XTClient--ServerHostName--ServerPort--DWCUserID--DWCUserPassword-->

>----StepName--Command--+------------------------+---+-----------+->
                        '-WaitForStepCompletion--'   '-RowLimit--'

>--------------------------------------------------------------><
Specify a fully qualified host name.
This value is usually 11004.
The name is case-sensitive. Enclose the name in double quotation marks ("") if it includes blanks, such as "Corporate Profit".
The user ID under which you run the external trigger program must be in the same warehouse group as the process that contains the step.
The user ID under which you run the external trigger program must be in the same warehouse group as the process that contains the step.
The user ID under which you run the external trigger program must be in the same warehouse group as the process that contains the step.
The user ID under which you run the external trigger program must be in the same warehouse group as the process that contains the step.
The user ID under which you run the external trigger program must be in the same warehouse group as the process that contains the step.
This parameter is valid only when the step is in test mode.
For example, you want to start the Corporate Profit step using a user ID of db2admin and a password of db2admin. The external trigger program is on the dwserver host. You issue the following command:
java XTClient dwserver 11004 db2admin db2admin "Corporate Profit" 1
When you run the external trigger program, it sends a message to the warehouse server. If the message is sent successfully, the external trigger program returns a zero return code.
If you specified a value of 1 for the WaitForStepCompletion parameter, then the external trigger program will wait until the step finishes running and then will return the return code from that run.
The external trigger program returns a nonzero return code if it could not send the message to the warehouse server. The return codes match the corresponding codes that are issued by the Data Warehouse Center function when there is a communications error or when authentication fails. For information about the Data Warehouse Center operations codes, see DB2 Universal Database Messages and Reason Codes.