Data Warehouse Center Administration Guide
Before you can create steps that access your data sources, you must perform
the following tasks:
- Determine which data sources you will use in your warehouse.
- Set up connectivity between the sources and the warehouse agent that you
have decided to use.
- Define the sources to the Data Warehouse Center as warehouse
sources.
This chapter describes the types of data sources with which the Data
Warehouse Center works and tells you how to set up access to them.
The Data Warehouse Center supports a wide variety of relational and
nonrelational data sources. You can populate your Data Warehouse Center
warehouse with data from the following databases and files:
For information about the versions and releases of these products, and the
products' prerequisites, see the DB2 Warehouse Manager Installation
Guide.
You can also access other databases and files, such as workstation-based
spreadsheets and Lotus Notes databases, using the Data Warehouse Center
generic ODBC driver.
The Data Warehouse Center also includes several Merant ODBC drivers that
you can use to access non-IBM data. For information about installing
these drivers, see DB2 Universal Database Quick Beginnings for your operating system.
Certain warehouse agents support certain sources. Table 1 summarizes which warehouse agents support which
sources.
Table 1. Warehouse agent support for sources
| Data Source
| Windows NT or Windows 2000 agent
| AIX agent
| Solaris Operating Environment agent
| IBM Operating System/2 (OS/2) agent
| AS/400
| OS/390
|
| DB2 family
| X
| X
| X
| X
| X
| X
|
| DataJoiner
| X
| X
|
|
|
|
|
| Oracle
| X
| X
| X
| X
|
|
|
| Sybase
| X
| X
| X
| X
|
|
|
| Microsoft SQL Server
| X
| X
| X
|
|
|
|
| Informix
| X
| X
| X
|
|
|
|
| Generic ODBC driver
| X
| X
| X
| X
|
|
|
| Local file
| X
| X
| X
| X
|
|
|
| Remote file
| X
| X
| X
| X
|
|
|
| IMS
| X
| X
| X1
| X1
|
|
|
| VSAM
| X
| X
| X1
| X1
|
|
|
- To access IMS or VSAM data when DataJoiner is on a remote workstation,
catalog the node on which DataJoiner resides and catalog the DataJoiner
database on the agent site.
|
Table 2 lists the supported data sources on Windows NT or Windows
2000 and explains what you need to do to connect to those sources.
Table 2. Connectivity requirements for supported data sources on Windows NT or Windows 2000
| Source database or file:
| Prerequisite products for Windows NT or Windows 2000:
| How to connect:
|
| DB2 Universal Database databases
|
- Database access program:
- None
- Source / agent connection:
- ODBC
- Client enabler program:
- DB2 Universal Database Version 7 server or a DB2 client
|
- Install the DB2 server or a DB2 client on the agent site.
- Catalog the remote database.
- Identify the user ID and password with access to the source
database.
- Bind database utilities and ODBC(CLI) to the database.
|
| DB2 DRDA databases
|
- Database access program:
- None
- Source / agent connection:
- ODBC
- Client enabler program:
- DB2 Connect
|
- Install DB2 Connect on the gateway site.
- Catalog the node of the gateway site on the agent site.
- Catalog the DB2 Connect database on the agent site.
- Identify the user ID and password with access to the source
database.
|
| IMS (OS/390)
|
- Database access program:
- One of the following programs:
- The CROSS ACCESS ODBC driver and DataJoiner Classic Connect
- DataJoiner and DataJoiner Classic Connect
- Source / agent connection:
- If you are using the CROSS ACCESS ODBC driver, ODBC
If you are using DataJoiner, TCP/IP or APPC
- Client enabler program:
- None
|
If you are using the CROSS ACCESS ODBC driver
- Establish a link from the agent site to the host.
- Install and configure the data server on the host.
- Install and configure the CROSS ACCESS ODBC driver on the agent
site.
- Identify the user ID and password with access to the source
database.
If you are using DataJoiner, do the following procedure from the DataJoiner
workstation:
- Establish a link from the workstation to the host.
- Install and configure the adapter on the host.
- Identify the user ID and password with access to the source
database.
From the agent site:
- Catalog the node on which DataJoiner resides.
- Catalog the DataJoiner database.
|
| VSAM (OS/390)
|
- Database access program:
- One of the following programs:
- The CROSS ACCESS ODBC driver and DataJoiner Classic Connect
- DataJoiner and DataJoiner Classic Connect
- Source / agent connection:
- If you are using the CROSS ACCESS ODBC driver, ODBC
If you are using DataJoiner, TCP/IP or APPC
- Client enabler program:
- None
|
If you are using the CROSS ACCESS ODBC driver
- Establish a link from the agent site to the host.
- Install and configure the data server on the host.
- Install and configure the CROSS ACCESS ODBC driver on the agent
site.
- Identify the user ID and password with access to the source
database.
If you are using DataJoiner, do the following procedure from the DataJoiner
workstation:
- Establish a link from the workstation to the host.
- Install and configure the adapter on the host.
- Identify the user ID and password with access to the source
database.
From the agent site:
- Catalog the node on which DataJoiner resides.
- Catalog the DataJoiner database.
|
| OS/390 file
|
- Database access program:
- FTP or NFS
- Source / agent connection:
- TCP/IP (FTP or NFS)
- Client enabler program:
- None
|
Establish a link from the agent site to the host.
For more information about accessing files using NFS, see Accessing files with NFS.
For more information about accessing files using FTP, see Accessing files with FTP.
|
| VM file
|
- Database access program:
- FTP or NFS
- Source / agent connection:
- TCP/IP (FTP or NFS)
- Client enabler program:
- None
|
Establish a link from the agent site to the host.
For more information about accessing files using NFS, see Accessing files with NFS.
For more information about accessing files using FTP, see Accessing files with FTP.
|
| Sybase
|
- Database access program:
- None
- Source / agent connection:
- ODBC
- Client enabler program:
- For Intel(R) systems, Sybase Open Client Library Version 10.03
(or later) and the appropriate Sybase Net-Library
For Alpha systems, Sybase Open Client Library Version 11.01 (or
later) and the appropriate Sybase Net-Library
|
- Install the Open Client on the agent site.
- Catalog the remote database according to the client enabler
instructions.
- Identify the user ID and password with access to the source
database.
|
| Oracle
|
- Database access program:
- None
- Source / agent connection:
- ODBC
- Client enabler program:
- Oracle SQL*Net V2
|
- Install SQL*NET on the agent site.
- Catalog the remote database according to client enabler
instructions.
- Identify the user ID and password with access to the source
database.
|
| Informix
|
- Database access program:
- None
- Source / agent connection:
- ODBC
- Client enabler program:
- For Informix 5, 6, and 7.x, i-connect 7.2
For Informix 7.x and 9.x, i-connect 9.x
|
- Install i-connect on the agent site.
- Catalog the remote database according to the client enabler
instructions.
- Identify the user ID and password with access to the source
database.
|
| Microsoft SQL Server
|
- Database access program:
- None
- Source / agent connection:
- ODBC
- Client enabler program:
- For access to a Version 6.0 DBMS, Microsoft SQL Server DB-Library
and Net-Library Version 6.0
For access to a Version 7.0 DBMS, Microsoft SQL Server DB-Library
and Net-Library Version 7.0
|
- Install the Microsoft SQL Server DB-Library and Net-Library on the agent
site.
- Catalog the remote database according to client enabler
instructions.
- Identify the user ID and password with access to the source
database.
|
| Local file
|
- Database access program:
- None
- Source / agent connection:
- TCP/IP
- Client enabler program:
- None
| If required, supply a pre-access command, a post-access command, or
both.
|
| Remote file
|
- Database access program:
- None
- Source / agent connection:
- TCP/IP
- Client enabler program:
- None
|
- Obtain the FTP server or mount string.
- Identify the user ID and password with access to the source
files.
For more information about accessing files using NFS, see Accessing files with NFS.
For more information about accessing files using FTP, see Accessing files with FTP.
|
Microsoft Access
|
- Database access program:
- None
- Source / agent connection:
- ODBC
- Client enabler program:
- None
|
- Use the generic ODBC connect string.
- See the Microsoft Access help topics for a mapping of the ANSI SQL data
types supported by Microsoft Access.
For detailed instructions about creating a warehouse that uses Microsoft
Access as a source database, see Microsoft Access.
|
Microsoft Excel
|
- Database access program:
- None
- Source / agent connection:
- ODBC
- Client enabler program:
- None
|
- Use the generic ODBC connect string.
- See the Microsoft Excel help topics for a mapping of the ANSI SQL data
types supported by Microsoft Excel.
For detailed instructions about creating a warehouse that uses Microsoft
Excel as a source database, see Microsoft Excel.
|
Table 3 lists the supported data sources on AIX and explains what
you need to do to connect to those sources.
There are two versions of the AIX warehouse agent: one for ODBC
access and one for CLI access. The non-DB2 databases listed in the
following table require that you install the ODBC version of the warehouse
agent.
To verify which version of the warehouse agent that you have installed,
type the following command:
ls -l /usr/bin/IWH2AGNT
If the command returns db2cli, you are using the DB2 CLI
version. If the command returns ivodbc, you are using the
ODBC version.
For more information about installing and configuring the warehouse agent,
see the DB2 Warehouse Manager Installation Guide.
Table 3. Connectivity requirements for supported data sources on AIX
| Source database or file:
| Prerequisite products for AIX:
| How to connect:
|
| DB2 Universal Database databases
|
- Database access program:
- None
- Source / agent connection:
- ODBC
- Client enabler program:
- DB2 UDB Version 7 server or a DB2 client
|
- Install the DB2 server or a DB2 client on the agent site.
- Catalog the remote database.
- Identify the user ID and password with access to the source
database.
- Bind database utilities and ODBC(CLI) to the database.
|
| DB2 DRDA databases
|
- Database access program:
- None
- Source / agent connection:
- ODBC
- Client enabler program:
- DB2 Connect
|
- Install DB2 Connect on the gateway site.
- Catalog the node of the gateway site on the agent site.
- Catalog the DB2 Connect database on the agent site.
- Identify the user ID and password with access to the source
database.
|
| IMS (OS/390)
|
- Database access program:
- DataJoiner and DataJoiner Classic Connect
- Source / agent connection:
- TCP/IP or APPC
- Client enabler program:
- None
|
From the DataJoiner workstation:
- Establish a link from the workstation to the host.
- Install and configure the adapter on the host.
- Identify the user ID and password with access to the source
database.
From the agent site:
- Catalog the node on which DataJoiner resides.
- Catalog the DataJoiner database.
|
| VSAM (OS/390)
|
- Database access program:
- DataJoiner and DataJoiner Classic Connect
- Source / agent connection:
- TCP/IP or APPC
- Client enabler program:
- None
|
From the DataJoiner workstation:
- Establish a link from the workstation to the host.
- Install and configure the adapter on the host.
- Identify the user ID and password with access to the source
database.
From the agent site:
- Catalog the node on which DataJoiner resides.
- Catalog the DataJoiner database.
|
| OS/390 file
|
- Database access program:
- FTP or NFS
- Source / agent connection:
- TCP/IP (FTP or NFS)
- Client enabler program:
- None
|
Establish a link from the agent site to the host.
For more information about accessing files using NFS, see Accessing files with NFS.
For more information about accessing files using FTP, see Accessing files with FTP.
|
| VM file
|
- Database access program:
- FTP or NFS
- Source / agent connection:
- TCP/IP (FTP or NFS)
- Client enabler program:
- None
|
Establish a link from the agent site to the host.
For more information about accessing files using NFS, see Accessing files with NFS.
For more information about accessing files using FTP, see Accessing files with FTP.
|
| Sybase
|
- Database access program:
- None
- Source / agent connection:
- ODBC
- Client enabler program:
- Intersolv Version 3.6 Driver Manager and Sybase driver
|
- Install the version of the AIX warehouse agent with ODBC access.
- Identify the user ID and password with access to the source
database.
|
| Oracle
|
- Database access program:
- None
- Source / agent connection:
- ODBC
- Client enabler program:
- Intersolv Version 3.6 Driver Manager and Oracle driver
|
- Install the version of the AIX warehouse agent with ODBC access.
- Identify the user ID and password with access to the source
database.
|
| Informix
|
- Database access program:
- None
- Source / agent connection:
- ODBC
- Client enabler program:
- Intersolv Version 3.6 Driver Manager and Informix driver
|
- Install the version of the AIX warehouse agent with ODBC access.
- Identify the user ID and password with access to the source
database.
|
| Microsoft SQL Server
|
- Database access program:
- None
- Source / agent connection:
- ODBC
- Client enabler program:
- Data Warehouse Center ODBC driver manager1
|
- Install the version of the AIX warehouse agent with ODBC access.
- Identify the user ID and password with access to the source
database.
|
| Local file
|
- Database access program:
- None
- Source / agent connection:
- TCP/IP
- Client enabler program:
- None
| If required, supply a pre-access command, a post-access command, or
both.
|
| Remote file
|
- Database access program:
- None
- Source / agent connection:
- TCP/IP
- Client enabler program:
- None
|
- Obtain the FTP server or mount string.
- Identify the user ID and password with access to the source
files.
For more information about accessing files using NFS, see Accessing files with NFS.
For more information about accessing files using FTP, see Accessing files with FTP.
|
| Notes:
1 The Data Warehouse Center ODBC drivers and driver manager are
the DataDirect Connect ODBC drivers and driver manager provided by
Merant.
|
Table 4 lists the supported data sources on the Solaris Operating
Environment and explains what you need to do to connect to those
sources.
There are two versions of the Solaris Operating Environment warehouse
agent: one for ODBC access and one for CLI access. The non-DB2
databases listed in the following table require that you install the ODBC
version of the warehouse agent.
To verify which version of the warehouse agent that you have installed,
type the following command:
ls -l /usr/bin/IWH2AGNT
If the command returns db2cli, you are using the DB2 CLI
version. If the command returns ivodbc, you are using the
ODBC version.
For more information about installing and configuring the warehouse agent,
see the DB2 Warehouse Manager Installation Guide.
Table 4. Connectivity requirements for supported data sources on the Solaris Operating Environment
| Source database or file:
| Prerequisite products for the Solaris Operating
Environment:
| How to connect:
|
| DB2 Universal Database
|
- Database access program:
- None
- Source / agent connection:
- ODBC
- Client enabler program:
- DB2 UDB Version 7 server or a DB2 client
|
- Install the DB2 server or a DB2 client on the agent site.
- Catalog the remote database.
- Identify the user ID and password with access to the source
database.
- Bind database utilities and ODBC(CLI) to the database.
|
| DB2 DRDA databases
|
- Database access program:
- None
- Source / agent connection:
- ODBC
- Client enabler program:
- DB2 Connect
|
- Install DB2 Connect on the gateway site.
- Catalog the node of the gateway site on the agent site.
- Catalog the DB2 Connect database on the agent site.
- Identify the user ID and password with access to the source
database.
|
| IMS (OS/390)
|
- Database access program:
- DataJoiner and DataJoiner Classic Connect
- Source / agent connection:
- ODBC (to DataJoiner database)
- Client enabler program:
- None
|
From the DataJoiner workstation:
- Establish a link from the workstation to the host.
- Install and configure the adapter on the host.
- Identify the user ID and password with access to the source
database.
From the agent site:
- Catalog the node on which DataJoiner resides.
- Catalog the DataJoiner database.
|
| VSAM (OS/390)
|
- Database access program:
- DataJoiner and DataJoiner Classic Connect
- Source / agent connection:
- ODBC (to DataJoiner database)
- Client enabler program:
- None
|
From the agent site:
- Catalog the node on which DataJoiner resides.
- Catalog the DataJoiner database.
|
| OS/390 file
|
- Database access program:
- FTP or NFS
- Source / agent connection:
- TCP/IP (FTP or NFS)
- Client enabler program:
- None
|
Establish a link from the agent site to the host.
For more information about accessing files using NFS, see Accessing files with NFS.
For more information about accessing files using FTP, see Accessing files with FTP.
|
| VM file
|
- Database access program:
- FTP or NFS
- Source / agent connection:
- TCP/IP (FTP or NFS)
- Client enabler program:
- None
|
Establish a link from the agent site to the host.
For more information about accessing files using NFS, see Accessing files with NFS.
For more information about accessing files using FTP, see Accessing files with FTP.
|
| Sybase
|
- Database access program:
- None
- Source / agent connection:
- ODBC
- Client enabler program:
- For Sybase 11, Intersolv Version 3.6 Driver Manager and Sybase
driver
|
- Install the version of the Solaris Operating Environment warehouse agent
with ODBC access.
- Identify the user ID and password with access to the source
database.
|
| Oracle
|
- Database access program:
- None
- Source / agent connection:
- ODBC
- Client enabler program:
- For Oracle Version 7.3.2, Intersolv Version 3.6
Driver Manager and Oracle driver
|
- Install the version of the Solaris Operating Environment warehouse agent
with ODBC access.
- Identify the user ID and password with access to the source
database.
|
| Informix
|
- Database access program:
- None
- Source / agent connection:
- ODBC
- Client enabler program:
- Intersolv Version 3.6 Driver Manager and Informix driver
|
- Install the version of the Solaris Operating Environment warehouse agent
with ODBC access.
- Identify the user ID and password with access to the source
database.
|
| Microsoft SQL Server
|
- Database access program:
- None
- Source / agent connection:
- ODBC
- Client enabler program:
- Data Warehouse Center ODBC Driver Manager1
|
- Install the version of the AIX warehouse agent with ODBC access.
- Identify the user ID and password with access to the source
database.
|
| Local file
|
- Database access program:
- None
- Source / agent connection:
- TCP/IP
- Client enabler program:
- None
| If required, supply a pre-access command, a post-access command, or
both.
|
| Remote file
|
- Database access program:
- None
- Source / agent connection:
- TCP/IP
- Client enabler program:
- None
|
- Obtain the FTP server or mount string.
- Identify the user ID and password with access to the source
files.
For more information about accessing files using NFS, see Accessing files with NFS.
For more information about accessing files using FTP, see Accessing files with FTP.
|
| Notes:
1 The Data Warehouse Center ODBC drivers and driver manager are
the DataDirect Connect ODBC drivers and driver manager provided by
Merant.
|
Table 5 lists the supported data sources on OS/2 and explains what
you need to do to connect to those sources.
Table 5. Connectivity requirements for supported data sources on OS/2
| Source database or file:
| Prerequisite products for OS/2:
| How to connect:
|
| DB2 Universal Database databases
|
- Database access program:
- None
- Source / agent connection:
- ODBC
- Client enabler program:
- DB2 UDB Version 7 server or a DB2 client
|
- Install the DB2 server or a DB2 client on the agent site.
- Catalog the remote database.
- Identify the user ID and password with access to the source
database.
- Bind database utilities and ODBC(CLI) to the database.
|
| DB2 DRDA databases
|
- Database access program:
- None
- Source / agent connection:
- ODBC
- Client enabler program:
- DB2 Connect
|
- Install DB2 Connect on the gateway site.
- Catalog the node of the gateway site on the agent site.
- Catalog the DB2 Connect database on the agent site.
- Identify the user ID and password with access to the source
database.
|
| LAN BLOB file
|
- Database access program:
- None
- Source / agent connection:
- TCP/IP
- Client enabler program:
- None
|
- Obtain the FTP server or mount string.
- Identify the user ID and password with access to the source
files.
For more information about accessing files using NFS, see Accessing files with NFS.
For more information about accessing files using FTP, see Accessing files with FTP.
|
| IMS (OS/390)
|
- Database access program:
- DataJoiner and DataJoiner Classic Connect
- Source / agent connection:
- ODBC (to DataJoiner database
- Client enabler program:
- None
|
If you are using DataJoiner, do the following procedure from the agent
site:
- Catalog the node on which DataJoiner resides.
- Catalog the DataJoiner database.
|
| VSAM (OS/390)
|
- Database access program:
- DataJoiner and DataJoiner Classic Connect
- Source / agent connection:
- ODBC (to DataJoiner database
- Client enabler program:
- None
|
From the agent site:
- Catalog the node on which DataJoiner resides.
- Catalog the DataJoiner database.
|
| OS/390 file
|
- Database access program:
- FTP or NFS
- Source / agent connection:
- TCP/IP (FTP or NFS)
- Client enabler program:
- None
|
Establish a link from the agent site to the host.
For more information about accessing files using NFS, see Accessing files with NFS.
For more information about accessing files using FTP, see Accessing files with FTP.
|
| VM file
|
- Database access program:
- FTP or NFS
- Source / agent connection:
- TCP/IP (FTP or NFS)
- Client enabler program:
- None
|
Establish a link from the agent site to the host.
For more information about accessing files using NFS, see Accessing files with NFS.
For more information about accessing files using FTP, see Accessing files with FTP.
|
| Sybase
|
- Database access program:
- None
- Source / agent connection:
- ODBC
- Client enabler program:
- Sybase Open Client Library Version 10 for OS/2, Intersolv Version
3.6 Driver Manager, and Sybase driver
|
- Install the Open Client on the agent site.
- Catalog the remote database according to the client enabler
instructions.
- Identify the user ID and password with access to the source
database.
|
| Oracle
|
- Database access program:
- None
- Source / agent connection:
- ODBC
- Client enabler program:
- Oracle SQL*Net V2.1.4 for OS/2, Intersolv Version 3.6
Driver Manager and Oracle driver
|
- Install SQL*NET on the agent site.
- Catalog the remote database according to the client enabler
instructions.
- Identify the user ID and password with access to the source
database.
|
| Informix
|
- Database access program:
- None
- Source / agent connection:
- ODBC
- Client enabler program:
- Informix-Net for OS/2, Intersolv Version 3.6 Driver Manager and
Informix driver
|
- Install Informix-Net on the agent site.
- Catalog the remote database according to the client enabler
instructions.
- Identify the user ID and password with access to the source
database.
|
| Local file
|
- Database access program:
- None
- Source / agent connection:
- TCP/IP
- Client enabler program:
- None
| If required, supply a pre-access command, a post-access command, or
both.
|
| Remote file
|
- Database access program:
- None
- Source / agent connection:
- TCP/IP
- Client enabler program:
- None
|
- Obtain the FTP server or mount string.
- Identify the user ID and password with access to the source
files.
For more information about accessing files using NFS, see Accessing files with NFS.
For more information about accessing files using FTP, see Accessing files with FTP.
|
You can use any DB2 Universal Database(R) database as a source database
for your warehouse. For more information about using DB2 Universal
Database, see DB2 Universal Database Installation and Configuration
Supplement.
To set up access to DB2 Universal Database source databases:
- Define privileges to the source databases.
- Establish connectivity to the source databases.
The system administrator of the source system must set up a user ID with
the following privileges:
- BINDADD (database-level privilege)
- CONNECT (database-level privilege)
Additionally, the following SYSIBM system tables require explicit SELECT
privilege:
- SYSIBM.SYSTABLES
- SYSIBM.SYSCOLUMNS
- SYSIBM.SYSDBAUTH
- SYSIBM.SYSTABAUTH
- SYSIBM.SYSINDEXES
- SYSIBM.SYSRELS
- SYSIBM.SYSTABCONST
Any tables that you want to access also require explicit SELECT
privilege.
After the system administrator defines the required privileges, establish
connectivity to the source database at the agent site:
- Set up communications to the database if the database is remote.
- Catalog the node if the database is remote.
- Catalog the database.
- Register the database as a ODBC system DSN if you are using the Windows
NT, Windows 2000, or OS/2 warehouse agent, or the version of the AIX or
Solaris Operating Environment warehouse agent that uses ODBC. If you
are using the AIX or Solaris Operating Environment warehouse agent that uses
the CLI interface, catalog the database using DB2 catalog utilities.
- Bind database utilities and ODBC(CLI) to the database. Each type of
client requires only one bind.
To access DB2 Distributed Relational Database Architecture(TM)
(DRDA(R)) source databases using a gateway:
- Verify that the gateway server has the prerequisite products installed
- Define privileges to the source databases.
- Set up the DB2 Connect(TM) gateway site.
- Establish connectivity to the source databases.
To access DB2 Distributed Relational Database Architecture(TM)
(DRDA(R)) source databases through a direct connection, establish
connectivity to the source databases. See Establishing connectivity to DB2 DRDA source databases for step-by-step instructions.
If you want to access data from the one of the following source
databases, you need a gateway site. Configure the site for DRDA:
- DB2 Universal Database for AS/400(R)
- DB2 Universal Database for OS/390
- DB2 for VM
- DB2 for VSE
To configure the server for DRDA, install DB2 Connect.
For more information about DRDA, see the Distributed Relational
Database Architecture Connectivity Guide.
For information about DB2 Connect, see the following books:
- DB2 Connect Quick Beginnings for your product edition
- DB2 Connect User's Guide
- Installation and Configuration Supplement
The system administrator of the source system must set up a user ID with
the following privileges on a server that is configured for DRDA:
- For all DRDA servers, the user ID must be authorized to CONNECT to the database.
Additionally, the following system tables, and any tables you want to
access, require explicit SELECT privilege:
- SYSIBM.SYSTABLES
- SYSIBM.SYSCOLUMNS
- SYSIBM.SYSDBAUTH
- SYSIBM.SYSTABAUTH
- SYSIBM.SYSINDEXES
- SYSIBM.SYSRELS
- SYSIBM.SYSTABCONST
- For DB2 Universal Database for OS/390, the user ID must have one of the following
authorizations:
- SYSADM
- SYSCTRL
- BINDADD and the CREATE IN COLLECTION NULLID authorization
- For DB2 for VSE or DB2 for VM, the user ID must have DBA authority.
To use the GRANT option on the BIND command, the NULLID user ID must have
the authority to grant authority to other users on the following tables:
- SYSTEM.SYSCATALOG
- SYSTEM.SYSCOLUMNS
- SYSTEM.SYSINDEXES
- SYSTEM.SYSTABAUTH
- SYSTEM.SYSKEYCOLS
- SYSTEM.SYSSYNONYMS
- SYSTEM.SYSKEYS
- SYSTEM.SYSCOLAUTH
- For DB2 Universal Database for AS/400, the user ID must have CHANGE authority or higher on the NULLID collection
After your user ID is set up with the required privileges, perform the
following tasks at the gateway site:
- For Windows NT or Windows 2000, install Microsoft SNA Server.
- Install DB2 Connect.
- Configure your DB2 Connect system to communicate with the source
databases.
- Update the DB2 node directory, system database directory, and DCS
directory.
You need to establish connectivity to the source database at the warehouse
agent site:
- Set up communications to the DB2 Connect site.
- Catalog the node of the DB2 Connect site.
- Catalog the database.
- Register the database as a system DSN by using the ODBC
Administrator.
- Bind the DB2 Connect utilities to the DRDA server as described in the
DB2 Connect User's Guide. Each type of client requires only one bind.
Tip: On Windows 32-bit systems, you can use the DB2
UDB Client Configuration Assistant to complete this task. See IBM
DB2 Universal Database: Quick Beginnings
for Windows for information about registering databases with the DB2 UDB Client
Configuration Assistant.
You can access remote databases via the AS/400 agent only through Systems
Network Architecture (SNA) connectivity that uses IBM Distributed Relational
Database Architecture (DRDA). Currently, the AS/400 agent does not
support DRDA over TCP/IP.
You must have DRDA connectivity to access the following remote
databases:
- DB2 Universal Database for AS/400
- DB2 Universal Database for OS/390
You can to connect from the AS/400 agent to a remote database when the
following conditions are met:
- The SNA connection to the remote database is correct.
- The remote database is cataloged in the AS/400 Relational Database
Directory.
Tip: You should be able to connect to a remote database
from the Data Warehouse Center and query it if the following conditions are
met:
- You can connect to the remote database from the AS/400 agent.
- You can query the remote database from the AS/400 interactive SQL facility
(STRSQL).
For more information about using DRDA through SNA to connect to different
types of databases, see the Redbook, Distributed Relational Database
Cross Platform Connectivity
and Application. You can also view this book online at
http://www.redbooks.ibm.com.
You must catalog the names of local and remote database that you plan to
use as a warehouse source or target in the AS/400 Relational Database
directory on your agent site. You must also catalog these database
names on the remote workstation that your agent accesses.
The local database name that you catalog on your agent site must be
cataloged as the remote database name on the remote workstation that your
agent will access. Likewise, the remote database name that you catalog
on your agent site must be cataloged as the local database name on the remote
workstation your agent will access.
For example, Fred is creating a data warehouse. He wants to catalog
the database names for a database that is named Sales and a database that is
named Expenses. The database named Sales is located on the same
workstation as the AS/400 agent. The database named Expenses is located
on the remote workstation that the agent will access. Table 6 describes how Fred should catalog each database on each
workstation.
Table 6. How to catalog local and remote database names
| Database name
| Location
| Cataloged as local or remote on agent site
| Cataloged as local or remote on remote machine
|
| Sales
| Agent site
| Local
| Remote
|
| Expenses
| Machine agent accesses
| Remote
| Local
|
If your source database and target database are located on the same
workstation, you must catalog one as local and the other as remote.
To add a database name entry to the AS/400 Relational Database directory,
enter the following command at an AS/400 command prompt:
ADDRDBDIRE databasename locationname
where databasename is the name of your AS/400 database, and
locationname is the location name of your AS/400
workstation. You must specify whether the database is local or
remote.
Ensure that you supply both the name of the database and the name of the
location, even if they are the same name.
For the local database, the location name is the *LOCAL keyword. For
each remote database, the location field must contain the SNA LU
name.
Attention: If you change the name of a database in the Remote Database
Directory, you must update each warehouse source that refers to it.
Failure to do so will result in warehouse source database connection
errors.
You can also use the WRKRDBDIRE command to view, add, change,
and remove remote Relational Database directory entries. To use this
command, enter the command at an AS/400 command prompt. A list of
currently defined remote database names is displayed. A set of options
is displayed at the top of the window.
For more information, see the AS/400 online help for each of these
commands.
You can access remote databases from the OS/390 agent using IBM Distributed
Relational Database Architecture (DRDA) over TCP/IP.
DRDA connectivity is required to access the following remote
databases:
- DB2 Universal Database for OS/390
- DB2 Universal Database for AS/400
- Oracle, Sybase, Informix, and other similar database products, when
DataJoiner(R) is used
For more information about using DRDA to connect to different types of
databases, see the IBM Distributed
Relational Database Architecture Reference.
The OS/390 agent allows you to access IMS and VSAM remote databases through
the Classic Connect ODBC driver. The Classic Connect ODBC driver cannot
be used to access DB2 Universal Database databases directly. For more
information on using Classic Connect with IMS and VSAM databases, see Appendix F, Using Classic Connect with the Data Warehouse Center.
When you use the OS/390 agent to access DataJoiner Version 2 and other
DataJoiner data sources, Systems Network Architecture (SNA) LU 6.2 is
required as the communications protocol. TCP/IP cannot be used with
DataJoiner Version 2 and other DataJoiner data sources, because DataJoiner
Version 2 and other DataJoiner data sources do not support TCP/IP.
Also, DataJoiner can not be used as a target for OS/390, because DataJoiner
does not support two-phase commit from DRDA, a requirement of DB2 Universal
Database for OS/390.
For more information about using DRDA through SNA to connect to different
types of databases, see the IBM redbook, Distributed Relational Database
Cross Platform Connectivity. You can view this book online at
http://www.redbooks.ibm.com.
If you are using source databases that are remote to the warehouse agent,
you must register the databases on the workstation that contains the warehouse
agent.
The Data Warehouse Center supports source tables that use ordinary SQL
identifiers. An ordinary identifier:
- Must start with a letter
- Can include uppercase letters, number, and underscores
- Cannot be a reserved word
If a table has a lowercase letter as part of its ordinary identifier, the
Data Warehouse Center stores the lowercase letter as an uppercase
letter.
The Data Warehouse Center does not support source tables that use delimited
identifiers. A delimited identifier:
- Is enclosed within double quotes
- Can include uppercase and lowercase letters, numbers, underscores, and
spaces
- Can contain a double quotation mark, represented by two consecutive
quotation marks
To save time, you can import metadata from certain types of tables, files,
and views into the Data Warehouse Center. Importing the metadata saves
you the time it would take to define the sources manually. For more
information, see the online help.
To help you determine which tables in the data source that you want to use,
you can view the data in the source tables.
You view the data from one table at a time. The Data Warehouse Center
displays all the column names of the table, regardless of whether data is
present in the column. It displays up to a maximum of 200 rows of
data.
You can view the data before or after you import the definition of the
table.
Any warehouse user can define a warehouse source, but only warehouse users
who belong to a warehouse group with access to the warehouse source can change
it.
To define a DB2 Universal Database warehouse source:
- Right-click the Warehouse Sources folder.
- Click Define.
The Define Warehouse Source notebook opens.
- In the Warehouse source name field, type the business name for
the warehouse source.
You will use this name to refer to your warehouse source throughout the
Data Warehouse Center.
- In the Administrator field, type the contact for the warehouse
source.
- In the Description field, type a short description of the
data.
- In the Warehouse source type list, select the version of DB2
Universal Database for your operating system (such as DB2 UDB for Windows
NT).
- Click the Agent sites page. The sites that you can
select are displayed in the Available Agent Sites list.
- From the Available agent sites list, select the name of the
site to which you want to give access to your warehouse source and
click>. The agent site is added to the Selected
agent sites list. The site can now be used to access the
warehouse source.
To include all of the items in the Available agent sites list,
click >>.
- Click the Database tab.
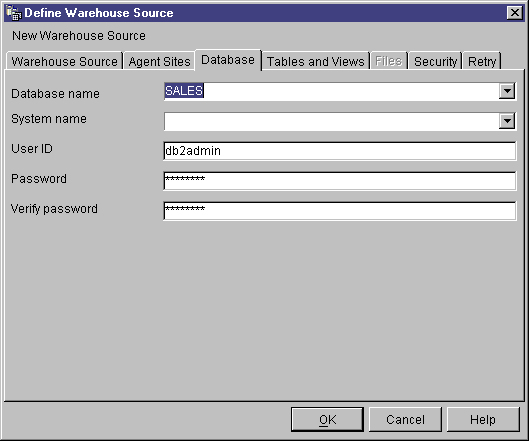
- In the Database name field, type as the name of the physical
database.
- In the User ID field, type a user ID that has access to the
database.
- In the Password field, type your password as the password for
the user ID that will access the database.
- In the Verify Password field, type the password again.
- Click the Agent sites page. The sites that you can
select are displayed in the Available Agent Sites list.
- From the Available agent sites list, select the name of the
site to which you want to give access to your warehouse source and click
>. The agent site is added to the Selected agent
sites list. The site can now be used to access the warehouse
source.
To include all of the items in the Available agent sites list,
click >>.
- Click the Tables and views tab.
Because the tables are in a DB2 database, you can import the table
definitions from DB2 Universal Database rather than defining them
manually.
On OS/400 Version 4 Release 2 and Version 4 Release 3, you must select the
View folder to import system tables.
- Expand the Tables folder.
The Filter window opens.
- Click OK.
The Data Warehouse Center displays a progress window. The import
might take a while.
If the warehouse source has more than one agent site selected, the
warehouse server uses the agent site with the name that sorts first (depending
on the user's locale) for the import.
For example, your warehouse source has three agent sites selected:
Default Agent, AIX Agent, and MVS(TM) Agent. The warehouse server uses
the agent site named AIX Agent for the import.
After the import finishes, the Data Warehouse Center lists the imported
objects in the Available tables and views list.
- From the Available tables and views list, select the tables and
views that you want to include in your warehouse source and to include all the
items in the Available tables and views list, click
>>.
The tables and views that you selected are moved to the Selected
tables and views list.
- Click the Security tab.
- Select warehouse group to grant users in the group the ability to create
steps that use this warehouse source.
- Click >.
The warehouse group moves to the Selected security groups
list.
Accept the rest of the values in the notebook. For more information
about the values, see "Warehouse Source" in the online help.
- Click the Retry tab.
- In the Default Retry Count field on the Retry page,
type the value for the number of times that you want to retry the extract, or
use the up and down arrows on the button to the right of the field to scroll
through a list of values that you can select.
- In the Default Retry Interval field, specify the amount of time
that you want to elapse until the Data Warehouse Center retries the data
extract. Use the up and down arrows to the right of the
Hours and Minutes fields to scroll through a list of
available values that you can select.
- Click OK to save your changes and close the Define Warehouse
Sources notebook.
There are several ways that a step can access files on a remote
workstation. This section lists some of the access methods that you can
set up for your step.
You can use data files as a source file for a step.
If the file is not on the agent site, but is accessed through a Windows NT or
Windows 2000 file server, be aware of the following requirements. The
requirements for accessing a remote file on a LAN server are similar to these
requirements.
The agent site must have a user ID and password that is authorized to
access the file. The agent site must contain a .bat file that
performs the NET USE command. The file must contain at least the
following lines:
 NET USE drive: /DELETE
 NET USE drive: //hostname/sharedDrive password /USER:userid
where:
- drive is the drive letter that represents the shared drive on the
agent site
- hostname is the TCP/IP hostname of the remote workstation
- sharedDrive is the drive on the remote workstation that contains
the file
- password is the password that is required to access the shared
drive
- userid is the user ID that is required to access the shared drive
The first line of the file releases the drive letter if it is in
use. The second line of the file establishes the connection.
When you define the agent site, specify the user ID and password that are
used to access the file.
When you define the warehouse source for the file, specify the .bat
file in the Pre-Access Command field in the Advanced window that
you open from the Files notebook page of the Warehouse Source notebook.
You can also define a similar .bat file to delete the link to the
remote drive after the Data Warehouse Center processes the files. If
you do this, specify the .bat file in the Post-Access
Command field in the Advanced window.
To use a source data file, you also must register the file with ODBC as a
system DSN of IWH_TEXT. Use an appropriate driver, such VISWHSE
3.6 32-bit Textfile (*.*).
Another way to access files from an agent site is to use the
Network File System (NFS) protocol of TCP/IP. When you use NFS, you
must provide a user ID on NFS command (which is NFS LINK if you use Maestro
from Hummingbird). You must specify the access commands in the
Pre-Access Command field in the Advanced window that you open from
the Files notebook page of the Warehouse Source notebook.
If the agent site does not have NFS installed, use the NET USE command to
access NFS, as described in Accessing files through a Windows NT or Windows 2000 file server.
To use a source data file, you also must register the file with ODBC as a
system DSN of IWH_TEXT. Use an appropriate driver, such VISWHSE
3.6 32-bit Textfile (*.*).
You can use FTP to access data files on a remote
workstation. As a guideline, use FTP if the file is 20 megabytes or
less. When you promote a step that uses remote files to test mode, the
files will be transferred just as they would be if the step was promoted to
production mode. If the file is large, promotion can take a long time,
and the agent site can run out of space.
One way to avoid this problem is to place a dummy file on the remote
workstation during testing. Another way is to use Copy file using FTP
instead of FTP (see Accessing data files with Copy file using FTP).
To use FTP to access a data file:
- Store the file on an FTP site.
- Declare the file with a Warehouse Source Type of Remote
File.
- Specify the System Name, User ID, and
Password in the Advanced window that you open from the Files
notebook page of the Warehouse Source notebook.
When you promote the step that uses this source to test mode, the Data
Warehouse Center transfers the file to a temporary file on the agent
site.
If you are having problems accessing a remote file on a secure UNIX system,
verify that the home directory of the user ID contains a .netrc
file. The
.netrc file must contain an entry that includes the hostname of the
agent site and the remote user ID that you want to use.
For example, the hostname of the agent site is
glacier.stl.ibm.com. You want to transfer a file
using FTP from the remote site kingkong.stl.ibm.com to
the agent site, using the remote user ID vwinst2. The
~vwinst2/.netrc file must contain the following entry:
machine glacier.stl.ibm.com login vwinst2
You can use Copy file using FTP to access data files on a
remote workstation. Use Copy file using FTP if the file is larger then
20 megabytes. The Data Warehouse Center does not run warehouse programs
when a step is promoted to test status, so the file will not be
transferred. You can also specify the location of the target file for
Copy file using FTP.
To use Copy file using FTP to access a file:
- Declare the file with a Warehouse Source Type of Local
File.
- Define two steps to access a file of this size:
- Define the first step to use the Copy file using FTP warehouse
program.
Use this step to copy the file to the agent site.
- Define the second step to use the warehouse source that you create for the
file.
The step will access the file as a local file. This file is the
output file of the first step.
You can define one or more files in a warehouse source.
You cannot view data in Local File or Remote File warehouse sources before
you define the file to Data Warehouse Center.
To define a File source:
- Right-click the Warehouse Sources folder.
- Click Define.
The Warehouse Source notebook opens.
- In the Warehouse source name field, type the business name for
the warehouse source:
- In the Administrator field, type your name as the contact for
the warehouse source.
- In the Description field, type a short description of the
data.
- In the Warehouse source type list, click Local file
or Remote file.
- Click the Agent sites page. The sites that you can
select are displayed in the Available Agent Sites list.
- From the Available agent sites list, select the name of the
site to which you want to give access to your warehouse source and click
>. The agent site is added to the Selected agent
sites list. The site can now be used to access the warehouse
source.
To include all of the items in the Available agent sites list,
click >>.
- Click the Files tab.
- Right-click the blank area of the Files list, and click
Define.
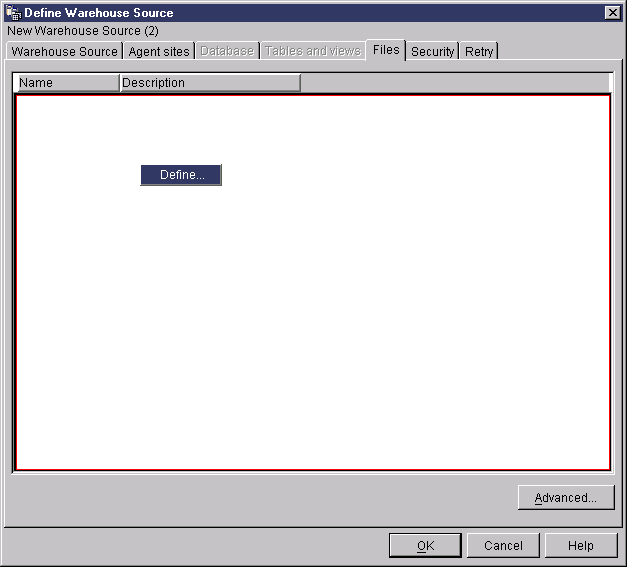
The Define Warehouse Source File notebook opens.
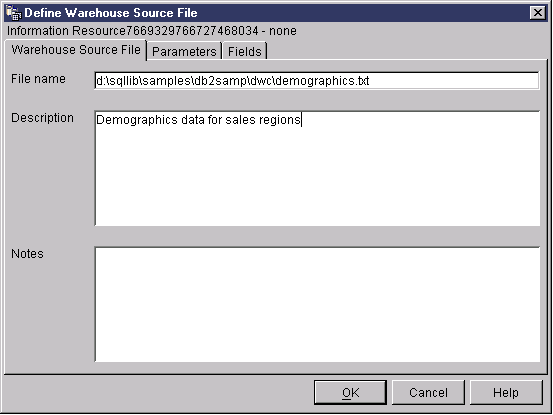
- In the File name field, type the fully-qualified path and
file.
The name of the file must not contain spaces. On a UNIX(R)
system, file names are case-sensitive.
- In the Description field, type a short description of the
file.
- Click the Parameters tab.
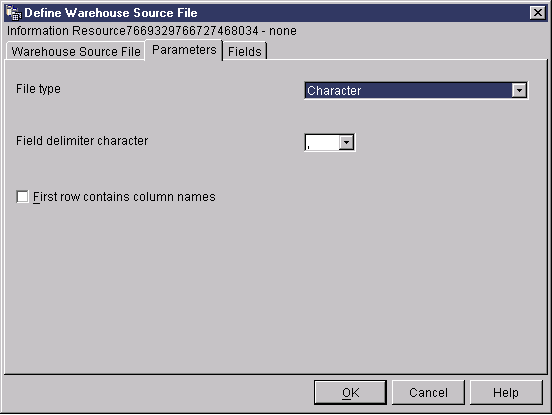
- From the File type list, select a file type.
- In the Field delimiter character field, specify a character to
be used as a delimiter. This field is active only when
Character is selected from the File type list.
- Select the First row contains column names check box if the
first row of the file contains column names.
The Data Warehouse Center will ignore the column names and extract data
starting from the second row of the file, which contains data.
If you are defining a remote file warehouse source, specify one of the
following FTP transfer formats.
- Select ASCII to transfer files in ASCII format.
- Select Binary to transfer files in binary format.
- Click the Fields tab.
The Data Warehouse Center reads the file that you specified on the
Warehouse Source File page. It defines columns based on the fields in
the file, and displays the column definitions in the Fields
list. It displays sample data in the File preview
area. Up to 10 rows of sample data are displayed. You can scroll
to see all the sample data.
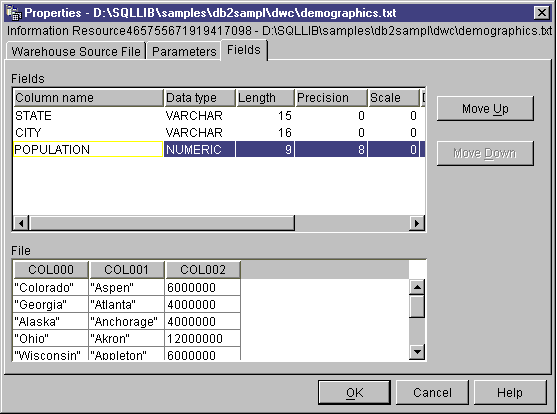
- If you want to change the column names that the Data
Warehouse Center generates, double-click the column name.
- Type the new name for the column.
- Press Enter.
The new name is displayed in the Column name field. In
the following figure, COL000 was renamed to STATE.
- Click OK.
The File notebook closes.
- If you need to specify a pre-or post-access command to access command,
click the Advanced button on the Files page of the warehouse
sources notebook.
The Advanced window opens.
- In the Pre-access command field, type the command that you use
to access a local file.
- In the Post-access command field, type the command that you use
after you access the file.
- Click OK to save your changes and close the window.
- Click the Security tab.
- Select a warehouse group to grant users in the group the ability to create
steps that use this warehouse source.
- Click >. The warehouse group moves to the
Selected security groups list.
- Click the Retry tab.
- In the Default Retry Count field on the Retry page,
type the value for the number of times that you want to retry the extract, or
use the up and down arrows on the button to the right of the field to scroll
through a list of values that you can select.
- In the Default Retry Interval field, specify the amount of time
that you want to elapse until the Data Warehouse Center retries the data
extract. Use the up and down arrows to the right of the
Hours and Minutes fields to scroll through a list of
available values that you can select.
- Click OK to save your changes and close the Warehouse Sources
notebook.
You can access data from non-DB2 sources. You must define these
sources before you create any steps that will access them.
There might be more than one way to access some sources. For
example, you can use the Data Warehouse Center ODBC drivers to access many of
the non-DB2 databases. However, you can also use DataJoiner to access
the databases. For more information about using DataJoiner with the
Data Warehouse Center, see Defining warehouse sources for use with DataJoiner.
The following sections describe how to set up Informix, Sybase, Oracle,
Microsoft SQL Server, Microsoft Access, Microsoft Excel, IMS, and VSAM sources
on Windows NT.
This section contains the steps for the following tasks:
- Configuring your Informix client
- Installing and configuring the ODBC driver
To set up access to the Informix client, you must configure the
Informix server and host information using the Informix-Setnet 32
utility.
To configure the Informix server information:
- Click Start --> Programs --> Informix Client
--> Setnet32.
A Setnet32 window opens.
- Click the Server Information tab.
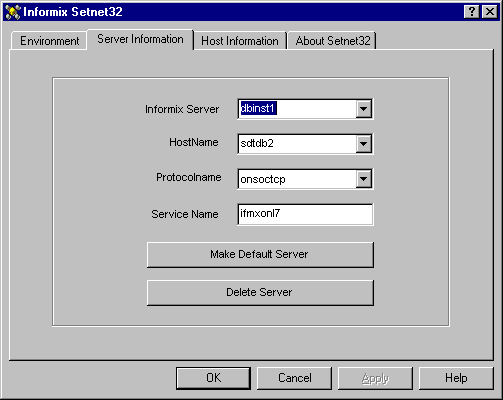
- Select an existing Informix database server from the Informix
Server list, or type the name of a new database server in the
Informix Server field.
- Select the host with the database server you want to use from the
HostName drop-down list, or type in the name of a new host computer
in the HostName field.
- Select the required network protocol from the Protocolname
list.
- In the Service Name field, type the service name or the port
number assigned to the database server on the host computer.
The service name must be defined in the services file in the
Windows NT installation directory on the client workstation.
- Click the Environment tab.
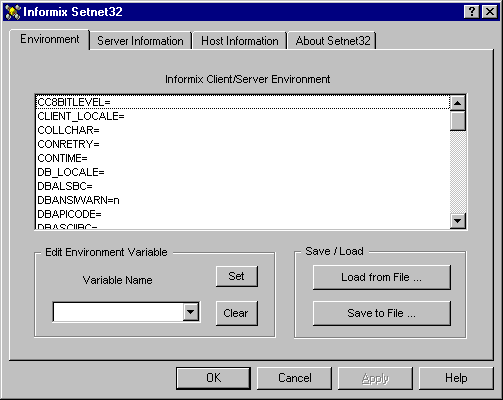
- Type INFORMIXSERVER in the Variable Name
field.
- Click Set.
- Click OK.
To configure the Informix host information:
- Click the Host Information tab in the Setnet32 window.

- Select the name of the host computer that you want to use to establish a
network connection from the Current Host list, or type a name in
the Current Host field to define a new host name.
- Ensure that the user name in the Current Host field is the user
name for an account on the selected host computer.
- Type your password in the Password field.
- Click OK.
ODBC drivers are used to register the source, target, and control
databases that the Data Warehouse Center will access.
If you do not have the ODBC driver that is required to access an Informix
database, you can get the driver from the DB2 Universal Database CD-ROM using
the Custom installation choice. For information about how to select and
install the appropriate driver, see IBM
DB2 Universal Database Quick Beginnings for your operating system.
After the ODBC driver is installed, you must set up access to your Informix
database by registering the database as a system database source name (DSN) in
ODBC.
To register a DSN for an ODBC driver in Windows NT:
- Click Start --> Settings --> Control
Panel.
- Double-click ODBC Data Sources.
- Click the System DSN tab.
- Click Add.
- Select the ODBC driver that you want to register.
- Click Finish.
A driver setup window opens.
- Click the General tab.
- Type the database alias in the Data Source Name field.
- Type a description of the database in the Database Description
field.
- Type the name of the database in the Database Name
field.
- Click the Connection tab.
- Type the user ID in the Default User Name field.
- Type the name of the server in the Host Name field.
- Type the service name in the Service Name field.
- Select onsoctcp from the Protocol Type
list.
- Click OK.
- Select the desired database alias from the System Data Sources
window.
- Click OK.
- Close the ODBC windows.
This section contains the steps for the following tasks:
- Configuring your Sybase client
- Installing and configuring the ODBC driver
To configure a Sybase client:
- Click Start --> Programs --> Sybase for Windows NT
--> DSEDIT.
The DSEDIT window opens.
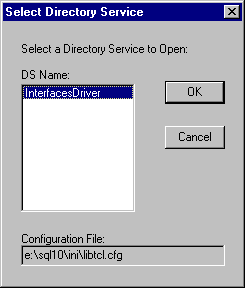
- Select the DS name that you want from the DS Name list.
- Click OK.
The InterfacesDriver window opens.
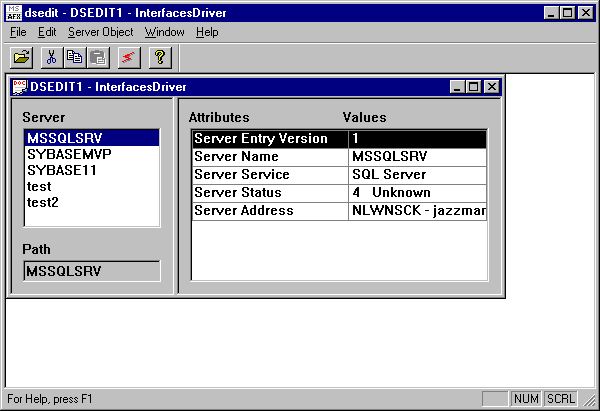
- Choose the server that you want to configure from the list in the Server
window.
- If the server that you want to use is not listed, add a new server to the
list.
To add a new server to the list of servers:
- Right-click in the Server window.
- Click Add.
- Type the name of the server in the Name field.
In the right panel of the Server window, the following server attributes
will be displayed: Entry version, Server name, Server service, Server
status, Server address. You should leave the default values for Entry
version, Server service, and Server status.
- Select the Server address attribute.
- Select Modify Attribute from the Server Object
menu.
Optionally, you can double-click on the attribute, or you can right-click
on the attribute and select Modify Attribute.
- Select NLWNSCK from the protocol list.
Optionally, if the protocol that you want to use is not in the list:
- Click Add.
- Select the protocol type from the Protocol list.
- Type the server address and port number in the Network Address
field.
- Click OK.
- Verify that the server that you added is highlighted.
- Click OK.
- Verify that the server that you want to configure is highlighted.
- Close the DSEDIT program.
ODBC drivers are used to register the source, target, and control
databases that the Data Warehouse Center will access.
If you do not have the ODBC driver that is required to access a Sybase
database, you can get the driver from the DB2 Universal Database CD-ROM using
the Custom installation choice. For information about how to select and
install the appropriate driver, see IBM
DB2 Universal Database Quick Beginnings for your operating system.
After the ODBC driver is installed, you must set up access to your Sybase
database by registering the database as a system database source name (DSN) in
ODBC.
To register a DSN for an ODBC driver in Windows NT:
- Click Start --> Settings --> Control
Panel.
- Double-click ODBC Data Sources.
- Click the System DSN tab.
- Click Add.
- Select the ODBC driver that you want to register.
- Click Finish.
A driver setup window opens.
- Click the General tab.
- Type the database alias in the Data Source Name field.
- Type a description of the database in the Database Description
field.
- Type the name of the server in the Server Name field.
- Type the name of the database in the Database Name
field.
- Click the Connection tab.
- Type the logon ID in the Default Logon ID field.
- Type the ID of the workstation in the Workstation ID
field.
- Click OK.
- Select the desired database alias from the System Data Sources
window.
- Click OK.
- Close the ODBC windows.
This section contains the steps for the following tasks:
- Configuring your Oracle client
- Installing and configuring the ODBC driver
To configure an Oracle 7 client:
- Click Start --> Programs --> Oracle for Windows NT
--> SQL Net Easy Configuration.
The SQL Net Easy Configuration window opens and displays several choices
for working with your client configurations.
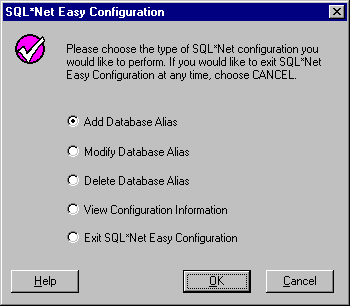
- Click the radio button next to the client configuration choice that you
want.
You can add a new client configuration or change or view an existing
configuration.
- If you click Add database alias:
-
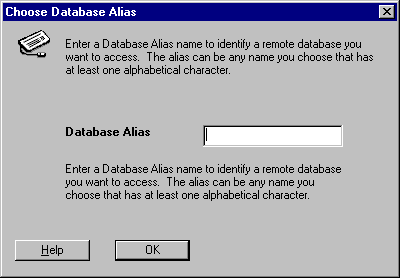
Click OK.
- Type the database alias name in the Database alias
field.
- Click OK.
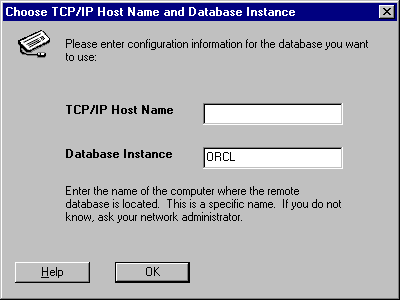
- Type the TCP/IP host name in the TCP/IP host name field.
- Type the database instance in the Database instance field, or
use the default.
- Click OK.
A confirmation window opens.
- Review the information in the confirmation window.
- If the information is correct, click Yes.
If the information in the confirmation window is not correct:
- Click Back until you reach the window with the incorrect
information.
- Correct the information.
- Repeat steps 7 through 9.
To configure an Oracle 8 client:
- Click Start --> Programs --> Oracle for Windows NT
--> Oracle Net8 Easy Configuration.
The Oracle Net8 Easy Configuration window opens and displays several
choices for working with your client configurations.
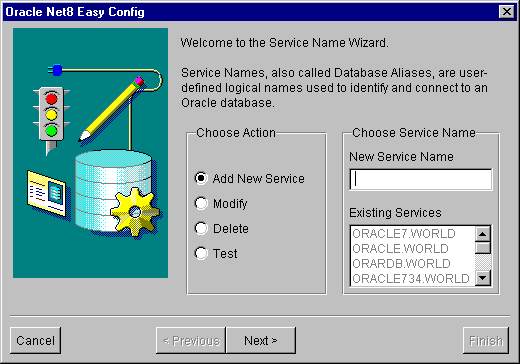
- Click the radio button next to the client configuration choice you
want.
You can add a new client configuration or change or view an existing
configuration.
- If you click Add, you must also type a database alias name in
the New Service Name field.
- Click Next.
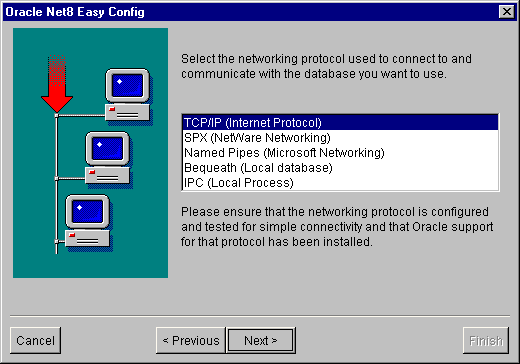
- Select the type of networking protocol that you want from the list in the
Protocol window.
- Click Next.
- Type the TCP/IP host name in the Host Name field in the TCP/IP
Protocol window.
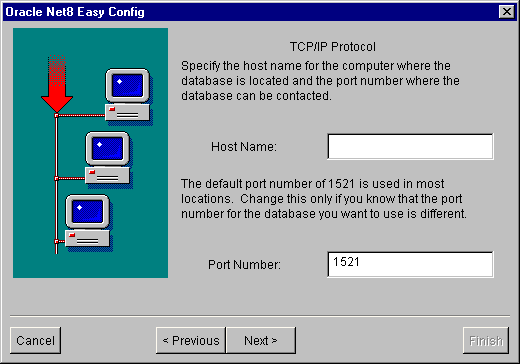
- Type the TCP/IP port number in the Port Number field in the
TCP/IP Protocol window.
- Click Next.
- Type the database SID in the Database SID field.
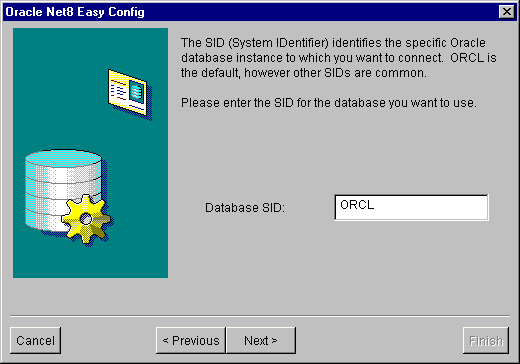
- Click Next.
The Test window opens.
- Click Test to test the configuration.
If you do not want to test the configuration, click Next.
If you click Test:
- Type the user ID in the User ID field.
- Type the password in the Password field.
- Click Test.
- Click Next.
- Click Done
A confirmation window opens.
- Review the information in the confirmation window.
- Click Finish, if the information in the
confirmation window is correct.
If the information in the confirmation window is not correct:
- Click Previous until you reach the window with the incorrect
information.
- Correct the information.
- Repeat steps 9 through 16.
ODBC drivers are used to register the source, target, and control
databases that the Data Warehouse Center will access.
If you do not have the ODBC driver that is required to access an Oracle
database, you can get the driver from the DB2 Universal Database CD-ROM using
the Custom installation choice. For information about how to select and
install the appropriate driver, see IBM
DB2 Universal Database Quick Beginnings for your operating system.
After the ODBC driver is installed, you must set up access to your Oracle
database by registering the database as a system database source name (DSN) in
ODBC.
To register a DSN for an ODBC driver in Windows NT:
- Click Start --> Settings --> Control
Panel.
- Double-click ODBC Data Sources.
- Click the System DSN tab.
- Click Add.
- Select the ODBC driver that you want to register.
- Click Finish.
A driver setup window opens.
- Select the General tab.
- Type the database alias in the Data Source Name field.
- Type the name of the database in the Database Name
field.
- Type the name of the server in the Server Name field.
- Click OK.
- Select the desired database alias from the System Data Sources
window.
- Click OK.
- Close the ODBC windows.
This section contains the steps for the following tasks:
- Configuring your Microsoft SQL Server client
- Installing and configuring the ODBC driver
To set up access to the Microsoft SQL Server client, you must configure
the Microsoft SQL Server client software using the Microsoft SQL Server Client
Network Utility.
To configure a Microsoft SQL Server client:
- Click Start --> Programs --> Microsoft SQL Server for
Windows NT --> Client Net Utility.
The SQL Server Client Network Utility window opens.
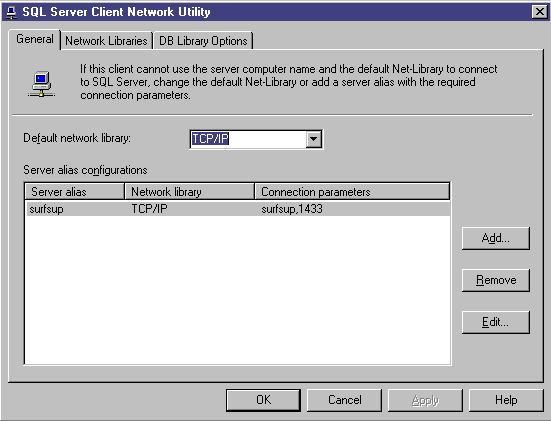
- Click TCP/IP from the Default network library
list.
- Select the server name that you want from the Server alias
configurations list.
Optionally, click Add to add a new server to the list.
The Add Network Library Configuration window opens.
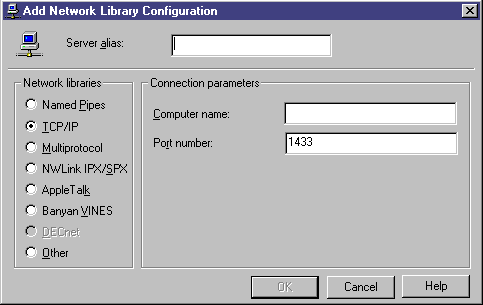
- Type the name of the server in the Server alias field.
- Type the name of the server in the Computer name field.
This name should be the same name that you typed in the Server
alias field.
- Type the port number in the Port number field.
- Click OK to close the Add Network Library Configuration
window.
- Select the server name that you just created from the Server alias
configurations list.
- Click OK.
ODBC drivers are used to register the source, target, and control
databases that the Data Warehouse Center will access.
If you do not have the ODBC driver that is required to access a Microsoft
SQL Server database, you can get the driver from the DB2 Universal Database
CD-ROM using the Custom installation choice. For information about how
to select and install the appropriate driver, see IBM DB2 Universal
Database Quick Beginnings for your operating system.
After the ODBC driver is installed, you must set up access to your
Microsoft SQL Server database by registering the database as a system database
source name (DSN) in ODBC.
To register a DSN for an ODBC driver in Windows NT:
- Click Start --> Settings -->Control
Panel.
- Double-click ODBC Data Sources.
- Click the System DSN tab.
- Click Add.
- Select the ODBC driver that you want to register.
- Click Finish.
The ODBC SQL Server Driver Setup window opens.
- Click the General tab.
- Type the database alias name in the Data Source Name
field.
- Type a description of the database in the Description
field.
- Type the name of the server that you want to use in the Server
Name field.
- Type the name of the database that you want to use in the Database
Name field.
- Click the Advanced tab.
- Type the user name in the Default Logon field.
- Type the workstation ID in the Workstation ID field.
- Click OK.
- Select the desired database alias from the System Data Sources
window.
- Click OK.
- Close the ODBC windows.
This section contains the steps for the following tasks:
- Creating and cataloging a Microsoft Access database
- Creating and cataloging a target warehouse database
- Defining a warehouse that uses the databases
To create a Microsoft Access database:
- Open Microsoft Access.
- Click Database Wizard.
- Click OK.
The New window opens and displays database templates.
- Select a template.
- Click OK.
- Type the name of the database in the File name field.
- Click Create.
The Database wizard opens.
- Follow the prompts, and click Finish to create your
database.
Note the path and file name of the database, because you will use it
later.
- Create tables and enter data into the tables.
To catalog the database in ODBC:
- Click Start --> Settings --> Control
Panel.
- Double-click ODBC.
- Click System DSN.
If you do not have a System DSN push button, see the DB2 Universal Database Troubleshooting Guide.
- Click Add.
- Select Microsoft Access Driver from the Installed ODBC
Drivers list.
- Click OK.
- Type the database alias in the Data Source Name field.
- Optional: Type a description of the database in the
Description field.
- Click Select.
- Select the path and file name of the database from the list boxes.
- Click OK.
- Click Advanced.
- Type a user ID in the Login Name field.
- Type a password in the Password field.
- In the Options list, verify that the value of FIL is MS
Access.
- Click OK in the Set Advanced Options window.
- Click OK in the ODBC Microsoft Access Setup window.
- Click Close.
To create a target warehouse database in DB2:
- Start the DB2 Control Center by clicking Start --> Programs
--> IBM DB2 --> Control Center.
- Right-click the Databases folder, and click Create
--> Database Using Wizard. The Create Database wizard
opens.
- In the Database name field, type the name of the
database.
- From the Default drive list, select a drive for the
database.
- Optional: In the Comments field, type a description of
the database.
- Click Finish. All other fields and pages in this wizard
are optional. The database is created and is listed in the DB2 Control
Center.
To catalog the target warehouse database in ODBC:
- Click Start --> Settings --> Control
Panel.
- Double-click ODBC.
- Click System DSN.
If you do not have a System DSN push button, see DB2 Universal Database Troubleshooting Guide.
- Click Add.
- Click IBM DB2 ODBC Driver from the Installed ODBC
Drivers list.
- Click OK.
- Type the database alias in the Data Source Name field.
- Optional: Type a description of the database in the
Description field.
- Click Select.
- Select the path and file name of the database from the list boxes.
- Click OK.
- Click Close.
To create the Data Warehouse Center definitions for the database that
you created:
- Create a warehouse source for the Microsoft Access database by following
the instructions in Defining a non-DB2 database warehouse source in the Data Warehouse Center. Specify the following values for the listed
parameters:
- On the Database page:
- On the Agent Sites page, specify the agent site on which you registered
the Microsoft Access source database and the DB2 warehouse database.
- On the Tables page:
- Expand the Tables folder to import table definitions from your
Microsoft Access database.
- Click OK on the Filter window to list all the tables in your
database.
Verify that the tables that you created in the database are in the
Available Tables list.
- Select the table that you want to use from the Available Tables
list.
- Click >.
The table moves to the Selected Tables list.
- Create a warehouse for the DB2 database by following the instructions in Chapter 4, Setting up access to a warehouse.
- Create a step by following the instructions in Adding steps to the process. Give the step the following attributes:
- It uses one or more source tables from the warehouse source for the
Microsoft Access database.
- It creates a target table in the DB2 warehouse database.
- Promote the step to test mode.
- Run the step by right-clicking the step and clicking
Test.
- Verify that the data that you created in the Microsoft Access database is
in the warehouse database. Enter the following command in the DB2
Command Line Processor window:
select * from prefix.database-name
- prefix
- The prefix of the warehouse database (such as IWH).
- database-name
- The name of the warehouse database.
You should see the data that you entered in the Microsoft Access
database.
This section contains the steps for the following tasks:
- Creating and cataloging a Microsoft Excel database
- Creating and cataloging a target warehouse database
- Defining a warehouse that uses the databases
To create a Microsoft Excel database:
- Open Microsoft Excel.
- Click File --> New.
The New window opens and displays spreadsheet templates.
- Select a template.
- Click OK.
- Click File --> Save to save the spreadsheet.
- Type the name of the spreadsheet in the File name field.
- Click Save.
Note the path and file name of the spreadsheet, because you will use it
later.
- Enter data into the spreadsheet.
To catalog the database in ODBC:
- Click Start --> Settings --> Control
Panel.
- Double-click ODBC.
- Click System DSN.
If you do not have a System DSN push button, see DB2 Universal Database Troubleshooting Guide.
- Click Add.
- Select Microsoft Excel Driver from the Installed ODBC
Drivers list.
- Click OK.
- Type the database alias in the Data Source Name field.
- Optional: Type a description of the database in the
Description field.
- Select Excel 97 from the Version list.
- Click Select Workbook.
- Select the path and file name of the database from the list boxes.
- Click OK.
- Click OK in the ODBC Microsoft Excel Setup window.
- Click Close.
If you are using the Microsoft Excel 95/97 ODBC driver to access the Excel
spreadsheets, you need to create a named table for each of the worksheets
within the spreadsheet. To create a named table for each
worksheet:
- Select the columns and rows that you want.
- Click Excel --> Insert --> Name -->
Define.
- Type a name (or use the default name) for the marked data.
- Click OK.
You can now import tables when you define your warehouse source without
checking the Include system tables check box.
To create a target warehouse database in DB2:
- Start the DB2 Control Center by clicking Start --> Programs
--> IBM DB2 --> Control Center.
- Right-click the Databases folder, and click Create
--> Database Using Wizard. The Create Database wizard
opens.
- In the Database name field, type the name of the
database.
- From the Default drive list, select a drive for the
database.
- In the Comments field, type a description of the
database.
- Click Finish. All other fields and pages in this wizard
are optional. The database is created and is listed in the DB2 Control
Center.
To catalog the target warehouse database in ODBC:
- Click Start --> Settings --> Control
Panel.
- Double-click ODBC.
- Click System DSN.
If you do not have a System DSN push button, see DB2 Universal Database Troubleshooting Guide.
- Click Add.
- Select IBM DB2 ODBC Driver from the Installed ODBC
Drivers list.
- Click OK.
- Type the database alias in the Data Source Name field.
- Optional: Type a description of the database in the
Description field.
- Click Select.
- Select the path and file name of the database from the list boxes.
- Click OK.
- Click Close.
To create the Data Warehouse Center definitions for the database that
you created:
- Create a warehouse source for the Microsoft Excel spreadsheet by following
the instructions in Defining a non-DB2 database warehouse source in the Data Warehouse Center. Specify the following values for the listed
parameters:
- On the Database page:
- On the Agent Sites page, specify the agent site on which you registered
the Microsoft Excel source spreadsheet and the DB2 warehouse database.
- On the Tables page:
- Expand the Tables folder to import the table definition from
your Microsoft Excel spreadsheet.
- Click OK on the Filter window to list all the tables in your
spreadsheet.
Verify that the tables that you created in the database are in the
Available Tables list.
- Select the table that you want to use from the Available Tables
list.
- Click >.
The table moves to the Selected Tables list.
- Create a warehouse target for the DB2 database by following the
instructions in Chapter 4, Setting up access to a warehouse.
- Create a step by following the instructions in Adding steps to the process. Give the step the following attributes:
- It uses one or more source tables from the warehouse source for the
Microsoft Excel spreadsheet.
- It creates a target table in the DB2 warehouse database.
- Promote the step to test mode.
- Run the step by right-clicking the step and clicking
Test.
- Verify that the data that you created in the Microsoft Access database is
in the warehouse database. Enter the following command in the DB2
Command Line Processor window:
select * from prefix.database-name
- prefix
- The prefix of the warehouse database (such as IWH).
- database-name
- The name of the warehouse database.
You should see the data that you entered in the Microsoft Access
database.
Use Classic Connect with the Data Warehouse Center if your data warehouse
uses operational data in an IMS or VSAM database. Use Classic Connect
to map the nonrelational data into a pseudo-relational format. Then use
the CROSS ACCESS ODBC driver to access the pseudo-relational data. You
can then define an IMS or VSAM warehouse source in the Data Warehouse Center
that corresponds to the pseudo-relational data.
For more information about using Classic Connect with the Data Warehouse
Center, see Appendix F, Using Classic Connect with the Data Warehouse Center.
The following sections describe how to set up Informix, Sybase, Oracle,
and Microsoft SQL Server sources on AIX or the Solaris Operating
Environment.
This section contains the steps for the following tasks:
- Configuring your Informix client
- Installing and configuring the ODBC driver
To configure your Informix client on AIX or the Solaris Operating
Environment:
- Open the sqlhosts file.
- Add a new entry listing to the file.
To keep the same format, copy and paste the example listing. Then,
change the entry information as described in the following steps.
- Enter the database name.
- Enter the protocol type onsoctcp.
- Enter the host name.
- Enter the port name.
The port name must be the same as the port name defined in the
/etc/services file in the Windows installation directory on the
client computer.
Figure 5 shows an example of the sqlhosts file with the
new entry listing.
Figure 5. A completed sqlhosts file entry listing
# Informix V5
database1     olsoctcp     test0    ifmxfrst1
database2     olsoctcp     test0    ifmxfrst2
|
ODBC drivers are used to register the source, target, and control
databases that the Data Warehouse Center will access.
If you do not have the ODBC driver that is required to access an Informix
database, you can get the driver from the DB2 Universal Database CD-ROM using
the Custom installation choice. For information about how to select and
install the appropriate driver, see IBM
DB2 Universal Database Quick Beginnings for your operating system.
After the ODBC driver is installed, you must set up access to your Informix
database.
To set up access to your Informix database:
- Open the .odbc.ini file.
- Define your Informix database alias at the top of the
file.
- Add a new entry to the file.
- Enter the directory location of the ODBC driver.
- Enter a description of the database.
- Enter the database name.
- Enter the server host name.
- Enter in the login ID.
- Enter the password for the login ID.
- Enter the server name.
- Enter the service name.
- Save and close the file.
Figure 6 shows an example of a completed entry for an Informix
database.
Figure 6. A completed .odbc.ini entry for an Informix database
[INF72]
Driver=/home/merant/3.6/odbc/lib/ivinf12.so
Description=Informix7.23
Database=test7
HostName=xxyyy.zzz.ibm.com
LoginID=informix
Password=password
ServerName=ifmx72
Service=ifmxon72
|
This section contains the steps for the following tasks:
- Configuring your Sybase client
- Installing and configuring the ODBC driver
To configure your Sybase client on AIX or the Solaris Operating
Environment:
- Open the interfaces file.
- Add a new entry listing to the file.
To keep the same format, copy and paste the example listing. Then,
change the entry information as described in the following steps.
- Enter the database alias you want to use for the CONNECT statement.
- Enter query.
- Enter the protocol you want to use.
- Enter the server host name.
- Enter the port number.
Figure 7 shows an example of the interfaces file with the
new entry listing.
Figure 7. A completed interfaces file entry listing
Sybase11
        query tcp ether superman 2000
|
ODBC drivers are used to register the source, target, and control
databases that the Data Warehouse Center will access.
If you do not have the ODBC driver that is required to access a Sybase
database, you can get the driver from the DB2 Universal Database CD-ROM using
the Custom installation choice. For information about how to select and
install the appropriate driver, see IBM
DB2 Universal Database Quick Beginnings for your operating system.
After the ODBC driver is installed, you must set up access to your Sybase
database.
To set up access to your Sybase database:
- Open the .odbc.ini file.
- Define your Sybase database alias at the top of the
file.
- Add a new entry to the file.
- Enter the directory location of the ODBC driver.
- Enter a description of the database.
- Define the database type as master.
- Enter the server name.
- Enter in the logon ID.
- Enter the password for the logon ID.
- Enter the directory location of the interfaces file.
- Save and close the file.
Figure 8 shows an example of a completed entry for a Sybase
database.
Figure 8. A completed .odbc.ini entry for a Sybase database
[Sybase10]
Driver=/home/merant/3.6/odbc/lib/ivsyb1112.so
Description=Sybase 10 ODBC Database
Database=master
ServerName=Sybase10
LogonID=sybase
Password=password
InterfacesFile=/public/sdt_lab/sybase/AIX/System10/interfaces
|
This section contains the steps for the following tasks:
- Configuring your Oracle client
- Installing and configuring the ODBC driver
To configure your Oracle client on AIX or the Solaris Operating
Environment:
- Open the tnsnames.ora file.
- Add a new entry listing to the file.
To keep the same format, copy and paste the example listing. Then,
change the entry information as described in the following steps.
- Enter the protocol you want to use.
- Enter the server host name.
- Enter the port name.
- Enter the SID.
Figure 9 shows an example of the tnsnames.ora file
with the new entry listing.
Figure 9. A completed tnsnames.ora file entry listing
# Oracle 8.1.5
Oracle8i=
  (DESCRIPTION =
    (ADDRESS_LIST =
       (ADDRESS =
          (PROTOCOL = TCP)
          (HOST = superman)
          (PORT = 2000)
       )
    )
    (CONNECT_DATA =
       (SID=oracle8i)
    )
  )
|
ODBC drivers are used to register the source, target, and control
databases that the Data Warehouse Center will access.
If you do not have the ODBC driver that is required to access an Oracle
database, you can get the driver from the DB2 Universal Database CD-ROM using
the Custom installation choice. For information about how to select and
install the appropriate driver, see IBM
DB2 Universal Database Quick Beginnings for your operating system.
After the ODBC driver is installed, you must set up access to your Oracle
database.
To set up access to your Oracle database:
- Open the .odbc.ini file.
- Define your Oracle database alias at the top of the
file.
- Add a new entry to the file.
- Enter the directory location of the ODBC driver.
- Enter the server name.
- Enter a description of the database.
- Save and close the file.
Figure 10 shows an example of a completed entry for an Oracle
database.
Figure 10. A completed .odbc.ini entry for an Oracle database
[Oracle_8]
Driver=/home/merant/3.6/lib/ivor814.so
ServerName=Oracle8
Description=Oracle 8 ODBC Database
|
This section contains the steps for the following tasks:
- Configuring your Microsoft SQL Server client
- Installing and configuring the ODBC driver
To configure your Microsoft SQL Server client on an AIX or Solaris
Operating Environment, configure TCP/IP on both the AIX or Solaris Operating
Environment client and the Windows server where you have Microsoft SQL Server
installed. No other actions are required to configure your client
because the Microsoft SQL Server Client configuration is integrated with the
ODBC driver configuration in the INI file. For more information, see
the Merant DataDirect Connect ODBC Reference for your operating system.
ODBC drivers are used to register the source, target, and control
databases that the Data Warehouse Center will access.
If you do not have the ODBC driver that is required to access a Microsoft
SQL Server database, you can get the driver from the DB2 Universal Database
CD-ROM using the Custom installation choice. For information about how
to select and install the appropriate driver, see IBM DB2 Universal
Database Quick Beginnings for your operating system.
After the ODBC driver is installed, you must set up access to your
Microsoft SQL Server database.
To set up access to your Microsoft SQL Server database:
- Open the .odbc.ini file.
- Define your Microsoft SQL Server database alias at the top
of the file.
- Add a new entry to the file.
- Enter the network address of the server running Microsoft SQL
Server.
- Enter your preference for ANSI-defined behaviors the driver should
use.
- Enter the database name.
- Enter in the user ID.
- Enter the password for the user ID.
- Enter your preference for recognizing quotation marks in SQL
statements.
- Enter the version of TDS that is used with your database.
- If you are using SQL Server 6.5, enter your preference for creating
temporary stored procedures for SQL Prepare.
- Save and close the file.
For more information on configuring the ODBC driver and on
.odbc.ini values and attributes, see the Merant DataDirect
Connect ODBC Reference for your operating system.
Figure 11 shows a sample entry for a Microsoft SQL Server
database.
Figure 11. A sample .odbc.ini entry for a Microsoft SQL Server database
[MSSQL6.5]
Driver=/home/merant/3.6/odbc/lib/ivmsss14.so
Address=xxyyy.zzz.ibm.com
AnsiNPW=yes
Database=test7
UID=MSSQL
PWD=password
QuotedID=no
TDS=4.2
UseProcForPrepare=1
|
This section contains the steps for the following tasks:
- Configuring your Informix client
- Installing and configuring the ODBC driver
To configure your Informix client on OS/2:
- Double-click the Informix icon.
- Double-click the Setnet icon.
The Informix-Net for OS/2 Utility window opens.
- Type the host name in the Hostname field.
- Type the user name in the Username field.
- Type the service name in the Servicename field.
- Select the protocol from the Protocolname drop-down
list.
- Select the radio button next to your password choice in the
Password field.
- Click Save.
ODBC drivers are used to register the source, target, and control
databases that the Data Warehouse Center will access.
If you do not have the ODBC driver that is required to access an Informix
database, you can get the driver from the DB2 Universal Database CD-ROM using
the Custom installation choice. For information about how to select and
install the appropriate driver, see IBM
DB2 Universal Database Quick Beginnings for your operating system.
After the ODBC driver is installed, you must set up access to your Informix
database by registering the database as a system database source name (DSN) in
ODBC.
To register a DSN for an ODBC driver on OS/2:
- Click the ODBC Administrator icon.
If you installed the ODBC Administrator with the OS/2 agent instead of
updating an existing ODBC Administrator, the icon is in the Data Warehouse
Center Agent folder.
- Select the ODBC driver that you want to register.
- Click Add.
- Select the ODBC driver that you want to register, and click
OK.
- Select the desired database alias, and click OK.
- Close the ODBC windows.
This section contains the steps for the following tasks:
- Configuring your Sybase client
- Installing and configuring the ODBC driver
To configure your Sybase client on OS/2:
- Double-click the Sybase icon.
- Double-click SQL Edit icon.
The Open window opens.
- Select the file that you want to open.
- Click Open.
- Select the server that you want from the list in the window.
The Server window opens.
If the server that you want is not listed:
- Click Edit --> Add Service.
- Type the name of the server that you want to configure in the
Name field.
- Click Edit --> Add Service.
You must set up both master and query service.
- Click Master from the Service list.
- Select the network driver that you want from the Network driver
list.
- Type the name of the server and the port number in the Connection
information field.
- Click OK.
- Click Edit --> Add Service.
- Click query from the Service list.
- Select the network driver that you want from the Network driver
drop-down list.
- Type the name of the server and the port number in the Connection
information field.
- Click OK.
- Click Exit --> Exit edit services.
- Close the windows and exit the program.
ODBC drivers are used to register the source, target, and control
databases that the Data Warehouse Center will access.
If you do not have the ODBC driver that is required to access a Sybase
database, you can get the driver from the DB2 Universal Database CD-ROM using
the Custom installation choice. For information about how to select and
install the appropriate driver, see IBM
DB2 Universal Database Quick Beginnings for your operating system.
Once the ODBC driver is installed, you must set up access to your Sybase
database by registering the database as a system database source name (DSN) in
ODBC.
To register a DSN for an ODBC driver on OS/2:
- Click the ODBC Administrator icon.
If you installed the ODBC Administrator with the OS/2 agent instead of
updating an existing ODBC Administrator, the icon is in the Data Warehouse
Center Agent folder.
- Select the ODBC driver that you want to register.
- Click Add.
- Select the ODBC driver that you want to register, and click
OK.
- Select the desired database alias, and click OK.
- Close the ODBC windows.
This section contains the steps for the following tasks:
- Configuring your Oracle client
- Installing and configuring the ODBC driver
To configure your Oracle client on OS/2, use SQL*Net for OS/2
clients.
To configure Oracle SQL*Net for OS/2:
- Go to the \oraos2\network\admin directory.
- Open the TNSNAMES.ORA file.
- Add a new connect descriptor to the file for your database.
The connect descriptor must include the following information:
- A descriptor alias.
- The protocol adapter type.
- The port number
- The host name.
- The system ID.
- Type the information for your client into each of the connect descriptor
fields.
- Save and close the file.
Figure 12 shows an example of the tnsnames.ora file
with the new connect descriptor entry.
Figure 12. A completed tnsnames.ora connect descriptor entry
testtcp  =   (DESCRIPTION=
                 (ADDRESS=
                  (PROTOCOL=tcp)(PORT=1111)(HOST=oracle))
                  (CONNECT_DATA=(SID=ORACLE7)
                 ))
|
ODBC drivers are used to register the source, target, and control
databases that the Data Warehouse Center will access.
If you do not have the ODBC driver that is required to access an Oracle
database, you can get the driver from the DB2 Universal Database CD-ROM using
the Custom installation choice. For information about how to select and
install the appropriate driver, see IBM
DB2 Universal Database Quick Beginnings for your operating system.
Once the ODBC driver is installed, you must set up access to your Oracle
database by registering the database as a system database source name (DSN) in
ODBC.
To register a DSN for an ODBC driver on OS/2:
- Click the ODBC Administrator icon.
If you installed the ODBC Administrator with the OS/2 agent instead of
updating an existing ODBC Administrator, the icon is in the Data Warehouse
Center Agent folder.
- Select the ODBC driver that you want to register.
- Click Add.
- Select the ODBC driver that you want to register, and click
OK.
- Select the desired database alias, and click OK.
- Close the ODBC windows.
To define a non-DB2 warehouse source in the Data Warehouse Center, you must
complete the following tasks:
- Open the Warehouse Source notebook in the Data Warehouse Center
administrative client.
- Add information about a warehouse source.
- Specify an agent site to access a warehouse source.
- Specify database information for a warehouse source.
- Import source tables and views into a warehouse source.
- Authorize warehouse groups to access a warehouse source.
- Specify an agent site to access a warehouse source.
- Specify how often to retry data extracts.
The following sections apply to Informix, Sybase, Oracle, and Microsoft SQL
Server warehouse sources.
- Click Start --> Programs --> IBM DB2 -->
Control Center.
The Control Center opens.
- Click the Data Warehouse Center icon in the Control Center tool
bar.
The Data Warehouse Center Administrative Client opens.
- Right-click the Warehouse Sources folder.
- Select Define.
The Warehouse Source notebook opens.
- On the Warehouse Source page, type a business name for the warehouse
source in the Name field.
You will use this name to refer to your warehouse source throughout the
Data Warehouse Center.
- Optional: Type the name of a person to contact about the warehouse
source in the Administrator field.
- Optional: Type a short description of the data in the
Description field.
- Optional: Type any additional information about the warehouse source
in the Notes field.
- Select a data source from the Warehouse source type drop-down
list. Depending on the type of source that you select, subsequent pages
of the notebook may not be available.
- Click the Agent Sites tab.
The sites that you can select are displayed in the Available agent
sites list.
- Select the name of the site, in the Available agent sites list,
to which you want to give access to your warehouse source.
- Click >.
The agent site moves to the Selected agent sites list.
The site can now be used to access the warehouse source.
To include all of the items in the Available agent sites list,
click >>.
- Click the Database tab.
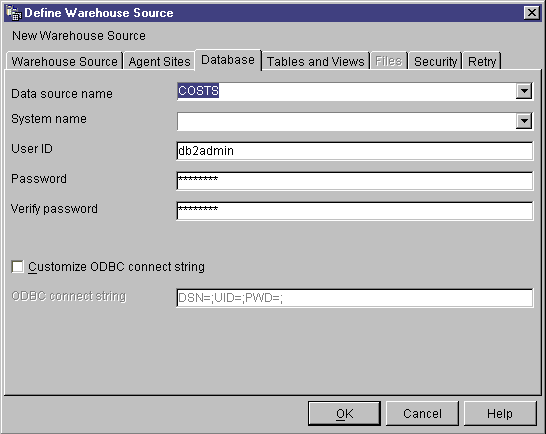
- Specify the system data source name in the Datasource Name
field.
For non-DB2 sources, the data source name can differ from the database
name.
- In the System Name field, specify the host name of the
workstation on which the database or file that you are defining as a warehouse
source exists.
This step is optional and is used only if you are using a database or file
that has the same name as another database or file on a different
workstation.
- In the User ID field, type the user ID that will access the
database from the agent site workstation.
- In the Password field, type the password for the user
ID.
- Type the password again in the Verify Password field.
- Optional: Select the Customize ODBC Connect String check
box to enter a specific connect string.
- If you selected the ODBC Connect String check box, type the ODBC connect
string in the ODBC Connect String field.
- Click the Tables and Views tab.
- Expand either the Tables or Views folder depending
on which type of object you want to import.
To import both tables and views, right-click the white space of the
Available tables and views list, and click
Refresh.
The Filter window opens.
- Specify the types of objects that you want to import from the database by
using the Filter window options.
The options available on the Filter window depend on whether you want to
import a table or a view.
- Select Retrieve only those tables that can be replicated to
retrieve only tables that are enabled for replication. This option is
available if you are importing a table.
- Select Retrieve only those views that can be replicated to
retrieve only views that are enabled for replication. This option is
available if you are importing a view.
- Select Include system tables to retrieve system tables from the
database. This option is available if you are importing a table.
- In the Object schema field, type a search string, including
wildcards, to define the characteristics of the schema names that contain the
objects to be returned from the database.
For example, XYZ* returns tables and views with schemas that start with
these characters.
- In the Object name field, type a search string, including
wildcards, to define the characteristics of the table and view names to be
returned from the database.
For example, XYZ* returns tables and views that start with these
characters.
- Click OK to submit the filter criteria that you entered.
The objects that met your filter criteria are returned by the system and
listed in the Available tables and views list.
- From the Available tables and views lists, select the tables,
views, or individual columns that you want to include in your warehouse
source.
- Click >.
The tables, views, and columns that you selected move to the Selected
tables and views list.
To include all of the items in the Available tables and views
list, click >>.
- Click the Security tab.
- From the Available warehouse groups list, select the warehouse
groups for which you want to grant access to the warehouse source.
- Click>.
The groups that you select move to the Selected warehouse groups
list.
To include all of the items in the Available warehouse groups
list, click >>.
- Click the Retry tab.
- In the Default Retry Count field, type the value for the number
of times that you want to retry the extract.
You can use the up and down arrows on the button to the right of the field
to scroll through a list of values that you can select.
- In the Default Retry Interval field, specify the amount of time
that you want to elapse until the Data Warehouse Center retries the data
extract.
Use the up and down arrows to the right of the Hours and Minutes
fields to scroll through a list of available values that you can
select.
- Click OK to save your changes and close the Warehouse Sources
notebook.
DataJoiner provides several advantages for accessing data for steps.
Instead of using ODBC support for non-IBM databases, you can use DataJoiner to
access those databases directly using the native database protocols.
You can also use DataJoiner to write to an Oracle database or other non-IBM
databases. With DataJoiner, you can access and join data from different
data sources with a single SQL statement and a single interface. The
interface hides the differences between the different IBM and non-IBM
databases. DataJoiner optimizes the SQL statement to enhance
performance.
You can define Data Warehouse Center steps that take advantage of
DataJoiner's benefits. First, you define warehouses that use
DataJoiner databases. Then you define steps that write to those
warehouses.
The Data Warehouse Center transformers are not supported with a DataJoiner
target database.
Before you read this section, read Chapter 2, Setting up your warehouse, Chapter 3, Setting up warehouse sources, Chapter 4, Setting up access to a warehouse, and Chapter 5, Defining and running processes to learn
about the basic components of a warehouse. You should also be familiar
with creating server mappings and nicknames in DataJoiner.
For more information about creating a server mapping in DataJoiner, see the
DB2 DataJoiner: Planning, Installation, and Configuration
Guide.
For information about creating tables and nicknames in DataJoiner, see the
DB2 DataJoiner: Administration Guide.
Define a separate warehouse source definition in the Data Warehouse Center
for each DataJoiner source database. Before you define the warehouse
sources, you must map each source database to a DataJoiner database through
DataJoiner's server mapping. You might also have to create a user mapping that maps the
DataJoiner user ID and password to the user ID and password for the source
database. The user ID and password that you define in the Data
Warehouse Center for the resource is the user ID and password for the
corresponding DataJoiner database. You also must create nicknames for each data source table that you want to use with the Data Warehouse Center.
The following example shows how to create a server mapping and
create a nickname for a table:
CREATE SERVER MAPPING FROM oracle1 TO NODE "
oranode"
TYPE Oracle VERSION
7.2 PROTOCOL "sqlnet"

create user mapping from USER to server oracle1 authid "iwhserve" password "VWPW"

create nickname iwh.oracle_target for ORACLE1.iwhserve.oratar
- The CREATE SERVER MAPPING command (extended across multiple
lines for readability) defines a source database called Oracle 1, where:
- oracle1
- The name that identifies the remote database in DataJoiner.
- oranode
- The entry defined in the Oracle TNSNAMES file, which identifies the
destination Oracle TCP/IP host and port.
- Oracle
- The type of database.
- 7.2
- The version of the database.
- sqlnet
- The method to use to access the database, such as SQLNET for Oracle or
dblib or ctlib for Sybase.
The value of DATABASE is null because Oracle allows only one database per
node. For some other data sources, you can specify a database.
For more information about creating a server mapping in DataJoiner, see the
DB2 DataJoiner: Planning, Installation, and Configuration
Guide.
- The create user mapping command specifies the user ID that
DataJoiner will use to connect to the remote database (Oracle). The
keyword USER is a DB2 special register that specifies the currently logged-on
user. The user will connect to the remote Oracle database by using the
specified user ID and password (iwhserve and VWPW)
- The create nickname command specifies a nickname,
iwh.oracle_target, for a remote Oracle table,
ORACLE1.iwhserve.oratar. After you create the nickname in
DataJoiner, you can substitute the nickname for the name of the remote table. For example, if you specify SELECT * FROM
iwh.oracle_target, DataJoiner returns data from the Oracle table
iwhserve.oratar.
After you create the mapping and nicknames, you can define the warehouse
sources. To define the source tables for each warehouse source, import
the DataJoiner nicknames as table definitions. In the previous example,
you would import iwh.oracle_target from DataJoiner.
[ Top of Page | Previous Page | Next Page ]