Data Warehouse Center Administration Guide
To set up your warehouse, you need to log on to the Data Warehouse Center
and specify the agent sites that the Data Warehouse Center will use when it
accesses the source and target databases. You also need to set up
security for the objects that you will define for your warehouse.
Finally, you need to set up subject areas that will contain the information
about the processes that are required to populate your warehouse.
This chapter describes the steps you need to take to set up your warehouse,
including:
The process of building a warehouse is iterative. You might begin
with a certain set of assumptions and build a warehouse that reflects those
assumptions. Eventually, you might want to change these assumptions and
the warehouse that they reflect. Because the Data Warehouse Center is
easy to install and use, you can make changes without having to rebuild your
warehouse. You can iteratively evaluate your assumptions and change
your warehouse as many times as you need. The Data Warehouse Center
adjusts with you.
To start the Data Warehouse Center, you need to start the
components of the Data Warehouse Center. Some components start
automatically, and some start manually.
After the warehouse server and logger are installed, they start
automatically when you start Windows NT. The warehouse agent can start
automatically or manually. You open the Data Warehouse Center
administrative interface manually from the DB2 Control Center.
The warehouse server and the warehouse logger run as Windows NT
Services. To start them, you must restart the system after you
initialize the warehouse control database. Then the warehouse server
and logger will automatically start every time you start Windows NT, unless
you change them to a manual service.
To start the warehouse server and logger manually, use one of the following
options:
- From the Windows NT desktop:
- Click Start --> Settings --> Control Panel
--> Services.
- Scroll down the list until you find Warehouse Server.
Click Start, and click OK.
- Enter the following command from a DOS command prompt:
NET START VWKERNEL
The warehouse server can function as a warehouse agent, called the
local agent. The local agent is defined as the default
warehouse agent for all Data Warehouse Center activities. The local
agent starts automatically when the warehouse server starts.
If you installed an AIX or Solaris Operating Environment warehouse agent,
the warehouse agent daemon starts automatically.
If you are using a remote Windows NT warehouse agent or an OS/2 warehouse
agent, you can select whether to start the warehouse agent daemon
automatically or manually during installation.
If you are using an AS/400 or OS/390 warehouse agent, you must start it
manually.
For more information about installing warehouse agents, see the DB2
Warehouse Manager Installation Guide.
If you installed a Windows NT warehouse agent other than the local
agent, you can manually start the warehouse agent daemon just as you start any
Windows NT service:
- Click Start --> Settings --> Control Panel -->
Services.
- Scroll down the list until you find Warehouse Agent
Daemon. Make any changes you want, and click
OK.
To manually start the OS/2 warehouse agent, type the following command at
an OS/2 command prompt:
START /B "IBM Visual Warehouse-NT OS/2 Daemon" d:\directory\VWDAEMON.EXE
where d:\directory is the drive and directory in which
you installed the warehouse agent and warehouse agent daemon.
After you install the AS/400 warehouse agent, you need to start the
warehouse agent daemon.
The user profile that starts the agent daemon should have *PGMR (bind
capability) as the User Class and *JOBCTL authority.
To start the agent daemon, enter STRVWD at an AS/400 command
prompt. The STRVWD command starts QIWH/IWHVWD (the warehouse agent
daemon) in the QIWH subsystem. This causes all warehouse agent
processes that are started by the warehouse agent daemon to start in the QIWH
subsystem.
To verify that the warehouse agent daemon started:
- Enter WRKACTJOB at an AS/400 command prompt.
- Look for the jobs VWD and IWH4MSGQ. If these jobs are displayed,
the warehouse agent daemon is started.
The warehouse agent daemon runs as a background job.
Occasionally, you might want to verify that the AS/400 warehouse agent
daemon that you started is still running. For example, you use the
AS/400 warehouse agent throughout your work week, then go home for the
weekend. When you return the following Monday, you should verify that
the warehouse agent daemon is active before you initiate a new agent
process.
To verify that the AS/400 warehouse agent daemon is active:
- At an AS/400 command prompt, enter WRKACTJOB. The active
jobs are displayed.
- Look for the function PGM-IWHVWD that is associated with the user ID you
used when you started the warehouse agent daemon. If the function is
not displayed, the warehouse agent is inactive.
After you finish configuring your system for the OS/390 warehouse agent,
you need to start the warehouse agent daemon. Both the OS/390 agent and
OS/390 agent daemon run on the UNIX(R) System Services (USS)
platform.
To start the warehouse agent daemon:
- Telnet to USS on OS/390 through the OS/390 host name and USS port.
- Enter vwd on the command line to start the agent daemon in the
foreground.
Optionally, to start the agent daemon in the background, enter vwd >
/u/mydir/vwd.backgr & on the command line, where
vwd.backgr is the file where messages are stored.
To verify from a UNIX shell that the warehouse agent daemon is running,
enter ps -e | grep vwd on a UNIX shell command line.
If the warehouse agent daemon is running, and if you are authorized to see
the task, a message similar to the following message will be returned:
$ ps -ef | grep vwd
MVSUSR2        198   16777537  - 13:13:22 ttyp0013  0:00 grep vwd
MVSUSR2   16777446   16777538  - 09:57:21 ttyp0002  0:00 vwd
If the warehouse agent daemon is not running, or if you are not authorized
to see the task, a message similar to the following message will be
returned:
$ ps -ef | grep vwd
MVSUSR2        198   16777537  - 13:13:22 ttyp0013  0:00 grep vwd
To verify from an OS/390 console that the warehouse agent daemon is
running, enter D OMVS,A=ALL at the OS/390 command prompt.
If the warehouse agent daemon is running, a task with the string
vwd will be displayed in the message that is returned. A
message similar to the following example is displayed:
D OMVS,A=ALL
BPXO040I 13.16.15 DISPLAY OMVS 156
OMVS     000E ACTIVE          OMVS=(00)
USER     JOBNAME  ASID        PID       PPID STATE   START     CT_SECS
MVSUSR2  MVSUSR24 00C5   16777446   16777538 HRI   09.57.20       .769
  LATCHWAITPID=         0 CMD=vwd
The Data Warehouse Center uses TCP/IP to communicate with a remote agent
site. For this communication to take place, the warehouse server must
be able to recognize the fully qualified host name of the agent site.
Also, the agent site must be able to recognize the fully qualified host name
of the warehouse server.
To verify that one site recognizes the fully qualified host name of the
other site, use the ping command from a command prompt.
For example, the fully qualified host name for a warehouse agent site is
abc.xyz.commerce.com. To verify that
the warehouse server recognizes the fully qualified host name of the agent
site, from a DOS command prompt, enter:
ping abc.xyz.commerce.com
Ensure that you verify communication from both the agent site to the
warehouse server workstation and vice versa.
Occasionally, you might need to stop the warehouse agent daemon, such
as when you need to change the environment variables for the warehouse agent
and warehouse agent daemon.
To stop the Windows NT warehouse agent daemon:
- Click Start --> Settings --> Control Panel
--> Services.
- Select Warehouse Agent Daemon.
- Click Stop.
The warehouse agent daemon stops.
- Click OK.
The only circumstance under which you need to stop an AIX or Solaris
Operating Environment warehouse agent daemon is if you want to change the
environment variables for the warehouse agents and its corresponding warehouse
agent daemon.
To successfully change the environment variables for one of the warehouse
agents and its corresponding warehouse agent daemon:
- Change the environment variables for both the warehouse agent and the
warehouse agent daemon by editing the IWH.ENVIRONMENT file.
- Display the process ID for the warehouse agent daemon. At an AIX or
Solaris Operating Environment command line, enter:
ps -ef|grep vwd
The process ID is displayed.
- Stop the warehouse agent daemon. At a command line enter:
kill processid
where processid is the process ID that was displayed in step
2.
When the warehouse agent daemon stops, it immediately restarts by
default. When the warehouse agent daemon restarts, it uses the new
environment variables.
Occasionally, you might need to stop the AS/400 warehouse agent
daemon.
To stop the warehouse agent daemon, enter ENDVW at an AS/400
command prompt.
When you enter this command, either the warehouse agent daemon stops, or a
list of jobs is displayed. If a list of jobs is displayed, end the job
that has ACTIVE status.
If you need to stop the agent daemon:
- Determine the daemon process ID.
You can determine the daemon process ID by entering ps -ef | grep
vwd or D OMVS,A=ALL on the command line.
- Stop the daemon.
You can stop the daemon process by entering kill [-9] pid on the
command line, where pid is the daemon process ID.
To start the Data Warehouse Center administrative interface:
- Start the DB2 Control Center:
- Click Tools --> Data Warehouse Center in the DB2 Control
Center window. The Data Warehouse Center Logon window opens.
- Click Advanced if you are logging on for the first time.
The Advanced window opens.
- In the Control database field, type the ODBC system data set
name (system DSN) for, the name of the warehouse control database.
- In the Server host name field, type the TCP/IP host name for
the workstation where the warehouse server is installed.
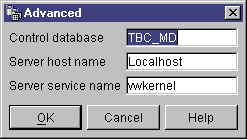
- Click OK.
The Advanced window closes.
The next time that you log on, the Data Warehouse Center will use the
settings that you specified in the Advanced window.
- In the User ID field of the Logon window, type a valid Data
Warehouse Center user ID.
If you are logging on for the first time, type the default warehouse user
ID.
- In the Password field, type the password for the user
ID.
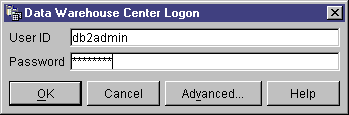
- Click OK.
The Data Warehouse Center Logon window closes.
The Data Warehouse Center uses the local agent as the default agent for all
Data Warehouse Center activities. However, you probably will want to
use a warehouse agent on a different site from the workstation that contains
the warehouse server. You need to define the agent site,
which is the workstation on which the agent is installed, to the Data
Warehouse Center. The Data Warehouse Center uses this definition to
identify the workstation on which to start the agent.
To use a warehouse agent, you must complete the following tasks:
- Determine where to place the warehouse agent.
- Establish connectivity to local and remote databases.
- For an OS/390 warehouse agent, configure TCP/IP, set environment
variables, and set up authorization for the warehouse agent daemon.
- Start the agent daemon. (See Starting a warehouse agent daemon.)
- Verify communication between the warehouse server and the warehouse
agent.
- Define the agent site to the Data Warehouse Center.
The warehouse agent receives SQL commands from the warehouse server, and
then passes the commands to the source or target databases.
You can set up the warehouse agent in one of three configurations:
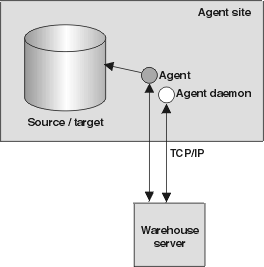
- The warehouse agent, source, and target are located on the same
workstation.
- The warehouse agent is installed on a system that contains both the
warehouse source table and the warehouse target table in the same database, as
shown in Figure 1.
Figure 1. The warehouse agent, warehouse source, and warehouse target are located on the same system.
The warehouse server can also be located on the same system as the
warehouse agent, warehouse source, and warehouse target.
In this configuration, the warehouse agent passes SQL statements that
extract data from the source tables. The warehouse agent transforms the
data, if necessary, and then writes it to the target table.
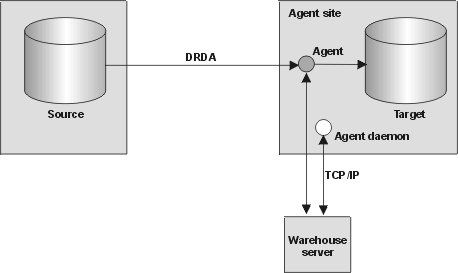
- The warehouse agent and warehouse target are located on the same
system.
- The warehouse agent is installed on the system that contains the warehouse
target table, as shown in Figure 2.
Figure 2. The warehouse agent and warehouse target are located on the same system.
In this configuration, the warehouse agent passes SQL statements that
extract data from a remote source. The warehouse agent transforms the
data, if necessary, and then writes the data to the target table on the local
database.
This configuration offers the best performance when the source and target
reside on different systems.
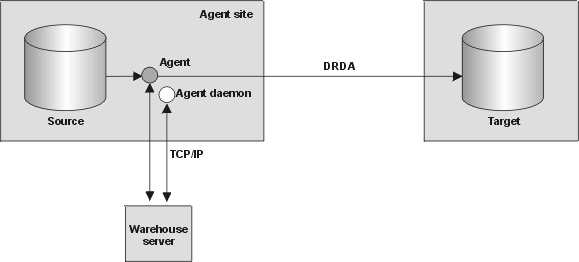
- The warehouse agent and warehouse source are located on the same
system.
- The warehouse agent is installed on the system that contains the warehouse
source, as shown in Figure 3.
Figure 3. The warehouse agent and warehouse source are located on the same system.
In this configuration, the warehouse agent passes SQL that extracts data
from the warehouse source on the local database. The warehouse agent
transforms the data, if necessary, and then writes the data to the target
table on the remote database.
After you set up access to your data and you determine the location of your
warehouse agent, you must define security for your warehouse. For
information about defining warehouse security, see Data Warehouse Center security.
The warehouse server uses TCP/IP to communicate with the warehouse agent
and the warehouse agent daemon. For this communication to take place,
the warehouse server must be able to recognize the fully qualified host name
of the warehouse agent. Also, the warehouse agent must be able to
recognize the fully qualified host name of the warehouse server.
By default, the warehouse server sends messages to the warehouse agent
daemon on port 11001 and receives responses on port 11000. The
warehouse logger uses port 11002. If another application uses one of
the default Data Warehouse Center port numbers, you can change the port number
that the Data Warehouse Center uses. If you need to change a port
number, see DB2 Universal Database Troubleshooting
Guide.
To configure TCP/IP on OS/390:
- Go to the /etc/services file or the
'TCPIP.ETC.SERVICES' file in the OS/390
environment.
- Add the following services to the file:
| Port name
| Port number
|
| vwkernel
| 11000/tcp
|
| vwd
| 11001/tcp
|
| vwlogger
| 11002/tcp
|
To update your environment variables, add the following variables to
your
.profile file:
| Variable
| Notes
|
| export VWS_LOGGING=/u/mydir/logs/
| /u/mydir/logs/ is the directory where you want to put the
agent logs.
|
| export DSNAOINI='DBA1.INSTALIB(DSNAOINI)'
| For more information on INI files, see the DB2 UDB for OS/390 ODBC
Guide and Reference.
|
| export DSNAOTRC='DBA1.DSNAOTRC'
| Use only if you want to receive CLI traces.
|
| export STEPLIB='DSN610.SDSNLOAD'
| DSN610.SDSNLOAD is the DB2 load library.
|
Use the Agent Sites notebook to define an agent site to the
Data Warehouse Center.
If you are using the local agent that is installed with the warehouse
server, you do not have to define the local agent. It is defined
automatically as the default agent site.
If you want your agent to access a user object, such as a LAN drive, you
should specify the Data Warehouse Center to run as a user process instead of
as a system process.
No authority level is required to define an agent site to the Data
Warehouse Center.
To define an agent site to the Data Warehouse Center:
- Open the Agent Sites notebook:
- From the Data Warehouse Center tree, expand the Administration
folder.
- Right-click the Agent Sites folder and click
Define. The Agent Sites notebook opens.
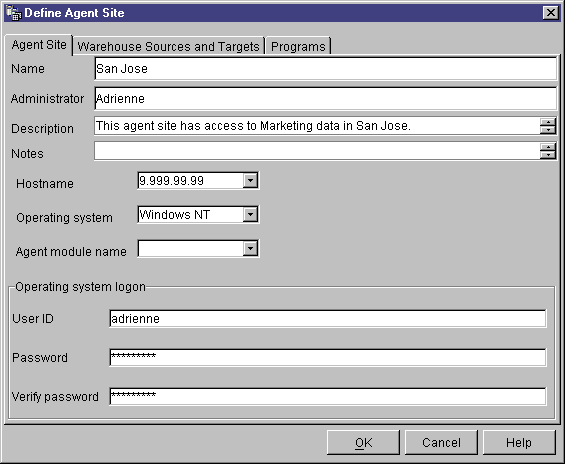
- In the Name field, type a name for the agent site that you are
defining to the Data Warehouse Center. This name can be up to 80
characters in length.
- Optional: In the Administrator field, type the name of
the warehouse administrator who is responsible for this agent site
definition.
- Optional: In the Description field, type a business
description for your agent definition. This description can be a
maximum of 255 characters.
- Optional: In the Notes field, type detailed information
that might be helpful to users who can access the Agent Sites notebook.
- In the Hostname field, type the IP address for the system or
workstation where the agent is installed, or type the machine host
name. Type the IP address in the form of
n.nnn.nn.nnn. In the Operating System
field, select the operating system on which your warehouse agent runs.
- Optional: In the Agent module name field, you can change
the name of the warehouse agent program at the direction of IBM Software
Support. The default value is IWH2AGNT.
- In the User ID field, type a valid user ID for the agent site,
if one is required. If you don't specify a user ID, the agent
assumes the characteristics of the warehouse server (for the default agent
only) or the agent daemon. For example, if the warehouse agent daemon
runs as a system process, the warehouse agent does, too. If you specify
a user ID, the warehouse agent inherits the characteristics of the user
specified by the user ID.
- If you supplied a user ID, type the password that is associated with the
user ID in the Password field. Type the password again in
the Verify Password field.
- If you have already defined warehouse sources and targets, click the
Warehouse Sources and Targets tab. In the Available
warehouse sources and targets list, select a warehouse source that you
want your agent to access, and click >. To select
multiple warehouse sources, hold down the Ctrl key, and click the sources that
you want to add. Then, click >. If you want to add
all of the items in the list, click >>.
- Optional: If your warehouse agent will run warehouse programs,
transformers, or user-defined programs, click the Programs
tab. In the Available Programs list, click a program or
transformer that your warehouse agent will run, then click
>. To select multiple programs, hold down the Ctrl key,
and click the programs that you want to add. Then, click
>. If you want to add all of the items in the
Available Programs list, click >>.
- Click OK to define your agent site to the Data Warehouse
Center.
If you are installing a warehouse program on the agent site, you must
define the program to the Data Warehouse Center before you can use it.
For more information, see Defining a user-defined program.
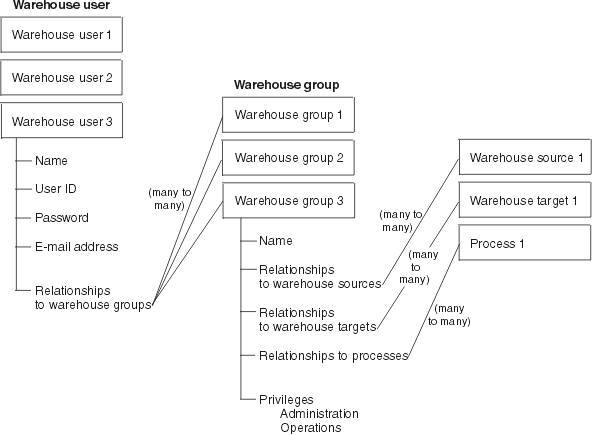
Because the Data Warehouse Center stores user IDs and passwords for various
databases and systems, there is a Data Warehouse Center security structure
that is separate from the database and operating system security. This
structure consists of warehouse groups and warehouse users. Users gain
privileges and access to Data Warehouse Center objects by belonging to a
warehouse group. A warehouse group is a named grouping of
warehouse users and privileges, which is the users'
authorization to perform functions. Warehouse users and warehouse
groups do not need to match the DB users and DB groups that are defined for
the warehouse control database.
During initialization, you specify the ODBC name of the warehouse control
database, a valid DB2 user ID, and a password. The Data Warehouse
Center authorizes this user ID and password to update the warehouse control
database. In the Data Warehouse Center, this user ID is defined as the
default warehouse user.
| Tip: | The default warehouse user requires a different type of database and
operating system authorization for each operating system that the warehouse
control database supports. For more information, see the DB2
Warehouse Manager Installation Guide.
|
When you log on to the Data Warehouse Center, the Data Warehouse Center
verifies that you are authorized to open the Data Warehouse Center
administrative interface by comparing your user ID to the defined warehouse
users.
If you don't want to define security, you can log on as the default
warehouse user and access all Data Warehouse Center objects and perform all
Data Warehouse Center functions. The default warehouse user is a part
of the default warehouse group. This warehouse group has access to all
the objects that are defined in the Data Warehouse Center, unless you remove
objects from the warehouse group.
However, you probably want different groups of users to have different
access to objects within the Data Warehouse Center. For example,
warehouse sources and warehouse targets contain the user IDs and passwords for
their corresponding databases. You might want to restrict access to the
warehouse sources and warehouse targets that contain sensitive data, such as
personnel data.
You restrict the actions that users can perform by assigning privileges to
the warehouse group. In the Data Warehouse Center, two privileges can
be assigned to groups: administration privilege and operations
privilege.
- Administration privilege
- Users in the warehouse group can define and change warehouse users and
warehouse groups, change Data Warehouse Center properties, import metadata,
and define which warehouse groups have access to objects when they are
created.
- Operations privilege
- Users in the warehouse group can monitor the status of scheduled
processing.
Privileges are assigned (by a user with administration privilege) to
groups. In order for warehouse users to have a privilege, they must
belong to a warehouse group that has the privilege.
In addition to the privileges, a warehouse group contains lists of objects
to which the users in the group have access. You can specify access to
sources, targets, and processes.
For example, you might define a warehouse user that corresponds to someone
who uses the Data Warehouse Center. You might then define a warehouse
group that is authorized to access certain warehouse sources, and add the new
user to the new warehouse group. The new user is authorized to access
the warehouse sources that are included in the group.
You can give users various types of authorization. You can include
any of the different types of authorization in a warehouse group. You
can also include a warehouse user in more than one warehouse group. The
combination of the groups to which a user belongs is the user's overall
authorization.
When a user defines a new object to the Data Warehouse Center and does not
have administration privilege, all of the groups to which the user belongs
will have access to the new object by default. The list of groups to
which they can assign access is limited to the groups to which they
belong. The Security page of the object notebook will not be available
to the user.
The list of tables or views that users can access from a source will be
limited by their group membership as well, so that they will be able to choose
from among the tables and views to which they have access. Further, the
set of actions available to the user through the Data Warehouse Center will be
limited by the level of security that the user has. For example, a user
will not be able to access the properties of an object if the user does not
belong to a group that has access to the object.
For a summary of the relationship between Data Warehouse Center objects and
the group membership that is required to define or edit the object, see
"Data Warehouse Center security" in the online help.
The Data Warehouse Center works with the security for your database manager
by including the user ID and password for the database as part of the
warehouse source and warehouse target properties.
Figure 4 shows the relationship between warehouse users, warehouse
groups, and the user IDs and passwords for the warehouse databases:
Figure 4. Relationship between warehouse users, warehouse groups, and the user IDs and passwords for the warehouse databases
The Data Warehouse Center controls access with user IDs. When a
user logs on, the user ID is compared to the warehouse users that are defined
in the Data Warehouse Center to determine whether the user is authorized to
access the Data Warehouse Center. You can authorize additional users to
access the Data Warehouse Center by defining new warehouse users.
The user ID for the new user does not require authorization to the
operating system or the warehouse control database. The user ID exists
only within the Data Warehouse Center.
To define a warehouse user:
- In the left side of the main Data Warehouse Center window, click the
Administration folder.
- Expand the Warehouse Users and Groups tree.
- Right-click the Warehouse Users folder, and click
Define.
The Define Warehouse User notebook opens.
- In the Name field, type the business name of the user.
The name identifies the user ID within the Data Warehouse Center.
This name can be up to 80 characters, including spaces.
- In the Administrator field, type the contact for this
user.
- In the Description field, type a short description of the
user.
| Tip: | You can use the Description and Notes fields to provide
metadata about the definitions for your warehouse. You can then publish
this metadata in an information catalog for the warehouse. Users of the
warehouse can search the metadata to find the warehouse that contains the
information they need to query.
|
- In the User ID field, type the new user ID.
The user ID must be no longer than 60 characters and cannot contain spaces,
dashes, or special characters (such as @, #, $, %,>, +, =). It can
contain the underscore character.
- In the Password field, type the password. Then, type the
password again in the Verify Password field.
Passwords must be a minimum of six characters and cannot contain spaces,
dashes, or special characters.
| Tip: | You can change your password on this page of the Define Warehouse User
notebook.
|
- Verify that the Active User check box is selected.
| Tip: | You can clear this check box to temporarily revoke a user's access to
the Data Warehouse Center, without deleting the user definition.
|
- Click OK to save the warehouse user and close the
notebook.
In the Data Warehouse Center, warehouse groups include the
authorization to perform certain tasks and access objects in the Data
Warehouse Center. To authorize one or more users to perform tasks, you
must define a warehouse group, and then add the users to the group.
To define the warehouse group:
- From the main Data Warehouse Center window, right-click the Warehouse
Groups folder, and click Define.
The Warehouse Groups notebook opens.
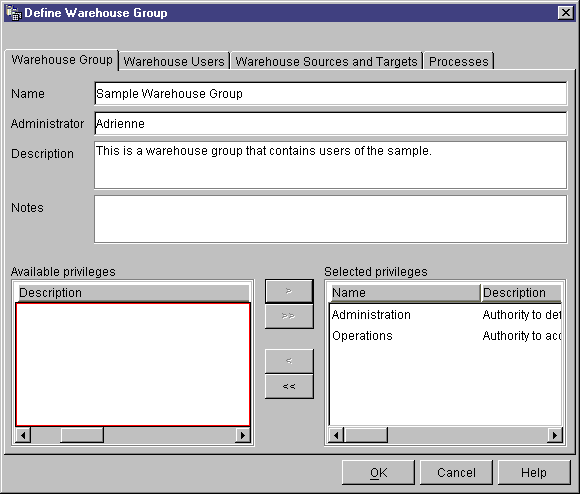
- In the Name field, type the name for the new warehouse
group.
- Optional: In the Administrator field, type the contact
for this new warehouse group.
- Optional: In the Description field, type a short
description of the new warehouse group.
- Optional: In the Notes field, type any additional
information that an administrator might need to know about this warehouse
group.
- From the Available privileges list, select the privileges that
you want to assign to the warehouse group, and click >.
The privileges that you select are moved to the Selected privileges
list.
If you want to assign all of the privileges in the Available
privileges list, click >>.
You can select from the following privileges:
- Administration
- Users in the warehouse group can define and change warehouse users and
warehouse groups, change Data Warehouse Center properties, import metadata,
and define which warehouse groups have access to objects when they are
created.
- Operations
- Users in the warehouse group can monitor the status of scheduled
processing.
- On the Warehouse Users page, select the warehouse users that you want to
include in the warehouse group from the Available users list, and
click >. The warehouse users that you select are moved to
the Selected users list.
If you want to include all existing warehouse users from the Available
users list, click >>.
- On the Warehouse Sources and Targets page, select the warehouse sources
and warehouse targets to which the warehouse group will have access from the
Available warehouse source and targets list, and click
>. The warehouse sources and targets that you select are
moved to the Selected warehouse source and targets list.
If you want the warehouse group to have access to all warehouse sources and
targets in the Available warehouse source and targets list, click
>>.
Tip: You can authorize warehouse groups to access
warehouse sources and warehouse targets from the Define Warehouse Group
notebook, or the Define Warehouse Source, or Define Warehouse Target
notebook.
- On the Processes page, select the processes to which the warehouse group
will have access from the Available processes list, and click
>. The processes that you select are moved to the
Selected processes list.
If you want the warehouse group to have access to all processes in the
Available processes list, click >>.
Tip: You can authorize warehouse groups to access
processes from either the Define Warehouse Group notebook or the Define
Process notebook.
- Click OK to save the warehouse user group and close the
notebook.
[ Top of Page | Previous Page | Next Page ]