This installation guide applies to IBM(R) WebSphere Development Studio Client, Version 6.0, which is available on CD and DVD, and can be installed on a PC workstation. To quickly get started with installing the product, follow these guidelines:
The Readme file contains prerequisite information, limitations of the product, and information not included in the documentation. For information on migrating from WebSphere(R) Development Studio Client Version 4.0, 5.0, 5.1, or 5.1.2, or from WebSphere Development Tools V5R1M0, see the Migration Guide before installing this product.
You might not have to read this installation guide if you want to do a typical installation on your workstation. The Read Me First booklet packaged with the CDs and DVD contains quick-start installation information. Read it before you install.
For the latest product information, see the Development Studio Client Web site.
This file is available in the following national languages:
Table 1. - National language availability for this install guide
| Brazilian Portuguese | Traditional Chinese | German | Spanish |
| French | Japanese | Korean |
|
You can find the latest version of this guide at ftp://ftp.software.ibm.com/as400/products/ad/wdt400/v601/manuals/install.html.
Migration, upgrade and coexistence issues
Installing WebSphere Development Studio Client
Starting Development Studio Client
Installing WebSphere Development Studio Client Lite for iSeries technology preview
Uninstalling WebSphere Development Studio Client
Returning Users
If you already have WebSphere Development Studio Client installed and want to update to Version 6.0.1, it is not necessary to uninstall the existing software. The Rational Product Updater will update Development Studio Client to the current version on the Web. Consult Upgrades and Updates for details on using the Rational Product Updater. Otherwise, continue with this guide to follow the full installation process.
Installation Process
You need to log on as an administrator to install or uninstall the product on a workstation.
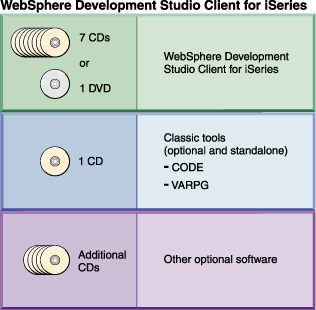
Your CD package contains a number of CDs and one DVD. The DVD contains our product, which contains the same functions as the Rational base product ( Rational Web Developer), adapted for the needs of iSeries programmers. There are other CDs in the package (for example, CODE and VisualAge RPG; DB2 Universal Database) that are not on the DVD. If you have a DVD reader and want to do a typical installation on your workstation, it is easier to install from the DVD.
Here is a brief summary of the installation process:
Cooperative Development Environment (CODE) and VisualAge RPG are not included in this installation. If you want to install them, find the CODE and VisualAge RPG CD. You need to install CODE if you want to view your DDS source as it will appear on a screen. This enables you to see how Web settings will appear in your WebFacing applications before converting the source and running the application.
You cannot directly install the product to a LAN server. You can, however, copy the product files to a LAN server and launch the installation to a local machine. See Copying the product to a LAN server.
The IBM Rational(R) Software Development Platform is a common development environment that is shared by the following products:
If you install any of these products, the Rational Software Development Platform is automatically installed as part of the product. If you have more than one of these products installed, the development platform is installed only once. All of these products share the same workbench or integrated development environment, called the workbench, and each product adds function to the workbench by contributing plug-ins. A plug-in is a software module that adds function to an existing program or application.
Starting Rational and WebSphere software products
When you open the Start menu, regardless of what Rational or WebSphere product you have installed, the top-level menu entry will always be IBM Rational.
Depending on how many products you have installed, you will have a subfolder for each product under IBM Rational. If, for example, you have both Rational Functional Tester and Development Studio Client installed, you can see a subfolder for each of these. These subfolders contain links to product specific information (such as readme files), as well as a launchpoint for the workbench. The launchpoint has the name of the product (such as Development Studio Client), and it starts the workbench.
You can also start the workbench by clicking the Rational Software Development Platform option, under the IBM Rational menu.
Migration and coexistence
Be sure to read the section Upgrades and Updates if you already have at least one Rational or WebSphere product installed and you want to install Development Studio Client. It contains important information about release levels.
Table 2 illustrates what happens when you try to install more than one product that is built on the Rational Software Development Platform on the same machine. In the table, the vertical axis represents products already installed, while the horizontal axis represents products that you are attempting to install.
Products installed in sequence can either block, upgrade, or share with each other.
| Attempt to install > | Rational Software Modeler | Rational Web Developer | WebSphere Development Studio Client | Rational Application Developer | WebSphere Development Studio Client Advanced Edition | Rational Software Architect | Rational Functional Tester | Rational Performance Tester |
|---|---|---|---|---|---|---|---|---|
| WebSphere Development Studio Client for iSeries | Share | Share | N/A | Upgrade | Upgrade | Share | Share | Share |
| WebSphere Development Studio Client Advanced Edition for iSeries | Share | Block | Block | Share | N/A | Share | Share | Share |
| Rational Application Developer | Share | Block | Share | N/A | Share | Upgrade | Share | Share |
| Rational Web Developer | Share | N/A | Share | Upgrade | Share | Upgrade | Share | Share |
| Rational Software Architect | Block | Block | Share | Block | Share | N/A | Share | Share |
| Rational Software Modeler | N/A | Share | Share | Share | Share | Upgrade | Share | Share |
| Rational Functional Tester | Share | Share | Share | Share | Share | Share | N/A | Share |
| Rational Performance Tester | Share | Share | Share | Share | Share | Share | Share | N/A |
Uninstallation
The workbench is installed in the installation directory of the first product you install that uses the Rational Software Development Platform. It is not reinstalled with any other products, so if you upgrade your first product, you should not remove your first installation directory after the upgrade has completed, as it still contains the files for the workbench.
When you run launchpad.exe or insert Disk 1 or the DVD into your
disk drive, a launchpad opens from which you can install a number of products
or components. These are located on the other CDs contained in the
media package. Documentation (section
 in Figure 2) is located on Disk 1.
Figure 2. Installation launchpad
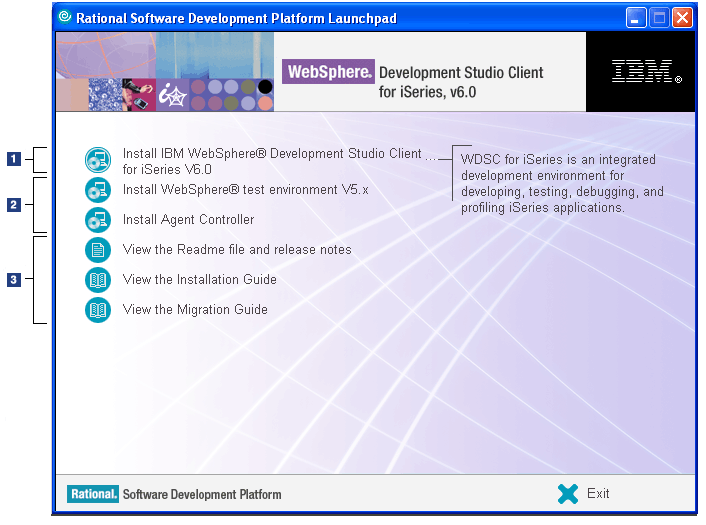
Table 3 can help you decide which products to install. You must install WebSphere Development Studio Client first. The launchpad stays on the screen while you install Development Studio Client. Afterwards, you can install additional components one at a time. (You can also install them in parallel, but it might be hard on your system.)
The links in the third column are to sections in the Rational Web Developer
Installation Guide.
| Launchpad item | Description | Link to more information |
|---|---|---|
Core (section
 in the picture) in the picture)
| ||
| Install IBM WebSphere Development Studio Client | WebSphere Development Studio Client is an integrated development environment for developing, testing, debugging, and profiling iSeries applications. | This guide. |
Optional (section
 in the picture) in the picture)
| ||
| Install WebSphere test environment V5.x | (Optional) This test environment allows you to test J2EE applications in a local instance of WebSphere Application Server V5.x. | Installing WebSphere Application Server 5.x as an integrated test environment |
| Install Agent Controller | (Optional) Agent Controller is a daemon that provides application data to local or remote testing and profiling tools such as the Rational Developer products. Also helps with remote deployment. | Installing Agent Controller |
The product installs one language according to the user locale setting in Microsoft Windows. If you change the locale after the installation is complete, product components and help screens might not display the correct language. To change languages, completely uninstall the product as described in the Uninstalling WebSphere Development Studio Client section, change the locale, and then install the product again.
Development Studio Client requires the following hardware:
Additional disk space is needed if the electronic image to install WebSphere Development Studio Client is downloaded. Also, additional disk space is required for the resources that you develop. Disk space requirements can be reduced if optional features and runtime environments are not installed. If your disk is formatted with a FAT32 file system instead of NTFS, more space is required. The many small files can use disk space inefficiently due to the disk blocking structure that FAT32 uses.
If you want to use the WebSphere Development Studio Client Lite for iSeries technology preview, a minimum of only 256 MB of RAM is necessary. However, it requires an additional 400 MB of disk space.
Table 4. - Hardware requirements
Minimum Recommended Memory
- 768 MB for WebSphere Development Studio Client
- 256 MB for WebSphere Development Studio Client Lite for iSeries technology preview
- 1.0 GB (required when using the WebSphere Application Server test environment)
Permanent disk space
- 3.5 GB
- 3.9 GB for WebSphere Development Studio Client Lite for iSeries technology preview
- 4.5 GB for WebSphere Development Studio Client
Temporary disk space needed during product installation
- 1 GB in the installation directory
- 800 MB in a temporary directory
- 1 GB in the installation directory
- 800 MB in a temporary directory
Because the product needs extra temporary space during installation, you can change the default drive for temporary space to another drive.
To move your temporary space:
WebSphere Development Studio Client, Version 6.0, can be installed on Microsoft Windows 2000 and Windows XP. It cannot be installed on Windows 95, Windows 98, Windows NT, or Windows Me.
The product requires one of the operating systems in Table 5 and the other software in Table 6.
Table 5. Operating system requirements
| Operating system | Requirements |
| Windows 2000 | Windows 2000 Professional, Service Pack 3 or 4
Microsoft Internet Explorer 5.5, Service Pack 1 |
| Windows XP | Windows XP Professional, Service Pack 1 or 2 |
| Windows 2000 Server | Windows 2000 Server, Service Pack 3 or 4 |
| Windows 2000 Advanced Server | Windows 2000 Advanced Server, Service Pack 3 or 4 |
| Windows Server 2003 Standard Edition | Windows Server 2003 Standard Edition |
| Windows Server 2003 Enterprise Edition | Windows Server 2003 Enterprise Edition |
Table 6. Other software requirements
| Development time requirements | Runtime requirements |
|
|
You can migrate from WebSphere Development Studio Client V4.x.x., 5.0.x, or 5.1.x to Version 6.0. Version 6.0 can also coexist with any of these versions. See the Migration Guide for more migration information.
See the IBM Rational Software Development Platform section for more information about coexisting with other Rational and WebSphere products that use the workbench.
If you have a beta version of IBM WebSphere Development Studio Client, or any version of WebSphere Development Tools, please remove it before installing Version 6.0.
If you have a previous version of Agent Controller or any software derived from the Hyades Data Collection Engine, you should stop it, uninstall it, and clean up any leftover files before installing this version of Agent Controller.
You can install the product from the DVD or CD-ROM, or copy the product files to a LAN server and install it from the server to a local machine. See Copying the product to a LAN server. An installation wizard is provided, but you can also install from a command prompt.
Figure 1 contains a diagram showing product names and CD distribution. To install the product from CDs, follow these steps:
Tip: You can bypass the launchpad and go straight to the installation wizard by running setup.exe from the \setup directory on Disk 1.
Supported national languages are Brazilian Portuguese, French, German, Italian, Japanese, Korean, Simplified Chinese, Spanish, and Traditional Chinese.
Note: If you select the optional Language Pack feature and then cancel the installation shortly afterwards while files are being copied, subsequent installations will show some anomalies. On a subsequent installation, the status of the language pack will show as installed on the Feature panel. You can reinstall the Language Pack feature to copy the proper files to your disk. In this situation, at the end of the installation you might receive a message stating that One or more errors occurred during replacement of files. You can safely ignore this error message.
486604803  The requested license has expired
486604805  The start dates for all licenses have not yet occurred
Additional features can be installed from the CD or DVD following the initial installation of the product.
Errors occurred during the installation - User cancelled installationWhen you attempt to uninstall the product in this state, you may receive the following error:
A suitable JVM could not be found. Please run the program again using
the option -is:javahome <JAVA HOME DIR>.
To work around this, you must rerun the installation program to complete the previously canceled modification, and then proceed to uninstall the product.
The installation from the DVD is very similar to the installation from CDs, except that there is only one DVD. Follow the instructions under Installing from the CD-ROM, except use the supplied DVD instead of the set of CDs. When using the DVD, you do not have to switch disks. You still have to use the CDs for the other options on the launchpad, however.
If you want to install the product from a command prompt without using the graphical interface, run the following command from the \setup directory on the first installation CD:
setup.exe -console
Canceling the installation through the console mode is limited. You can cancel the installation during the preparation steps of the installation process, but there is not a supported method of canceling the installation after files have begun to be copied to the hard drive. Pressing Ctrl+C will force the installation process to quit, but this is not recommended, and you will have to do some cleanup.
The Development Studio Client installation program can be run silently if you do not want to interact with the installation wizard.
Prior to silently installing the product, you must set up your local copies:
The following features are installed by default when silently installing WebSphere Development Studio Client:
To install WebSphere Development Studio Client silently with only the default selected features to the default directory system_drive:\Program Files\IBM\Rational\SDP\6.0:
setup.exe -silent
By changing the installLocation parameter, you can install WebSphere Development Studio Client to a different directory. For example, if you want "d:\my softdev" to be your installation directory, follow the same steps that were just described, but run the following command:
setup.exe -silent -P installLocation="d:\my softdev"
(In this example, only the default features are installed.)
WebSphere Development Studio Client provides you with a sample response file that silently installs all the default features. This response file is called responsefile.txt and it is located in the \disk1\util directory. If you want to change the response file to install other features, it is recommended that you first make a backup copy of responsefile.txt.
You can update the response file to install one or more optional WebSphere
Development Studio Client features. The following table shows the
response file options and their corresponding entries in the response
file.
Table 7. Response file options
| Feature | Response file entry |
|---|---|
| Product installation directory | installLocation |
| WebSphere Application Server Version 6.0 | feature_was6_win32.active |
| Language Pack | feature_lang_pack_rwd_win32.active |
| Enterprise Generation Language (EGL) | feature_egl_win32.active |
| Examples for Eclipse Plug-in Development | feature_examples_win32.active |
To silently install any of the optional features:
In this example, the revised line shows the changes:
-P feature_examples_win32.active=true
setup.exe -silent -options "Your_directory\myresponsefile.txt"Your_directory is the fully qualified directory name of where your response file resides.
Upgrading to WebSphere Development Studio Client Advanced Edition is a true upgrade, not a merge. When you upgrade to the Advanced Edition, all the plug-ins for the standard edition are deleted.
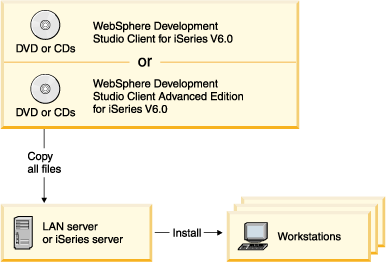
In addition to installing by CD or DVD, you can also copy the contents of the CD to a LAN server, and then users can install the product from the server to their workstations.
Although you cannot install the product on a LAN drive, as an administrator you can copy all the files from the DVD or CDs onto a LAN server. Your users can then install the product from the server to their workstations.
Figure 3. A LAN installation flow from DVD to LAN to workstations
You need approximately 7.5 GB of disk space to store CD or DVD content on the disk.
To copy the files from the CDs:
These are all the core installation files. If you want the installation files for any of the following optional features, copy the contents of the appropriate CDs into your temporary directory.
To copy from DVD to a server:
After the product is copied to a LAN server, it can be installed onto a workstation from the server. The installation must be done from the workstation.
To install from the LAN server to a workstation:
You can also run this command from Windows Explorer. Click Tools > Map Network Drive.
The product can be copied from the CDs or DVD to an iSeries server, which can then be installed by users on their workstations.
An administrator or user can copy all the files from the DVD to an iSeries server. This allows users to install from the iSeries server to a workstation.
To copy the DVD or the CDs to an iSeries server, follow the instructions given under Copying the product to a LAN server. See Figure 3 for an illustration.
After the product is copied to the iSeries server, it can be installed onto a workstation from the server. The installation must be done on the workstation.
To install from the iSeries server to a workstation:
You do not need to reboot your workstation after installing the product.
Because the product is part of the Rational Software Development Platform, it will be in a folder in the Start menu called IBM Rational. This is different from previous versions. Your work in the product is stored in a directory called a workspace. You can set it to whatever you want.
To start the product:
Tip: If you select the Use this as the default and do not ask again check box, the software will use the workspace from the previous session. You might want to indicate your workspace each time you start the product if you maintain different workspaces for different projects. You can change the default value after you have started the product by selecting File > Switch Workspace and browsing to (or creating) a folder on your local system.
The workbench first opens to a series of welcome pages that provide a product overview and information about what's new, plus links to tutorials, samples, and external Web resources. Spend some time exploring these options, and be sure to scroll. Notice as well the sources of information that are available from the Help menu. To display the help, click Help > Help Contents.
Updating to WebSphere Development Studio Client > WebSphere Development Studio Client Version 6.0.1
In order to update WebSphere Development Studio Client for iSeries to Version 6.0.1, first install Version 6.0. From here, Rational Product Updater can be used to install the Version 6.0.1 Refresh Pack.
The Rational Product Updater is a tool that keeps track of all Rational Software Development Platform products installed on your system and searches for and installs product updates and optional new features. This new tool replaces Update Manager.
The Product Updater is installed automatically when you install the first Rational software development product on your system. All subsequent Rational software development products that you install are automatically registered with this tool. You can search for and automatically install updates to each product:
Any dependencies between updates are automatically enforced. The Product Updater allows you to manage updates to all of your Rational software development products from a single location. It even updates itself when needed.
The Product Updater also enables you to perform these tasks:
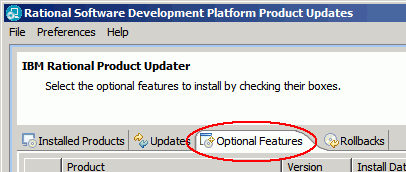
To start the Product Updater on your workstation and find information on using the tool:
Figure 4. Accessing the Rational Product Updater from the Start Menu

Figure 5. Accessing the Rational Product Updater from the Help menu

If you have other Rational products installed and you want to install Development Studio Client, the existing products must be at the correct fix pack level first. If they are not, a dialog box asks you to update both Rational Product Updater and the existing products before you install Development Studio Client.
The following table shows the correct fix pack levels for Rational
products:
Table 8. Fix pack levels for Rational products
| Product | Fix pack level |
|---|---|
| Rational Software Modeler | 6.0.0.1 |
| Rational Software Architect | 6.0.0.1 |
| Rational Performance Tester | 6.1.0 |
| Rational Performance Tester Agent | 6.1.0 |
| Rational Functional Tester | 6.1.0.1 |
| Rational Manual Tester | 6.1.0.1 |
| Rational Performance Analyst | 6.0.0 |
| WebSphere Messagebrokers Toolkit | 6.0.0 |
| WebSphere Eventbrokers Toolkit | 6.0.0 |
| WebSphere Developer zSeries | 6.0.0 |
| WebSphere Integration Developer | 6.0.0 |
| WebSphere Development Studio Client for iSeries | 6.0.1 |
If you are not sure which Rational products you have installed, check Start > Programs > IBM Rational.
The technology preview requires less system memory than the standard product and includes a set of core development tools, for editing, compiling, and debugging. This is an ideal product for RPG and COBOL programmers looking for a way to work with their code without having to load the full workbench. As a result of the decreased memory requirements, WebSphere Development Studio Client Lite for iSeries technology preview will perform much quicker than the standard Development Studio Client.
System Requirements for WebSphere Development Studio Client Lite for iSeries technology preview:
In order to install WebSphere Development Studio Client Lite for iSeries technology preview, follow these steps:
To start the product, click Start > Programs > IBM Rational > WebSphere Development Studio Client Lite for iSeries technology preview > Launch WebSphere Development Studio Client Lite.
To uninstall Development Studio Client:
You do not need to reboot your workstation after uninstalling the product.
All files in any plug-ins or features directories are automatically deleted, including your data and third-party plug-ins that reside in any of these directories. Your workspace directory, which contains your work, is not deleted. Some other directories remain:
If you try to partially uninstall one or more of the Development Studio Client required features, you receive an error message similar to this:
Invalid selection:
Unable to uninstall ide_required: root is not set for uninstall
To work around this problem, select the Product Uninstallation check box. The uninstallation page of the wizard is reinitialized so that you can now uninstall the product entirely, or clear the selection of features that you do not want to uninstall.
Note to U.S. Government Users Restricted Rights - Use, duplication or disclosure restricted by GSA ADP Schedule Contract with IBM Corp.
This information was developed for products and services offered in the U.S.A. IBM may not offer the products, services, or features discussed in this Documentation in other countries. Consult your local IBM representative for information on the products and services currently available in your area. Any reference to an IBM product, program, or service is not intended to state or imply that only that IBM product, program, or service may be used. Any functionally equivalent product, program, or service that does not infringe any IBM intellectual property right may be used instead. However, it is the user's responsibility to evaluate and verify the operation of any non-IBM product, program, or service.
IBM may have patents or pending patent applications covering subject matter described in this Documentation. The furnishing of this Documentation does not give you any license to these patents. You can send license inquiries, in writing, to:
IBM Director of LicensingFor license inquiries regarding double-byte (DBCS) information, contact the IBM Intellectual Property Department in your country or send inquiries, in writing, to:
IBM World Trade Asia CorporationThe following paragraph does not apply to the United Kingdom or any other country where such provisions are inconsistent with local law: INTERNATIONAL BUSINESS MACHINES CORPORATION PROVIDES THIS PUBLICATION "AS IS" WITHOUT WARRANTY OF ANY KIND, EITHER EXPRESS OR IMPLIED, INCLUDING, BUT NOT LIMITED TO, THE IMPLIED WARRANTIES OR CONDITIONS OF NON-INFRINGEMENT, MERCHANTABILITY OR FITNESS FOR A PARTICULAR PURPOSE. Some states do not allow disclaimer of express or implied warranties in certain transactions, therefore, this statement may not apply to you.
This information could include technical inaccuracies or typographical errors. Changes are periodically made to the information herein; these changes will be incorporated in new editions of the publication. IBM may make improvements and/or changes in the product(s) and/or the program(s) described in this publication at any time without notice.
Any references in this information to non-IBM Web sites are provided for convenience only and do not in any manner serve as an endorsement of those Web sites. The materials at those Web sites are not part of the materials for this IBM product and use of those Web sites is at your own risk.
IBM may use or distribute any of the information you supply in any way it believes appropriate without incurring any obligation to you.
Licensees of this program who wish to have information about it for the purpose of enabling: (i) the exchange of information between independently created programs and other programs (including this one) and (ii) the mutual use of the information which has been exchanged, should contact:
Lab DirectorSuch information may be available, subject to appropriate terms and conditions, including in some cases, payment of a fee.
The licensed program described in this Documentation and all licensed material available for it are provided by IBM under terms of the IBM Customer Agreement, IBM International Program License Agreement or any equivalent agreement between us.
Information concerning non-IBM products was obtained from the suppliers of those products, their published announcements or other publicly available sources. IBM has not tested those products and cannot confirm the accuracy of performance, compatibility or any other claims related to non-IBM products. Questions on the capabilities of non-IBM products should be addressed to the suppliers of those products.
This information contains examples of data and reports used in daily business operations. To illustrate them as completely as possible, the examples may include the names of individuals, companies, brands, and products. All of these names are fictitious and any similarity to the names and addresses used by an actual business enterprise is entirely coincidental.
This information contains sample application programs in source language, which illustrates programming techniques on various operating platforms. You may copy, modify, and distribute these sample programs in any form without payment to IBM, for the purposes of developing, using, marketing or distributing application programs conforming to the application programming interface for the operating platform for which the sample programs are written. These examples have not been thoroughly tested under all conditions. IBM, therefore, cannot guarantee or imply reliability, serviceability, or function of these programs. You may copy, modify, and distribute these sample programs in any form without payment to IBM for the purposes of developing, using, marketing, or distributing application programs conforming to IBM's application programming interfaces.
Each copy or any portion of these sample programs or any derivative work, must include a copyright notice as follows:
(C) (your company name) (year). Portions of this code are derived from IBM Corp. Sample Programs. (C) Copyright IBM Corp. 2000, 2005. All rights reserved.
Programming interface information is intended to help you create application software using this program.
General-use programming interfaces allow you to write application software that obtain the services of this program's tools.
However, this information may also contain diagnosis, modification, and tuning information. Diagnosis, modification and tuning information is provided to help you debug your application software.
Warning: Do not use this diagnosis, modification, and tuning information as a programming interface because it is subject to change.
The following terms are trademarks of International Business Machines Corporation in the United States, other countries, or both:

InstallShield is a trademark of InstallShield Corporation.
Intel(R) and Pentium(R) are trademarks of Intel Corporation in the United States, other countries, or both.
Java(TM) and all Java-based trademarks and logos are trademarks or registered trademarks of Sun Microsystems, Inc. in the United States, other countries, or both.
Rational is a trademark of International Business Machines Corporation and Rational Software Corporation(R), in the United States, other countries or both.
Microsoft(R), Windows(R), Windows NT(R), and the Windows logo are trademarks of Microsoft Corporation in the United States, other countries, or both.
Other company, product, and service names may be trademarks or service marks of others.