Dependencies are configured on originating (build) workflows so that the artifacts of the child project can be retrieved at run time. Codestation, AnthillPro's dependency-management system, enables you to set how dependency builds occur. For example, a dependency can be configured so that the parent project checks its dependencies and builds them at run time. This is called a pull build. Or, a build for the child project can kick off a build of the parent. This is called a push build.
To successfully configure a dependency relationship requires configuration on both the parent and child projects:
Artifact Set configuration on the child project. AnthillPro stores the build artifacts of the child project in Codestation as an Artifact Sets. See Capture and Deliver Build Artifacts (Child Project).
Dependency configuration on the parent project. Once the child project's build artifacts are captured and delivered to Codestation, the dependency is configured on the parent project's originating workflow. You will also need to add a Resolve Dependency Artifacts step to the parent project's build job. See Configure Dependency (Parent).
Dependencies may also be configured using the Dependency Viewer on the Administration tab. While the view is different, the basic process is the same as outlined below. The one main advantage to using the Dependency Viewer is that you can manipulate multiple dependency configurations without haveing to navigate to the individual projects.
You will need read and write permission to the Administration page, as well as administrative permissions for configuring Life-Cycle Models if you need to add a new Artifact Set. See Setting Up Security or contact your AnthillPro administrator.
The child project should already have at least one successful Build Life. If you are configuring a dependency on a Codestation project, make sure you have configured a Build Life. See Using Codestation Projects.
Before you can complete a dependency relationship, AnthillPro will need to capture the child project's build artifacts and then deliver those artifacts to the embedded dependency-management system (called Codestation). Once the artifacts are in Codestation, AnthillPro will be able to keep track of when and where they are used as dependencies.
Since AnthillPro does not know what artifacts you want captured, you will need to label them so they can be grouped and stored together. This is done by defining an artifact set on your build process. You can think of the artifact set as a grouping of build artifacts (files) that allows for fine-grained consumption of the artifacts. Once the artifacts are labeled and grouped into an artifact set, you will need to manually add a Deliver Artifact step to your build job.
To capture and deliver build artifacts:
Go to Administration and select the child project's build workflow.
On the Workflow page, select the Artifacts tab, then click the New Artifact Config button.
Configure artifact set:
Artifact Set. Select an artifact set from the drop-down menu (using one of the defaults is fine if you are just starting out). AnthillPro ships with 3 default artifacts sets that correspond to the most common tiers of a 3-tier application:
APP. Used to group objects for deployment to the application tier of a 3-tier application.
DB. Used to group objects for deployment to the database tier of a 3-tier application.
WEB. Used to group objects for deployment to the web tier of a 3-tier application.
Generally, an artifact set is named for the type of objects which are grouped inside of them. The objects within an artifact set, in turn, are grouped by how the objects are going to be consumed.
Most users will eventually need to configure their own artifact sets to better reflect the contents. The process is rather simple for an existing project: You simply add a new artifact set to the project's Life-Cycle Model.
Base Directory. Here, you need to give the directory where the artifacts (say a jar or dll file) are placed once the build is complete. This directory is relative to the build's working directory. So if your build places the artifacts in a "dist" directory, you would specify
dist/here. Note that if you leave this filed blank, AnthillPro will include the entire contents of the working directory in the artifact set.Include Artifacts. List the artifacts to be retrieved from within the base directory. You can specify the names of files that reside in the base directory: e.g.,
myProjectArtifacts.zip. Or, if the artifacts are located in a sub directory, you specify something likebin/myProjectArtifacts.jar. Each include pattern must be entered on a separate line.You can also use the following wild cards to tell AnthillPro what to include in the artifact set:
**Indicates include every directory within the base directory.*Used to include every file. So, if you use*.zip, the files matching this pattern will be included.**/*Tells AnthillPro to retrieve the entire file tree underneath the base directory.
If you leave this filed blank, AnthillPro will include all the files in the base directory (if one was specified).
Advanced: To include symbolic links and empty directories, add the link/directory as part of your include pattern. See Configure Server Miscellaneous Settings. Exclude Artifacts. Give the patterns of the artifacts that should be skipped from the include. This field is set in the same way as the Include Artifacts field, only you are telling AnthillPro what NOT to include. If you leave this filed blank, AnthillPro will exclude no files.
Click Save.
To deliver your build artifacts to Codestation, you need to add the Artifact Delivery step to the build job. Go to the child project's job configuration page (on the Administration page).
In order for AnthillPro to manage the artifacts, they must be sent to Codestation, AnthillPro's built-in artifact/dependency management system. If the deliver step is not included, the artifacts will remain in the working directory (until it is cleaned up, etc.) and unavailable for dependency relationships.
Click the Insert After icon of the step prior to where this step should run. Remember, the steps run in order, so any step, such as the Artifact Deliver step, which deals with the build artifacts must come after the actual "build" step.
On the Steps page, expand the Artifacts folder, select Artifact Deliver, and click Select.
Configure step:
Name. Give a name for this step. A simple "Artifact Deliver" is sufficient.
Artifact Set. Select the artifact set you just finished configuring.
Show Additional Options. These are advanced settings. For a simple dependency relationship, you can skip these settings.
Click Save.
Run a build of the child project. The artifacts will be delivered to the AnthillPro dependency-management system. This will make the artifacts available as a dependency to other projects.
To view the artifacts, go to the Dashboard and select your build workflow. Click on the most recent Build Life (i.e., build number) and then select the Artifacts tab.
After verifying the correct artifacts have been captured and delivered, see Configure Dependency (Parent).
Once the child project's artifacts are in Codestation, you need to configure the dependency relationship on the parent project's originating (build) workflow, and add a resolve dependency step to the build job. When configuring dependencies, you will also need to tell AnthillPro how you want your dependencies handled. To get started:
Go to Administration and select the parent project's originating (build) workflow.
Select the Dependencies tab.
Click New Dependency at the bottom of the page. Configure the dependency:
Project. Begin typing the name of the child project. You can use the wild card * (star) to return all available projects. The auto fill will give you both the name of the project and associated workflows. If the child project has multiple originating workflows, make sure you select the correct one. See Capture and Deliver Build Artifacts (Child Project). Click Select.
Build Life Criteria. Allows you to define which Build Life on the child project will be used to fulfill the dependency. The criteria for this is based on the status and/or stamp value.
The values given here will also be used when a build, based on the dependency trigger (see below), fails. Should a requested child-project build fail or if one is not needed, AnthillPro will use the Build Life Criteria to determine which child-project Build Life to use when building the parent project. Build Life Criteria is cumulative. Having "success" and "1.2.*" will match successful builds whose build number starts with 1.2.* -- not with successful builds or those that start with 1.2 (without the final period). With Status. Select a status from the drop-down menu. The statuses used here were configured on the child project's Life-Cycle Model. If you select a status, only Build Lives that assigned the status are available to the parent project.
With Stamp. You can either input the exact stamp or specify a stamp pattern using '?' for a single character and '*' for matching any sequence of characters. If you use a stamp, make sure it matches the stamp used on the child project.
If configuring a dependency on a Codestation project, make sure you have assigned the appropriate Status and Stamps on the that project's configuration page. See Using Codestation Projects. Dependency Trigger. Determine how AnthillPro should treats builds of the parent project.
Before configuring a Dependency Trigger, please see Pulling Builds and Pushing Builds. None. AnthillPro will look up the matching build and use it. No additional builds will be created by the dependency relationship.
Pull Build. Before the parent project's workflow runs, it will create a new build request for the child project. See Pulling Builds.
Use existing if pull fails. AnthillPro will use the most recent child-project build if the request results in a failed build.
Always force. Will always build, even if a failure occurs down the dependency graph.
Cascade force. Forces a build of all the projects down the dependency tree.
Push Build. Pushes builds up the dependency relationship. Each time a new build of the child project meets the criteria, a build request for the parent project's workflow is created. See Pushing Builds.
Artifact Retrieval. Tell AnthillPro which Artifact Set to put in what location. The locations are relative to the workflow working directory. Check the box next to each artifact to retrieve.
Retrieve. Check the box next to the appropriate artifact set.
Transitive. Check to retrieve dependencies of the dependency into the same folder. The grandchildren must have an artifact set of the same name and the dependency must also check the transitive box for each of those dependencies.
Location. Specify the relative path(s) from the working directory (of the parent project) to copy the dependency artifacts to. You can set multiple locations by using the add link. Project and workflow properties are the only scripting allowed. E.g. ${property:deps_dir}. Use '.' for the current working directory, leave empty to remove.
Click Save.
Conflict Strategy. Tell AnthillPro how you want to deal with dependency conflicts.
The conflict strategy works a bit differently for pulling and pushing dependency triggers. For examples, see Dependency Conflict Strategy. Click the Edit button under the Conflict Strategy menu and select one of the following from the drop-down:
Fail. This option will fail the parent-project's build when a conflict is detected. If your notifications are configured correctly, AnthillPro will notify you that the build failed. The parent project will not build until you correct the conflict.
Favor old. Use this option to have the oldest Build Life's artifacts overwrite those from newer Build Lives. AnthillPro will always use the oldest available artifacts from the child project when a conflict occurs.
Favor new. Allows the newest Build Life's artifacts to overwrite those from older Build Lives. AnthillPro will use the most recent child-project artifacts when a conflict occurs.
Add Resolve Dependency Artifacts job step. This will allow AnthillPro to retrieve the artifacts generated by the child project.
Go to Administration and select the parent-project's build job. Click the Insert After icon of the step prior to where the resolve step is to be included. This should be added before the build step, typically after the populate, changelog, and stamp steps. Configure step:
Name. Give the step a descriptive step. For example, Get Dependency Artifacts.
Transfer Only Changed Files. Retrieves only files that are not already present. To have AnthillPro transfer only changed files based on checksums of the secured artifacts, check the box. Before you run the build, see Secure Artifact Sets.
File Include Patterns. Leave blank or use **/* for all artifacts. To include specific files, give the name patterns that describe the files that will be resolved.
File Exclude Patterns. Give the file name patterns identifying the files that will NOT be resolved.
Artifact Set Include Patterns. Give the patterns matching artifact set names that will be resolved. Use * to match zero or more characters, or ? to match exactly one character.
Artifact Set Exclude Patterns. Give the patterns matching artifact set names that will be resolved. Use * to match zero or more characters, or ? to match exactly one character.
Show Additional Options (advanced). Select the Show Additional Options link to configure more options.
Is Active. Select No to temporarily deactivate the step without deleting it; otherwise select Yes.
Pre-Condition Script. From the drop down menu, select the condition which must be met for the step to continue. Before editing an existing script or creating a new one, see Step Pre-Condition Scripts.
Ignore Failures. Select Yes if this step should not effect the determination for step continuation or the status determination of the job.
PostProcessingScript. Select a script for determining when commands should count as fail or succeed. See Post Processing Scripts.
Timeout. Enter the time in minutes after the start of the step when AnthillPro will consider the step as timed out and abort it.
Click Save.
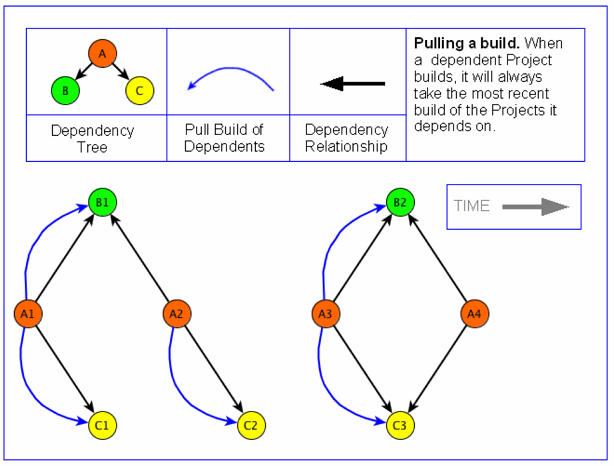
Pull builds will build every dependency that is out of date prior to building the top level project. Before the parent-project's workflow runs, it will create a build request for the child project. The build request may or may not result in a new Build Life of the child project. If the request determines changes have been made to the child project since the last time the parent project was built, the request will kick off a new build of the child project. When the child project finishes building, the new Build Life will be used to fulfill the dependency (see example below).
If a Build Life is not created or the creation of the Build Life fails, AnthillPro will use the Build Life Criteria to determine which child-project Build Life to use when building the parent project. If you are setting a dependency trigger, make sure the Build Life Criteria is configured. Build Life Criteria is cumulative. Having "success" and "1.2.*" will match successful builds whose build number starts with 1.2.* -- not with successful builds or those that start with 1.2 (without the final period).
| Pulling Builds |
When project A builds, it checks for any new builds of projects B and C since the last time project A was built. For build A1, both projects B and C have been built since the last time project A built, so the project A build kicks off (pulls) builds B1 and C1 and then uses the artifacts of the new builds. For build A2, only project C has changed, so build C2 is pulled and used. Since project B has not changed since the last build of project A, build B1 is used for build A2. When project A builds for a third time (A3), it detects changes in both dependent projects, so it pulls a build for both projects (B2 and C3 respectively). For build A4 of project A, no builds of the dependent projects (A and B) are required because no changes have been made to either project since the last build of project A (build A3). So, build A4 simply uses the artifacts of builds B2 and C3 during the build.  |
A Pull Dependency configuration uses less resources than pushing builds, and can be used if resources are scarce. However, there is a trade off when compared to pushing builds: A pulled build does not have the same guarantee that every child project down the dependency tree will compile when the parent project builds. This is highlighted when the dependency trigger is configured to use an existing build if a pulled build fails (see example below).
| Use Existing Build if Pull Build Fails |
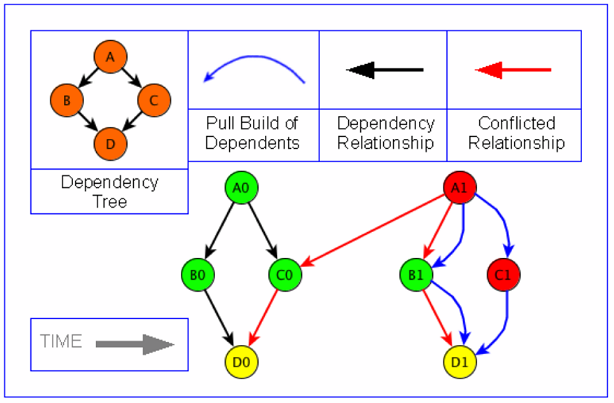
Each project in the dependency tree successfully built (builds B0, C0, and D0 respectively) when the parent project A0 was built. When another build (A1) of project A (the parent project), it created a request for a build of all the projects down the dependency. However, the second build of project C (C1) failed. Because AnthillPro was configured to use an existing build of a child project, the build of project A (the parent) takes the most recent successful build of project C (C0).  |
If your notifications are configured correctly, AnthillPro will notify you that the build of project C (C1) failed. You can then view the Request Context of project C's failed build to diagnose the problem.
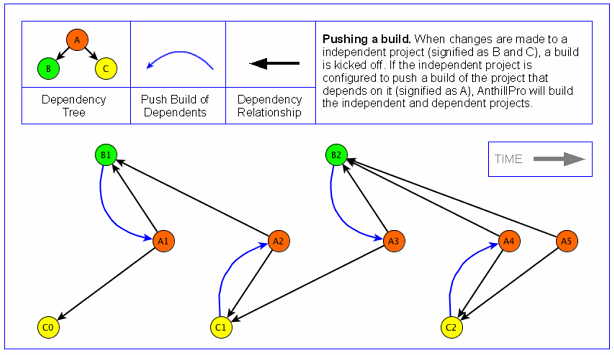
Push builds perform the minimum number of builds, in the correct order, to ensure that a change to a component does not break anything that depends on it directly or transitively. In a typical scenario core libraries (represented by project C in the illustration) rebuild rarely and so rarely trigger builds. If low level libraries change frequently, Push builds will rebuild large parts of the tree regularly causing many builds.
It is worth noting that push builds can become resource intensive, especially when you have a large dependency tree. However, pushing builds provides the best assurance the parent project will compile successfully (see example below).
| Pushing Builds |
When changes are made to a child project (projects B and C), a build is kicked off. If a push-build dependency trigger is configured on the parent project (project A), AnthillPro will build both the child and parents. For example, when project B builds (B1), a build of project A is pushed (kicked off), creating build A1. When project C builds (C1), a build of project A is pushed. Likewise, when project B builds again (B2), a build of project A is pushed, creating build A3. The pushed build of project A then checks the dependency relationship with project C, and uses the most recent project C build (C1). When project C builds (C2), a build of project A is pushed, creating build A4. Build A4 uses build B2. So when a build of Project A is kicked off (A5), it will use the most recent builds of projects B and C (B2 and C2 respectively).  |
The dependency conflict strategy allows you to control how AnthillPro acts when a conflict occurs within the dependency tree. To configure, see Conflict Strategy.
Conflicts typically show up when the parent project (project A in the examples below) depends on two different child projects (B and C respectively) that depend on the same project (D). Looking at the examples below, the build requests are conflicted because two different builds of the same project have been requested in the same context.
When determining the conflict strategy, you can select the following options:
Fail. This option will fail the parent project's build when a conflict is detected. If your notifications are configured correctly, AnthillPro will notify you that the build failed. The parent project will not build until you correct the conflict.
Favor old. Use this option to have the oldest Build Life's artifacts overwrite those from newer Build Lives. In the examples below, AnthillPro would use project D's original build (D0) as part of build A1 for the parent project.
Favor new. Allows the newest Build Life's artifacts to overwrite those from older Build Lives. AnthillPro will use the most recent child-project artifacts when a conflict occurs. In the examples below, AnthillPro would use project D's newest build (D1) as part of build A1 for the parent project.
| Conflict Strategy with Pull Dependencies |
When project A needs to build (A1), it creates a request for build B1 and C1. Likewise, builds B1 and C1 both request a build of project D (i.e., they both want build D1) within the same context. This is where the conflict comes in: Build C1 fails, and build A1 reverts to build C0. Unfortunately, C0 depends on build D0 and build B1 depends on build D1. Because two versions of D are in use, there is a conflict. The conflict strategy is used to determine which version of project D to use when building project A (build A1) or to fail the build of project A.  See also Pulling Builds. |
How the conflict strategy behaves is different for a pulled builds and pushed builds; however, the strategy is configured the same for both dependency trigger types.
| Conflict Strategy with Push Dependencies |
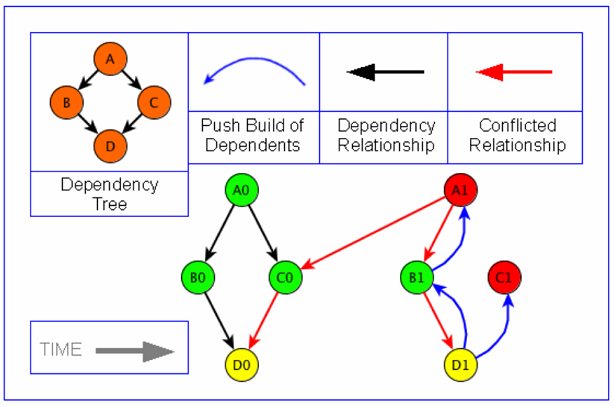
When project D needs to build (D1), it creates a request for builds B1 and C1. The builds of projects B and C result in a request for a build of project A (project A depends on a successful build of projects B and C). However, when project D builds, it pushes an new build of project C (C1). When the build of project C fails, the latest successful build of project C reverts back to build C0 -- this creates a mismatch with project D build versions, causing the project A build to fail. The conflict strategy is used to determine which version of project C to use when building project D (build D1) or to fail the build of project D.  See also Pushing Builds. |