Exercise 5.2: Adding a user to IBM SmartCloud for Social Business

In this exercise you will learn how to add a new user to IBM SmartCloud™ for Social Business.

Overview

To add users, you must have administrator privileges. The procedure below describes how to add one user at a time. If you want to add many users at once, contact your Customer Service Representative.

Depending on the services selected during initial account creation, there may be more than one way to notify the user of their new account.

For users set up with a collaboration service, administrators provide an e-mail address that becomes the user's SmartCloud for Social Business Account Identity. Those users will receive an invitation to the service at that e-mail address.

When setting up an account for SmartCloud iNotes® users, administrators have the option of generating a notification automatically or manually. If the manual option is chosen, it is the administrator's responsibility to notify the user that the account is ready and provide the user's login credentials.

Objectives

After completing this exercise, you should be able to:

Glossary

Term Definition
Account Identity e-mail (Username) Requirements The e-mail address provided for the account identity will serve as the user's login name. It must comply with the following rules:
An e-mail address must contain:
  • a letter, number or underscore as the first character
An e-mail address can contain:
  • periods
  • hyphens
An e-mail address cannot contain:
  • more than 64 characters, excluding the domain name
  • 2 consecutive periods
  • a period as the last character
Administrator An Administrator has access to modify all company settings like contact information and description, system settings like security options, file sharing rules, and company theme. In addition, they can add or remove users, manage user roles, assign administrator privileges or administrator assistant privileges to other users, enable integrated applications for users, and manage service subscriptions.

Administrators can reset passwords for users with mail subscriptions, but not for users with collaboration subscriptions.

Administrators cannot subscribe to a service unless they are also assigned the User role. Do not select both the Administrator role and the Administrator Assistant role for a single user.

Administrator Assistant An Administrator Assistant has sufficient permissions to reset passwords for users with mail or collaboration subscriptions. They can also resend invitations to pending users.

An Administrator Assistant cannot subscribe to a service unless they are also assigned the User role. Do not select both the Administrator role and the Administrator Assistant role for a single user.

Integrated Apps Integrated Apps are third-party applications that help you work smarter. For more information on available applications, visit the Integrated Applications page.

Integrated Apps will display as a choice on the Add User Account page only after they have been enabled by an administrator. You will learn more about Integrated Apps in a later exercise.

Password requirements All passwords must comply with the following rules.
A password must contain:
  • 8 or more characters
  • 1 or more non-alphabetic characters
  • 4 or more alphabetic characters
A password cannot contain:
  • spaces
  • 3 or more repeated characters
  • the user's first name
  • the user's last name
  • the user's e-mail address
A password cannot be:
  • the same as any of the previous 8 passwords
Subscription Subscriptions denote which services and how many seats per service have been purchased by your company. Only subscriptions with available accounts will be displayed.
User A User can view an organization's page, add files, and access to their personal settings. They cannot access organization settings, modify any system settings like security options, profile options, or modify organization themes or logos.

Procedure

Step
Action
1
Log in and navigate to the Administration panel. For detailed steps, see the procedure document: Accessing the Administration Panel.
2
From the navigation pane, click User Accounts.
User Accounts link
3
From the User Accounts page, click Add User Account.
Add User Account button
4
Complete the Basics section.
  1. Enter the user's first and last name.
    First and Last Name text fields
  2. Select the user's language.
    Language pull-down menu.
  3. Select one or more user roles.
    Check boxes for Admin Assistant, Administrator, AppDeveloper, and User user roles
  4. Enter the message that will be sent to the user after the account is created.
    Invitation Text input field.
5
If you selected the User role, available subscriptions will appear.
  1. Select the subscription(s) for the user.
    Collaboration and Mail subscription pull down menus.
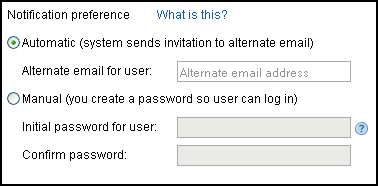
  2. For iNotes user accounts only: Select a notification preference.
    Option 1: Automatic notification
    If you select Automatic, you must provide an alternate external e-mail address. The notification message you created will be sent to this address along with instructions to register and log in.
    Notification preferences for iNotes user accounts. Automatic option is selected.
    Option 2: Manual notification
    If you select Manual, you must create an initial password for the user. Refer to the Password Requirements listed in the glossary. After the account is created, you must send an e-mail to the user that includes:
    • their user name (used to log onto the service -- you will create the user name in Step 7)
    • their password
    • instructions on how to log in
    A sample e-mail is provided for your reference: letter.pdf
6
(optional) Select any available Integrated Apps. You will learn more about Integrated Apps in a later exercise.
The option to select the SmartCloud for Social Business API Explorer integrated application.
7
Set the user Account Identity.
  1. Enter an e-mail address. Refer to the e-mail Requirements listed in the glossary.
    1. For a user with a Collaboration subscription only, this e-mail address will be the user's login name. An account confirmation e-mail will automatically be sent to this address.
      e-mail text field for Collaboration user
    2. For a user with a Mail subscription, this e-mail address will be the user's login name, as well as the e-mail address for their SmartCloud for Social Business e-mail.

      If automatic notification is selected, an account confirmation e-mail will automatically be sent to the alternate e-mail address specified in Step 5b. If manual notification, you must send the user's login credentials to their alternate e-mail address.

      iNotes e-mail text field and a sample company domain is displayed

  2. (optional) Enter a department. This is the department or code your company associates with the user.
    Department text field
8
Click Save.
Save button
9
The next steps are completed by the user:
  1. The user receives an e-mail notification sent either automatically by the service or manually by the administrator.
  2. The user clicks the link in e-mail message.
  3. The user accepts the Terms of Use and changes their password.
  4. On subsequent uses, the user will log in directly through the SmartCloud for Social Business homepage.

Troubleshooting

Problem Resolution
The user does not receive the registration confirmation e-mail after new account creation on a service.
  • Verify that the e-mail address entered in User Accounts > Account Identity is correct.
  • Verify the e-mail is not in the user's Junk Mail folder.
  • Verify that the confirmation e-mail is not in the SPAM filter of your e-mail client. In most cases adding signup@lotuslive.com to your contacts list prevents erroneous SPAM filtering.
  • Resend the invite. Invites will expire if not acted on within 28 days. You will learn about resending invites in a later exercise - Exercise 6.1 Resending the invitation e-mail

Test Yourself

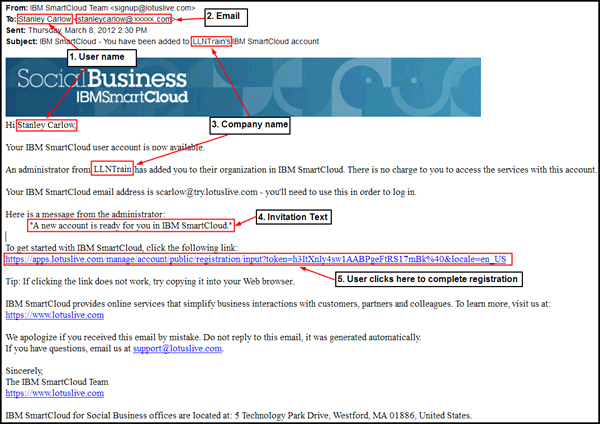
Refer to the picture below of an auto-generated notification to answer the following questions:

The user name, email address, company name, invitation text and registration link are highlighted in an email. Refer to attached autoLetter.pdf
autoLetter.pdf

Question Answer
True or False: 1. User name points to the user's log in name. False. This is the user's actual name. The log in name will be an e-mail address.
True or False: If this user has access to only collaboration services, 2. e-mail points to the user's log in name. True. For collaboration-only users, the email address set in the Account Identity section is where the automatic notification is sent and will be the user's login name.
If this user has a mail subscription, where on the Add a User page was the value of 2. e-mail set? In the Subscriptions section. Once a mail subscription and automatic notification are selected, an e-mail address needs to be specified. This is where the notification email is sent.

This address will not be the user's login name. The user's login name will be the iNotes e-mail address set in the Account Identity section.

In what step of the Adding a User procedure was the value of 3. Company name set? None. The company name is set when you configure your company settings.
In what section of the Add a User page was the value of 4. Invitation Text set? The invitation text was entered in the Basics section.
If I'm sending a SmartCloud iNotes user notification manually, do I need a URL similar to the one shown as 5. User clicks here to complete registration? No. You can direct them to the SmartCloud for Social Business homepage and provide them with their log in name (iNotes e-mail address) and initial password (set when you selected manual notification).

Resources