 View figure. View figure. |
This chapter describes how to setup a Data Restore machine to be managed by Control Center.
Prior to performing the Data Restore setup process detailed in this chapter you should have:
Control Center helps you manage the operational functions of databases in different ways, adapting to the needs of each specific database. You should determine your recovery strategy and decide how Control Center, together with Data Restore, can best meet your needs. Decisions should be made such as:
Notes:
Preliminary Setup
Control Files Setup
Data Restore Machine Setup
Setup Verification
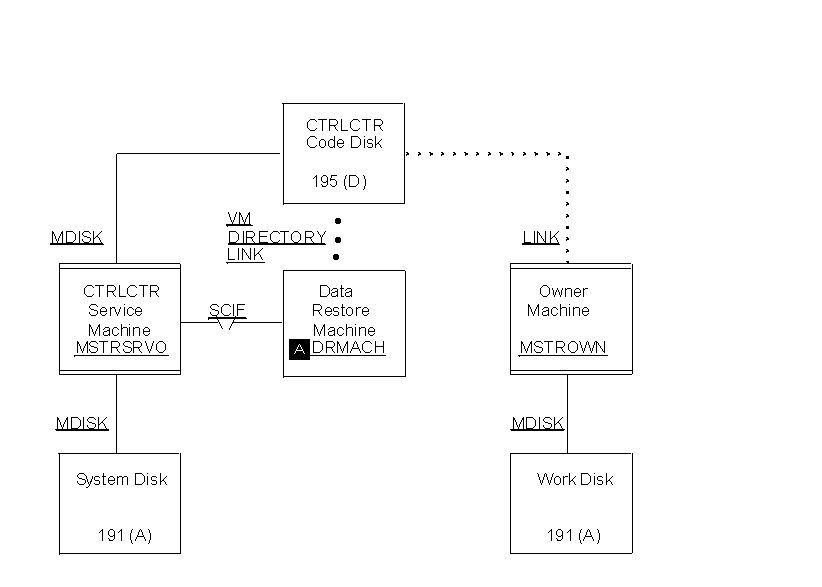
Steps 1 through 4 prepare Control Center to interface with your Data Restore machine. Figure 20 summarizes what you will accomplish.
Figure 20. Data Restore machine in a Control Center Environment. Data Restore machine DRMACH (A) has been added to the environment shown in Figure 20 using the Data Restore machine setup process. Service machine MSTRSRVO manages DRMACH and is the owner of the Control Center code disk. Communications between DRMACH and MSTRSRVO is through the SCIF interface.
View figure.
To begin the Data Restore machine setup, log on to the MAINT virtual machine.
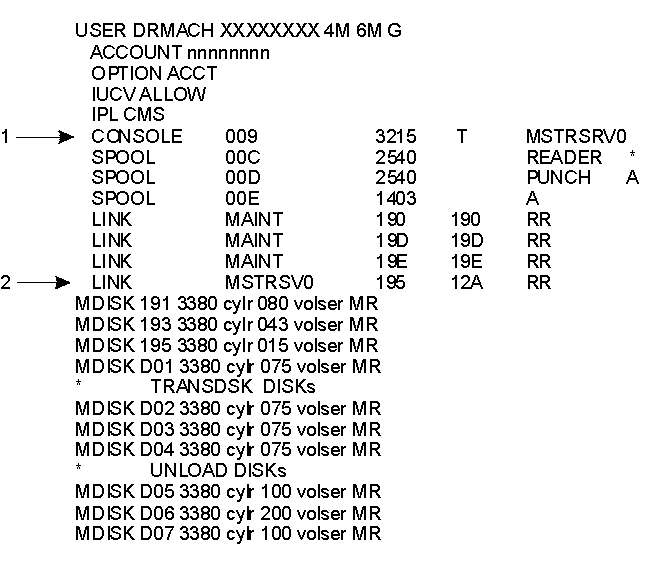
Change the VM directory entries for the Data Restore machine to activate the Single Console Interface Facility (SCIF) and to link the Control Center code disk. Refer to the appropriate VM/ESA Operation manuals for a complete description of these statements.
Figure 21. Example VM Directory Control Statements for a Data Restore machine
 View figure. View figure. |
| Note: | The number and size of minidisks needed by the DRMACH will depend on the size of the tables, whether tapes or disks are used, the number of databases being managed, and the frequency of Data Restore operations. The DRMACH's 191 must be large enough to hold the output from a RELOAD with log recovery. |
| Note: | The managing service machine can either be the owner of the code disk or a service machine that shares a code disk. |
Instead of including the above statement in the VM directory, you can, during a later step, add a LINK statement to the PROFILE EXEC of the DRMACH machine.
DRMACH must be authorized to access the Control Center code disk in READ mode.
| Important: |
|---|
|
|
After you have made the VM directory statement changes for the Data Restore machine, update the VM directory using your local operating procedures.
Under normal operations the DRMACH machine should be autologged each time the CPU is IPLed. The DRMACH machine should therefore be included in the list of virtual machines that are autologged each time the CPU is IPLed.
For proper startup of each Data Restore machine when the CPU is IPLed, the Data Restore machine must be autologged after the managing Control Center service machine.
| Important: |
|---|
|
|
Preliminary Data Restore setup is now complete. Log off the MAINT machine.
Log on to the MSTROWN machine or any machine that has Administrator authority on the Control Center service machine.
Link and access the Control Center code disk in READ mode with an available virtual device address (CUU) and access mode (195 D).
Notes:
To define the Data Restore DRPARMS file, perform these tasks:
Figure 22. Example DREST1 DRPARMS File
******************************************************************
*                         DREST1 DRPARMS                         *
******************************************************************
:Nick.DREST61
 :Drmstr_Machine.Y
 :Version.
 :Administrators.DUKEWE
 :Operators.SQMDEMO3
 :Notify_error.DUKEWE
 :Notify_severe.DUKEWE
 :Notify_dbstatus.DUKEWE
 :Notify_operator.
 :Drtape_premount_timeout.60
When Drtape-premount = Y in the database PARMS file, Control Center will issue a tape mount request for the first tape of a single or multi-tape series, and wait until the tape is mounted before executing the Data Restore function. Control Center will also premount tapes when using native CMS tape handling or when the DMSTVI tape exit is not present. When the tape mount request exceeds the number of minutes indicated by Drtape_premount_timeout, the tape mount and function will be cancelled.
The SDRESTOR DIRECTRY file is used to show which database and Control Center service machine work with which Data Restore machine.
In brief, the steps for manually updating the SDRESTOR DIRECTRY are:
Figure 23 contains entries for two Data Restore machines on the same node, both managed by Control Center service machine, MSTRSRVO.
Figure 23. Example SDRESTOR Directory File
*DBNICK   DBMACH    DBNAME    SQMMACH   NODE       DRMACH
DB2VM510  DB2VM510  DB2VM510  MSTRSRVO  MSTRSRV1   DREST51
DB2VM51A  DB2VM51A  DB2VM51A  MSTRSRVO  MSTRSRV1   DREST51
Table 5. SDRESTOR DIRECTRY File Format
| Word | Description |
|---|---|
| 1 | Database machine name or nickname |
| 2 | Database machine name (virtual machine name) |
| 3 | Database name |
| 4 | Control Center service machine name |
| 5 | Control Center service machine node |
| 6 | Data Restore machine name |
| Important: |
|---|
|
If the same database name exists on two different nodes, you must always use the nickname to direct communication to the correct Data Restore machine. |
You must have Control Center Administrator authority to migrate a file to the 195 disk owned by Control Center. Use the CMS sendfile command to transfer the SDRESTOR DIRECTRY to the code disk.
To establish communications with MSTRSRVO, and to start Control Center in panel mode, enter these commands at the CMS prompt:
SQM (MSTRSRVO
SQM
Replace MSTRSRVO with the machine ID of your service machine. The Control Center Main Menu should now be displayed.
Terminology Used in the various tape file Sections:
You must now update or define the various database TAPES files for Data Restore enablement. Refer to Chapter 11, Tape Management Tool for a complete description of the Tape Management tool.
Two separate database tapes files are maintained by Control Center for each database that will be enabled for Data Restore support. These files are kept on the Control Center service machine's 191 disk and are listed below.
Control Center uses the two database tapes files to maintain a list of output media assigned for usage during a database archive, log archive, trace activities and Data Restore functions.
If you have set up a database using Control Center, then the database TAPES file will already exist. The BACKUP, TRANS and TRANSDSK entries will be added to this file for every series. If Dual Backups will be performed, then BACKUP2 entries will be added. If Incremental Backup will be performed, then INCBK entries will be added. In Setup Step 12: Define & Update Database TAPES Files which follows, new UNLTAPES files will be created.
Data Restore functions are executed on the Data Restore machine. All output media used for Data Restore functions (BACKUP, TRANSLATE, and UNLOAD) will be owned by the Data Restore machine. If output is to DISK, then the CUU indicated for the Data Restore functions must be the real address of the disk. The filemode value is used as a placeholder and will be indicated with an asterisk (*).
When a Data Restore function is started, Control Center will automatically link to the specified real address using the next free virtual address starting at CUU 120, and access the disk using the next free filemode available. When the function either completes or fails, Control Center will automatically detach any disks or tapes used during that operation. While in contrast, for database activities such as ARCHIVES, LOG ARCHIVES or TRACES, all disks used by the database must be linked and accessed beforehand.
It is the responsibility of the database administrator to ensure that the TAPES files are created correctly with valid tape volids and with series numbers that match those identified in the database parameters file. The Series field in the parameters file indicates which group of tapes within the TAPES file will be used for the next operation. Figure 24 illustrates a sample database TAPES file. |For a complete description of the database TAPES file format, refer |to Database TAPES File Format.
Figure 24. Sample database TAPES File With Data Restore Entries
100 ARCHIVE 00000 00:00:00 UNUSED VOL001 100 BACKUP 00000 00:00:00 UNUSED VOL002 100 BACKUP2 00000 00:00:00 UNUSED VOL003 100 01INCBK 00000 00:00:00 UNUSED VOL004 100 01INCBK2 00000 00:00:00 UNUSED VOL005 100 02INCBK 00000 00:00:00 UNUSED VOL006 100 02INCBK2 00000 00:00:00 UNUSED VOL007 100 LOG 00000 00:00:00 UNUSED VOL008 100 LOG 00000 00:00:00 UNUSED VOL009 100 LOG 00000 00:00:00 UNUSED VOL010 100 TRANS 00000 00:00:00 UNUSED VOL011 100 TRANSDSK 00000 00:00:00 UNUSED SQLDB100 TRANSDSK * 196 200 ARCHIVE 00000 00:00:00 UNUSED VOL012 200 BACKUP 00000 00:00:00 UNUSED VOL013 200 BACKUP2 00000 00:00:00 UNUSED VOL014 200 01INCBK 00000 00:00:00 UNUSED VOL015 200 01INCBK2 00000 00:00:00 UNUSED VOL016 200 02INCBK 00000 00:00:00 UNUSED VOL017 200 02INCBK2 00000 00:00:00 UNUSED VOL018 200 LOG 00000 00:00:00 UNUSED VOL019 200 LOG 00000 00:00:00 UNUSED VOL020 200 LOG 00000 00:00:00 UNUSED VOL021 200 TRANS 00000 00:00:00 UNUSED VOL022 200 TRANSDSK 00000 00:00:00 UNUSED SQLDB200 TRANSDSK * 197 300 ARCHIVE 00000 00:00:00 UNUSED VOL023 300 BACKUP 00000 00:00:00 UNUSED VOL024 300 BACKUP2 00000 00:00:00 UNUSED VOL025 300 01INCBK 00000 00:00:00 UNUSED VOL026 300 01INCBK2 00000 00:00:00 UNUSED VOL027 300 02INCBK 00000 00:00:00 UNUSED VOL028 300 02INCBK2 00000 00:00:00 UNUSED VOL029 300 LOG 00000 00:00:00 UNUSED VOL030 300 LOG 00000 00:00:00 UNUSED VOL031 300 LOG 00000 00:00:00 UNUSED VOL032 300 TRANS 00000 00:00:00 UNUSED VOL033 300 TRANSDSK 00000 00:00:00 UNUSED SQLDB300 TRANSDSK * 198 |
| Important: |
|---|
|
There are several restrictions and special precautions that apply when output is to disk rather than tapes. These are discussed in detail in About Archiving to Disk. |
|Select Option P from Control Center's main menu. Then choose the update option |('U') found on the Database Parameter's menu (see Figure 86) to update the database parameters file. Information about the Data Restore values in the database parameters file can be found in Figure 94. For a complete description of the Database Parameters Tool, see About the Database Parameters Tool.
Control Center maintains a set of database startup and control parameters for each database it manages. The PARMS file must be updated for each database that will execute Data Restore functions.
Use tape maintenance functions from the Data Restore Menu, Figure 111, to define the Data Restore BACKUP (TAPES) and UNLOAD (UNLTAPES) files. These files will be used for the Data Restore BACKUP and UNLOAD operations. Select Option BM to add BACKUP and TRANSLATE tapes to the database TAPES file and option UM to define the UNLOAD, database UNLTAPES file. For more details on tape usage, refer to the Data Restore chapters on BACKUP, UNLOAD, and TRANSLATE.
To update the Control Center service machine SQLMSTR profile:
To use Data Restore functions, a LINKPWDS file is required for each Data Restore machine. See Password File Setup for the Data Restore machine for specific instructions on creating this file. After you have created the DRMACH LINKPWDS, use the CMS sendfile to transfer it to the Control Center service machine's 191 disk.
To restart Control Center, or to initialize the new SQLMSTR profile, execute the Control Center NEWPROF command. This can be invoked either through CMS by entering SQM NEWPROF, or from the Control Center menu interface by first selecting Option G on the Control Center main menu, followed by Option N from the General Utilities Functions menu.
Once these steps have been completed, log off the MSTROWN machine.
Steps 16 through 21 complete the Data Restore interface to Control Center.
Log on to the Data Restore machine. At the CMS prompt type: query secuser. If the response does not indicate the Control Center service machine, review the VM directory entries to determine if the SCIF interface has been established. See Setup Step 2: Redefine the Data Restore Machine (DRMACH).
Access the Control Center code disk with an available disk access mode. If you did not include a LINK statement in the VM directory (Step 2), you will first need to link to the code disk with an available CUU that is not the same as any address that the database uses.
| Note: | DRMACH must be authorized to access the Control Center code disk in READ mode. |
To create the Data Restore machine's SQLMSTR profile, link to the Control Center service machine's 191 disk and copy the SQLMSTR profile to your 191 disk.
COPYFILE PROFILE EXEC A PROFILE OEXEC A
COPYFILE DRFPROF EXEC * PROFILE EXEC A (REP
| Note: | You must not link to any disk using a virtual address that is the same as the
real address of any database directory, log, or data disk, as Data Restore
will detach those disks.
|
The XTS9X001 EXEC is a template provided by Data Restore to allow users to change log Labeldefs during Reload Recovery. Control Center provides this EXEC for you on its code disk. You must rename the XTS9X001 EXEC on the Data Restore code disk so that the Control Center code will execute.
Locate the XTS9X001 EXEC on the Data Restore code disk and execute this CMS command:
RENAME XTS9X001 EXEC fm = EXECDRF =
where "fm" is the filemode of the Data Restore disk.
If all of the previous steps were completed successfully, then the Data Restore machine can be started by entering this command at the CMS command prompt:
DRMSTR
The DRMSTR process will disconnect the Data Restore machine from your console and will start the Data Restore interface with Control Center.
To determine if Data Restore is properly setup, from an authorized Control Center ID, MSTROWN, where DRMACH is the Data Restore machine name, enter the CMS command:
SQM DRMACH CMS TELL MSTROWN HELLO
This tells the Data Restore machine to send you a "HELLO" message, thereby verifying that the SCIF processing paths are complete. You should see these messages on the screen from which you issued the command above:
'MSG FROM' MSTSRV ':TELL' MSTOWN 'HELLO ISSUED TO' DRMACH
'MSG FROM' DRMACH 'HELLO'