
Step
 of 6:
Enable OS/400 single sign-on: Part II
of 6:
Enable OS/400 single sign-on: Part II
Now that you have configured NAS,
you are ready to configure EIM. Together, NAS and EIM provide a single sign-on
environment.
EIM is a mechanism for mapping (associating)
a person or entity to the appropriate user identities in various user
registries (opens new browser) throughout the enterprise. EIM provides
APIs for creating and managing these identity mapping relationships, as well
as APIs that applications use to query this information.
To configure EIM, take the following
steps:
- Configure
the EIM domain and configure the directory server on iSeries-B to be the EIM
domain controller.
- Configure
iSeries-A to participate in the EIM domain.
- Create
EIM identifiers for users in the enterprise.
- Add
EIM associations for the OS/400 user profiles and principal names to the EIM
identifier.
- Configure
iSeries Access for Windows connections to use Kerberos principals as authentication
method.
- Verify
NAS and EIM setup.
 |
Any and all passwords
used within this scenario are for example purposes only. They should not
be used during an actual configuration.
|
1. Configure the EIM domain and
configure Directory Server on iSeries-B to be the EIM domain controller.
You now need to configure an EIM
domain in your network. You also need to configure iSeries-B to be the EIM domain
controller for the new EIM domain. When you have finished this step, you will
have completed the following tasks:
- Created a new EIM domain.
- Configured the Directory Server
on iSeries-B to be the EIM domain controller.
- Created EIM registries for iSeries-B
and Kerberos user registry in the domain.
- Configured iSeries-B to participate
in the EIM domain.
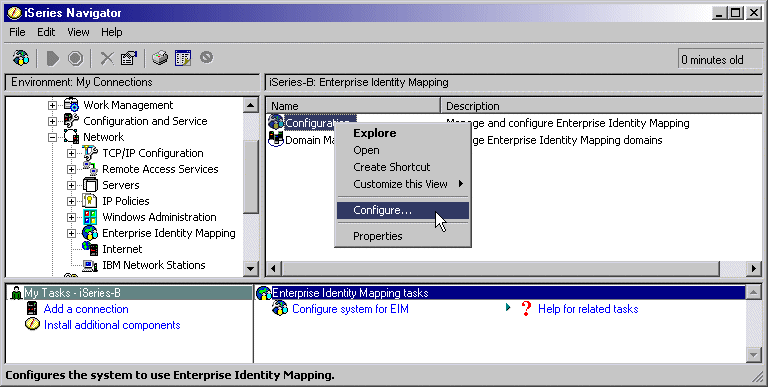
- In iSeries Navigator, expand iSeries-B
> Network > Enterprise Identity Mapping.
- Right-click Configuration
and select Configure to start the configuration
wizard.
- On the Welcome
page, select Create and join a new domain. Click
Next.
- On the Configure
Directory Server page, in the Port
field, accept the default 389. In the Distinguished name
field, enter
cn=administrator. Enter and confirm a password.
This password will be used when accessing EIM domain management tasks. For
example, the administrator for MyCo entered mycopwd in the Password
and Confirm password fields. Click Next.
- On the Specify
Domain page, enter the name of the domain. For example, the administrator
for MyCo entered
mycoeimDomain in the Domain
field.
|
The
domain name cannot contain any of the following characters: =+<>,#;\and*.
|
The Description field is
optional. If you want, enter a brief description of the domain controller.
Click Next.
- On the Specify
Parent DN for Domain page, select No
to allow EIM data to reside in its own suffix in the namespace. Click Next.
- On the Registry
Information page, select Local OS/400
and Kerberos. Select Kerberos
user identities are case sensitive. Click Next.
Write down the registry names. You will need these registry names when creating
associations to EIM identifiers.
|
Registry
names must be unique to the domain.
|
- On the Specify
EIM System User page, select the system EIM user. Accept the defaults
that appear on this page. For example, MyCo had the following information
on this page:
- User type: Distinguished name and password
- Distinguished name:
cn=administrator
- Password:
mycopwd
Click Next.
- On the Summary
page, confirm the EIM configuration information. Click Finish.
You have now configured the directory
server on iSeries-B as the EIM domain controller for the newly configured EIM
domain in the network. Now you must specify iSeries-A as a participant in this
EIM domain.
Back
to top
2. Configure iSeries-A to participate
in the EIM domain.
To configure iSeries-A to participate
in the EIM domain, take the following steps:
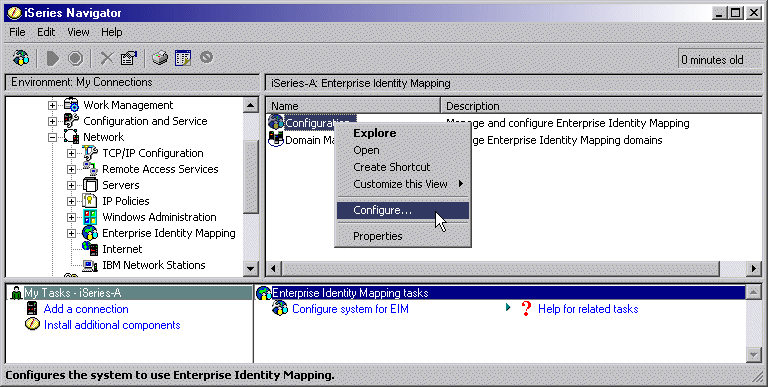
- In iSeries Navigator, expand iSeries-A
> Network > Enterprise Identity Mapping.
- Right-click Configuration
and select Configure to start the configuration
wizard.
- On the Welcome
page, select Join an existing domain. Click Next.
- On the Specify
Domain Controller page, enter the name of the domain controller.
For example, the administrator for MyCo entered
iseriesb.ordept.myco.com
in the Domain controller name field. Click Next.
- On the Specify
User for Connection page, select Distinguished
name and password for the user type. For example, the administrator
for MyCo entered
cn=administrator in the Distinguished
name field and mycopwd in the password and confirm
password fields. Click Next.
- On the Specify
Domain page, select the name of the domain in which you want to
participate. Click Next. For example, the administrator
for MyCo selected
mycoeimDomain.
- On the Registry
Information page, select Local OS/400.
Click Next. Write down the registry names. You
will need these registry names when creating associations to EIM identifiers.
|
Registry
names must be unique to the domain. |
- On the Specify
EIM System User page, select the system EIM user. Accept the defaults
that appear on this page. For example, MyCo had the following information
on this page:
- User type: Distinguished name and password
- Distinguished name:
cn=administrator
- Password:
mycopwd
Click Next.
- On the Summary
page, confirm the EIM configuration. Click Finish.
You have now configured iSeries-A
to participate in the domain. You now need to create EIM identifiers for each
user in the enterprise.
Back
to top
3: Create EIM identifiers for
users in the enterprise.
An EIM identifier represents a user
or entity on the network. In the case of MyCo, the administrator created two
EIM identifiers, John Smith and Sharon Jones.
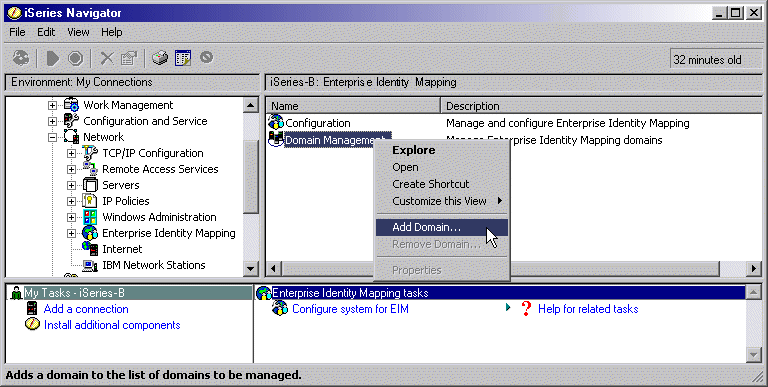
- On iSeries-B, expand Network
> Enterprise Identity Mapping.
- Right-click Domain
Management and select Add Domain...
- On the Add Domain
dialog, these defaults should display for MyCos EIM domain:
- Domain:
mycoeimDomain
- Parent DN: none
- Domain controller:
iseriesb.ordept.myco.com
- Port: 389
|
These
defaults were created during EIM domain controller configuration. |
- Click OK.
- The iSeries Navigator hierarchy
refreshes with mycoeimDomain under Domain
Management. Click mycoeimDomain. You
will be prompted with the Connect to EIM Domain Controller
dialog. You must connect to the EIM domain controller before you can manage
the domain.
- On the Connect
to EIM Domain Controller page, enter the Domain Controllers administrator
distinguished name and password. These are the same distinguished name and
password that are created during the configuration of the EIM domain controller.
For MyCo, the administrator entered the following:
- Distinguished name:
cn=administrator
- Password:
mycopwd
- Click OK.
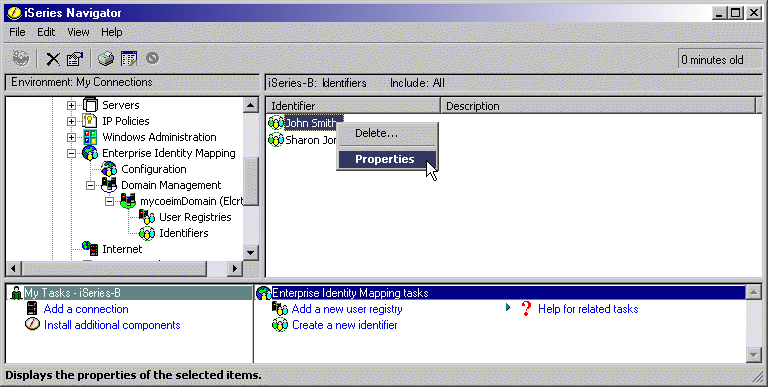
- Two new folders will display:
User Registries and Identifiers.
Right-click Identifiers and select New
Identifier.
- On the New EIM
Identifier page, enter an identifier in the Identifier
field. Repeat this step until all users have an identifier. MyCo added the
following identifiers:
- Click OK.
Now that unique EIM identifiers have
been created for John Smith and Sharon Jones, we can now associate their OS/400
user names on iSeries-A and iSeries-B and their Kerberos principals to these EIM
identifiers.
Back
to top
4. Add
EIM associations for the OS/400 user profiles and principal names to the EIM
identifier.
To complete this task, MyCos administrator
completed the following steps:
- On iSeries-B, expand Network
> Enterprise Identity Mapping > Domain Management > mycoeimDomain
> Identifiers. Right-click John
Smith, and select Properties.
There will be three associations for this identifier: Kerberos principal,
the user profile on iSeries-A, and the user profile for iSeries-B.
- To associate the Kerberos principal
with the identifier John Smith, take the following steps:
- On the Associations
tab, click Add.
- On the Add
Association page, click Browse in
the Registry field, and select
ORDEPT.MYCO.COM.
This is the Kerberos user registry that was added during EIM configuration.
- In the User
field, enter
jsmith.
- In the Association
type field, select Source.
- Click OK.
- To associate the user name on
iSeries-A with the identifier John Smith, take the following steps:
- On the Associations
tab, click Add.
- On the Add
Association page, click Browse in
the Registry field, and select
iseriesa.ordept.myco.com.
This is the OS/400 user registry for iSeries-A.
- In the User
field, enter
JOHNS.
- In the Association
type field, select Target.
- Click OK.
- To associate the user name on
iSeries-B with the identifier John Smith, take the following steps:
- On the Associations
tab, click Add.
- On the Add
Association page, click Browse
in the Registry field and select
iseriesb.ordept.myco.com.
This is the OS/400 user registry on iSeries-B.
- In the User
field, enter Smithjo.
- In the Association
type field, select Target.
- Click OK.
- Repeat these steps for user Sharon
Jones.
Back
to top
5. Configure iSeries Access for
Windows connections to use Kerberos principals as authentication method.
You now need to configure both the
Jsmith and Sjones PCs to use Kerberos when authenticating to the iSeries-A and
iSeries-B servers. From Jsmiths PC, configure iSeries-A and its applications
to use Kerberos authentication by completing the following steps:
- In iSeries Navigator, right-click
iSeries-A and select Properties.
- On the Connection
tab, select Use Kerberos principal name, no prompting.
This will allow iSeries Access for Windows connections to use the Kerberos
principal name and password for authentication.
- Repeat these steps for iSeries-B.
- Repeat these steps on Sjoness
PC.
Back
to top
14. Verify
NAS and EIM setup.
At this point, all configuration
steps are completed. To verify that NAS and EIM have been set up correctly,
the administrator had Sharon Jones and John Smith log on to the Windows 2000
domain and request access to an application on the iSeries host. If no iSeries
sign-on prompt displays, EIM successfully mapped the Kerberos principal to an
identifier on the domain.
You may also use a Windows 2000 Resource
Kit Tool called Kerbtray to confirm that your Windows clients are able to retrieve
Kerberos tickets from the KDC. Go to http://www.microsoft.com
(opens new browser) and search for kerbtray.exe. Follow the accompanying
documentation to use the tool.
Back
to top


