
Step
 of 6:
Enable OS/400 single sign-on: Part I
of 6:
Enable OS/400 single sign-on: Part I
The first part of enabling OS/400
single sign-on is configuring
network authentication service (NAS) on both iSeries-A
and iSeries-B. You
will configure Enterprise Identity Mapping (EIM)
in the next step.
 |
You must configure
NAS on all iSeries servers in your network that will participate in the
Kerberos realm, including the server that will serve as the EIM domain
controller. If there is only one iSeries server in your environment, you
can configure both NAS and EIM on one server.
|
To configure NAS on iSeries-A
and iSeries-B, the administrator takes the following steps:
- Verify
host name and TCP/IP domain information.
- Configure
NAS on iSeries-A.
- Add
iSeries-A principal name to the KDC.
- Create
a home directory for each user on iSeries-A.
- Test
NAS configuration on iSeries-A.
- Repeat
steps 2-5 on iSeries-B.
|
Any and all passwords
used within this scenario are for example purposes only. They should
not be used during an actual configuration.
|
1. Verify host name and TCP/IP
domain information.
In order to enable single sign-on
capability, all components within the network must agree on the same host name
and TCP/IP domain information. Otherwise, the components may not be able to
"talk" to each other and users will not be properly authenticated.
In this step, you will confirm that your PC and iSeries servers agree on the
same information. Performing this step before you begin configuring NAS
may save you valuable time in later steps.
Take the following three steps, A-C:
- From your Windows PC, determine
the fully qualified TCP/IP host name for the OS/400 server.
|
Depending on how
you manage your network, you may wish to do this on other PCs that
take part in the single sign-on environment.
|
- Open the hosts file. This
file contains the mappings of IP addresses to host names. Take note of
the system name of the first entry, for example, iseriesa.ordept.myco.com.
Also note the upper and lower case characters. The path to this file depends
on your Windows operating system:
- Windows 2000 operating system: C:\WINNT\system32\drivers\etc\hosts
- Windows XP operating system: C:\WINDOWS\system32\drivers\etc\hosts
If the hosts file does not exist on your PC or there is no OS/400 server
entry in your hosts file, then your PC may be using a DNS server to resolve
host names. If this is the case, proceed with the rest of Step A. Otherwise,
skip to Step B.
- If you either did not find
the hosts file on your PC or your hosts file does not contain an entry
for the OS/400 server, use NSLOOKUP (Name Server Lookup) to query the
DNS server for the host name and IP address.
a. At a command prompt, type NSLOOKUP and press Enter. At the NSLOOKUP
prompt, type the IP address of the host and press Enter. The DNS server
returns the host name of the OS/400 server. Take note of the name, including
the upper and lower case characters. In this scenario, the DNS server
returned iseriesa.ordept.myco.com.
b. At the NSLOOKUP prompt, type the name of the host name that was returned
by the DNS server (iseriesa.ordept.myco.com) and press Enter. Verify that
the DNS server returns the IP address that you expect.
Important: If NSLOOKUP does not return the expected results, you
have an incomplete DNS record. For example, if NSLOOKUP returns an IP
address that is different than the address you entered in this step, you
need to contact the DNS administrator to resolve this problem before you
can continue with the next steps.
- From the OS/400 server, determine
the fully qualified TCP/IP host name.
- Determine TCP/IP domain information:
a. At the command prompt, type CFGTCP and select Option 12 (Change TCP/IP
domain information).
b. Take note of the values for the Host name parameter and the Domain
name parameter, including the upper and lower case characters. In this
scenario, the host name is iseriesa and the domain name is ordept.myco.com.
c. Take note of the value for the Host name search priority parameter.
This value depends on how the administrator configured TCP/IP to perform
host resolution on the server.
- *LOCAL: The operating system searches the local host table (equivalent
to the hosts file on the PC) first. If no matching entry exists in the
host table and you have configured a DNS server, the operating system
searches your DNS server.
- *REMOTE: The operating system searches the DNS server first.
If no matching entry exists in the DNS server, the operating system searches
the local host table.
- Determine TCP/IP host table
information:
a. At the command prompt, type CFGTCP and select Option 10 (Work with
TCP/IP host table entries).
b. Take note of the value in the Host Name column that corresponds to
the OS/400 server, including the upper and lower case characters. In this
scenario, the value is iseriesa.ordept.myco.com.
If you do not find an entry for the OS/400 server in the host table, proceed
to the next step.
- Determine DNS server information:
a. At a command prompt, type NSLOOKUP and press Enter. At the NSLOOKUP
prompt, type the IP address of the host and press Enter. The DNS server
returns the host name of the OS/400 server. Take note of the name, including
the upper and lower case characters. In this scenario, the DNS server
returned iseriesa.ordept.myco.com.
b. At the NSLOOKUP prompt, type the name of the host name that was returned
by the DNS server (iseriesa.ordept.myco.com). Verify that the DNS server
returns same IP address that you expect.
Important: If NSLOOKUP does not return the expected results, you
have an incomplete DNS record. For example, if NSLOOKUP returns an Internet
address that is different than the address you entered in this step, you
need to contact the DNS administrator to resolve this problem before you
can continue with the next steps.
- Determine which host name
value for the OS/400 server to keep, based on the TCP/IP configuration.
- If the value for the Host name search priority parameter is *LOCAL,
keep the entry noted from the local host table (Step B- (ii)b)
- If the value for the Host name search priority parameter is *REMOTE,
keep the entry noted from the DNS server (Step B- (iii)a)
- If only one of these sources contains an entry for the OS/400 server,
keep that entry.
- Compare the results from the following
steps:
- Step A: Name that the PC uses for the OS/400 server (If you found an entry
for the OS/400 in the PC's hosts file, use that entry. Otherwise, use the
entry from the DNS server.
- Step B - (ii)b: Name that the OS/400 server calls itself within the TCP/IP
configuration.
- Step B - (iv): Name that the OS/400 server calls itself based on the host
name resolution.
All three of these entries must match exactly, including upper and lower case
characters. If the results do not match exactly, you will receive an error
message indicating that a keytab entry cannot be found.
Back
to top
2. Configure NAS on iSeries-A.
Use the information from your worksheets
to configure NAS on iSeries-A by completing the following tasks:
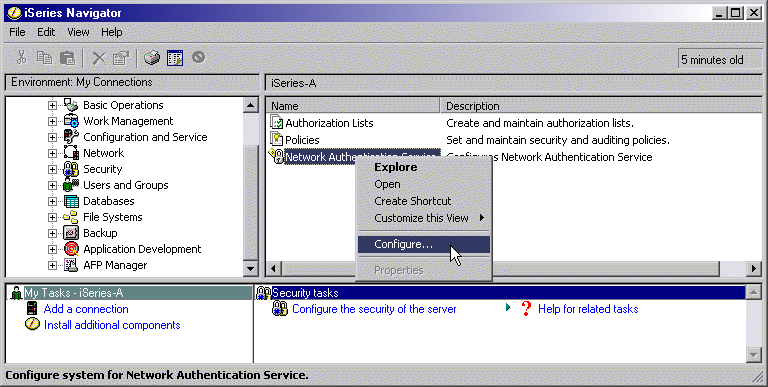
-
Open iSeries Navigator
and expand iSeries-A > Security.
Right-click Network
Authentication Service and select Configure
to start the configuration wizard.
|
Once
you have configured NAS , this option changes to Reconfigure. |
- Review the Welcome
page for information about what objects the wizard creates. Click Next.
- On the Specify
Realm Information page, enter
ORDEPT.MYCO.COM (in
all upper case) in the Default realm field.
Click Next.
- On the Specify
KDC Information page, enter
kdc1.ordept.myco.com in
the KDC field and accept the default 88 in the
Port field. Click Next.
- On the Specify
Password Information page, select Yes.
Enter
kdc1.ordept.myco.com in the Password
server field and 464 in the Port field.
Click Next.
- On the Create
Keytab Entry page, select iSeries Kerberos Authentication.
Click Next.
- On the Create
iSeries Keytab Entry page, write down the keytab and principal
for iSeries-A. You will need the principal name when you add this to the KDC.
Enter and confirm a password. For example, the administrator for MyCo entered
iseriesa123. Click
Next.
- On the Summary
page, review the NAS configuration details. Click Finish.
Now you are finished configuring
NAS on iSeries-A. The next step is to add the principal name to the KDC.
Back
to top
3. Add iSeries-A service principal
name to the KDC.
To add the iSeries system to the
Windows 2000 KDC, you must first use Microsoft Active Directory (R) to create
accounts for your network users and then map these users to the Kerberos service
principal. By convention, the iSeries host name (iseriesa.ordept.myco.com)
can be used as the username. Take these steps on your Windows 2000 server to
add the following service principal name to the KDC:
krbsvr400/iseriesa.ordept.myco.com@ORDEPT.MYCO.COM
where krbsvr400 is the
name of the service, iseriesa.ordept.myco.com is the host name
of the iSeries machine, and ORDEPT.MYCO.COM is the name of the
realm. Service principal names
are made up of these three parts.
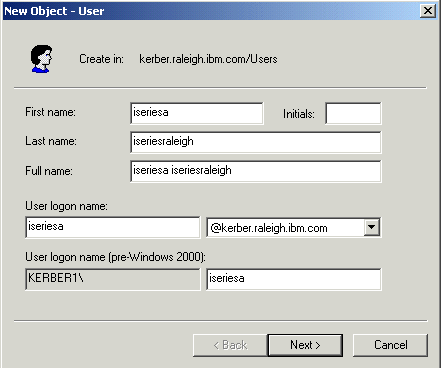
- Use the Active Directory
Management tool to create a user account for the iSeries system (select the
Users folder, right-click, select New,
then select User.) Specify the first and last
name of the Active Directory user account. In this scenario, the administrator
types
iseriesa
for first name, iseriesaraleigh
as the last
name, and iseriesa as the user logon name. Click Next.
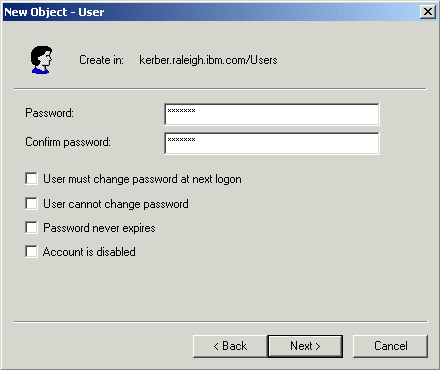
- Type the password in the Password
and Confirm password fields. Click Next
and then Finish.
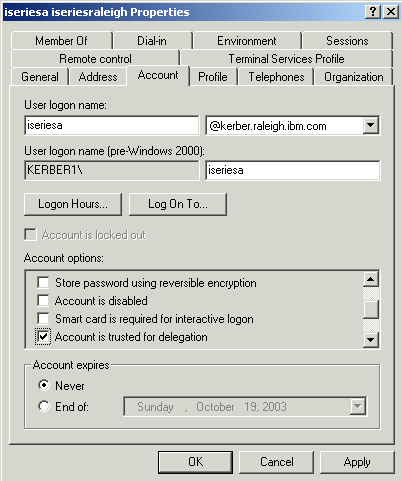
- Access the properties for the
Active Directory user
iseriesa by double-clicking the Active
Directory user name in the user list window. From the Account
tab, select the Account is trusted for delegation.
This allows the iSeries-A service principal to access other services on behalf
of a signed-in user.
- From the KDC server, map the iSeries
user account to the principal by using the
ktpass command. The
ktpass tool is provided in the Service Tools
folder on the Windows 2000 Server installation CD. To map the user account,
enter the following:
ktpass -princ krbsvr400/iseriesa.ordept.myco.com@ORDEPT.MYCO.COM

    -mapuser iseriesa -pass iseriesa123 -mapop set
where iseriesa123 is the password that you specified when you
configured NAS in the Step
#2, part G. Adding -mapop set to the command is optional
but is recommended because it removes any existing mappings.
Back
to top
4. Create a home directory for
each user on iSeries-A.
Each user that connects to the iSeries
server and iSeries applications needs a subdirectory in the /home
directory. This directory contains the name of the users Kerberos credentials
cache. To create a home directory for a user, complete the following steps:
- On an iSeries command line, enter
the following:
CRTDIR home/username
where username is the user's iSeries username. For example, the
administrator for MyCo entered CRTDIR home/Johns for the user
John Smith.
- Repeat these steps for all your
network users.
Back
to top
5. Test NAS configuration on iSeries-A.
At this point, you can verify that
you have configured NAS correctly by requesting a ticket granting ticket for
iSeries-A principal name.
|
To
perform this step, you must have created a home directory (see Step 4);
otherwise you cannot run this command. |
- On a command line, enter
QSH
to start the Qshell Interpreter.
- Enter
keytab list
to display a list of principals registered in the keytab file. In this scenario,
krbsvr400/iseriesa.ordept.myco.com@ORDEPT.MYCO.COM should display
as the principal name for iSeries-A.
|
If
you chose to configure principals for LDAP and iSeries NetServer, there
will be other entries in the keytab file. In this scenario, the administrator
chose not to configure principals for these services. |
- Enter
kinit -k krbsvr400/iseriesa.ordept.myco.com@ORDEPT.MYCO.COM
. If this is successful, then the QSH command will display without
errors.
- Enter
klist to verify
that the default principal is krbsvr400/iseriesa.ordept.myco.com@ORDEPT.MYCO.COM.
Back
to top
6. Repeat steps 2- 5 for iSeries-B.
Click Next
to finish enabling single sign-on capability in your OS/400 environment.


