

Printer-friendly version. Use your browser's Print command to print this version.
This tutorial explains how to configure a Host On-Demand VT Display session to use the Secure Shell (SSH) protocol.
This tutorial covers the following topics:
To benefit from this tutorial you should already know:
Click here for information about configuring the Host On-Demand sftp (SSH File Transfer protocol) client to use SSH.
Host On-Demand Version 8.0 supports a subset of SSH Version 2 for the following session types:
Although this tutorial describes SSH configuration only for a VT Display session, SSH configuration for an sftp session is very similar to SSH configuration for a VT Display session.
In fact, the two configuration processes are almost identical.
The only difference is the location of the User ID and Password fields. As later pages of this tutorial describe, for a VT Display session the User ID and Password fields are in the SSH configuration window.
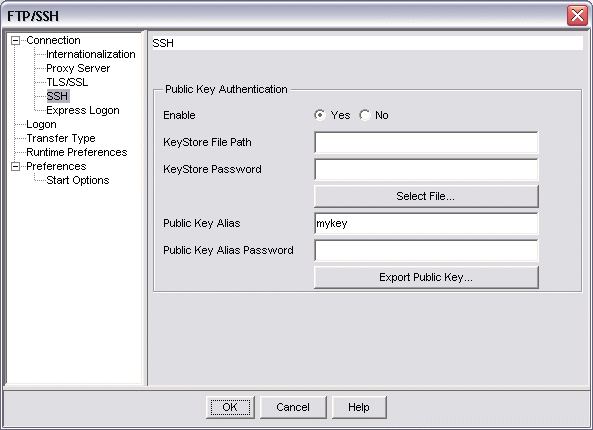
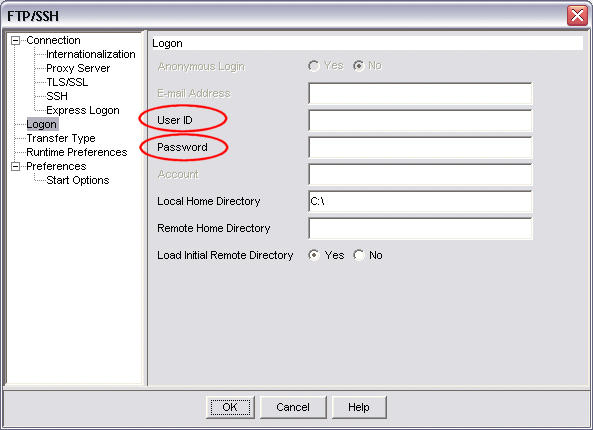
However, for the sftp client, the SSH configuration window does not include fields for the User ID and Password (click here to see the SSH configuration window for an sftp session). Instead, the sftp client uses the values in the User ID and Password fields of the Logon configuration window (click here to see the Logon configuration window for an sftp session).
The image below shows the the SSH configuration window for an sftp (SSH File Transfer protocol) session. Notice that, unlike the SSH configuration window for a VT Display session, the SSH configuration window for an sftp session does not include fields for a User ID and Password.
The image below shows the the Logon configuration window for an sftp (SSH File Transfer protocol) session. SSH configuration for an sftp session uses the values in the User ID and Password fields of this window for the User ID and Password values for SSH configuration.
The SSH server must support SSH Version 2.
Host On-Demand does not support earlier versions of SSH, such as SSH version 1.3 or SSH Version 1.5.
For SSH support Host On-Demand requires the following configuration on the client workstation:
For non-Windows client platforms, contact your system administrator to obtain a Java 2 plug-in and the corresponding version of the JCE.
For Windows client platforms, the JCE is included as part of the IBM 32-bit Runtime Environment (JRE) for Java 2, v1.4 (for Windows platforms only). This version of the Java 2 JRE is included with Host On-Demand Version 8.0 and can be downloaded by Windows platform clients from any Host On-Demand Version 8.0 server (no matter what platform the Host On-Demand server is running on). To download this JRE, an end user should follow these steps:
<HOD server address>\<HOD public directory>\HODMain.html
IBM 32-bit Runtime Environment for Java 2
and follow the instructions.
The JCE is also included in Sun Java 2 JRE Version 1.4.
If you use Java 2 Version 1.3, then you must first install Java 2 JRE Version 1.3 and then separately install the JCE for Java 2 Version 1.3.
You must use Java 2 JRE Version 1.3 or later.
Earlier versions of the JRE will not work.
To configure a VT Display session for SSH, you must set the appropriate values in the Connection configuration window of the VT Display session configuration.
The values that you set in this window define the session connection.
The image below shows the Connection configuration window for a VT Display session. Notice that:
VT Display/SSH - Tutorial on SSH client
(see 2).

To successfully launch an SSH session, an SSH client must provide two types of configurable information to an SSH server:
user1 or root)
on the SSH server.
Host On-Demand supports two types of client authentication for SSH:
For an SSH client, the two types of client authentication are complementary rather than mutually exclusive.
The remainder of this tutorial contains the following sections:
This section of the tutorial describes how to configure a VT Display session for SSH client authentication using a password.
Click Back to return to the page showing the Sections in this tutorial.
You can jump directly to a topic by clicking one of the numbered icons below, or you can click Next at any time to advance to the next topic.
Password authentication of the SSH client requires a user id and a password.
This user id and password must correspond to an actual user id and password on the host on which the SSH server resides.
For example, suppose that the host
on which the SSH server resides is
host 9.27.63.30,
and suppose also that there exists on this host
a user id user1
with the password user1pass.
In this situation,
an SSH client could log on to the host
by specifying
the user id user1
and the password user1pass.
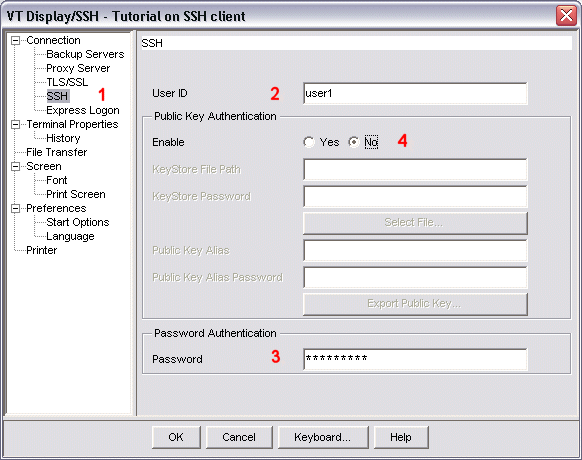
For SSH client authentication using a password in a VT Display session, you must type the valid user id and password (as described on the previous page of this tutorial) into the User ID and Password fields of the SSH configuration window.
The image below shows the SSH configuration window for a VT Display session, with the parameters configured for SSH client authentication using a password. Notice that:
user1)
that exists
on the host on which the SSH server resides.
user1pw,
displayed as
*********)
for the user id user1 on the host.
When the end user starts this session,
then
Host On-Demand
connects to the SSH server
and displays a terminal session for
user1.
Click here to see a sample
session window for an SSH session.
|
The image below shows a sample Connection configuration window for a VT Display session using the SSH protocol.
Notice that:
VT Display/SSH - Tutorial on SSH client
(see 2).

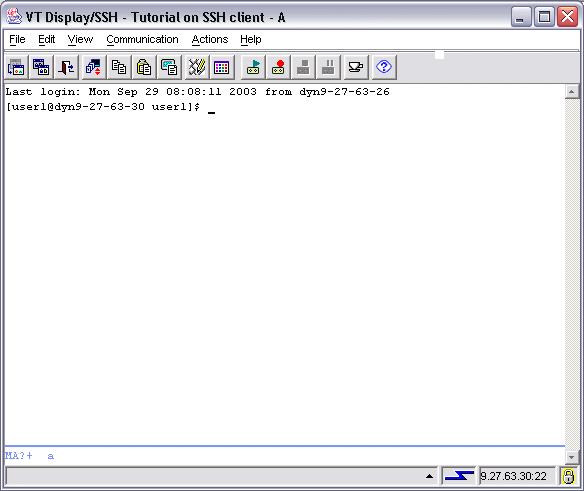
The image below shows the
session window
for a VT Display session
configured to use SSH.
The user is logged on
as
user1
to the host on which the SSH server resides.
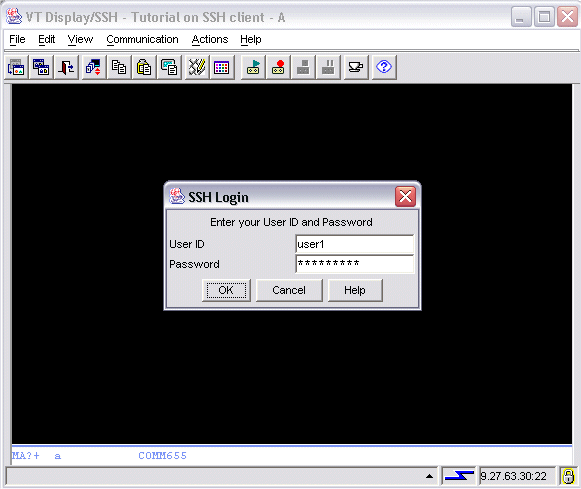
If you want to create a session profile that allows the end user to specify the user id and the password for an SSH connection, you can do so by leaving the User ID and Password fields blank in the SSH configuration window. To repeat,
When the end user starts the session, Host On-Demand displays a window prompting for a user id and password. The user can specify any valid user id and password.
If the end user specifies an invalid user id or an incorrect password, then Host On-Demand again displays the prompt window.
The image below shows the
window
that appears when
the end user starts the session.
The end user has typed a user id (user1)
and a password (user1pass, displayed as ********* )
into the input fields of the prompt window.
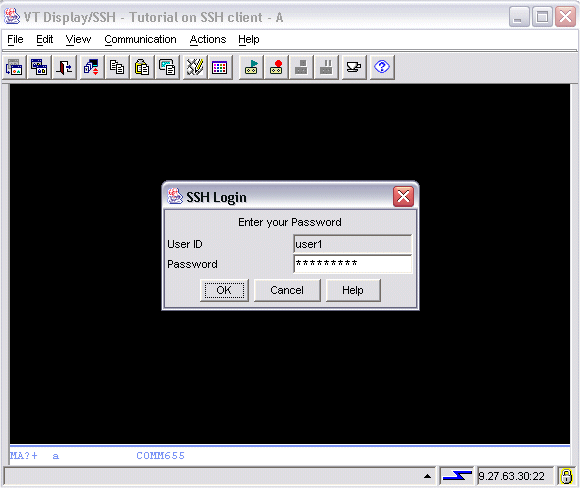
If you want to create a session profile that allows the end user to specify the password for an SSH connection, but not the user id, you can do so by setting the User ID field to a valid user id and leaving the Password field blank in the SSH configuration window. To repeat,
When the end user starts the session, Host On-Demand displays a window showing the configured user id in a non-editable field and prompting for a password. The user must type the correct password.
If the end user specifies the wrong password, then Host On-Demand again displays the prompt window.
The image below shows the
window
that appears when
the end user starts the session.
The configured user id is user1.
The end user has typed
a password (user1pass, displayed as *********)
into the input field of the prompt window.
This page summarizes the information about SSH client authentication using a password. Click Next to return to the topics page of this section.
This section of the tutorial describes how to configure a VT Display session for SSH client authentication using a public key.
Click Back to return to the page showing the Sections in this tutorial.
You can jump directly to a topic by clicking one of the numbered icons below, or you can click Next at any time to advance to the next topic.
Public key authentication of the SSH client requires a user id and a public-private key pair.
The user id must correspond to an actual user id on the host on which the SSH server resides.
The public-private key pair is a symmetrical pair of encryption keys. "Symmetrical" means that a message encrypted using the public key can be decrypted using the private key, and vice versa.
The image below illustrates how the public and private keys are used to configure the SSH server and SSH client. This image shows the general process for any system (not the exact process for Host On-Demand).

|
In the SSH protocol, the public-private key pair that is used for client authentication is not also used for encrypting data after the SSH session has started. Instead, the SSH server separately generates keys for encrypting data.
When the end user starts a session using SSH, client authentication occurs as follows:
Here is a preview of the steps to follow in configuring a VT Display session for SSH client authentication using a public key:
The remaining pages of this tutorial describe these steps.
The first step in configuring a VT Display session for SSH client authentication using a public key is to use the keytool program to generate a public-private key pair.
keytool is a multipurpose utility program, included in the Java 2 Version 1.4 JRE and distributed with Host On-Demand, for managing keys and certificates.
Because keytool is a multipurpose tool for managing keys and certificates, you may find it easier to understand the generating of a public-private key pair by looking first at a less complex tool available on Unix-like platforms, named ssh-keygen. (This is for illustration purposes only. You cannot use ssh-keygen to generate public-private keys for Host On-Demand.)
You can get access to keytool from the Host On-Demand server in either of two ways:
<install_directory>\jre\bin\keytool.exe
IBM-Win32-JRE.exe.
On the Windows platform of the Host On-Demand server this file is at the
following location:
<install_directory>\<publish_directory>\JREInstall\IBM-Win32-JRE.exe
Here is an example of invoking keytool to create a public-private key pair. (In the example below the parameters are written on multiple lines for the purpose of clarity. When you invoke keytool, you must type the program name and its parameters all on one line.)
      keytool
      -genkey
      -keystore  f:\tm\keys\johnkeystore
      -alias     johnkey02
      -storepass johnstorepass
      -keypass   johnstorepass
      -dname "CN=John Smith, OU=Development, O=Standard Supplies Inc.,
             L=Anytown, S=North Carolina, C=US"
The parameters have the following significance:
| Parameter: | Significance: |
|---|---|
| -genkey | Tells keytool to generate a public-private key pair. |
| -keystore | Specifies the path and file name of the keystore to be created (if it does not already exist) or to be added to (if it already exists). A keystore is a file that contains one or more public-private key pairs. |
| -alias | Specifies the alias for the public-private key pair. An alias is a character string that identifies the public-private key pair within the keystore. |
| -storepass | Specifies the password required to access the keystore. |
| -keypass | Specifies the password required to access the public-private key pair. |
| -dname |
Specifies the distinguished name for a certificate
associated with the key.
Notice that the distinguished name is enclosed in double
quotation marks. The six parameters inside the quoted
string have the following significance:
|
The items in the following list provide additional comments on each parameter in the example invocation of keytool above.
-genkey
-keystore f:\tm\keys\johnkeystore
f:\tm\keys\johnkeystore.
-alias johnkey02
mykey or johnkey02,
that distinguishes a key pair
from other key pairs stored in the same keystore.
An alias must be unique within a single keystore.
-storepass johnstorepass
johnstorepass.
If the keystore does not already exist, keytool creates the keystore and associates this password with it (encrypted). When you subsequently want to access the keystore, either to read from it or to write into it, you must specify the keystore password. If you forget the keystore password, there is no way to recover it.
Somewhat similarly, ssh-keygen (the tool available on Unix-like platforms) allows you to specify a password that is required to access the private key file.
-keypass johnstorepass
If you like, you can simplify things somewhat
by using the same password for the keystore password
and the key password.
Here the key password is the same as the keystore password,
johnstorepass.
      -dname "CN=John Smith, OU=Development, O=Standard Supplies Inc.,
             L=Anytown, S=North Carolina, C=US"
Although you must specify this information when you generate a public-private key pair with keytool, this certificate is not used by Host On-Demand or the SSH server during SSH client authentication using a public key.
There are a few other options that are used with the -genkey option. However, normally you should not specify these additional options. When you do not specify these options, keytool uses the default value. The following table shows the additional options and the default values that are used when you do not specify these additional options.
| Parameter: | Significance (default value): |
|---|---|
| -keyalg | Algorithm used to generate the public-private key pair (DSA). |
| -sigalg | Algorithm used to sign the certificate (when DSA is the default key algorithm, the default certificate-signing algorithm is SHA1withDSA). |
| -keysize | Size of the public key and of the private key (1024 bits). |
| -storetype | Format of the keystore (JKS, a proprietary keystore format of Sun Microsystems). |
| -validity | Number of days before the self-signed certificate expires (180 days). Because the self-signed certificate is not used in SSH public key authentication, the expiration of the certificate does not affect a Host On-Demand session configured to use SSH with public key authentication. Public key authentication continues to function securely even after the self-signed certificate expires. |
Click here to see a few of the other operations that you can perform with keytool.
Host On-Demand provides the utility program keytool for generating public-private key pairs. This tool is part of the Java 1.4 JRE and is also distributed with Host On-Demand. You should use keytool to generate keys for configuring a VT Display session for client authentication using a public key.
However, because keytool is a multipurpose utility for managing keys and certificates, you may find it easier to understand generating a public-private key pair by looking first at a less complex tool available on Unix-like platforms, named ssh-keygen. (This description is for illustration purposes only. You cannot use ssh-keygen to generate public-private key pairs for Host On-Demand.)
Here is an example of invoking ssh-keygen. This example is taken from the console of a system running Red Hat Linux 8.0:
ssh-keygen -t dsa -f johnkey02.id_dsa -N johnpass
The parameters have the following significance:
-t dsa specifies the type of key to generate (DSA).
-f johnkey02.id_dsa specifies name of the file
that ssh-keygen is to create to hold the private key.
-N johnpass specifies the password for the
private key file.
The invocation above causes the following files to be
created in the local directory. This is how the files
could appear if you issued an ls -l command
from the console of Red Hat Linux 8.0:
-rw-------  1  mytmp  mytmp   736 Sep 21 17:50 johnkey02.id_dsa
-rw-r--r--  1  mytmp  mytmp   625 Sep 21 17:50 johnkey02.id_dsa.pub
The file johnkey02.id_dsa contains the private key.
johnpass.
The file johnkey02.id_dsa.pub contains the public key.
Notice that the name of this file is created
by appending .pub to the name of
the file containing the private key.
This page describes a few of the other options that you can perform with keytool.
To list the contents of a keystore, invoke keytool as follows (not all of the possible parameters are shown here):
   keytool
   -list
   -keystore  johnkeystore
   -alias     johnkey02
   -storepass johnstorepass
   -v
To change a keystore password, invoke keytool as follows (not all of the possible parameters are shown here):
   keytool
   -storepasswd
   -keystore  johnkeystore
   -storepass johnstorepass
   -new       newstorepass
   -v
To change a key password, invoke keytool as follows (not all of the possible parameters are shown here):
   keytool
   -keypasswd
   -keystore  johnkeystore
   -storepass johnstorepass
   -alias     johnkey02
   -keypass   johnstorepass
   -new       newkeypass
   -v
The SSH protocol requires the public key to be stored in a plain text (that is, unencrypted) file located on the host on which the SSH server resides. However, as the previous page of this tutorial describes, the keytool program places both the public key and the private key into an entry inside a keystore file. Both the keystore file and the entry are password protected.
Therefore, you need to run an Export Public Key utility to read the public key from the keystore and place a copy of the public key into a plain text file that can be used by an SSH server.
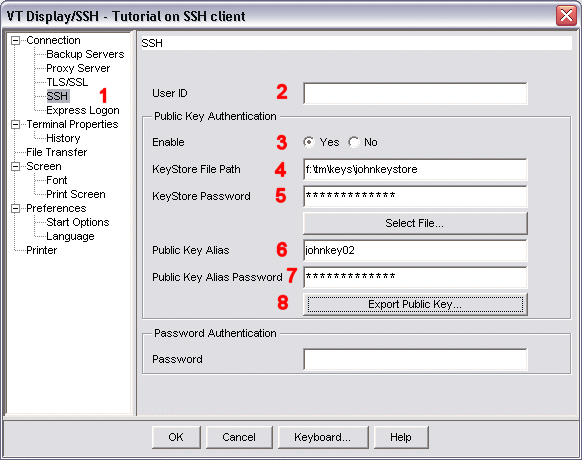
The user interface for this Export Public Key utility is included in the Public Key Authentication group of the SSH configuration window (shown below). This group includes the following parameters:
These parameters in the Public Key Authentication group of the SSH configuration window are used for two purposes, either for configuring public key authentication or for extracting a public key from a keystore.
The image below shows the SSH configuration window configured to use the Export Public Key utility.
f:\tm\keys\johnkeystore
(see 4).
This is the keystore that was generated with
keytool in the step described on the previous page.
johnstorepass (displayed as *************)
(see 5).
This is the password for the keystore.
johnkey02
(see 6).
This is the alias for
the public-private key pair.
johnstorepass (displayed as *************)
(see 7).
This is the password for
the public-private key pair.
In this example, the value for the public-private key pair
is the same as the value for the keystore password.
When you click Export Public Key to start the extraction, then Host On-Demand displays the Export Public Key window, which prompts you for two additional parameters, a path for the output file and a format for the output file. Click here to see Export Public Key window.
For some of input fields in the Public Key Authentication group, the Export Public Key utility uses a default value if the input field is left blank. Click here to learn more about the default values.
|
The image below shows the Export Public Key window. Host On-Demand displays this window when you click Export Public Key in the Public Key Authentication group of the SSH configuration window of the VT Display session configuration.
f:\tm\keys
and the file name is
johnkey02.id_dsa.pub.
The default value for the path is the value
specified in the Java system property user.home, and
the default value for the file name is .id_dsa.
For example, on a Windows client platform the default path and file name
could be
c:\Documents and Settings\johnsmith\id_dsa.pub.
Click here for information on
determining the value of user.home
on a client system.
Check with your system administrator to determine which format your SSH server requires. If necessary, generate a public key in each of the 2 formats, then try each on the host to see which format works with the SSH client.

user.home on a client system
To determine the value of user.home on a client system,
follow these steps:
s.
s command
to find the value for user.home.
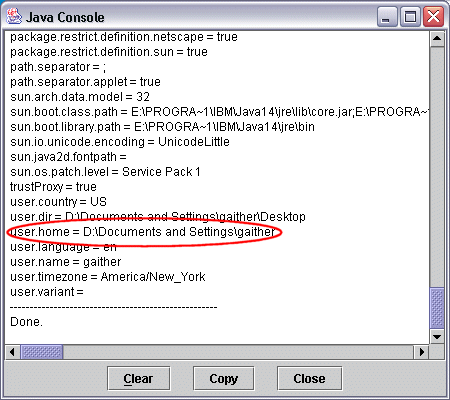
The image below shows the Java Console window with the
listing from the s command showing the
user.home value.
The table below shows the default value that the Export Public Key utility uses if the value for the parameter is blank in the SSH configuration window.
| Input field: | Default value that the Export Public Key utility uses, if the input field is left blank: |
|---|---|
| KeyStore File Path |
user.home.
Click here for information on
determining the value of user.home
on a client system.
.keystore
|
| KeyStore Password | No default value. If this field is blank then the Export Public Key utility prompts you for the keystore password. |
| Public Key Alias |
mykey
|
| Public Key Alias Password | The Export Public Key utility first tries the value for the Keystore Password. If this value fails, then the Export Public Key utility prompts you for the key alias password. |
user.home on a client system
To determine the value of user.home on a client system,
follow these steps:
s.
s command
to find the value for user.home.
The image below shows the Java Console window with the
listing from the s command showing the
user.home value.

When the SSH client initiates client authentication (by sending a public key and a signature to the SSH server), then the SSH server must be able to verify that it has been configured with the same public key that it receives from the client.
Therefore, the next step is to configure the SSH server with the public key. Two substeps are required:
You must transfer the public key file that you extracted in the previous step to the host on which the SSH server resides. Although this is a public key, you should choose a secure method for transferring the public key file. For example, you can use a secure FTP (sftp) session, or you can put the file on some physical media (such as a diskette) and have the media securely transferred.
Depending on the platform, on the SSH server implementation, and on the SSH server configuration, each SSH server can have somewhat different requirements for configuring the public key. Consult the system administrator of your SSH server for the requirements.
As an example, in the OpenSSH porting of SSH available on Red Hat Linux 8.0,
by default the public key is appended to the file
$HOME/.ssh/authorized_keys,
where $HOME is the home directory
of the user ID to which the SSH client logs on.
For example, if you configure the SSH client with
a user ID of
user1,
then the path for the
authorized_keys
file could be:
/home/user1/.ssh/authorized_keys.
Here is how you could perform the steps
involved in configuring the SSH server
on a system running Red Hat Linux 8.0.
(This information is for illustration purposes only.
Your SSH server may not require the same settings,
even if the platform is Red Hat Linux 8.0).
The red numerals (such as 1)
refer to lines in the console listing further below.
user1
on the host on which the SSH server resides
(see 1).
user1
(see 2).
.ssh under
/home/user1
(see 3).
.ssh
(see 4).
.ssh
to rwx------
(see 5).
.ssh
(see 6).
.ssh directory
(see 7).
johnkey02.id_dsa.pub
(see 8).
authorized_keys
(see 9).
If the file authorized_keys does not already exist,
this command creates it.
authorized_keys
(see 10).
authorized_keys
to rw-------
(see 11).
authorized_keys
(see 12).
johnkey02.id_dsa.pub if you want
(see 13).
Here is the console listing:
[user1@9.27.63.30]$                                                  1
[user1@9.27.63.30]$ cd /home/user1                                   2
[user1@9.27.63.30]$ mkdir .ssh                                       3
[user1@9.27.63.30]$ ls -la                                           4
drwxrwxr-x    2 user1    user1            4096 Oct 1 06:44 .ssh
[user1@9.27.63.30]$ chmod 700 .ssh                                   5
[user1@9.27.63.30]$ ls -la                                           6
drwx------    2 user1    user1            4096 Oct 1 06:44 .ssh
[user1@9.27.63.30]$ cd .ssh                                          7
[user1@9.27.63.30]$ cp /public_keys_received/johnkey02.id_dsa.pub .  8
[user1@9.27.63.30]$ cat johnkey02.id_dsa.pub >> authorized_keys      9
[user1@9.27.63.30]$ ls -l                                           10
-rw-rw-r--    2 user1     user1           4096 Oct 1 07:54 authorized_keys
-rwxr-xr-x    2 user1     user1           4096 Oct 1 07:54 johnkey02.id_dsa.pub
[user1@9.27.63.30]$ chmod 600 authorized_keys                       11
[user1@9.27.63.30]$ ls -l                                           12
-rw-------    2 user1     user1           4096 Oct 1 07:54 authorized_keys
-rwxr-xr-x    2 user1     user1           4096 Oct 1 07:54 johnkey02.id_dsa.pub
[user1@9.27.63.30]$ rm johnkey02.id_dsa.pub                         13
The next step is to make the public-private key pair accessible to the SSH client. As with the previous step, there are two substeps.
You must transfer the keystore file containing the public-private key pair to the workstation from which the SSH client is launched. You should choose a secure method for transferring the keystore file. For example, you can attach the file to a secure electronic message (such as a Lotus Notes note).
You must set up the keystore file with the same path and file name that you intend to specify in the KeyStore File Path field of the SSH configuration window in the VT Display session configuration.
You can set up the keystore file using any path and file name on the client workstation, so long as the path and file name match the value of the KeyStore File Path field of the SSH configuration window.
If you leave the KeyStore File Path field blank
in the SSH configuration window,
then Host On-Demand looks for the keystore file
in the default location.
The default value for the path is the value specified in the Java system
property
user.home,
and the default value for the file name is .keystore.
For example,
on a Windows client platform the default path and file name could be:
c:\Documents and Settings\<userid>\.keystore.
Click here for information on
determining the value of user.home
on a client system.
Using the example keystore file johnkeystore,
and using the default value for the keystore path and file name,
and assuming that the client platform is Windows
and that the Windows user id is johnsmith,
you would follow these steps to
set up the keystore file with the default path and file name:
johnkeystore into the directory
c:\Documents and Settings\johnsmith\.
johnkeystore to .keystore .
The complete path and file name of the keystore file in this example is:
c:\Documents and Settings\johnsmith\.keystore.
Remember that you do not have to use the default path and file name for the keystore. Nevertheless, using the default path and file name makes it much easier for users on different workstations (possibly running different client platforms) to share the same VT Display configuration file.
user.home on a client system
To determine the value of user.home on a client system,
follow these steps:
s.
s command
to find the value for user.home.
The image below shows the Java Console window with the
listing from the s command showing the
user.home value.

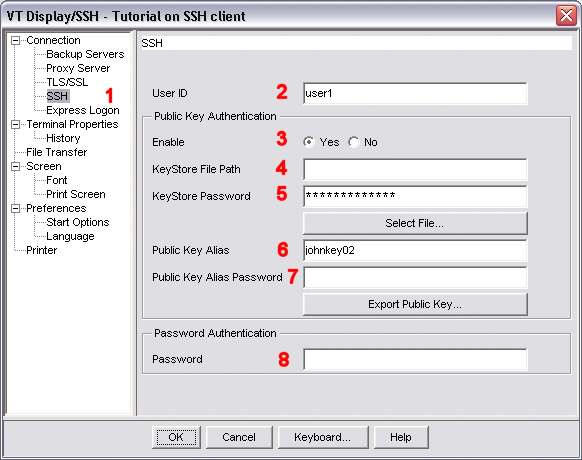
The last step is to configure the SSH configuration window for client authentication using a public key. To perform this step, type the appropriate values into the input fields of the Public Key Authentication group in the SSH configuration window.
In a previous step (step 2), you typed values into these input fields to export a public key file from the keystore file. However, in this step (step 5) you do not necessarily have to use all the same values that you used when you exported the public key file. Instead, set the values for public key authentication to correspond to the actual location, name, and contents of the keystore file on the workstation from which the SSH client is launched.
For some input fields in the Public Key Authentication group, if the input field is left blank, then Host On-Demand uses a default value when the session is started. Click here to learn more about these default values.
The image below shows the SSH configuration window for a VT Display session. Notice that:
user1)
of the host on which the SSH server resides.
This must be the user id with which the
SSH server was configured in a previous step.
Here, because the KeyStore File Path is left blank,
Host On-Demand uses the default path and file name for the keystore file
when the SSH session is launched from the client.
The default value for the path is the value specified in the Java system
property
user.home,
and the default value for the file name is .keystore.
For example,
on a Windows client platform the default path and file name
could be:
c:\Documents and Settings\<userid>\.keystore.
Click here for information on
determining the value of user.home
on a client system.
johnkeystore,
displayed as
************)
of the keystore file on the workstation
from which the SSH client is launched.
johnkey02)
for the public-private
key pair being used.
The password for Password Authentication is set to the actual password for the user ID on the host on which the SSH server resides (see 8). Here, because the input field is left blank, Host On-Demand prompts the user for the password if public key authentication fails.
Leave this field blank if you want to force the end user to use public key authentication. If you specify a valid password here instead of leaving the field blank, then when the end user launches the session, and the VT Display session connects with the SSH server successfully, you cannot determine whether the connection succeeds because of public key authentication or because of password authentication.
When the end user starts this session,
then Host On-Demand
connects to the SSH server
and displays a terminal session for
user1.
Click here to see a sample
session window for an SSH session.
|
The table below shows the value that Host On-Demand uses for an SSH parameter when an SSH session is started, if the value for the parameter is left blank in the Public Key Authentication group of the SSH configuration window.
| Field: | Default value when session is started, if left blank: |
|---|---|
| User ID | No default value. If this field is blank then Host On-Demand prompts the end user for the User ID when the session is started. |
| KeyStore File Path |
user.home.
.keystore.
|
| KeyStore Password | No default value. If this field is blank then Host On-Demand prompts the end user for the KeyStore Password when the session is started. |
| Public Key Alias |
mykey
|
| Public Key Alias Password | The value used for the KeyStore Password. If this fails, then Host On-Demand prompts the end user for the key alias password. |
| Password (for password authentication) | No default value. If this field is blank, and public key authentication fails (or is not specified), then Host On-Demand prompts the end user for the logon password. |
user.home on a client system
To determine the value of user.home on a client system,
follow these steps:
s.
s command
to find the value for user.home.
The image below shows the Java Console window with the
listing from the s command showing the
user.home value.

The image below shows the
session window
for a VT Display session
configured to use SSH.
The user is logged on
as
user1
to the host on which the SSH server resides.

Here again are the steps we have covered for configuring a VT Display session for SSH client authentication using a public key:
If public key authentication is not working, try the following checks:
If you cannot log on to the SSH server using password authentication alone, then check the Destination Address and the Port Address, and verify that you are using a valid user id on the host on which the SSH server resides.
You can verify these values by invoking
keytool with the -list function to list the
public-private key entry in the keystore file.
For the list function to succeed
you must specify the correct keystore password, key alias, and key
alias password.
If you have specified the default path and file name for the keystore file (by leaving this field blank in the SSH configuration window), then verify that the default path and file name are correct for the client workstation that is failing.
Verify that the keystore on the client workstation has the correct keystore password, key alias, and key alias password in the SSH configuration window. (See item 2 above.)
Verify that the configuration of the public key on the SSH server is correct, by consulting with the system administrator for the SSH server.
As an example,
the settings in the following table seem to be required
by the default SSH server configuration on Red Hat Linux 8.0.
(These values are provided only as an example of
the type of requirements that an SSH server could impose.
These values may not be correct for
your SSH server,
even if the platform is Red Hat Linux 8.0.)
The entries in this table assume that the user id is user1.
| Item: | Setting: |
|---|---|
Owner and group for directory .ssh
|
user1 |
Permission settings for directory .ssh
|
rwx------ |
Owner and group for file authorized_keys
|
user1 |
Permission settings for file authorized_keys
|
rw------- |
The following are some considerations for public key authentication if you have many users accessing either the same user id or different user ids:
The following are some considerations for public key authentication if you have users accessing the same user id or different user ids from different client platforms.
The following are some considerations for public key authentication if you have one or more users that need to access more than one user id on the same SSH server, or user ids on more than one SSH server.
The table below shows the value that Host On-Demand uses for an SSH parameter when an SSH session is started, if the value for the parameter is left blank in the Public Key Authentication group of the SSH configuration window.
| Field: | Default value when session is started, if left blank: |
|---|---|
| User ID | No default value. If this field is blank then Host On-Demand prompts the end user for the User ID when the session is started. |
| KeyStore File Path |
user.home.
.keystore.
|
| KeyStore Password | No default value. If this field is blank then Host On-Demand prompts the end user for the KeyStore Password when the session is started. |
| Public Key Alias |
mykey
|
| Public Key Alias Password | The value used for the KeyStore Password. If this fails, then Host On-Demand prompts the end user for the key alias password. |
| Password (for password authentication) | No default value. If this field is blank, and public key authentication fails (or is not specified), then Host On-Demand prompts the end user for the logon password. |
This page summarizes the information about SSH client authentication using a public key. Click Next to return to the topics page of this section.