Comparing and Merging Models
ContentsThis chapter is organized as follows:
- About the Model Integrator
- Model Integrator and ClearCase
- Comparing and Merging Models
- Performing a Partial Merge
- Merging Models Without a Base Model
- Viewing a Single Model File
- Using Model Integrator from the Command Line
About the Model IntegratorModel Integrator is a tool for comparing and merging Rational Rose models. Model Integrator lets you compare model elements from up to seven contributor files, discover their differences, and merge them into a recipient model.
For example, two developers may need to modify a shared model at the same time. They can each copy the model, modify it separately, and then use Model Integrator to merge their changes back into a single shared copy of the model. Or they can use Model Integrator to compare their models and identify the differences between them.
You can also use Model Integrator can to view the contents of a single model file. Model Integrator provides a method of looking at a model that is different from the view provided by Rational Rose. Model Integrator provides a low-level textual view of all model elements and their properties. This method of examining a model allows you to view all property settings in use.
Model Integrator runs in two modes: Compare mode and Merge mode. As described later in this chapter, you can switch between modes.
Model Integrator Interface
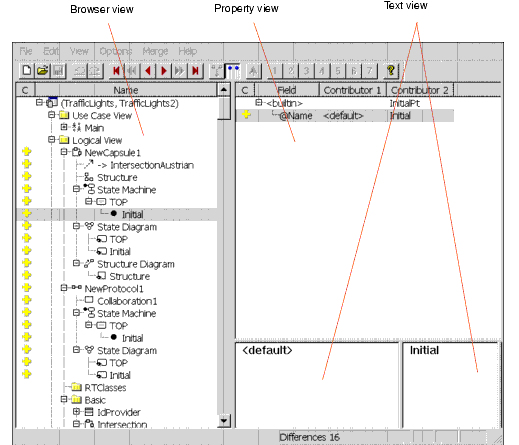
Model Integrator runs outside of Rational Rose and provides its own interface as shown in Figure 29.
Figure 29 Model Integrator Graphical User Interface
There are three major components to the interface: browser view, property view, and text view.
Browser View
The left window pane is called the browser view. In this window, the primary objects that make up the model are displayed in a hierarchical tree structure similar to that used in Rational Rose. However, the objects displayed in the browser view are not identical to those displayed in Rational Rose. Model Integrator displays some objects that Rational Rose hides from your view. See Model Files and Model Integrator for a brief discussion of the objects Model Integrator displays.
The browser view displays only a single view of the model hierarchy, even though there are several models loaded. The browser view shows all of the objects from all of the contributing models, but it attempts to partner objects that are the same across all the models. If all of the contributors have the same model element in the same location, the browser only displays a single entry for that node of the model.
If different contributors have the same model element located in different places in the model, there is a node in the browser view for each location where the model element exists in the merged model. However, only one of these locations will be written to the final merged output model file (you will decide which one when you resolve the conflict at that node).
On the left side of the browser window are icons that display the results of comparing and, in merge mode, of merging the models. The meaning of these icons is discussed in Interpreting Compare and Merge Results .
Property View
The upper right window pane is called the property view. This window displays the set of properties that belong to the currently selected object in the browser view. In this view, there is a column for each contributor and a column for the recipient model (in merge mode). There is also a column of icons to help you see the comparison state of the properties provided by the different contributors. These icons are the same as the comparison icons mentioned above.
Text View
These windows along the lower right side of the main window display the values from each contributor for the property currently selected in the property view. In merge mode, the left-most text view displays the value for the recipient model, with the other contributors following it to the right in numerical order. These windows are for viewing purposes only. You cannot change the values displayed there.
Other Interface Features
The toolbar makes some commonly used functions available as buttons. All of these functions are also available in the menus. When you position the cursor over the icons in the browser view, they display a message explaining the compare or merge state. At the bottom of the screen, a status bar displays the merge status of the node currently selected in the browser view.
Contributors
Contributors are the models that form the input to Model Integrator. Model Integrator accepts up to seven contributor models for merging. All contributors must be of the same type; you cannot compare a .mdl to a .sub file, for example. A contributor can be any of the following:
- A model file, with or without its associated controlled units (subunits). If you specify a model file (*.mdl) as the contributor, and the model has subunits, Model Integrator prompts you to load its subunits.
- A controlled unit of a model.
You can specify a single controlled unit (a .cat, .sub, .pty, .prc, or .prp file) as the contributor. Controlled units are also referred to as subunits.
The first contributor, called Contributor 1, has special significance to Model Integrator; it is the base model used for comparing the differences between the other models.
Base Model
The base model is the model that is the ancestor to all of the other contributor models being merged. That is, the base model is the version of the model that existed before any changes were made. The base model must always be specified as Contributor 1.
Comparing Models
Compare mode in Model Integrator highlights the differences and conflicts between two or more models. You can switch back and forth between Compare mode and Merge mode; you can begin a work session in Compare mode and then switch to Merge mode if you decide to merge the models. In Compare mode, you cannot make any changes to the model, and the Merge menu and toolbar functions appear dimmed.
Merging Models
Merge mode incorporates all of the features of Compare mode, along with additional information to support the decisions you need to make to successfully merge model files. Model Integrator supports two types of merge functionality:
- Automatic Merge: Model Integrator merges all changes that do not produce conflicts.
- Selective Merge: Allows the user to optionally choose the contributor for each difference identified by Model Integrator between the models to merge.
Automatic merge takes effect when Model Integrator first enters Merge mode. It creates a recipient model and automatically merges all unchanged or trivially changed nodes into the recipient model for you. (A node is another name for an object in the model hierarchy. Examples of nodes are classes, use cases, objects, operations, components, and diagrams.) If the merged model has nodes that have conflicts, Model Integrator displays an icon at the location of the conflict in the browser window. As you make choices to resolve these conflicts, Model Integrator shows you the results of your merge.
The selective merge feature lets you change the contributor at nodes that have differences as well as conflicts. This can be useful when you do not want to accept all the changes that a contributor makes to your model. It is also useful when you need to correct more complicated errors such as those discovered by the semantic checking functions.
Model Integrator merges models that have a common ancestor (the base model). This is necessary when you keep your model under version control, and when two or more people modify the model at the same time. However, Model Integrator also supports merging models that do not have a base model.
Differences and Conflicts
Model Integrator uses the base model, called Contributor 1, to identify the types of changes made to the models being compared or merged. Each contributor is first compared to the base model. Model Integrator displays additions, changes, and deletions between a contributor and its base model as differences. Symbols identify the types of differences found. (These symbols are displayed in the C column of both the browser view and the property view.)
In compare mode, Model Integrator only displays differences; but in merge mode, Model Integrator also displays conflicts. A conflict occurs when there are two or more differences at the same node of the model. When Model Integrator finds a conflict, it cannot tell which of the different contributors to incorporate into the recipient model. (Conflicts are displayed in the M column of the browser window, along with other status information about the merge.)
In Merge mode, Model Integrator automatically incorporates differences into the recipient model. However, you must resolve conflicts by selecting the contributor from which to accept changes.
Model Integrator also supports comparing and merging models without using a base model as a reference point. However, in this mode, every node of the model displays as a difference. Conflicts continue to have the same meaning in this mode.
Model Files and Model Integrator
A Rational Rose model consists of a set of objects (also called model elements, items, or nodes), where each object has its own set of properties that define attributes of the object. Model Integrator exposes to your view all of the objects and properties defined in the models you are merging. This way of looking at the model is considerably different from the normal graphical presentation of the model in Rational Rose. The following is a brief introduction to the kinds of objects that Rational Rose models contain.
Basic Objects
The objects you are most concerned with when you create the model are those that represent elements in your application such as actors and classes.
Diagram Objects
Each diagram in your model is an object. The diagrams display differently in Model Integrator than in Rational Rose. The diagram titles are the same in the browser window, but the diagrams are not shown as pictures. They are shown as lists of their component objects. Some of these components you are already familiar with, such as Labels. Others are new because Rational Rose does not typically display them. These objects include view objects.
View Objects
Each basic object that appears in a diagram is represented by a view object when it appears in a diagram. For example, when a class appears on a diagram, the diagram object will have as a child a ClassView object for that class, and so on for every kind of basic object. Other view objects exist for items that are part of a mechanism.
Mechanism
A Mechanism is hidden component of a model that contains a set of objects used internally to implement parts of the model you created. A mechanism will contain more objects as children.
Quids
A quid is a unique identifying number that distinguishes the object it is attached to regardless of the object's name. A quid property is generated by Rational Rose for each object created in the model. quids are unique, so that they can be used to identify an object when the name of the object changes, or the object is moved in the model. Model Integrator uses quids extensively to determine whether objects are the same; if the quid is the same, then those objects have a common ancestry.
References
Much of the power of a Rational Rose model comes from the relationships that exist between objects. These relationships are identified by reference properties (or just references), based on quids, that enable one object to point to another one. A given object in a model may have no references at all or it may have many. Reference properties have names; common names are client, supplier, and quidu. Model Integrator provides the command View > Referenced Nodes that allows you to follow these references to view the model element that lies at the other end of the reference.
It is essential to maintain valid references between the objects in the model after a merge completes. When objects are deleted or moved, Model Integrator verifies that references from other objects remain valid. This semantic checking function is performed before the model saves.
Unnamed Objects
Virtually every object in a Rational Rose model has a unique name. You are not required to name every object that you create. For objects that you do not name, Rational Rose creates a name of the form $UNNAMED$nn, where nn is a number.
Often a model will contain many unnamed objects that you are not aware of because Rational Rose does not display the $UNNAMED$ string. Model Integrator displays the actual name of every object, including unnamed objects. You can determine an object's type by its corresponding icon in the browser view, its properties (the object type is at the top of the property view), and, in some cases, by looking at the children of the object.
Rational Rose Model File Versions
Each new version of Rational Rose contains new or improved features that must be represented in the model files produced by that version. This leads to model files having their own versions. You can see the model file version information listed in the property view of the first node of the model in the browser view, under the @Petal property.
It is good practice to only merge models that have the same model file version numbers. This avoids problems encountered when creating merged models that declare themselves to be one version, but contain model elements (accepted from contributors) that may be incomplete or different from the expected version. Model Integrator itself is independent of model file versions, and does not know how to bring old model files up to date.
Understanding Semantic Checking
Semantic checking is a merge mode feature that helps to ensure that the merge choices you make are valid. There are two forms of semantic checking available in Model Integrator. The first is performed by the Check Merge function.
This function is called automatically before a merged model is saved. It cross-references all of the nodes of the recipient model to ensure that the final result is complete.
The second form of semantic checking is an optional, real-time version of the Check Merge function. This function checks references on the nodes as you access them, and disables merge choices that may introduce errors into the model.
For example, your base model contains class A. Contributors 2 and 3 make changes to one member of this class, while contributor 4 deletes the class. If you already accepted changes from contributor 4 to delete the class, it does not make sense to allow you to accept the changes that contributors 2 or 3 made to the class. However, with semantic checking turned off, Model Integrator allows you to make these contradictory changes. Model Integrator does not discover the problem until either you save the recipient, or you use the Check Merge function to verify the model.
This example is very simple and probably would not be a problem in practice. But in a large, complicated model, it can be difficult to determine which contributors present valid choices at a particular node of the model. This problem can also arise when Model Integrator makes automatic merge choices at nodes that do not have conflicts. If a node is deleted automatically, you may not be aware of that fact when you are viewing a conflict at one of its dependent nodes. Semantic checking helps you avoid these problems by making your choices clearer at each step of the merge process.
When semantic checking is activated, and the user moves the current selection to a new node of the model tree, the checker determines which choice of contributor (if any) would result in an invalid model if chosen by the user. These choices are then disabled in the interface by dimming the appropriate menu items and Toolbar buttons.
When working with a very large model, you may not want the overhead of semantic checking. Or, you may want to make the change now and fix it later. In this case, semantic checking can be disabled. Merge choices can then be made in the normal manner. After making the merge choices, the user can then select the Merge > Check Merge menu function to check and repair the model. The model is always checked for validity before it is saved.
Limitations of Semantic Checking
For performance reasons, semantic checking only checks the nodes of the model you are currently viewing, and only when you view them. Consequently, it is necessary to perform a check of the entire model before saving, and this check may reveal errors that need to be corrected.
For both types of semantic checking, references to subunits that are not loaded into the merge session are not checked.
Memory Requirements and Performance
For a typical merge operation, Model Integrator must load the models and then compile additional information from the loaded models to compare and merge them. This requires an amount of memory proportionate to both the number and the size of the contributors.
The exact proportion varies, but a good estimate of the maximum amount required is to take the sum of the sizes of the model files you are merging and multiply that number by 5 to get the amount of memory Model Integrator will need to complete the merge operation. This memory is in addition to that used by your operating system and other programs you may be using.
If your models are small, memory is not a problem. If you have large models to merge, such a 30 megabyte (MB) set of models, this may be a strain on your system resources. A typical sign of a serious memory deficiency is that loading the models is extremely slow (Model Integrator may also appear to be frozen) while the disk drive is constantly busy. This condition is known as thrashing. It occurs because Model Integrator requires access to the entire data set for all the models you want to merge, but the physical memory shortage results in much of this data being stored in virtual memory on your hard disk (in your computer's pagefile or swap file, depending on which operating system you use). The computer devotes much of its resources on reading and writing to the disk, without completing the merge. If your virtual memory configuration is also insufficient, your computer may need to be rebooted in order to recover.
Here are some tips on how to improve the performance of Model Integrator:
- Configure your computer with enough RAM to meet or exceed the 5x requirement stated above. For example, if you have 30 MB of models to merge, you should have at least 150 MB of RAM in your computer. Anything less will compromise performance, as Model Integrator has to store its data on the disk.
- If there is not enough physical memory to meet the requirements for Model Integrator, ensure that you allocate enough virtual memory. Consult your operating system documentation or ask a system administrator to adjust the available virtual memory.
- Close other programs to free up memory. If you have a lot of RAM and virtual memory in your computer, other programs may claim large portions of it. In some extreme cases, applications may load system components that are not unloaded when the application exits. If you continue to have problems, you may want to try running Model Integrator after rebooting your computer and before running other applications.
- Use the tools that come with your operating system to measure and report memory usage. For example, in the Windows 2000 environment, you can use the Task Manager and its Performance page to report on you system's memory usage.
Model Integrator and ClearCaseModel Integrator is designed to work with Rational ClearCase to allow you to compare and merge individual model files from within the ClearCase environment. You can use the standard ClearCase tools, such as the Version Tree Browser or the ClearCase context menus in Windows Explorer, to compare model file versions and merge branched versions of models.
For example, you can right-click a model file version displayed in the ClearCase Version Tree Browser window and select Compare > with Previous Version from the shortcut menu. ClearCase will invoke Model Integrator to display the differences. Or, from Windows Explorer you can right-click a model file in a ClearCase view and select ClearCase > Compare with Previous Version to accomplish the same thing.
If you select one of the above compare commands and you do not see the models displayed within Model Integrator, it is likely that the ClearCase integration with Rational Rose has not been set up. See Chapter 6 for instructions.
Merging Whole Models with Controlled Subunits
ClearCase and Model Integrator only support comparing and merging individual model files or controlled units directly from ClearCase. Often this works well in a team environment because modelers are only working on individual component files of the model.
For example, use cases can be divided into categories so developers only have to check out the .cat file that contains their use cases. These files can be privately branched and subsequently merged back into the main development branch without having to merge the entire model.
However, it can be desirable to merge the entire model, because semantic checking works best when the whole model is loaded into Model Integrator. This is done by constructing a separate ClearCase view for each full contributor to the merge session. Each view is constructed to make the correct version of the model files for that contributor visible within the view. The model files are checked out for writing in the view that will receive the merge result.
Starting Model Integrator in a ClearCase Integration
Model Integrator is started, not from a ClearCase menu, but from the Rational Rose Tools menu or by the standard method for the system you are using, such as the Start menu in Windows. The merge session proceeds in the same way it would if ClearCase were not involved. When completed, the merged model files are saved and checked back into ClearCase.
Comparing and Merging ModelsStarting Model Integrator
To start Model Integrator, you can do one of the following:
- From within Rational Rose, select Tools > Model Integrator.
- From a Unix shell process or a Windows console process, type
For more information about the command line interface, see Using Model Integrator from the Command Line . To run Model Integrator from the command line, the directory containing the Model Integrator executable must be in your path variable.
- You can also start Model Integrator from Rational ClearCase as part of a ClearCase compare or merge operation. See Model Integrator and ClearCase .
Preparing Models for Merging
Before merging models, it is good practice to check each model with the Rational Rose Tools > Check Model. If errors are reported, correct the errors before performing a merge with Model Integrator.
Selecting the Contributors
An easy method of specifying contributor files is to drag and drop the files from Windows Explorer onto the Model Integrator window (Windows platform only). If the Contributors dialog box is not open, Model Integrator opens it for you. If it is already open, then you must drop the files onto the dialog box, not the main window.
Alternatively, select File > Contributors to display the Contributors dialog box. Then, follow these steps to specify the files to compare or merge:
- 1 Do one of the following to specify the first .mdl, .cat, .sub, .pty, .prc, or .prp file in the Files list.
- Enter the fully qualified file name in the blank area of the Files list.
- Click Browse at the top of the Files list control and use the file browser to find a file to add to the list.
- 2 Click Enter to confirm the file name.
- 3 Click New to create a new file input field.
- 4 Repeat steps 1 through 3 until all files are specified.
- 5 Click Compare or Merge.
Note: If the Compare/Merge Against Base Model check box is selected, then the first specified file must the base model. If the first file listed is not the base model, you can use the arrow buttons to change the order of filenames listed in the Files area so that the base model is listed first. Select one of the file names by clicking it, then click the arrow button to move it in the appropriate direction.
Model Integrator can provide a base model for you if you do not have one to use. See Merging Models Without a Base Model .
Loading or Unloading Controlled Units
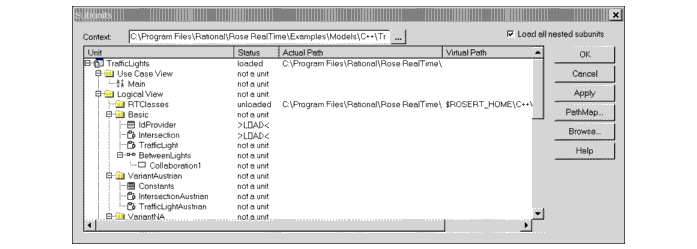
If one or more of the contributor files you specify have controlled units, Model Integrator displays the Subunits dialog box. This dialog box allows you to load or not load (unload) those units before comparing or merging your files, and to save them again when you save the merged model.
Figure 30 Subunits Dialog Box
Subunit Status
The Status column displays the subunit status for each potential subunit in the model you load or save. The Status column can display four different values when loading subunits, or two values when saving.
Loading Subunits
Subunits for each contributor are loaded separately, so a separate Subunits dialog box appears for each contributor .mdl file that has subunits. You can toggle the Status value between LOAD and unloaded by clicking the value with your left mouse button. By default, Model Integrator will try to load all subunits for a model. If there are units you do not want to load, click the Status value to change the status to "unload", and the subunit is skipped. If you do not want to load any subunits, click Cancel.
When you complete one dialog box and click OK, Model Integrator tries to load the subunits that have the LOAD Status value. If there is an error and some of the subunits cannot be loaded, the Subunits dialog box displays again.
Note: Model Integrator cannot perform reference checking for subunits that are not loaded.
Each contributor with subunits opens a corresponding Subunits dialog box. When you complete the final Subunits dialog box, Model Integrator immediately begins the Compare or Merge session.
Saving Subunits
When you save a model using File > Save or the Save button on the Toolbar, Model Integrator saves your subunits to the same place relative to the main .mdl file's location. In this case, the Subunit dialog box does not display. If you want to change the subunit configuration of your model, use File > Save As. When you save the merged model using this function, the Subunits dialog box displays. It allows you to:
- Save your existing subunits configuration by clicking OK in the dialog box.
- Create new subunits by clicking the Status column for the subunit you want to create. Model elements eligible to become subunits are displayed in the Subunits dialog box with the "not a unit" Status value. Click this value to change it to SAVE; when you click OK or Apply, a new subunit is created.
- Eliminate subunits by clicking the Status field and changing the SAVE value to "not a unit". When you click OK, this part of the model is saved in the main .mdl file instead of a separate subunit file.
Whether you use the Subunits dialog box or not, if you save subunits to a directory that already contains copies of the same subunits, Model Integrator warns you that you are overwriting the subunits and prompts you to continue. This is in addition to asking you if you want to overwrite the main model file. You can click Yes, No, or Yes to All to save your entire set of subunits with no more questions.
Subunit File and Path Names
The Subunits dialog box displays two columns of path-related information about the subunits in this model. The Virtual Path column shows the value of the path stored in the parent model. This value may be an absolute path or it may contain a virtual path map. The Actual Path column displays the path that Model Integrator is using to load the subunit.
If path map variables appear in the Actual Path column, click PathMap to set a value for the path map variable.
Model Integrator shares path map variables with Rational Rose and uses the same values transparently. However, Model Integrator may require you to enter a value for a path map variable if that variable has not previously been defined on the machine you are using. This situation is evident when you see a virtual path map variable listed in the Actual Path column of the Subunits dialog box.
You can left-click the value listed in the Actual Path column and directly edit the path name that Model Integrator uses to find the subunit.
When saving a subunit, we recommend that you define a path map variable (in the PathMap dialog box) and set it equal to the value "&". This prevents absolute path names from being stored in the .mdl file for the subunits, which makes it easier to move the files to new storage locations in the future.
Resolving Subunit Loading Errors
If you instruct Model Integrator to load a subunit and the load process fails, Model Integrator displays the Subunits dialog box to allow you to correct the problem. The Status column of the dialog box shows you the current status of each subunit. You may need to scroll through the dialog box to find a subunit that was not loaded. It will continue to display the LOAD status.
Currently, you have several options to resolve the problem:
- You can directly edit the Actual Path field to change the path for that particular subunit as mentioned above.
- If the subunit uses a path map variable, you can change the value of the path map variable by clicking PathMap and modifying the variable in the Pathmap dialog box.
- You can first select the subunit in the list and then click Browse to open a directory browser window to find the file. Select a file and click OK. The filename appears in the Subunit dialog box.
- You can change the current directory for path map variables that take the value "&" by changing Context located at the top of the Subunit dialog box.
- You can elect to not load the subunit. Click the Status value for the subunit. The status changes to "unloaded", and the subunit is not included in the merge.
Setting a New Context for Subunits
The Context box at the top of the Subunits dialog box shows the default path that Model Integrator uses to substitute for the "&" path map symbol (See Understanding Virtual Path Maps for a description of how to use path map symbols).
If you created your models using a virtual path map, you can define the value of the symbol to be "&", when Model Integrator encounters the "&" symbol in the definition of a path map, it replaces the symbol with the actual path specified in the Context box.
By default, the value of the Context box is the path where the main model file (*.mdl) is located. However, if you moved the files to a new location, you can change the Context value and Model Integrator will load the files from the new context.
You can select a new Context path by either entering a new value directly into the Context box, or by clicking Browse to the right of the field to locate the desired drive and folder.
Using Compare Mode
Use compare mode to scroll through the model and observe the differences between the contributors. If you want to merge the models, change the mode to merge mode or exit the program when you are done.
Using Merge Mode
In merge mode, Model Integrator has already tried to automatically merge the models for you. Your next step depends on the results of the automatic merge.
AutoMerge
When Model Integrator first enters merge mode, it applies the AutoMerge procedure to the entire set of contributors. The AutoMerge procedure follows the rules illustrated in Table 2 for a typical case of three contributors (not shown is a move operation, but it behaves like a change).
Table 2 AutoMerge Rules for Merging Models
AutoMerge State
Contributor
1 (Base)
Contributor 2
Contributor 3
Result
No change A A A A
Added -- A - A
Changed A A B B
Deleted A A - -
Conflict A B C ?
Conflict A B - ?
Conflict - B C ?
A, B, C are model elements. "-" means not present.
Note: Only the role of the base model is fixed in the AutoMerge procedure. The order of the other contributors does not matter. Swapping Contributor 2 and Contributor 3 does not affect the results.
If a contributor that is not the base model introduces a change (adds, modifies, moves, or deletes an object), that change is copied to the merged output instead of the original object. However, if two or more contributors change the same thing, then the AutoMerge procedure does not know how to decide which one to choose. Instead, it generates a conflict.
By default Model Integrator uses automatic merge to merge all changes that do not produce conflicts into your merged model. You can also use the Merge > AutoMerge command to reapply automatic merging to nodes of the model you have previously reverted using the Merge > Revert command.
In the bottom right corner of the main window, a message appears in the status bar saying "Unresolved items nn" where nn is a number. If the number of unresolved items is greater than zero, you must resolve these items before the merge can be completed. Use the Forward toolbar button to find the first conflict. Examine the contributors for this model element and accept your choice to resolve the conflict.
Interpreting Compare and Merge Results
Model Integrator shows the results of comparing the contributing models by displaying an icon to the left of each node in the browser view in the C column. Table 3 depicts the Compare status icons and their meanings.
Symbols indicating the status of a merge operation appear in the M column. Table 4 depicts the Merge status icons and their meanings.
Note: Merge results do not appear in Compare mode.
Navigating Through a Model
Searching for a Model Element
To search for a particular node by its name in the browser window, select Edit > Search. Enter the search string, select the direction to search in, and click Find.
The search starts at your current location in the browser window and proceeds through all the nodes in the model that are displayed in the browser window. (Use Edit > Expand All to display every model object in the browser.) If the string is found, the browser window scrolls to display the desired node, and its properties are displayed in the property view. If the node found is not the desired one, click Find Next to continue the search from the current point. When the search reaches the last (first) node of the model, it will wrap back to the beginning (end) and continue searching. After the desired node is found, click Cancel to dismiss the search window.
You do not have to specify the entire name you want to find. Model Integrator performs the search by matching the string you enter against any part of the model element name. The search is not case-sensitive.
Viewing Conflicts and Differences
The View menu contains a number of options for navigating through conflicts and differences. These same commands also appear as buttons on the toolbar. Use these commands to speed your way through the merged model, ensure that you visit all the conflicts and differences. These commands automatically expand the browser tree to make the next conflict visible.
Some of these commands, as noted in Table 5, operate in the same mode as the setting for Auto Advance mode. The text displayed in the menus and tool tips changes to reflect this.
Viewing Conflicts and Differences with Auto Advance
The Auto Advance function automatically moves the current selection in the browser window after you have accepted a change. The function has three modes of operation:
- Conflict: advances to the next conflict
- Differences: advances to the next difference
- None: does not auto advance
You can change the Auto Advance setting by selecting your choice from the Options > Auto Advance menu.
The Auto Advance setting also affects the functioning of the commands for viewing conflicts and differences.
The Auto Advance function is set automatically when you load a set of models. If the model has conflicts, then the Conflict mode is set. If the model has no conflicts, but has differences, the Differences mode is set. If there are no conflicts or differences, the None mode is set.
Viewing Model Elements that have Moved
Model Integrator can detect when you move items from one place to another within your model (for example, by using drag and drop editing or by using the Clipboard within Rational Rose). When you merge models with elements that have been moved, Model Integrator displays all the locations where the model elements could be placed by the different contributors. However, you can only keep one of these locations in the merged file.
When you see one of the status icons indicating that an item has been moved, you can navigate between the different locations by clicking View > Other Locations menu item. Each time you select this function, it will cycle to the next location where a contributor has placed the model element you are viewing. If the model element has only one location, this function is dimmed.
You can click View > Previous Location to return to the node you were originally viewing.
Viewing the Parent of a Node
Every node in the model, except for the first one, has a parent node. Usually there is an important relationship between a node and its parent. For example, the parent of a State node is a State Machine.
While merging models you may need to view the parent of a node currently displayed, but if the model is large, the parent node may not be visible on the screen. Click View > Parent to bring the parent node into view. Click View > Previous Location to return to the node you were viewing previously.
View Nodes Referenced by this Node
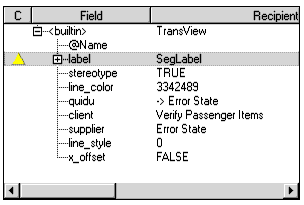
It is not uncommon for a particular node of a Rational Rose model to reference other nodes in the model. To ensure consistency in your merged model, you may want to view these referenced nodes while making a decision about which contributor to select to resolve a given conflict. Also, if semantic checking is turned on and a choice of contributor has been disabled, viewing the referenced nodes can often reveal why this is so. Use View > Referenced Node for those nodes that have one or more of the three common types of references: client, supplier, and quidu.
Note: These reference types are used internally within the Rational Rose model and their meaning changes depending on the node viewed. The only significance they have in Model Integrator is that they link two different objects in the model together.
Nodes that have these references displays them in the property view. Figure 31 shows an excerpt from the property view of a TransView object that has all three types of references. To the right of the reference name is the name of the referenced node. You could scroll through the browser trying to find this node, or click View > Referenced Node.
Figure 31 Property View of a TransView Object
When a node in the model contains any of these references, View > Referenced Node is active for the type of reference (client, supplier, or quidu). The pop-up menu for each type of reference contains an entry for the recipient and each contributor, since the referenced nodes may be in different places in different models (one of the contributors may have moved them). If you or Model Integrator have already accepted a change for the referenced node, View > Recipient becomes active. Typically, you view the recipient because it is saved in the merged model. If Recipient is not active, the referenced node is an unresolved item.
Accepting Changes from Contributors
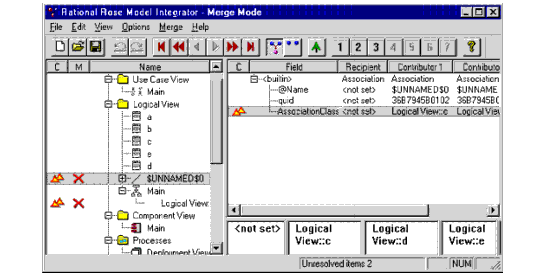
The results of the merge are in the main Model Integrator window, as shown in Figure 32.
Figure 32 Model Integrator Window
The X indicates a node that must be resolved before the merge can be completed. To resolve the conflict, you must specify which of the contributors to accept.
Deciding Which Contributor to Select
The crucial issue in performing a merge is to decide which changes you want to keep. There are a few rules you can follow to make this job easier:
- Merge often while you are familiar with the changes.
- Partition the work and the model so that developers can work on different parts of it at the same time. This will reduce the number of conflicts you have to resolve.
- Know the models you are merging. Know in advance which contributors you want to select for major components of the model, such as classes and diagrams. This will help guide the choices you must make.
- You may encounter internal parts of the model that you do not understand. For these items, choose the same contributor that you chose for related items that you do understand.
For example, you have a use case with an associated interaction diagram, and you are selecting contributor 3 for this diagram because it has the most recent set of changes. If conflicts arise among the hidden objects, such as the mechanism or one of its components that are also part of this use case, you should select contributor 3 for those objects as well. This maintains consistency in the final merged model.
Two Ways to Accept Changes
There are two functions that let you accept changes from a contributor. You can:
- Resolve all the remaining conflicts with Merge > Resolve All Conflicts Using. This command lets you choose a single contributor to resolve all the remaining unresolved items. It operates over the entire merged model, regardless of where you are when you select it. However, it only operates on unresolved conflicts. Nodes that you have previously accepted changes for, or that are displaying only differences, will not be affected.
- Resolve an individual conflict or difference by selecting its node and then using Merge > Resolve Selected Nodes Using. This command copies one of the available contributor choices to the recipient. Unlike Resolve All Conflicts Using, it operates on any node that displays either a conflict or a difference, and previous choices are overwritten.
This command can also be used with the Subtree mode to resolve an entire subtree of model nodes at one time, or with a set of nodes selected using the mouse and Shift+Ctrl keys. It affects all nodes displaying either conflicts or differences, and it changes values that have been set previously.
Warning: Subtree mode is very powerful. Use it with caution.
When semantic checking is enabled, Model Integrator disables choices of contributors that may produce errors in the recipient model. To make the change, you must turn off Merge > Semantic Checking.
You can use Edit > Undo to undo any merge choices you make.
Changing Nodes with Differences
You can accept changes from nodes that do not have conflicts, but do have differences. In this case, Model Integrator's AutoMerge procedure has already made the choice. The choice of contributor is not displayed in the M column of the browser window, but does appear in the property view. The Recipient column displays the values for the chosen contributor. The AutoMerge choice is the contributor that is different from the others.
You can override the Auto Merge choice by selecting the node in the browser and clicking Merge > Resolve Selected Nodes Using to select a different contributor. The change is not accepted because you choose a contributor that does not change the model. This is useful when, for example, you do not want to delete a model element that is deleted in one of the contributors. When you apply this command to a node with a difference, the M column will show the contributor you've chosen for the result.
Reversing Changes to Nodes
If you change a node, you can always click Edit > Undo to restore it to its original state. If you previously made changes in your current merge session and you do not want to undo other work you completed, there is another method of reversing the changes. Click Merge > Revert Selection to restore a node to the unmerged state.
This command makes the node unresolved, regardless of whether or not it is a conflict. The M column for this node changes to display the "X" icon. For conflict nodes, this command removes your choice of a contributor to resolve the conflict. For difference nodes, this command removes the AutoMerge choice made by Model Integrator.
The Merge > AutoMerge Selection command is only applied to reverted nodes. Applying the AutoMerge command to reverted nodes restores them to the state they were in when the merge session started.
Using Subtree Mode
Subtree Mode allows you to apply merge mode commands to the current node and to all of its children. Click Merge > Subtree Mode to toggle to Subtree mode.
With Subtree mode not set, you can visit each subtree node and make independent choices of contributor for each node. With Subtree mode set, Model Integrator automatically applies the selected command to all of the children of the current node.
Merge mode commands affected by Subtree mode are:
- Merge > Resolve Selected Nodes Using
- Merge > Revert Selection
- Merge > AutoMerge Selection
Subtree mode is useful when you want to accept a group of related objects from a particular contributor. For example, you can accept an entire diagram from a contributor by selecting the top level node of the diagram, enabling Subtree mode, and then selecting Merge > Resolve Selected Nodes Using (or use the toolbar buttons).
Subtree mode is very powerful. Use it with caution, and turn off Subtree mode when you are done; but, you can always click Edit > Undo to undo any unwanted changes.
Using Semantic Checking
Semantic checks are performed by the Check Merge command before you save the merged model, but they are also available while you work. Clicking Merge > Semantic Checking enables Model Integrator to perform reference checking when you select a new node in the browser. Model Integrator disables merge choices that result in merge errors later in the session.
Enable this command when you want to avoid accepting changes that may produce errors. However, the checking performed by this function is not complete because it may take too long to check the entire model every time you select a different node. Consequently, Model Integrator must use the Check Merge function, and it may continue to find errors when semantic checking is enabled.
Disabling a Contributor Using Semantic Checking
When a contributor is disabled using semantic checking, you have two options:
- Track down the reason the choice is disabled by looking at the model elements referenced by this node (View > Referenced Node), or the parents of this node, or its referenced nodes (View > Parent). You will find that one of these nodes is already being deleted by another contributor. Choose a new contributor that does not delete the node, and then use View > Previous Location to return to the original node and make your desired choice.
- Turn off Semantic Checking, and make your desired choices. Rely on the Check Merge command to find errors when you finish your merge.
Checking Merged Model for Consistency
Click Merge > Check Merge to check your merged model for internal consistency. Inconsistency can occur during a merge operation when, for example, one of the contributor models being merged deletes model elements that are currently in use by another contributor to your merged model. This can occur because of:
- Decisions you make when you resolve conflicts between contributors.
- Decisions made by the automatic merging feature in Model Integrator.
You can use the Check Merge command to check your model while you are using Model Integrator to create a merged model. If there are errors, the Check Merge dialog box opens.
Before saving a merged model, Model Integrator automatically uses Check Merge to verify the model for consistency. If a merged model fails the Check Merge consistency check, Model Integrator does not allow you to save it.
Correcting Merge Errors
The Merge Errors dialog box floats above the main Model Integrator window. It provides a set of tools that can help you find and correct errors that Model Integrator detected in the merged model.
The first step in repairing an error is to select an error message in the list of errors in the Merge Errors dialog box. To correct a merge error, you must select a different contributor for some node of the model (See Accepting Changes from Contributors ). The Merge Errors dialog box has buttons to help you find the node you need to change:
View Error: Takes you to the node of the model where the error was discovered - the error node.
View Definition: Takes you to the node of the model that defines the reference made by the error node.
View Parent: Takes you to the parent of the currently selected node in the browser. Use this command to search for the parent of a definition node. Click this button when you have a node whose parent is deleted.
View Other Locations: If the node you are viewing moved to different locations by a separate contributors, this command takes you to one of the other locations where the node exists. Only one of these locations actually exists in the merged output model; the other nodes are marked for deletion. Use this button when you have a forward reference error.
Refresh List: This command clears the error list and recomputes the Check Merge command. If new errors are encountered, they are listed. Use this command after fixing all the errors because there may be other errors that were hidden by the first set of errors. The same node of the model could have several errors, but only one is reported at a time. You may fix one error, but it may fix other errors. Refresh List always displays the current set of errors (if any).
Check Merge detects three types of merge errors. The error messages generated by Check Merge are:
- This node references a deleted node.
The error node references another node in the model that was deleted in the merged model. Click View Definition to display the location where the deletion occurs. This error must be corrected because the error node requires the other node to exist. To correct this error, choose either
- A contributor at the definition node that does not delete the node.
- A contributor that deletes the error node (if one is available).
- This node references a node whose parent is deleted.
Here the problem is essentially the same as for the first message above, except that one of the parent nodes of the defining node is being deleted, rather than the defining node itself. When the parent node is deleted, all of its children are also deleted; you must change the parent node so that it is not deleted. Click View Definition to go to the defining node in the model. Click View Parent to move up the model tree until you find the parent node being deleted. Choose a contributor for this node that contains a definition of the node rather than deleting it.
- This node has a forward reference.
The error node references another node in the model moved backward in the merged model (for example, the definition previously occurred before the reference in the original model, but now it occurs after the node that references it). Certain forms of Rational Rose model references are only allowed to nodes defined first in the model. Click View Definition to display the original location of the node. Click View Other Locations to find where the referenced node was moved in the other contributors. To correct this problem, you must choose a contributor that will restore the definition node to its original place in the model. To move the nodes to the new location, you must do it in Rational Rose after the merge completes. This allows all references and definitions to be updated properly.
Saving Results
When the number of unresolved items is zero, you can save the model. Click Save to initiate the save operation. Model Integrator checks the model for errors. If it encounters errors, you must correct them before Model Integrator can save the model. The Merge Errors dialog box has tools and help topics to help you correct these problems. After you finish correcting problems, close the Merge Errors dialog box and save the model again.
Model Integrator prompts you to specify the location to save the main model file. Select a file name and a directory for the output.
If your model contains loaded subunits, the Subunits dialog box prompts you to save the subunits. Click OK to continue the save operation. After the Subunit dialog box closes, the merge is complete and saved.
Performing a Partial MergeYou may have confined your editing in Rational Rose to a specific portion of the model, but when you load the model into Model Integrator, differences appear in other areas of the model that you may not expect. This is not an error on the part of Rational Rose or Model Integrator; it simply reflects the fact that the model is complicated, and not necessarily organized in the way you might expect.
However, if you want to restrict your merge session to a portion of the model, you can use a base model to provide the output for the parts of the model you do not want to modify. Follow this procedure to do a partial merge of a model:
- 1 Enter Merge mode, either from the Contributors dialog box or by clicking Options > Merge Mode.
- 2 Set Subtree mode by clicking Merge > Subtree Mode.
- 3 Select the root node of the model tree. This is the first node in the browser window.
- 4 Click Merge > Resolve Selected Nodes Using > Contributor 1. This causes the base model to be selected for all conflicts and differences in the entire model. The M column for the entire model changes to the 1 icon (nodes that were added by other contributors change to the 1- icon).
- 5 Select the part of the model to actively merge. You can use Subtree mode if the area you want to merge consists of one or more subtrees. Otherwise, you can select portions of the model by holding down the Shift or Ctrl keys while clicking nodes you want to select with the mouse. Ensure that you expand the model tree so that all nodes are visible or click View > Expand All.
- 6 Click Merge > Revert Selection to this part of the model to display an X icon opposite each node.
- 7 Click Merge > AutoMerge Selection to the same part of the model.
You have successfully restricted the AutoMerge command to a specific portion of the model. There may be conflicts in the part of the model you have reverted and automerged. Complete your merge of this part of the model and save the model.
Note: The Check Merge command may find errors due to references to the parts of the model you have excluded from the merge with this procedure. If this occurs, you must resolve the reference errors even when that means making changes outside of the area you have chosen to merge. You cannot save a merged model that has reference errors.
Merging Models Without a Base ModelTo merge two files that do not have a common base model as an ancestor:
- 1 Click File > Contributors dialog box.
- 2 Before clicking Compare or Merge to load the models, clear Compare/Merge Against Base Model in the Contributors dialog box.
- 3 Load the models.
Model Integrator automatically creates an empty base model. The base model occupies the slot for Contributor 1, but it is not displayed and you cannot accept changes from it in the merge.
Note: Previous versions of Model Integrator required you to supply your own empty base model. Using this new feature, a separate empty base model is no longer required. Because a base model is not required in this mode, Model Integrator allows you to specify a merge session with as few as two files when Compare/Merge Against Base Model is cleared.
When merging models using this feature, all nodes in the contributors that do not conflict with each other appear with a plus "+" sign, indicating that they are being added to the merged model.
Viewing a Single Model FileModel Integrator supports a view mode for viewing the contents of a single model file. Do the following to view a single file:
- 1 Click File > Contributors.
- 2 Click a single file in the Contributors dialog box, and click View.
Note: If two files display, or if you enter a second filename, the button changes from View to Compare. When the button displays Compare and you have only entered a single file name, clicking the Compare button changes to View mode.
Using Model Integrator from the Command LineModel Integrator supports a simplified command line interface used from the DOS and UNIX command lines.
Additionally, you can use the following command line options; use either the slash character (/) or the minus sign (-) to begin each option:
| Rational Software Corporation
http://www.rational.com support@rational.com techpubs@rational.com Copyright © 1993-2001, Rational Software Corporation. All rights reserved. |