Customizing Rational Rose Menus
ContentsThis chapter is organized as follows:
Extending Rational Rose MenusUsing the Rational Rose Extensibility Interface, you may add your own menu options to one of Rose's menus (for example, File and Edit). You can also add your own menu options to the Rose shortcut menu (displayed when you right-click).
This chapter explains how to customize the:
- Rose main menus.
- Rose shortcut menu.
Customizing Rose Main MenusYou can extend or customize Rose menus by updating the Rose menu file, which Rose reads during startup.
You can extend Rose menus by adding:
- Submenus.
- Menu items that execute any of the following:
- Rose primitives
- Rose scripts
- System commands
- External programs
- Menu separators (lines between menu items, used to group similar menu items).
Note: You can add information to existing menus (for example, File and Edit); however, you cannot add new menus to the Rose menu bar.
The content of Rose menus is defined in the Rose.mnu file. If you want to customize Rose menus, you must edit this file.
While you cannot add new menus to the Rose menu bar, you can add commands to the existing Rose menus.
Use the procedures, commands, and syntax described in this chapter to add Rose menu commands that:
- Execute a program or shell script.
- Execute a Rose script.
- Load or save controllable units.
- Display a dialog box for user input.
- Change write protection for a controllable unit.
- Execute an interface in a COM server (for example, from your add-in).
Procedure
The following procedure outlines the general steps for customizing Rose menus.
The subsections following the procedure provide information on command syntax, variables, and modifiers to use as you complete the procedure.
Check the sample menu file at the end of this chapter for a complete example that illustrates how to put the various menu elements together into a working menu file.
- 1 Using any text editor, open the Rose.mnu file. (The file resides in the directory where Rose is installed.)
- 2 Add entries to Rose.mnu for any or all of the following:
- Submenus
- Menu options
- Menu separators
Note: Pay close attention to the syntax rules that apply to your entries to the Rose menu file. For example, the syntax of the menu specifications includes opening and closing braces. You must include these braces in your specifications or they will not work properly. For complete details, see Syntax Rules for Rose Menu File Entries.
- 3 If the menu item executes a script, add or edit Rose's virtual path for scripts, unless one is already defined.
- 4 Save the file.
- To create another menu file while leaving the Rose.mnu file intact, save the file under a different name. (Recommended)
- To overwrite the file, save it as Rose.mnu.
Adding Entries to a Rose Menu File
Using any text editor and the following information, you can add menu entries to the Rose menu file. The entries will appear on the Rose menu in the order in which you specify them.
As you add menu entries, you will specify:
- Keywords that determine what to add to the menu (a submenu, a menu option, a separator).
- Menu actions that specify what action to take when the menu item is selected.
- Arguments that further define a menu action, or that determine the conditions under which a menu command is enabled or disabled in Rose.
Remember to follow all of the syntax rules as described in Syntax Rules for Rose Menu File Entries. For example, the syntax of the menu specifications includes opening and closing braces. You must include these braces in your specifications or they will not work properly. Remember that each opening brace ({) requires a corresponding closing brace (}).
Menu File Keywords
Table 1 describes the valid keywords for your entries in the Rose menu file.
Menu Actions
An action defines the result of activating a menu entry. The required arguments can be supplied as keywords, constants, variables, or variables with modifiers. Table 2 describes the valid menu actions for your entries in the Rose menu file.
Menu File Variables and Modifiers
Rose provides a set of variables that correspond to various Rose model items. You can use these variables in conjunction with a set of modifiers to determine the conditions under which menu items are enabled or disabled, as well as to specify specific menu actions.
The format for specifying variables with modifiers is:
variable[:mod1[:mod2[...[:mod10]]]Variables
Table 3 lists the set of variables that are valid for extending Rose menus.
Modifiers
Table 4 lists the set of modifiers that are valid for use with variables to extend Rose menus.
Syntax Rules for Rose Menu File Entries
Follow these rules when specifying menu text:
- When a text string contains embedded spaces, enclose the string in double quotation marks.
- When a text string has no embedded spaces (a single word, for example), enter the string without any quotation marks.
- When a text string that is not enclosed in quotes includes a special character, the special character could be misinterpreted as a variable. For this reason, you must precede any special characters (such as ^, ", or %) with an escape character. The escape character for all special characters is ^.
Option Calculate^%exec Notepad ^""c:\my files\file.txt"^"
Creates a menu action that executes the following command line:
notepad "c:\my files\file.txt".Note the escape character followed by an additional set of quotation marks. One set of quotation marks is necessary because there is a space in
my files. The second set, each of which is preceded by the ^ escape character, causes the actual command line to include the quotation marks as part of the command.- To create a mnemonic for the menu, add an ampersand (&) before the menu text.
- Menu text can include variables and modifiers.
For example,
Option "Validate "%modelCreates a menu option with the text Validate MyCurrentModel (assuming the current model is called MyCurrentModel).
See Menu File Variables and Modifiers for more information.
Adding Scripts to a Rose Menu
If you create a Rose script that you will use over and over again, you may want to add it to a Rose menu. For example, if you write a script to create a particular report based on the contents of a model, you will probably run that script periodically.
To add such scripts to a Rose menu:
- 1 Open the Rose Menu file, or create a new one to use in its place.
- 2 Edit the Path Map so that it includes a virtual script path. (See Adding or Editing the Virtual Path for Scripts.)
- 3 Modify the Rose menu file to add the script under the appropriate menu, being careful to follow all of the menu file syntax rules. To do this:
- In the menu file, locate the menu specification that corresponds to the Rose menu to which you want to add the script. Each menu specification is comprised of the Menu keyword followed by the name of a Rose menu. For example, the Tools menu specification begins with Menu Tools.
- Within the appropriate menu specification, add a menu option that specifies the text of the menu command that will run the script (for example, Run Conversion Wizard).
- Enter a RoseScript menu action to cause the script to execute when a user selects the menu command.
- 4 Save the updated menu file.
Adding or Editing the Virtual Path for Scripts
When you edit the Rose menu file to include script commands, you must include one of the following:
- The fully qualified name of the script file to execute
- The virtual path that maps to the actual path
Defining a virtual path for scripts simplifies the process of editing the menu file by allowing you to specify the symbolic virtual path name instead of the complete file path.
To add or edit a virtual path for scripts:
- 1 Start Rose.
- 2 Click File > Edit Path Map to display the Virtual Path Map dialog box.
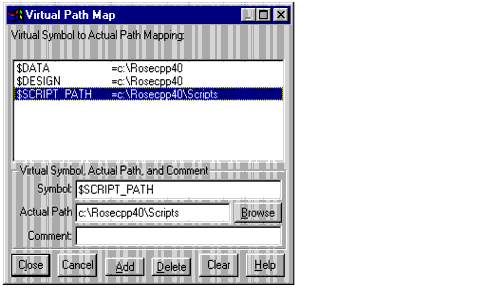
Figure 3 Adding Virtual Path for Scripts
- 3 Check for the $SCRIPT_PATH virtual symbol and do one of the following:
- If the symbol exists, select it in the dialog box to display its current mapping information in the lower portion of the dialog box.
- If the symbol does not exist, enter it in the Symbol field in the lower portion of the dialog box.
- Enter the actual path to your Rose scripts, or use the Browse button to locate and select the path. (Normally these scripts reside in a Scripts subdirectory of the Rose installation directory.)
- When you make changes in the dialog box, the Close button becomes an OK button. Click OK to save your changes and exit the Virtual Path Map dialog box.
Sample Rose Menu File
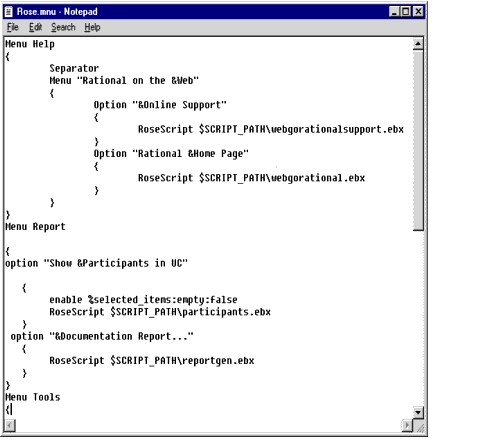
The following figure shows a portion of a Rose menu file.
Figure 4 Sample Rose Menu File
Note the following entries as you examine the menu specifications that comprise this file:
- Separator Entry
A separator entry causes a separator line to appear between the menu item above the keyword and the menu item below the keyword. In this case, a separator line will appear above the Rational on the Web submenu.
- Menu Entry
A Rose menu entry consists of the Menu keyword, followed by the name of the Rose menu being extended.
This menu file extends the Help menu, the Reports menu, and the Tools menu (only partially in view).
- Submenu Entry
A submenu is a second level menu that appears under a menu. A submenu entry looks just like a menu entry, with two exceptions:
- It appears within a Rose menu specification. (In this case, it is part of the Rose Help menu specification.)
- The Menu keyword is followed by the submenu title. (Notice that when the submenu title has embedded spaces, it is enclosed in quotation marks.)
- Option Entry
Menu option entries define menu commands that you add to a menu. They begin with the Option keyword and are followed by the option title.
This file adds the following commands to the specified menus:
- Online Support (Rational on the Web submenu of the Help menu)
- Rational Home Page (Rational on the Web submenu of the Help menu)
- Show Participants in UC (Report menu)
- Documentation Report (Report menu)
- Menu Action
Menu actions tell Rose what to do when the menu item is selected. Each of the options in this file executes a Rose Script. The Menu Actions topic describes all of the available actions.
- Menu Argument
Menu arguments can be included to enable or disable a menu item under various circumstances. The arguments begin with either an Enable or Disable keyword, followed by variables and modifiers which define the circumstances.
In this case, the Show Participants in UC menu item will be enabled only if at least one item is selected in the current diagram (that is, the statement, "The list of selected items is empty" is false).
- Braces
Customizing Rose Shortcut MenusWhen you or the user of your add-in to Rose right-clicks in Rose, a shortcut menu appears. The commands displayed on the shortcut menu are determined by where you or your add-in user clicks the mouse and what items are selected in the diagram or browser. You can take advantage of this feature in your add-in's functionality so that your add-in user sees your shortcut menu items when they right-click. If your add-in has features that you want to include on a shortcut menu, the shortcut menu Help topics explain how to add items to the Rose shortcut menu by using the Rose Extensibility Interface (REI).
Benefits
The REI exposure of Rose's shortcut menu interface provides the following benefits:
- Quicker access to your add-in's features for your customers
- Control of when the menu item appears on the shortcut menu
- Default (any time the user selects multiple different items, such as classes and packages, or has nothing selected)
- Diagram
- Package
- UseCase
- Class
- Attribute
- Operation
- Component
- Role
- Properties
- Model
- DeploymentUnit
- ExternalDoc
- Control of the state in which your menu item appears on the shortcut menu (enabled, disabled, checked, unchecked)
- Control of the order (but not position) of multiple menu items on the shortcut menu
- Ability to add submenus to shortcut menu items
- Ability to add separator lines to the shortcut menu and submenus
- Ability to create one shortcut menu item that works for items selected in the browser as well as in a diagram (you do not have to create one menu item for items selected in the browser and another menu item for items selected in the diagram)
Limitations
The position on the shortcut menu where your menu item appears is controlled by Rose. If you have more than one item on the shortcut menu, however, you can control the order in which those items appear by adding the items (using the AddContextMenuItem method) in the order in which you want the menu items to appear.
Key Terms and Concepts
Language-Dependent
Rose model elements are language-dependent if they can be associated with a specific language add-in, especially for code generation. These language-dependent model elements are:
- Associations
- Attributes
- Classes
- Components
- Operations
- Roles
Language-Neutral
Rose model elements are language-neutral if they are not associated with a specific language. They are not generated into code (although model elements within them can be generated into code). These language-neutral model elements are:
- Activities
- Decisions
- DeploymentUnits
- Diagrams
- ExternalDocs
- Models
- Packages
- Properties
- States
- Subsystems
- Swimlanes
- Synchronizations
- Transitions
- UseCases
Even though these model elements are language-neutral, a language add-in can work with them (except for DeploymentUnits, ExternalDocs, Models, and Properties) in the following ways. The language add-in can:
- Add shortcut menu items.
- Get the OnContextMenuItem event for them, as long as the language add-in is set as the default language.
In other words, if your language add-in is the default language, when a user right-clicks on any of the above language-neutral model elements (except for DeploymentUnits, ExternalDocs, Models, and Properties), the user sees your language add-in's shortcut menu items for these model elements. If your language add-in is not the default language and the user right-clicks on one of the language-neutral model elements (except for DeploymentUnits, ExternalDocs, Models, and Properties), the user does not see your shortcut menu items for these model elements.
Language Add-In
A language add-in is an add-in whose Rose Registry setting for "LanguageAddIn" is set to Yes.
Non-Language Add-In
A non-language add-in is an add-in whose Rose Registry setting for "LanguageAddIn" is set to No.
Behind the Scenes of Shortcut Menus
When Rose is started, it issues the OnActivate event and gets shortcut menu items (ContextMenuItem) from each add-in.
When you or the user of your add-in right-clicks, Rose sends the OnEnableContextMenuItems event to the appropriate add-ins to get the applicable menu states for the add-in's ContextMenuItems. Rose then formats and displays the shortcut menu with appropriate add-in menu items depending on:
- Where the user right-clicked.
- What items are selected (such as class and package).
- For what context the add-in's shortcut menu items are defined (ContextMenuItemType).
See How Rose Formats and Displays Shortcut Menu Items.
When the user selects a menu item from the shortcut menu, Rose sends the OnSelectedContextMenuItem to the appropriate add-ins. It is then up to the add-in to map the event and arguments to one of its methods.
The add-in then runs the method that corresponds to the selected shortcut menu item.
How Rose Formats and Displays Shortcut Menu Items
The methodology for determining which shortcut menu items appear and when they appear makes the add-in a smart, seamless part of Rose. Rose only displays your shortcut menu when it is appropriate to do so. For example, Rose displays your class shortcut items for a particular class if the following conditions are all true:
- Your add-in is a language add-in (defined by the registry setting)
- Your user creates a class with your language
- You have created the appropriate shortcut menu items (ContextMenuItems)
However, if your user creates a class with a different language add-in, Rose does not display your class shortcut menu items. (A menu item for C++ classes might not make sense for a Visual Basic class.) Because of the flexibility that Rose gives you through the REI to create shortcut menu items, it is also a complex concept. A shortcut menu item might not appear when expected. It is, therefore, important to understand the scenarios (explained later in this chapter) for the complete explanation of what is displayed and when it is displayed.
Shortcut menu items created by a non-language add-in are always displayed on the appropriate menu. Those items created by a language add-in are displayed when the selected items have that language assignment. Shortcut menu items created by a language add-in are also displayed when language-neutral items are selected and that language is the Default Language. Whether Rose displays a particular shortcut menu item is dependent on the following considerations:
- The Default Language setting (click Tools > Options > Notation)
- Whether the selected items are the same type
- Whether the selected items are language-dependent or language-neutral
- Whether the selected items are associated with a particular language add-in
See Shortcut Menu Scenarios for examples of how these issues affect shortcut menu items.
Shortcut Menu Scenarios
The following table describes all the possible scenarios for displaying shortcut menu items.
Note: If you want a shortcut menu item to appear on more than one menu (for example, for classes and the default), you must create a separate ContextMenuItem for each item type (for example, one for rsClass and one for rsDefault). For examples, see Sample Shortcut Menu Implementation Code and Sample Rose Script Shortcut Menu Code.
For more information on rsClass, rsAttribute, rsDefault, or rsDiagram see ContextMenuItemType Enumeration in the online Help.
Shortcut Menu Design Considerations
To keep the shortcut menu from becoming too cluttered with many different add-in menu options, try to keep menu items on the main shortcut menu to a minimum. Use submenus as much as possible. However, put all the important menu options on the main shortcut menu. Put less important menu options on a submenu under a generic main shortcut menu option.
Generate Code and Browse Code are not standard Rose shortcut menu options. Each language add-in is responsible for creating and manipulating these options according to their needs. This gives you greater control and flexibility with these features. When creating menu items, make the caption specific to your language (for example, Generate C++ Code, Generate Visual Basic Code). This reduces confusion since the user of your add-in could be using more than one language add-in in Rose. Place Generate Code and Browse Code at the top level of the shortcut menu instead of in a submenu.
You could also place shortcut menu items that open a custom specification sheet at the top level of the shortcut menu. However, if your add-in supports the OnPropertySpecOpen event, do not add a custom specification menu item because it would be redundant. This is due to the fact that when Rose detects that the OnPropertySpecOpen event is supported for an item, Rose adds the Open Standard Specification shortcut menu item (which displays the standard Rose specification) immediately after the Open Specification shortcut menu item (which, in this context, displays the add-in's custom specification sheet).
Procedure
To customize the Rose shortcut menu:
- 1 In order to use this feature of the REI, you must register your product in the Rose Add-In Manager.
- 2 Determine the following:
- What are your menu items?
- Through what states will each menu item go?
- Where should each menu item appear (main shortcut menu or a submenu)?
- In what order should your menu items appear on the shortcut menu or submenu?
- In which contexts should your menu items appear (for example, rsDefault, rsClass, and rsPackage).
- What circumstances will change menu states for each menu item?
- Which access keys, if any, should you assign to each menu option?
- Are there any other considerations that are specific to your implementation?
- 3 Create the prototyped event methods, OnActivate, OnEnableContextMenuItems, and OnSelectedContextMenuItem customizing for your specific needs.
- 4 Create ContextMenuItem objects for each menu item by using the AddContextMenuItem method for each menu item. Use AddContextMenuItem in the order in which you want the menu items displayed on the shortcut menu.
- 5 Create your specific methods to support each ContextMenuItem (shortcut menu item) that maps to a specific function of your add-in. If the method already exists, update it as needed to take advantage of the Rose shortcut menu.
- 6 Create and incorporate menu state changes as needed for your add-in. Use the MenuState property of the ContextMenuItem to change menu states.
- 7 Determine if there are any additional steps necessary for your specific implementation and perform those steps.
Adding Menu Items to the Shortcut Menu
To create and add menu items to the shortcut menu, use the AddContextMenuItem Method.
Note: An add-in should add context menu items when it gets the OnActivate event.
Working with Shortcut Menu Items
When the user activates the shortcut menu with items selected in the browser or a diagram, Rose sends the OnEnableContextMenuItems event to the specified language add-in. The language add-in can then call GetSelectedItems at the model level to get all selected items, regardless of whether the user selected the items in the browser or in a diagram.
Working with the Shortcut Menu Item Collection
To work with a subset or the set of all shortcut menu items, use the GetContextMenuItems Method.
To enable, disable, check, or uncheck shortcut menu items:
- 1 Iterate through the collection of ContextMenuItem objects by using the GetAt method.
- 2 Set the MenuState property accordingly.
Editing Shortcut Menu Items
To change the properties of the shortcut menu item, see the ContextMenuItem class properties and methods.
Changing the State of a Shortcut Menu Item
To enable, disable, check, or uncheck a particular shortcut menu item, change the ContextMenuItem's MenuState property.
Sample Shortcut Menu Implementation Code
The following are sample pieces of code that you might use to add your menu items to Rose's shortcut menu.
Sample Rose Script Shortcut Menu Code
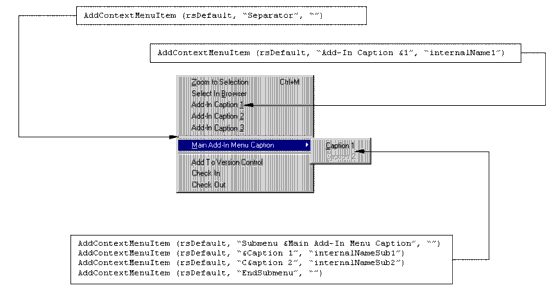
The sample RoseScript code below produced the shortcut menu in Figure 5.
Figure 5 Sample Code for Shortcut Menus
| Rational Software Corporation
http://www.rational.com support@rational.com techpubs@rational.com Copyright © 1993-2001, Rational Software Corporation. All rights reserved. |