Developing Add-Ins for Rational Rose
ContentsThis chapter is organized as follows:
- Introduction
- Why Create Add-Ins?
- Types of Add-Ins
- What Is in an Add-In?
- UNIX vs. Windows
- Creating Portable Add-Ins
- How to Develop Add-Ins
IntroductionThis appendix provides additional information for customers wanting to explore the use of add-ins. However, creation of add-ins is not directly supported by Rational Technical Support. Additional support for add-ins is available through the Rational Unified Solutions Partner Program and Rational University.
For more information on the Rational Unified Solutions Partner Program see http://www.rational.com/corpinfo/partners/.
For training on Rational Rose's REI and add-ins see the Extending Rose course from Rational University at http://www.rational.com/university/description/.
Add-ins allow you to package customizations and automation of several Rose features through the Rose Extensibility Interface (REI) into one package. An add-in is a collection of some combination of the following:
- Main menu items
- Shortcut menu items
- Custom specifications
- Properties
- Data types
- Stereotypes
- Online Help
- Context-sensitive Help
- Event handling
- Functionality through Rose Scripts or controls (OLE-server)
Rose Script or any language such as VB or C++ that can expose itself as an OLE server may be used to build an add-in.
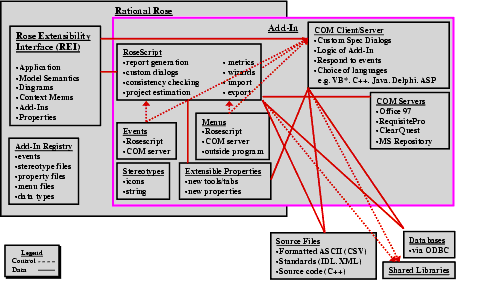
Figure 21 Rose Add-Ins Architecture
Note: Servers that wish to use Rose must use the supplied typelib included with Rose.
Why Create Add-Ins?You might want to create an add-in as opposed to a script or program if you answer "yes" to any of the following questions:
- Do you want to take advantage of Rose events like OnNewModel and OnAppInit?
- Do you want to interact with other Rose add-ins?
Types of Add-InsThere are two types of add-ins:
- Basic: A basic add-in is a non-language add-in that supplies its own responses for events to execute third-party scripts or executables, such as a Visual Basic program. It does not use the component view for code generation. A basic add-in cannot register for certain code generation-related events.
- Language: A language add-in takes advantage of the mapping to components by defining a target language. It also supplies its own responses for events that pertain to code generation and round-trip engineering integration. Code generation and round-trip engineering events include OnGenerateCode, OnBrowseBody, and OnBrowseHeader. Language add-ins support custom data types and overriding the default specification.
What Is in an Add-In?Add-ins customize or contain one or more of the following:
- Main menus
- Shortcut menu
- Custom specifications
- Properties
- Data types
- Stereotypes
- Online Help
- Context-sensitive Help
- Registering for events
- Functionality
Each of these are explained in the next sections.
Main Menus
The Rose main menus are the menus at the top of the Rose window, such as File and Edit. These menus connect the user interface to functionality in Rose. You can customize these menus to link functionality in your add-in to the Rose user interface.
Shortcut Menu
The Rose shortcut menu appears whenever you or your user right-clicks on part of the user interface. The shortcut menu is another link between the user interface and functionality in Rose. You can customize this menu to link functionality in your add-in to the Rose user interface.
Custom Specifications
Rose displays a standard specification dialog box for each model element to allow definition and description of that model element. If you are writing a language add-in, you can override the standard Rose specification dialog box and display your own custom dialog box. This is useful to:
- Remove irrelevant or inappropriate information.
- Target the dialog box to your end-user's needs.
- Drive the dialog box by stereotype or other characteristics, for example, naming conventions.
Properties
Rose model properties allow you to extend Rose model elements through additional properties and their values. You can add custom tools (such as a tab on the specification dialog box), sets, and properties to store the information relevant to your add-in with each Rose model element. You can also use this information to determine when functionality in your add-in should occur.
Data Types
Rose data types allow you to customize which selections your user sees in the type drop-down list for model elements associated with your add-in.
Stereotypes
Rose stereotypes allow you to customize the look of different model elements as makes sense to your add-in. This custom look can be as simple as an additional text string (for example, <<Special Class>>), or as fancy as new icons for the diagram editor, toolbar buttons, and browser icons.
Online Help
Rose provides extensive online Help to explain the product. You can also add your online Help.
Context-sensitive Help
Rose provides context-sensitive Help to provide quick, brief information on the context. You can add context-sensitive Help to your add-in's user interface, your custom Rose main menu items, shortcut menu items, and properties.
Registering for Events
Rose provides several COM events for which your add-in can register and respond.
Functionality
You can write code to provide the dialog boxes and other functionality desired in your add-in.
UNIX vs. WindowsIf you are developing add-ins for UNIX, see Table 14 for the differences between UNIX and Windows.
Table 14 UNIX vs. Windows
The basic difference is that to create an add-in for UNIX, you must "fake" setting up the "registry".
- 1 Copy the contents of rose.version/addins/cm directory to a new directory in the rose.version/addins directory where version is the installed version of Rose. For example:
- 2 Change to the new directory. For example:
- 3 Rename cm.mnu and cm.reg to the name of your add-in. For example:
- 4 Edit your menu file (.mnu) to add the menus you want. The format is the same on Windows and UNIX.
- 5 Edit the registry file (.reg) and replace "cm" with the name of your add-in. You should change:
- HKEY_LOCAL_MACHINE
- InstallDir
- MenuFile
- 6 Copy your add-in's custom Help file to the rose.version/help directory where version is the installed version of Rose. For example:
Creating Portable Add-InsTo create add-ins that will be portable to other platforms, keep the following recommendations in mind:
- Keep the logic of the integration in Rose Script.
- Keep dialog boxes and graphical user interfaces (GUIs) in Rose Script.
- Import and export through ASCII files.
- Do not use COM calls--write shell-accessible commands.
- Test the operating system with the BasicScript object (for example, Basic.OS).
- Use path map variables.
How to Develop Add-InsThe following procedure gives you a high-level look at what you need to do to develop your add-in:
- 1 Decide which language to use to create your add-in (Rose Script or a COM-enabled language such as Visual Basic, C++).
- 2 Decide whether you will create a basic or language add-in.
- 3 Decide which parts of Rose you want to customize or use:
- Main menus
- Shortcut menus
- Custom specifications
- Properties
- Data types
- Stereotypes
- Online Help
- Context-sensitive Help
- Registering for events
- 4 Design your add-in's functionality.
- 5 Create all the pieces for your add-in that you need:
- Menu file (.mnu)
- Property file (.pty) to add new tools, sets, and properties
- Data types
- Stereotypes (.ini, .bmp, .wmf, .emf)
- Online and context-sensitive Help (.hlp)
- Method for updating the registry file (.reg)
- Code to:
perform all the functions of your add-in (.ebs, .ebx, .exe, .dll, etc.)
register for and handle events
define your custom specification dialog boxes
- Installation routine
- Uninstallation routine
- Hardcopy documentation
- Anything else specific to your needs
- 6 Test your add-in and its pieces:
- Installation
- Activation
- New functionality
All other add-in functionality
- Deactivation
- Uninstallation
- 7 Package your add-in and distribute to your customers (whether internal or external).
Working with and customizing each of the items listed above (for example, menus and properties) are explained in more detail in the next sections.
Customizing Main Menus
Each add-in may introduce additions to the menus specific for that add-in, using the menu file technology (*.mnu). This is the only way an add-in can provide main menu items.
For more information on the syntax for the Rose menu file (*.mnu), see Customizing Rose Main Menus.
Note: If you choose to customize the main menus, you must update the registry (discussed in Updating the Registry).
Customizing the Shortcut Menu
For information on customizing the shortcut menu, see Customizing Rose Shortcut Menus.
Creating Custom Specifications
To create and activate custom specifications:
- 1 Create a language add-in.
- 2 Register for the OnPropertySpecOpen event.
- 3 Implement an OnPropertySpecOpen interface in your add-in's OLE server.
- 4 Code your custom specification dialog boxes.
Customizing Properties
Properties are added to Rose items by add-ins using the existing property file (.pty) technology. Each add-in can optionally supply its own property file that defines a name space for its properties and a tab in the specification editor to hold the custom tool, sets, and properties. You can only define one property file per add-in, but you can define multiple tools, sets, and properties within that one file. The property file is automatically enabled and disabled as your add-in is enabled and disabled. Even when the property file is disabled, however, your custom properties are persisted with the model file. To hide a tab, the user can deactivate the corresponding add-in in Rose.
Design Considerations
The ordering of the tabs (tools) must be independent of when, where, and what add-ins are installed or activated. The tab name (tool name) must be unique for each add-in. Rose cannot detect conflicts. You must always have a "default" set for each of your custom tools.
Note: If you choose to add a property file, you must update the registry (see Updating the Registry).
You can also add, delete, and clone properties through the extensibility interface. For more information on how to do this, see Managing Default Properties and subsequent sections.
Information in Property Files
Property Files contain the following information:
Format for Property Files
This section discusses the format of property files. Keywords are shown in
bold, while variable information that you need to set is shown initalics. Each element is explained at the end of the property file format.Comments about the property file#Begin version information(object Petalversionnumber_written"add-in name"charSet0) # End version information #Begin tool definition(list Attribute_Set#Tool setup(object Attributetool"tool"name"propertyID"value"809135966") #Begin set and model element definition(objectAttributetool"tool"name"set__model element"value(list Attribute_Set#Define first property(object Attributetool"tool"name"property"valuedatatype) #Define second property(object Attributetool"tool"name"property"valuedatatype) ... #Define nth property(object Attributetool"tool"name"property"valuedatatype) ) #End property list) #End set and model element list#Begin next set and model element list( ... ) #End next set and model element list) #End tool definition#Begin next tool definition. Repeat format.( ... ) #End next tool definition#End property fileThe property file is composed of the following elements:
- Comments: Place a number sign (#) at the beginning of the line to indicate that it is a comment line.
- Number: Enter the petal version number that corresponds to the version of Rose for which you are writing your add-in. To find out what this number is, first locate a model file (.mdl) saved in the same version of Rose. Next, open the model file in a text editor, such as Notepad.
- Add-in name: Enter the name you want to call your add-in. For example, Rose/MyAddin v1.0
- Tool: Enter the name of your tool. For example, My Tool. You may define multiple tools for your add-in in one property file.
- Value: Use the same value (809135966) for each of your tools. If you run into problems, add 1 to the number.
- Set__model element: Enter the name of your set and model element. For example, default__Project, CompilerV1.0__Project, CompilerV2.0__Project, default__Class. You may have multiple sets and multiple model elements per tool. Valid model elements are:
- Association
- Attribute
- Category
- Class
- Has
- Inherit
- Module-Spec
- Module-Body
- Operation
- Param
- Project
- Role
- Subsystem
- Uses
- Property: Enter the name of your property. For example, minCount.
- Data type: Enter the default value for the data type of your property. For example, if your property is:
- an integer, your default value may be 0.
- a string, your default value may be "" or "Unknown".
- a boolean, your default value may be TRUE.
Table 15 lists examples for each of the different data types and how to format them in your property file. Note the cases where quotes are used versus where they are not used.
Sample Property File
The results of adding a sample property file to Rose appear in Figure 22.
Figure 22 Sample Custom Properties
To add the tool, set, and properties (with default values) displayed in the property dialog box in Figure 22, we created the following property file:
(object Petal
 version     43)

(list Attribute_Set
 (object Attribute
    tool  "myTool"
    name  "default__Category"
    value  (list Attribute_Set
         (object Attribute
      tool  "myTool"
      name  "MyNewEnumeration"
      value  (list Attribute_Set
           (object Attribute
        tool  "myTool"
        name  "Value1"
        value  1)
         (object Attribute
        tool  "myTool"
        name  "Value2"
        value  2)
         (object Attribute
        tool  "myTool"
        name  "Value3"
        value  3)))
       (object Attribute
      tool  "myTool"
      name  "MyEnumeratedProperty"
      value  ("MyNewEnumeration" 1))
       (object Attribute
      tool  "myTool"
      name  "isAppropriate"
      value  TRUE)
       (object Attribute
      tool  "myTool"
      name  "mySpace"
      value  5))))
Note: This tool tab only appears on package specifications, since we only defined them for packages (default__Category). To display this tab for classes, duplicate the default__Category section and rename it to default__Class.
For more examples of property files, see the .pty files that come with Rose.
Creating Property Files
To create a property file, for inclusion with your add-in:
- 1 Create a new text file with extension .pty in a text editor or use a copy of an existing .pty file.
- 2 Edit the property file (.pty) as desired. For guidance, see the explanations given previously and existing property files.
Testing Property Files
- 1 Create and save a test model with all the model elements for which you added properties.
- 2 Add the new property file in Rose by clicking Tools > Model Properties > Add and selecting your property file (.pty).
- 3 Check the error log to make sure your model properties were all loaded successfully. For example:
- 4 Test your new properties by opening the specification for each affected model element. Look for:
- A new tab or tabs with your tool name or names.
- Correct sets (default, plus any others) on each tool tab.
- Correct properties for each set.
- Correct default values for each property.
- Correct data types for each property. For example, click on an enumerated type to make sure that Rose displays a drop-down list that includes all the valid values for your enumeration.
Customizing Data Types
An add-in may also choose to supply a set of default data types to be presented to the user for typing attributes, parameters, and so on, in Rose specifications. These data types are defined in the registry setting called FundamentalTypes. For information on updating the FundamentalTypes registry setting, see Updating the Registry.
Customizing Stereotypes
An add-in may supply a set of stereotypes and an additional set of metafile icons to represent them. These stereotypes will be loaded and made available to Rose when the add-in is activated. Your custom stereotypes are added to Rose's default set of stereotypes for the UML. Custom stereotypes do not replace standard ones. The location of your custom stereotypes is defined in the registry setting called StereotypeCfgFile. For information on updating the StereotypeCfgFile registry setting, see Updating the Registry.
You may provide icons for your stereotypes or text. Stereotypes are applicable to the following model elements:
- Association
- Attribute
- Class
- Component
- Component package
- Connection
- Dependency
- Device
- Generalization
- Logical package
- Operation
- Processor
- Use case
- Use-case package
You may create custom icons for one or more of the following:
- Diagram editor icons (.wmf, .emf) to display on diagrams
- Diagram toolbar icons (.bmp) to display on the toolbar buttons
- Browser list icons (.bmp) to display in the browser
Note: You only need one bitmap file for your diagram toolbar icons and a separate bitmap file for all your custom browser icons. You do not need separate bitmap files for each of these icons. An index into the bitmap is used to indicate which bitmap goes with which stereotype.
Steps for Creating Add-In Stereotypes
To create an add-in stereotype:
- 1 Decide on the model element(s) and text stereotype name(s).
- 2 Decide which, if any, graphical representations you want to customize:
- Editor
- ToolBar
- Browser
- 3 Define the stereotype in the stereotype .ini file for the add-in.
- 4 Create the custom icon graphics (.wmf, .emf, .bmp).
General .ini File Format
This section describes the .ini file format. You can also find information on custom stereotypes and the stereotype configuration file in the Using Rose book and online Help.
The stereotype .ini file contains the following information:
General]
This section contains add-in specific settings such as the name of the add-in and whether it is a language add-in.
Stereotyped Items]
This section is like a table of contents for the stereotypes. It contains a list of stereotyped REI objects. For example, Class:Control, Component:DLL, Operation:Set.
REI Item:Stereotype name]
This section contains the settings for each stereotype, including any optional icon files and settings.
General]ConfigurationName=NameIsLanguageConfiguration=Yes or No[Stereotyped Items]REI item:Stereotype name REI item:Stereotype name... [REI item:Stereotype name]Item=REI itemStereotype=Stereotype name optional icon settings:Metafile=&/model-element.wmfSmallPaletteImages=&/palette_icons.bmpSmallPaletteIndex=IndexMediumPaletteImages=&/palette_icons.bmpMediumPaletteIndex=IndexListImages=&/stereotypes.bmpListIndex=Index... [REI item:Stereotype name]Item=REI itemStereotype=Stereotype name optional icon settings:Metafile=&/model-element.wmfSmallPaletteImages=&/palette_icons.bmpSmallPaletteIndex=IndexMediumPaletteImages=&/palette_icons.bmpMediumPaletteIndex=IndexListImages=&/stereotype.bmpListIndex=IndexThe stereotype .ini file is composed of the following elements:
- ConfigurationName: This is the name of the add-in or name used for maintenance.
- IsLanguageConfiguration: Type Yes if your add-in is a language add-in. Otherwise, type No. This information conditionalizes stereotypes so that they only appear if the language of the model element in Rose is the same as the
ConfigurationNamelisted above.- Item: The model element for which you are defining a stereotype.
- Stereotype: The text string stereotype. This is the text to be displayed between guillemets (<< >>).
- Metafile: The windows metafile (.wmf) or enhanced metafile (.emf) containing your diagram editor icon stereotype.
- Windows Meta Files (.wmf) may require additional extent settings.
- Enhanced Meta Files (.emf) are preferred.
- SmallPaletteImages: The bitmap file (.bmp) containing all your small icons for your toolbar buttons. This defines non-large icons (15 pixels high x 16n wide).
- SmallPaletteIndex: The integer number indicating the location in the bitmap file of the small toolbar button icon for this stereotype. The index starts with 1.
- MediumPaletteImages: The bitmap file (.bmp) containing all your medium icons for your toolbar buttons. This defines large icons (24 pixels high x 24n wide).
- MediumPaletteIndex: The integer number indicating the location in the bitmap file of the medium toolbar button icon for this stereotype. The index starts with 1.
- ListImages: The bitmap file (.bmp) containing all your custom browser icons:
- Device independent bitmaps
- 16 high x 16n pixels wide
- White background
- Use paint or bitmap editor
- & is the installation directory
- ListIndex: The integer number indicating the location in the bitmap file of the custom browser icon for this stereotype. The index starts with 1.
The following sections focus on the different types of text and icon stereotypes you can create. You do not need separate files for each of these items; all text and icon information can go in one .ini file.
Text-Only Stereotypes .ini File
No custom icons are included--only the text stereotypes.
Custom Diagram Editor Icons .ini File
Metafilemust be used in the optional icon settings section to define diagram icons.Custom Toolbar Button Icons .ini File
SmallPaletteImages,SmallPaletteIndex,MediumPaletteImages, andMediumPaletteIndexmust be used in the optional icons settings section to define diagram palette icons.Custom Browser List Icons .ini File
The [
General] section is needed.ListImagesandListIndexmust be used in the optional icon settings section.Additional Online Help
Each add-in may introduce additions to the online Help when installed or activated. These additions are activated when your add-in is activated.
Online Help should cover the capabilities of the installed add-in. Each add-in should have only one first-level Help book in the master table of contents. Your add-in should add a single book, for example "My AddIn". There may be many books under that book, but only one book should appear in the main Rose Help table of contents.
Adding Online Help for Your Add-In
To be included in the Rose Help, the add-in .hlp and .cnt files must reside in the same directory as the rest of the Rose Help.
- In Windows, the Help directory is specified by the HelpFileDir general Rose registry setting. The registry key for this setting is [HKEY_LOCAL_MACHINE\SOFTWARE\Rational Software\Rose\HelpFileDir].
- In UNIX, the Help directory is fixed: /rose.version/help where version is the version of the currently installed Rose (for example, /rose.4.5.8153/help).
In addition, you must include the add-in.cnt file in the roseu.cnt file.
To include the add-in.cnt file:
- 1 Locate the Rose Help files.
- 2 Identify the roseX.cnt file you wish to use:
- Roseu.cnt supports the UML Help variant.
- Rosec.cnt supports the COM Help variant.
- 3 Make a backup copy of the RoseX.cnt file.
- 4 Open the roseX.cnt file.
- 5 Add the following lines to the top of the roseX.cnt file along with the other Index and Link definitions:
title=filename.hlpfilename.hlp
where
titleis the text that appears in the title bar of the Contents window of the add-in Help file,filename.hlpis the name of the add-in Help file.- 6 Add the following line at the bottom of the roseX.cnt file:
filename.cntAdditional Context-sensitive Help
To be consistent with Rose, you can include context-sensitive Help in your add-in for your custom menu items, properties, and user interface (your add-in's dialog boxes, for example). Each context-sensitive Help topic must have an A-keyword defined for it. Since menu items and properties are Rose features, we explain the format needed to connect your custom menu items and properties to your context-sensitive Help. Create your A-links for your context-sensitive Help in your chosen Help authoring tool.
Main Menu Items
For main menu items, added via the menu file (.mnu), use the following format for the A-keyword.
For items not on submenus (items located directly on Rose main menus):
For example, Tools, MyAddIn, MyScript would be the alias for a context-sensitive Help topic that explains the "MyScript" menu option on the "MyAddIn" submenu of the "Tools" menu (Tools > MyAddIn > MyScript).
Menu, submenu, and menu item names in the A-keyword must include all punctuation. For example, if your menu path includes ellipsis:
Your A-keyword must also include ellipsis:
Note: There is no F1 Help for intermediary submenus, only for menu items. So for the examples listed previously, there is no F1 Help for "MyAddIn" or "My Language". If you have defined Help topics and A-keywords, however, there is F1 Help for "MyScript" and "Project Specification...".
Model Properties
The format for the A-keyword is:
where property is the name of your custom property, model element is the name of the model element to which your property is applied, and tool is the name of your tab (tool) in the specification.
For example, isAppropriate (Category, myTool) would be the alias for a context-sensitive Help topic that defines the "isAppropriate" property that applies to the myTool Packages.
User Manuals
You may supply your own soft or hardcopy documentation for your add-in that covers its installation, use, and limitations.
Registering for Events
You may register your add-in for Rose's events, thus triggering functionality in your add-in when that event occurs in Rose. Since any number of add-ins may trigger on the same event, the order in which your add-in entry points are called must be independent of when, where, and what add-ins are installed or activated.
Responses to events are usually coded as COM server interfaces, but some events can be mapped to Rose Scripts. Events map to either an interface on your COM server or a Rose Script, if the particular event allows Rose Script.
Some events only apply to language add-ins (for example, OnGenerateCode and OnPropertySpecOpen).
Events fall into one of the following categories:
- Registry entry required
- Interface events
- Script events
- No registry entry needed, but an OLE server is required
Interface and script events are explained further in the next section.
Interface vs. Script Events
Rose's registry-required events can be implemented in one of two ways, interface or script. An interface event requires a registered COM server (.dll) that includes an interface, named the same as the event, to handle the event. A script event requires a script that can be executed (.ebx) to handle the event.
What Events Are Available?
- Model-related: OnNewModel, OnCancelModel, OnCloseModel, OnOpenModel, OnSaveModel
- Model element-related: OnNewModelElement, OnModifiedModelElement, OnModifiedModelElementEx, OnDeletedModelElement, OnDeletedModelElementEx
- When the Rose application is initialized: OnAppInit
- Add-In activation/deactivation: OnActivate, OnDeactivate
- Generating source code: OnGenerateCode
- Browsing source code: OnBrowseHeader, OnBrowseBody
- Override the specification dialog box: OnPropertySpecOpen
- Extend the context menu: OnSelectedContextMenuItem, OnEnableContextMenuItems
Each of these events are described in detail in the online Help along with warnings and precautions. The detailed descriptions also include a Registry and Server Requirements section explaining whether the event requires a registry entry or OLE server.
How to Add Events to Your Add-In
This is the process for adding an event:
- 1 Add your COM server to your add-in registry.
- 2 Add events to your add-in registry.
- 3 Define an interface for each event.
- 4 Register your COM server with the operating system.
Each of these steps is detailed in the next sections.
Step 1--Adding your COM server to the add-in registry
This step is optional for Rose Script responses.
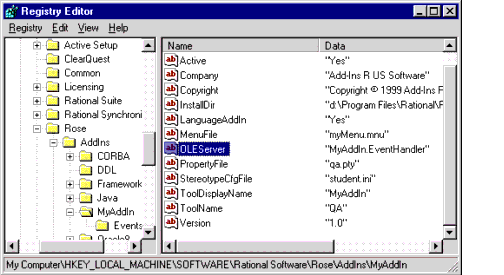
Set the OLEServer registry value to the name of your COM object (for example, MyAddIn.EventHandler).
Figure 23 OLEServer Windows Registry Entry
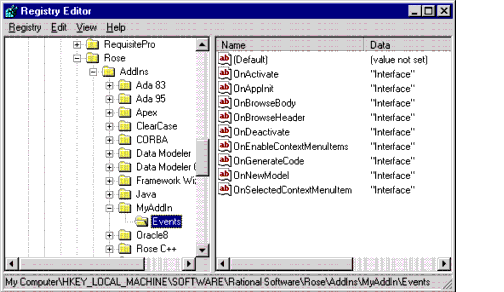
Step 2--Adding events to the add-in registry
- 1 Create an Events registry subkey under your add-in's subkey.
- 2 In the Name column, list each event for which your add-in is registering.
- 3 Set the Data column to one of these values:
- "Interface" indicates a COM server call
- "
eventName.ebx" indicates Rose Script execution whereeventName.ebxis the name of your compiled RoseScript.Figure 24 Windows Registry Entries for Rose Events
Note: The script file must reside in the add-in's installation directory, as specified by the add-in's InstallDir registry setting, or a subdirectory of the add-in's installation directory. If you choose to put the script in a subdirectory of your add-in's installation directory (for example, \scripts), specify the subdirectory as part of the script file name (for example, \scripts\OnNewModel.ebx).
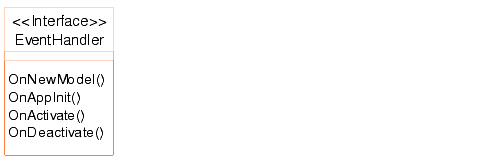
Step 3--Defining an interface for each event
For each event for which your add-in is registering, name your interface or Rose Script the same. For example, if your add-in is registering for the OnNewModel event, you would have one of the following:
- OnNewModel() interface in your OLE server (see the example in Figure 25)
Figure 25 Sample Add-In Event Handler
Note: Your COM server should only contain those events that you are responding to in your add-in.
- OnNewModel.ebx compiled Rose Script
While the signature of the interface varies by event, most interface signatures are:
voidevent_name(LPDispatchpRoseApp)Step 4--Register your COM server with the operating system
Add your COM server to the windows registry so that a client can get to it by COM object name (for example, CreateObject/GetObject). This is usually taken care of by the Integrated Development Environment (IDE). For example, Visual Basic registers your .dll file for you. Otherwise, to register your COM server, execute the command line:
regsvr32file.dllTo verify that your COM server is registered, add a reference to it in the object browser of your IDE.
Updating the Registry
Once the add-in is created, the following registry settings are necessary to enable an add-in. They are placed as subkeys to a subkey that represents the add-in name. The following would be an example of an add-in named MyAddIn:
The add-in registry information should be placed in the Rose\AddIns folder of the registry.
Registry Entries
The following registry entries are available when introducing add-ins.
Figure 26 Windows Registry Entries for an Add-In
This list shows the registry subkey names, descriptions, and defaults:
Active: Whether the add-in is active or not. Can be set by the user through the Rose Add-in Manager. Default set to "Yes".
Company: Name of the independent software vendor (ISV) that produced the add-in. For example, "Custom Software, Inc."
Copyright: Specifies the copyright date of the add-in. For example, "©2000-2001".
FundamentalTypes: A string list of data types that appear in the drop-down list for attributes when the add-in is active. This setting is required for all language add-ins. This field is case sensitive. For example, "LOGICAL;CHAR;REAL".
HelpFileName: Name of the Help file for the add-in, without any path or extension. For example, "myOnlineHelp"
Note: All add-in Help files, including .cnt files, need to be located in the Help directory specified by the HelpFileDir general Rose registry setting ([HKEY_LOCAL_MACHINE\SOFTWARE\Rational Software\Rose]).
InstallDir: Directory where the add-in is installed. For example, "d:\My AddIn"
LanguageAddIn: Whether the add-in is a round-trip engineering (RTE) language add-in that wishes to use the component mapping feature. For example, "Yes"
MenuFile: Name of the menu file (*.mnu) that tailors Rose. It needs to be installed in InstallDir. For example, "anaddin.mnu"
OLEServer: The name of the object that represents the OLE server that Rose communicates with, if the add-in uses an OLE server. For example, "MyAddIn.EventHandler"
Note: The OLEServer value is case sensitive and only required if the add-in is using an OLE server to handle events.
PropertyFile: Name of the property file (.pty) for the add-in (for example,"user.pty"). This needs to be installed in InstallDir. This registry setting is required if the add-in is introducing properties.
StereotypeCfgFile: Specifies the custom stereotype configuration file for the add-in (for example, "stereotypes.ini"). This setting is required if the add-in is introducing stereotypes. This needs to be installed in InstallDir.
ToolDisplayName: Specifies the add-in's tool name that gets displayed on the properties tab and in the drop-down list of languages in Rose. This name can be different from the name that is used in the .pty file. Note that this is not a required setting. If this setting is not specified, the ToolName is displayed on the properties tab and in the drop-down list of languages in Rose. If this setting is specified, this is the name that gets assigned to a component. For example, "myLang" is the ToolName for the add-in, but "My Proprietary Language" is the ToolDisplayName.
ToolList: Displays the list of additional tools or property pages introduced by the add-in. Each tool is separated by a semicolon. For example, "myLang;Tool2". This setting is only required if the add-in introduces more than one property page.
ToolName: Specifies the add-in's tool name, which must match the tool name in the add-in's .pty file (the name that gets assigned to a component). For example, "myLang", unless it is overridden by a ToolDisplayName. In that case, the ToolDisplayName is assigned to the component.
Version: Version number of the add-in, (not Rose). For example, "1.2.3"
Registering Custom Stereotypes
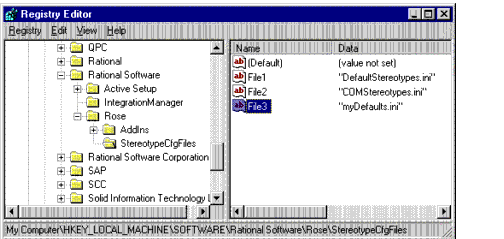
Add your stereotype .ini file to the StereotypeCfgFiles subkey under the Rose Subkey. Name your entry FileX where X is the next available integer.
Figure 27 Registry Entry for a Custom Stereotype Configuration File
The stereotype configuration file (.ini) must be located in the directory listed in the InstallDir registry setting.
Updating the Registry During Installation
Since manual updates during installation are error-prone, we recommend that you avoid manual updates, like regedit. Instead, we suggest that you use an installation utility or execute a custom registry file.
Installation utilities
Most installation utilities (for example, InstallShield) provide programmatic interfaces to the registry. Follow your installation utility's directions for updating the registry.
Executing registry files
You can also update the registry by creating a registry file (.reg), then executing it during the installation of your add-in.
To create a custom registry file, do one of the following:
- Create a registry file (.reg) from scratch in a text editor such as Notepad following the traditional .ini file format.
- Copy and edit an existing registry file (.reg).
- Manually create your registry entries (in regedit, for example) then reverse engineer the format into a registry file (.reg):
- Select existing add-in registry settings in a registry editor.
- Select the menu option to export the registry.
Registry File Anatomy
A registry file (.reg) looks like the following:
Installing, Setting Up, and Uninstalling Your Add-In
After you finish designing and coding your add-in, it will consist of a combination of the following:
- Main menu items (.mnu)
- Shortcut menu items
- Custom specifications
- Properties (.pty)
- Data types
- Stereotypes (.ini, .bmp, .wmf, .emf)
- Online Help (.hlp, .cnt)
- Context-sensitive Help (.hlp)
- Event handling (.dll)
- Functionality through Rose Scripts (.ebx) or controls (OLE-server) (.dll, .exe)
- Installation script
- Uninstall script
The purpose of the last two items, installation and uninstall scripts, is to introduce the files into the Rose file structure and to register their locations, as well as other data needed by the framework, and to undo all this at a later time when the add-in is not wanted.
Installation Reminders
When creating your installation script, remember to do the following:
- Install the pieces of your add-in (menu file, property file, and so on) in the subdirectory indicated in your add-ins InstallDir registry subkey.
- Update the roseX.cnt file as needed and install your Help (.hlp) and contents (.cnt) file in the same directory as the Rose Help files.
- Update the windows registry, using your chosen method. When you update the registry, do the following:
- Create a registry subkey for your add-in (for example, [HKEY_LOCAL_MACHINE\SOFTWARE\Rational Software\Rose\AddIns\MyAddIn])
- Populate this subkey with the appropriate names and values (for example, InstallDir, MenuFile)
- If using events, create an Events subkey under your add-in subkey. Populate the Events subkey with event names and "Interface" or "EventName.ebx" values.
- If using custom stereotypes, add your stereotype configuration file name (.ini) to the StereotypeCfgFile subkey.
- Create any other subkeys and registry entries needed for your implementation.
Installing Add-Ins
It is possible for an add-in supplier to provide a programmatic and complete install of the add-in, for example, by using InstallShield. The same applies to reinstalls and updates. Installation changes will not take effect while Rose is running, but will take effect upon start-up of Rose.
To install an add-in on your Windows 95, Windows 98, or Windows NT system:
- 1 Exit Rose.
- 2 Insert the application's CD-ROM or other media and run the setup.exe program.
- 3 Respond to the installation program's dialog boxes to complete your installation.
- 4 Restart Rose. Confirm that your add-in is installed and activated (checked) using the Rose Add-In Manager menu.
Uninstalling Add-Ins
We recommend that you provide a programmatic and complete uninstall of your add-in. Uninstall must remove not only the scripts, menu files, properties files, and Help files, but must also clean the registry entries for the add-in.
Activating and Deactivating Add-Ins
Once an add-in is installed, it can be in an activated or deactivated state. Immediately after installation, new add-ins start out as activated.
When deactivated, an add-in is all but uninstalled:
- All menu items added by the add-in are removed.
- All property tabs added by the add-in disappear.
- All event bindings added by the add-in are disengaged.
Note: A user may want to deactivate an add-in for a short time to keep it from functioning without actually uninstalling it.
Add-ins are activated and deactivated in the Rose user interface with the Add-In Manager. Add-ins are activated and deactivated programmatically with the REI AddInManager class.
| Rational Software Corporation
http://www.rational.com support@rational.com techpubs@rational.com Copyright © 1993-2001, Rational Software Corporation. All rights reserved. |