


|
|
Because of operating system differences, VOB backup operations are handled differently on UNIX and Windows. All VOB backup operations begin with locking the VOB. This step is critical to the integrity of any VOB backup.
A VOB backup on UNIX can be summarized as follows:
Lock the VOB.
Back up the VOB storage directory.
Unlock the VOB.
By default, a VOB storage directory is wholly contained in a single directory tree, which resides in a single disk partition. If you use a file-oriented backup tool, you specify only the VOB storage directory to ensure a complete backup. If you use a disk-partition-oriented backup tool, you specify only the partition name.
VOB storage on Windows is wholly contained in a single directory tree, which simplifies the backup process. A VOB backup on Windows can be summarized as follows:
If your backup software can be configured to capture files that are open for write access:
Lock the VOB
Back up the VOB storage directory.
Unlock the VOB.
If your backup software cannot process files that are open for write access, you must stop ClearCase on the ClearCase LT server, back up the VOB storage directory, restart ClearCase, and unlock the VOB.
WARNING: Many Windows backup utilities do not back up files that are open for writing. Because the VOB database files are typically in this state while ClearCase is running, even when the VOB is locked, your backup operation skips these files unless you stop ClearCase before performing the backup. Unless your backup software can capture files open for write access, you must stop ClearCase on the VOB host before performing a backup. To stop ClearCase on the ClearCase LT server, use the ClearCase program in Control Panel.
The standard backup procedure is to lock the VOB and back up the entire VOB-VOB database, plus VOB storage pools and various other files in the VOB storage directory. The VOB must remain locked for the duration of the backup. Keeping VOB database and storage pools synchronized on backup media is desirable; the standard backup procedure is recommended for all sites that can accept the duration of required locks. Locking a VOB prevents checkins, checkouts, and other operations that affect VOB data and metadata. These include UCM deliver operations and any UCM rebase operations that require merging. Other development tasks, such as editing, compiling, and debugging, can take place while a VOB is locked.
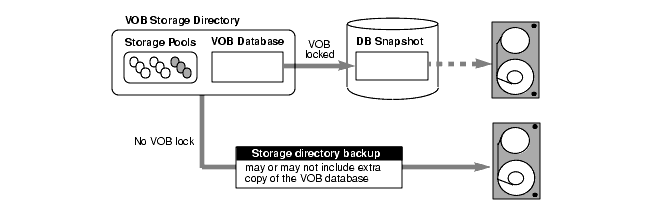
As illustrated in Figure 9, semi-live backup involves backing up the two major pieces of a VOB separately, as follows:
VOB database. Configure the VOB to have the vob_snapshot utility periodically lock the VOB and copy the VOB database to another location on disk (from which it can be backed up as part of the site's normal backup process).
VOB storage pools. Back up the VOB storage directory routinely, without locking the VOB. The backed up VOB storage directory may include a copy of the VOB database. However, because it is backed up while the VOB is unlocked, this database is useless and is discarded when the VOB is restored.
VOB lock time reduced. The VOB storage directory can be backed up unlocked. The vob_snapshot utility locks the VOB, copies the VOB database to another disk location, and unlocks the VOB.
More disk space is required. A second copy of the VOB database must be captured to disk. In addition, each of the VOB's source pool data containers, when replaced by a container with new version data, is retained for an additional 30 minutes to guarantee that source containers can be reconstructed when checkvob resynchronizes the VOB database and the storage pools at VOB restore time.
The VOB restore procedure is more complex. The VOB storage pools and the VOB database have different reference times. VOB database and storage pools must be resynchronized when you restore the VOB. In particular, version data added or removed in the interval between the database snapshot and storage pool backup cause database or pool skew that must be resolved. The vob_restore utility runs the checkvob utility to do this work.
Some data may be lost at VOB restore time. If the restored pools are older than the restored VOB database, data missing from the pools is lost (as expected). If the restored pool backup is newer than the database, pool version data newer than the snapshot is not added to the restored database. See also vob_restore: Restoring with a Database Snapshot.
To enable database snapshots, run vob_snapshot_setup on a VOB. This command causes the ClearCase LT scheduler to run vob_snapshot periodically on the VOB (daily, by default). The vob_snapshot and vob_snapshot_setup reference pages explain these operations. Consult them if you choose to use semi-live backup.
The backup procedures that follow accommodate (but do not require) snapshot-enabled VOBs. However, their focus is the standard backup approach, which requires the VOB to be locked for long enough to back up the database and all the pools. The vob_restore procedure applies equally to VOBs with and without database snapshots.
Deferred deletion is enabled by the vob_snapshot_setup program. It ensures that the source pool will contain all needed containers when a backup program archives an active VOB. When a container is replaced by new version data (for example, during a checkin), the new container is created and the client requests the vob_server to remove the old container. If deferred deletion is deactivated, the container is immediately removed. If deferred deletion is enabled, the old container is added to a list of pending deletions, and it is removed in 30 minutes. Keeping source data containers for 30 minutes increases disk space requirements. The increase can be substantial during any 30-minute interval of heavy VOB checkin activity.
On UNIX platforms, you can execute the kill -HUP command on the vob_server process to send deferred deletion statistics to the vob_server log (see also getlog and getlog -gr).
When checkvob examines source pools, it reports containers on the deferred deletion list.
The deferred deletion list is written every five minutes to the file delete_list.db in the VOB storage directory.
To determine the location of a VOB storage directory, use the ClearCase Administration Console or the cleartool lsvob command. If your backup program runs locally, it probably uses the VOB server access path. If your backup program runs over the network, it probably uses the Global path.
cleartool lsvob -long \vob_flex
Tag: \flex
Global path: \\ccsvr01\vobstore\vob_flex.vbs
.
.
.
VOB on host: ccsvr01
VOB server access path: c:\vobstore\vob_flex.vbs
Specify the appropriate pathname to your backup program.
NOTE: Some UNIX utilities that back up entire disk partitions require you to specify the disk partition where the VOB storage directory resides.
A backup represents a self-consistent snapshot of a VOB storage directory's contents only if the VOB is not modified while the backup program is working. That's why it is essential to lock the VOB before backing it up and unlock it after the backup completes.
WARNING: Regardless of your chosen backup strategy (see Choosing Between Standard and Semi-Live Backup), you must lock the VOB against all users. Use the ClearCase Administration Console or the Windows Explorer shortcut menu to lock the VOB. If you use the cleartool lock command, do not use the -nusers option. The lock is mandatory. It is not sufficient to capture a VOB that happens to be idle. The lock does more than ensure that no one modifies the VOB. It also causes the VOB to flush a database checkpoint to disk before backup. A VOB lock applied with the -nusers option does not perform the required database checkpoint.
You must be a privileged user to lock or unlock a VOB. There are several GUIs that support VOB locking, as well as two cleartool commands.
You can lock or unlock a VOB on any UNIX or Windows host from the ClearCase Administration Console:
Navigate to the VOB storage node for the VOB. This is a subnode of the host node for the host where the VOB storage directory resides.
Click Action > Properties. In the Properties of VOB dialog box, click the Lock tab.
From a Windows host, you can lock or unlock a VOB using the Windows Explorer shortcut menu for the VOB. Click ClearCase > Properties of VOB and click the Lock tab. On the command line, use cleartool lock and unlock:
cleartool lock vob:/flex
Locked versioned object base "/net/pluto/vobstore/flex.vbs".
<perform backup>
cleartool unlock vob:/flex
Unlocked versioned object base "/net/pluto/vobstore/flex.vbs".
If you use a file-oriented backup program, you may want to exclude some subdirectories within the VOB storage directory to save time. Use the guidelines in Table 3 to determine the relative importance of the various directories.
VOB Directory | Importance for Backup |
|---|---|
Top-level VOB storage directory | Required |
VOB database subdirectory | Required |
Source storage pools | Required |
Cleartext storage pools | Optional |
Administrative directory | Important, but not required |
Backing up cleartext storage pools is not important, because they are caches that enhance performance. Type managers re-create cleartext data containers as necessary.
If you do not back up cleartext pools, include each pool's roots in the backup-the pool's root directory (c\cdft, for example) and pool_id file, but not its subdirectories. Doing so prevents pool root check failure at restore time (see also Database or Storage Pool Inconsistencies) and possible cleartext construction errors in the restored VOB.
The admin directory contains data on how much disk space has been used by the VOB and its derived objects. The ClearCase LT scheduler runs periodic jobs that collect data on disk space use and store it in the admin directory. By default, the scheduler stores data for the previous 30 days. This historical data cannot be re-created. If the data is important to you, back up the admin directory.
Using a base-plus-incremental scheme to restore a VOB storage directory typically restores too much data. Depending on your particular VOB and disk, this data may fill up the disk.
ClearCase LT stores version data in delta format (for example, the container of a text_file element). Instead of modifying an existing data container when a new version of an element is checked in, ClearCase LT creates a new container at a different pathname within the source storage pool. (It then deletes the old container.)
An example demonstrates how this storage strategy works with an incremental backup scheme. Suppose that one or more new versions of a particular element are created each day for a week. Each day's incremental backup picks up a different source data container for that element. If a crash occurs on the ClearCase LT server at the end of the week, restoring the VOB places all those source data containers in the source storage pool, even though only one of them (the most recent) corresponds to the current state of the VOB database. Also, checkvob reports large numbers of unreferenced data containers when it runs at VOB restore time. (See the checkvob reference page for details.)
Given this situation, we recommend that you perform only a few incremental backups on a VOB storage directory before the next full backup. This practice minimizes the extra data involved in a base-plus-incremental restoration of the VOB. Run checkvob to detect and clean up the extra debris containers.
|
|
Feedback on the documentation in this site? We welcome any comments!
Copyright © 2001 by Rational Software Corporation. All rights reserved. |