


|
|
You can add files or directories to source control at any time. Usually, you add a few files to a directory that is already under source control. Less frequently, you may need to add an entire directory tree to source control.
This section explains these tasks:
Adding files and directories to an existing directory
Adding a directory tree for a new development project
NOTE: Your view's version-selection rules determine the branch on which an element's first version is created. Make sure the view you use to add elements creates versions on an appropriate branch.
To add files and directories to source control from an existing directory tree:
In ClearCase Explorer, navigate to the view used for your development task.
Navigate to the parent directory to which you want to add the files or directories.
If the files or directories are not present, drag them to the parent directory.
Select the files and directories you want to add to source control.
Right-click one of the selected objects. On the shortcut menu, click Add to Source Control.
We recommend you select items that are the farthest from the root of the directory tree: the Add to Source Control command for any given file or directory also adds any parent directories (up to the VOB root directory) that are not already elements.
Click OK.
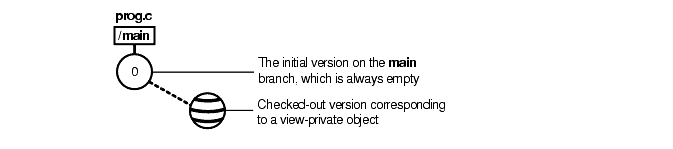
The mkelem or Add to Source Control command always creates an element and initializes its version tree by creating a single branch (named main) and a single, empty version (version 0) on that branch. The following arguments for the mkelem command or options in the Add to Source Control dialog box determine optional ClearCase behavior:
Selecting the Keep checked out check box or using mkelem with no arguments checks out the element. Any view-private data that corresponds to the element pathname remains in your view only and is added to version 1 in the VOB when you check in (Figure 30).
Clearing the Keep checked out check box or using mkelem -ci checks in the element, using any existing view-private data that corresponds to the element pathname as the content for version 1. Your view's config spec determines the branch on which ClearCase creates version 1.
Selecting the Preserve file modification time check box or using mkelem -ci -ptime does not alter the date and time that the file was last modified.
Clearing the Preserve file modification time check box changes the modified time on the file to the checkin time.
Using mkelem -nco suppresses automatic checkout; mkelem creates the new element, along with the main branch and version \main\0, but does not check it out. If element-pathname exists, it is moved aside to a .keep file.
(Replicated VOBs only) Selecting the Make current replica the master of all newly created branches check box or using mkelem -master assigns to your current replica mastership of all branches created during element creation. You will be able to create new versions on the branches.
Clearing this check box or using mkelem without the -master option assigns mastership of a new branch to the VOB replica that masters the associated branch type. If this replica is not your current replica, you cannot create new versions on the branch.
You can set the default for mastership assignment in the User Options dialog box:
In ClearCase Explorer, click Tools > Options.
In the User Options dialog box, click ClearCase Options.
In the ClearCase User Options dialog box, click the Operations tab.
Click Advanced Options.
Select the When creating an element in a replicated VOB, make current replica the master of all newly created branches check box.
Click OK.
Other views do not see the element until you check in the element's parent directories (the Add to Source Control command does this for you) and check in the file or directory.
NOTE: VOB links make it possible to have more than one copy of a directory in a snapshot view. When you add a file or directory to a snapshot view, ClearCase updates all other instances of the parent directory that are loaded into your view.
Each element is an instance of an element type. You can specify an element type with the -eltype option. (The lstype -kind eltype command lists a VOB's element types.) The element type must already exist in the VOB in which you are creating the new element, or must exist in the Admin VOB hierarchy associated with the VOB in which you are creating the new element. A mkelem -eltype directory command is equivalent to a mkdir command.
If you do not specify an element type on the command line, mkelem determines one by using the magic files to perform file-typing. This involves matching patterns in the new element's name (and examining the existing view-private file with that name, if one exists; see Conversion of View-Private Files to Elements). If file-typing fails, an error occurs and no element is created:
cleartool: Error: Can't pick element type from rules in ...
For more information about file-typing, see cc.magic in the Command Reference.
Elements are controlled by ClearCase permissions, as described in the permissions reference page in the Command Reference, not by the access modes for files and directories that are set by the operating system. When your view selects a checked-in version of an element, all of its write permissions are turned off. When you check out an element, write permissions are added to the view-private copy. (See the checkout reference page in the Command Reference for details.)
When you convert a view-private file to an element (see Conversion of View-Private Files to Elements),its access mode is changed to read-only. To add execute permission for an executable element, use protect -chmod +x (see the protect reference page in the Command Reference).
You can use the mkelem command to convert a view-private file to a file element with the same name. There are several cases:
By default, mkelem creates an empty version 0 of the new element, then checks out the new element to your view. The view-private file becomes the checked-out version of the new element.
If you use the -ci option (check in), mkelem does all of the above, then proceeds to check in version 1 of the new element. Thus, version 1 has the contents of the view-private file. With -ptime, mkelem preserves the modification time of the file being checked in.
If you use the -nco option (no check out), mkelem creates an empty version 0 of the new element.
During the element-creation process, the view-private is renamed to prevent a name collision that would affect other ClearCase tools (for example, triggers on the mkelem operation). If this renaming fails, a warning message appears. There are two renaming procedures:
If a new element is checked out, mkelem temporarily renames the view-private file, using a .mkelem (or possibly, .mkelem.n) suffix. After the new element is created and checked out, mkelem restores the original name. This action produces the intended effect: the data formerly in a view-private file is now accessible through an element with the same name.
If no checkout is performed on the new element, mkelem alerts you that the view-private file has been renamed, using a .keep (or possibly, .keep.n) extension. Note that the view-private file is not converted to an element; it is moved out of the way to allow creation of an element in its place.
NOTE: If mkelem does not complete correctly, your view-private file may be left under the .mkelem file name.
mkelem does not perform any special processing for a nonshareable DO. The process is the same as for a shareable DO, as described in Conversion of View-Private Files to Elements. However, when you check in version 1 of the new element, the checkin converts the nonshareable DO to a shareable DO, then checks it in.
NOTE: When a nonshareable DO is converted to a shareable DO, its DO-ID changes. For more information, see Derived Objects and Configuration Records in Building Software.
If you create a new directory element, you cannot use the same name as an existing view-private file or directory, and you cannot use mkelem to convert an existing view-private directory structure into directory and file elements. To accomplish this task, use the clearfsimport and clearimport utilities.
If your config spec has a /main/LATEST rule with a -mkbranch clause, mkelem checks out a subbranch instead of the main branch. For example, suppose your view has this config spec:
element * CHECKEDOUT
element * .../gopher_port/LATEST
element * V1.0.1 -mkbranch gopher_port
element * /main/LATEST -mkbranch gopher_port
In this case, a gopher_port branch is created for the new element, and this branch is checked out instead of main:
cleartool mkelem -c "new element for Gopher porting work" base.h
Created element "base.h" (type "text_file").
Created branch "gopher_port" from "base.h" version "\main\0".
Checked out "base.h" from version "\main\gopher_port\0".
The auto-make-branch facility is not invoked if you use the -nco option to suppress checkout of the new element. For more about this facility, see the checkout and config_spec reference pages in the Command Reference.
By default, when you create an element in a replicated VOB, mkelem assigns mastership of the element's main branch to the VOB replica that masters the branch type main. If this replica is not your current replica, you cannot create versions on the main branch. (You can create versions on other branches if they are mastered by the current replica.)
To assign mastership of a new element's main branch to the current replica, use the -master option. The -master option also allows auto-make-branch during element creation, even if the branch type specified in your config spec is not mastered by the current replica. In this case, mkelem assigns mastership of newly created branches to the current replica. For example, suppose your view has the following config spec:
element * CHECKEDOUT
element * .../gms_dev/LATEST
element * /main/LATEST -mkbranch gms_dev
When you create a new element with mkelem -master and do not use the -nco option, mkelem creates the branches main and gms_dev and assigns their mastership to the current replica.
NOTE: If you use the -nco option with -master, only the main branch is mastered by the current replica, because it is the only branch created by mkelem.
You sometimes need to distinguish an element itself from the particular version of the element that is selected by your view. In general:
Appending the extended naming symbol (by default, @@) to an element's name references the element itself.
A simple name (no extended naming symbol) is a reference to the version in the view.
For example, msg.c@@ references an element, whereas msg.c refers to a version of that element. In many contexts (for example, checkin and lsvtree), you can ignore the distinction. But there are ambiguous contexts in which you need to be careful. For example, you can attach attributes and hyperlinks either to version objects or to element objects. Thus, these two commands are different:
cleartool mkattr BugNum 403 msg.c (attaches attribute to version)
cleartool mkattr BugNum 403 msg.c@@ (attaches attribute to element)
The first command operates on the version of the element selected in your view, but the second command operates on the element itself.
CAUTION: Do not create elements whose names end with the extended-naming symbol. ClearCase software cannot handle such elements.
Physical storage for an element's versions (data containers) is allocated in the storage pools that mkelem assigns. You can change pool assignments with the chpool command.
Each VOB has a group list. If your principal group is on this list, you can create an element in that VOB. For more information about group lists, see the protectvob reference page in the Command Reference.
NOTE: This procedure assumes that a VOB exists. For information about creating VOBs, see Managing Software Projects.
In ClearCase Explorer, navigate to the view you created for the development task.
Do one of the following, depending on whether you work in a snapshot view or a dynamic view.
If you work in a snapshot view, create a folder in the view that corresponds to each VOB to which you want to add files and directories.
If you work in a dynamic view, make sure that each VOB to which you want to add files and directories is accessible from your view. If a VOB isn't accessible, activate it on your computer (see To Activate VOBs).
Under each VOB, do one of the following:
Create a directory structure.
If files and directories already exist, copy them into the appropriate location within the directory tree.
When you are finished, the view resembles Figure 31.
Figure 31 Directory Structure in a Snapshot View

In the Details pane of ClearCase Explorer, select files and directories.
We recommend that you select items that are the farthest from the root of the directory tree: the Add to Source Control command for any given file or directory also adds any parent directories (up to the VOB root directory) that are not already elements. For example, in Figure 31, if neither \guivob\hello_world nor \guivob\hello_world\src are elements, you can add both directories to source control by adding \guivob\hello_world\src to source control.
Right-click one of the selected objects. On the shortcut menu, click Add to Source Control.
If you're adding a large number of files and directories to source control, use the clearfsimport command (or clearexport commands) and clearimport command. For more information, see the clearfsimport and clearimport reference pages in the Command Reference.
|
|
Feedback on the documentation in this site? We welcome any comments!
Copyright © 2001 by Rational Software Corporation. All rights reserved. |