You can change the format and content of your chart by using QMF form panels. For example, you can make the following types of changes on a form panel:
Use QMF forms to change any chart property that is determined by the report
data. Table 8 identifies changes you can make to charts by using QMF
forms.
Table 8. Quick reference for changing a chart with QMF forms
| Change | Object | Comments |
|---|---|---|
| Chart type | CHART | Use ICUFORM parameter |
| X-axis data label text | FORM | Leftmost column (BREAK or GROUP) |
| X-axis data label length | FORM | WIDTH of leftmost column |
| Y-axis chart data | FORM | Numeric data columns (not OMIT) |
| Legend text* | FORM | Column headings of Y-data |
| Legend case | PROFILE | Select uppercase or string for the CASE option |
| Chart heading text | FORM | Page heading |
| Chart heading case | PROFILE | Select uppercase or string for the CASE option |
| * Legend text for pie charts is an exception. The data from the report column that normally appears as labels along the X-axis appears as labels attached to the pie slices. |
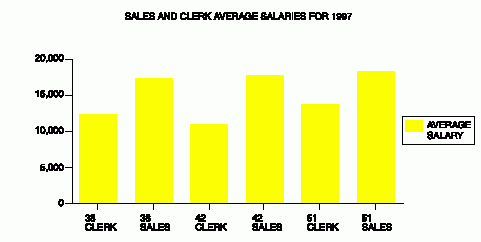
For this example, you'll modify the QMF default form from the previous example to display a bar chart that shows average salaries for clerks and salespeople by department.
To change a chart using forms:
In this example, you make all the form changes on the FORM.MAIN panel. Enter SHOW FORM on the QMF command line, or press the Show function key.
For this example, type the changes that are shown on the FORM.MAIN panel in Figure 141.
Figure 141. Make changes to the chart format on FORM.MAIN.
+--------------------------------------------------------------------------------+
| FORM.MAIN                                            MODIFIED                  |
|                      WARNING                                                   |
| COLUMNS:               Total Width of Report Columns: 24                       |
|  NUM COLUMN HEADING                           USAGE   INDENT WIDTH EDIT  SEQ   |
|  --- ---------------------------------------- ------- ------ ----- ----- ---   |
|    1 ID                                       OMIT    2      6     L     1     |
|    2 NAME                                     OMIT    2      9     C     2     |
|    3 DEPT                                     GROUP   2      6     L     3     |
|    4 JOB                                      GROUP   2      5     C     4     |
|    5 YEARS                                    OMIT    2      6     L     5     |
|                                                                                |
| PAGE:    HEADING  ===> SALES AND CLERK AVERAGE SALARIES FOR 1997               |
|          FOOTING  ===>                                                         |
| FINAL:   TEXT     ===>                                                         |
| BREAK1:  NEW PAGE FOR BREAK? ===> NO                                           |
|          FOOTING  ===>                                                         |
| BREAK2:  NEW PAGE FOR BREAK? ===> NO                                           |
|          FOOTING  ===>                                                         |
| OPTIONS: OUTLINE? ===> YES                DEFAULT BREAK TEXT? ===> YES         |
|                                                                                |
+--------------------------------------------------------------------------------+
If the sixth and seventh columns do not appear on the sample panel, scroll forward to see them. Here is the information you change for those columns:
 NUM  COLUMN HEADING          USAGE

   6  SALARY                  AVERAGE
   7  COMMISSION              OMIT
Figure 142. The report reflects the changes you make on FORM.MAIN.
+--------------------------------------------------------------------------------+
|                    SALES AND CLERK AVERAGE SALARIES FOR 1997                   |
|                                                                                |
|                                                                                |
|                     AVERAGE                                                    |
|     DEPT  JOB       SALARY                                                     |
|   ------  -----  ----------                                                    |
|       38  CLERK    12482.25                                                    |
|       38  SALES    17407.15                                                    |
|       42  CLERK    11007.25                                                    |
|       42  SALES    18001.75                                                    |
|       51  CLERK    13914.90                                                    |
|       51  SALES    18555.50                                                    |
|                  ==========                                                    |
|                    14975.99                                                    |
+--------------------------------------------------------------------------------+
Figure 143. The chart reflects the same changes.

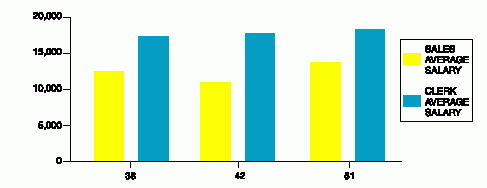
You can change the QMF form to display the same data in a way that makes it easier to compare the salaries in a chart.
For this example, type the information on the FORM.MAIN panel.Figure 144 shows the information to type.
Figure 144. Group data for the chart on FORM.MAIN.
+--------------------------------------------------------------------------------+
| FORM.MAIN                                            MODIFIED                  |
|                                                                                |
| COLUMNS:                                                                       |
|  NUM COLUMN HEADING                           USAGE   INDENT WIDTH EDIT  SEQ   |
|  --- ---------------------------------------- ------- ------ ----- ----- ---   |
|    1 ID                                       OMIT    2      6     L     1     |
|    2 NAME                                     OMIT    2      9     C     2     |
|    3 DEPT                                     GROUP   2      6     L     3     |
|    4 JOB                                      ACROSS  2      5     C     4     |
|    5 YEARS                                    OMIT    2      6     L     5     |
|                                                                                |
| PAGE:    HEADING  ===> SALES AND CLERK AVERAGE SALARIES FOR 1997               |
|          FOOTING  ===>                                                         |
| FINAL:   TEXT     ===>                                                         |
| BREAK1:  NEW PAGE FOR BREAK? ===> NO                                           |
|          FOOTING  ===>                                                         |
| BREAK2:  NEW PAGE FOR BREAK? ===> NO                                           |
|          FOOTING  ===>                                                         |
| OPTIONS: OUTLINE? ===> YES                DEFAULT BREAK TEXT? ===> YES         |
|                                                                                |
| 1=Help     2=Check    3=End          4=Show          5=Chart         6=Query   |
| 7=Backward 8=Forward  9=            10=Insert       11=Delete       12=Report  |
| OK, FORM.MAIN is shown.                                                        |
| COMMAND ===>                                                  SCROLL ===> PAGE |
+--------------------------------------------------------------------------------+
The report looks like Figure 145.
Figure 145. The report shows average salaries for sales and clerks.
+--------------------------------------------------------------------------------+
|                                                                                |
|           <--------- JOB ---------->                                           |
|           <- CLERK -->  <- SALES -->  <- TOTAL -->                             |
|                AVERAGE       AVERAGE       AVERAGE                             |
|     DEPT       SALARY        SALARY        SALARY                              |
|   ------    ----------    ----------    ----------                             |
|       38      12482.25      17407.15      14944.70                             |
|       42      11007.25      18001.75      13338.75                             |
|       51      13914.90      18555.50      16235.20                             |
|             ==========    ==========    ==========                             |
|               12468.13      17985.41      14975.99                             |
|                                                                                |
+--------------------------------------------------------------------------------+
Within each department, the report displays the average salary for clerks and for salespeople in a different column. Each column is a bar on the chart. The TOTAL column and the final summary line do not appear on a chart. The chart looks like Figure 146.
Figure 146. The chart makes comparing average salaries easier.
