 View figure.
After determining the design of your database, you can create objects to implement your design. These objects include dbspaces, tables, views, and indexes.
This chapter discusses the following topics:
This section provides an overview of the physical database and explains the relationships between objects, dbspaces, and storage pools.
When you create a database, its potential storage capacity is defined. You must do some planning to ensure that the database satisfies your data storage requirements.
The task of defining dbspaces, which contain tables, views, and indexes, involves reserving logical space in the database, assigning the dbspace to a storage pool, and setting usage parameters. You must understand what these parameters are and how to select them so that the dbspace will best accommodate the data to be stored in it.
Information is stored in a database by placing it in tables. You must know how to create tables and how to define referential constraints.
After you create tables, you can create views. A view is a logical, or virtual, table that is derived from one or more tables or other views. Using views can be advantageous in applications that have specific requirements for data tables.
Indexes are optional: they improve the speed with which table rows are accessed.
The catalog tables contain information about the existing structure of the database, which can be helpful in database design.
A DB2 Server for VSE & VM database is a collection of user data objects (tables and indexes) and supporting information maintained by the database manager for that data. The supporting information includes control information (such as how each data table is formatted and where each is located), and data recovery information (restoring data to an earlier state). The database is composed of:
A dbextent is an allocation of actual DASD space. Storage pools are composed of one or more dbextents. The size of the storage pool can be increased or reduced by:
| Note: | In VSE, each dbextent is the primary allocation of a VSAM data set (CLUSTER). |
Storage pools can be defined to be either recoverable or nonrecoverable. The default is for them to be recoverable, whereby every change made to the pool is logged. For nonrecoverable storage pools, there is limited recovery; the database manager does not log updates, but takes a checkpoint for each logical unit of work (LUW) to ensure that the LUW's changes are written to DASD.
To maintain referential integrity, both tables in any referential constraint must be in either recoverable or in nonrecoverable storage pools: they cannot be spread across both types.
This restriction is necessary because the portion of the relationship in the nonrecoverable pool might be lost, possibly invalidating the information remaining in the recoverable one. For more information about storage pools, refer to either the DB2 Server for VM System Administration or DB2 Server for VSE System Administration manual.
When a table is created, it must be assigned to a logical allocation of storage called a dbspace. The table creator can either do this assignment explicitly, or let the database manager use a default assignment. Any indexes created on that table will be stored in the same dbspace.
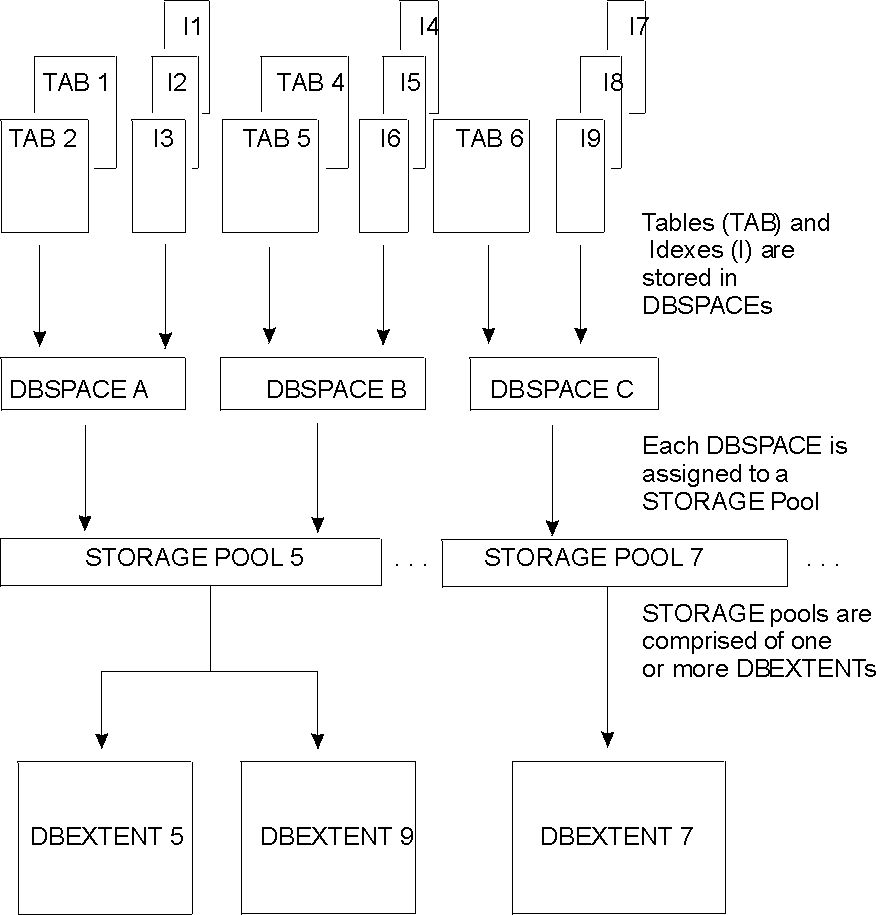
Figure 15 shows how tables are stored in the database. It includes two tables and their indexes in dbspace A, two tables and their indexes in dbspace B, and one table with three indexes in dbspace C.
Figure 15. Table Storage in a Database
View figure.
A dbspace is not a real allocation of DASD space: it is a logical allocation of page map tables in the directory that relates logical dbspace pages to DASD locations. It holds data in 4096-byte blocks called pages, and can hold up to 255 tables, and their indexes. As dbspaces are assigned to the storage pool and their pages are filled, the physical DASD pages used are taken from the dbextents of the storage pool.
The database manager dynamically allocates real DASD storage space to support dbspace pages on a demand basis. Unused pages of a dbspace do not occupy DASD space. The potential capacity of a dbspace is fixed when it is defined.
The dbspace used to hold a table is determined when the table is created. A table cannot span (reside in) multiple dbspaces. However, two or more tables in a referential relationship may reside in separate dbspaces.
Figure 16 shows how information is stored in a dbspace.
Figure 16. Table and Index Storage in a Dbspace
 View figure.
At the front of every dbspace are one to eight header pages, which contain control information about the tables and indexes stored in it. After the header pages are the data pages, which is where the rows of a table are stored. Index entries are stored in index pages at the back.
When you store multiple tables in the same dbspace, the database manager might store rows from different tables on the same data pages; however, it never puts index entries from different indexes on the same page.
This book does not describe how to create a database. That is the task of the system administrator, and is discussed in the DB2 Server for VM System Administration and DB2 Server for VSE System Administration manuals. Because initial DASD allocations are assigned and the potential capacity for the database is established during that process, it is important that you analyze your storage requirements and inform the person responsible for generating the database. The information you provide should include the:
Before defining a new dbspace, check to see if there are any already available having the properties that you require; if there are, you do not need to define a new one.
If you need to define one or more dbspaces, do the following:
Identify the data that the dbspace will contain and the way that it will be used.
Add the dbspace to the database directory (if this has not already been done), using either the SQLADBSP EXEC in VM, or the ADD DBSPACE statement in VSE.
After a dbspace is established, enter the ACQUIRE DBSPACE statement to acquire it for your use.
To identify dbspace requirements, consider the tables that are to be stored and the way they will be used. If performance is a requirement, you can define a dbspace to support only one table and its indexes; often, however, dbspaces are defined to support several tables. Tables that have common requirements can be stored in the same dbspace.
Table 4 shows the approach you should use for determining the way to
map tables to dbspaces.
Table 4. General Approach to Mapping Tables to Dbspaces
| Table Access | Type of Dbspace | Type of Data |
|---|---|---|
| Private tables | PRIVATE dbspaces (one per user, or user-application area) |
End user data Application development data Data prototyping tables |
| Shared tables | PUBLIC dbspaces (one per user group, or table group) |
Common end user data Application testing data Production application data |
Dbspaces come in two types: PRIVATE and PUBLIC.
For private data, reserve one PRIVATE dbspace for each user. Private data is always locked at the dbspace level to eliminate unnecessary locking overhead when users are accessing their own private data.
Data kept in a PRIVATE dbspace can be shared, and concurrent read-only access to the data is possible.
For most users, one PRIVATE dbspace is sufficient; however, people doing application or data design for different application areas might want one for each area. Others might request additional storage as their data requirements grow. For these users, you can reserve additional PRIVATE dbspaces as needed.
For data that is to be shared, use PUBLIC dbspaces. These can be locked either at the row, page, or dbspace level. Thus, several users can access data at the same time. (See Determining the Lock Size (LOCK).)
PUBLIC dbspaces support tables shared by a group of users. For example, a group of query users may have to share data. Rather than having each user keep a copy of the data, the extracted data could be directed to tables in a PUBLIC dbspace, where it could be accessed by all users.
For production application data, you should define one or more PUBLIC dbspaces, depending on logical groupings of tables. For further information on placing tables into dbspaces, refer to the DB2 Server for VSE & VM Performance Tuning Handbook manual.
To add a dbspace to a database you must reserve page tables in the directory, assign the dbspace to a storage pool, and specify the dbspace's type. These functions are described in the DB2 Server for VSE System Administration and DB2 Server for VM System Administration manuals.
Do not use SYS as the first three characters of a dbspace name; SYS denotes a dbspace reserved for database manager use.
| Note: | When you add dbspaces, you must be in single user mode. |
After you have identified the mapping of tables to dbspaces, and the
dbspaces have been added to the database, you can acquire them for use.
Begin this process by identifying the parameters to be established for each
dbspace. Table 5 summarizes these parameters; they are discussed in
detail below.
Table 5. Derivation of Dbspace Parameters
| Parameter | Derivation |
|---|---|
| Type | PUBLIC or PRIVATE, based on expected usage of tables. |
| SIZE (PAGES) | Sum of the potential sizes of each of the tables, plus the sum of the index size requirements, plus free space considerations. |
| STORPOOL | Consider device utilization of other dbspaces in the same pool and the availability of space in the pool. Also consider using nonrecoverable storage pools for read-only data. |
| NHEADER | Set based on the number of tables and indexes to be put in the dbspace. |
| PCTFREE | Set based on growth potential of the tables to be put in the dbspace. |
| PCTINDEX | Set based on the potential indexes to be created and their estimated sizes. |
| LOCK | Set based on the size of tables and the extent of their use. |
Use the ACQUIRE DBSPACE statement to specify the parameters in Table 5. When acquiring a dbspace, you must specify whether it is to be PUBLIC or PRIVATE, and you can optionally set the number of pages in it, the level of recovery, the percentage of space to be reserved for updates and indexes, and the amount to be locked when accessed by users. See the DB2 Server for VSE & VM SQL Reference manual for more information on the ACQUIRE DBSPACE statement.
If any table is to be accessed by multiple users at the same time, and any one of the users will be doing UPDATEs, INSERTs, or DELETEs, then it should be placed in a PUBLIC dbspace. You need Database Administrator (DBA) authority to acquire a PUBLIC dbspace.
Only users with DBA or RESOURCE authority can create objects in PUBLIC dbspaces.
To acquire a PUBLIC dbspace, enter the ACQUIRE DBSPACE statement specifying your requirements. For example, to acquire a PUBLIC dbspace named payroll and using the defaults, enter:
ACQUIRE PUBLIC DBSPACE NAMED PAYROLLYou need DBA or RESOURCE authority to acquire a PRIVATE dbspace.
Only the owner of the PRIVATE dbspace, or a user with DBA authority, can create objects in the dbspace.
Every PRIVATE dbspace has an owner. To acquire the PRIVATE dbspace PERSONAL for user JOHN, enter the following:
ACQUIRE PRIVATE DBSPACE NAMED JOHN.PERSONAL
You cannot use the ALTER DBSPACE statement to change the type of a dbspace after you acquire it.
You need to ensure that the dbspace contains enough pages to hold the tables and associated indexes to be stored there.
The size of the dbspace should be based on the estimated current size of the tables and their indexes, plus an allowance for their expected growth. A dbspace cannot contain less than 128 pages. You must allocate pages in multiples of 128, otherwise the number is rounded up to the next highest multiple of 128. Algorithms for determining the number of pages needed are described in Appendix A, Estimating Your Dbspace Requirements.
Because you cannot extend a dbspace after it is defined, you should overestimate the required number of pages. Unused pages are not stored, so the cost of overestimating is nominal. In contrast, the cost of underestimating pages can be quite expensive because of the reorganization activities required to re-establish the data in a larger dbspace later.
| Note: | Two directory blocks of 512 bytes each are used for every 128 data pages defined. |
Storage pools come in two types: recoverable and nonrecoverable.
Consider assigning a dbspace to a nonrecoverable storage pool if the data in it will be read-only. Changes made to data in a nonrecoverable storage pool are not logged, which offers the advantages of requiring less log space, elapsed time, and CPU time. (There should be an alternative method of recovery available, such as reloading the storage pool.) The disadvantage is that data cannot be recovered when media failures occur (which may be acceptable for read-only data).
If you are using referential integrity, you must use recoverable storage pools. For nonrecoverable storage pools, ROLLBACK is not performed and no logging is in effect, so that some operations can be neither completed successfully nor rolled back. Each operation containing a referential constraint is verified when it occurs. If a row of a multi-row operation violates the referential constraint, the operation terminates. The rows that were affected prior to the termination cannot be rolled back.
For example, in a multi-row delete of a parent table, if 15 rows are candidates for deletion and the ninth row violates the DELETE RESTRICT rule, then the first eight rows would be deleted and the operation would cease with the ninth row. The integrity of the table would be maintained but the operation would be only partially completed.
Because a unit of work modifying both recoverable and nonrecoverable pools can only ROLLBACK the recoverable pool, referential constraints cannot be created between the two types of pools.
You cannot use the ALTER DBSPACE statement to change the storage pool of a dbspace after you acquire it.
If you do not specify the STORPOOL parameter, a dbspace of the correct size and type will be acquired from any recoverable storage pool.
The storage pool you select should be chosen to:
A table resides on the devices used to support the storage pool to which the table's dbspace is assigned. Consider storing different tables on different devices based on device characteristics and table usage. To do this, you need multiple storage pools and multiple dbspaces.
For example, if you have two tables that are highly active, you can reduce potential device contention by storing them in different dbspaces that are assigned to different storage pools. The dbextents defined for the two storage pools would be on different devices.
You could use a similar technique for storing selected tables on higher or lower speed devices as appropriate.
For more information about storage pools, refer to either the DB2 Server for VM System Administration or the DB2 Server for VSE System Administration manual.
Header pages contain control information on the tables and indexes stored in the dbspace.
The number of header pages required depends on the number of objects to be stored in the dbspace. Generally, taking the default (8 pages) is recommended, as this gives you the most flexibility at nominal cost. However, if you plan to have few tables or indexes in the dbspace, you may allocate fewer. You must allocate at least one.
To estimate your needs, see Appendix A, Estimating Your Dbspace Requirements.
You cannot change the NHEADER parameter with the ALTER DBSPACE statement; after you set it, the only way to change it is to move all the data in the current dbspace to another dbspace having the required NHEADER value (see Altering the Design of a Dbspace).
The PCTFREE parameter refers to the percentage of each page that is to be reserved for updates that make the changed row longer than it was before. This free space is not used for inserts. You can reclaim the free space by reducing the PCTFREE value through an ALTER DBSPACE statement.
The PCTFREE value you choose will depend on the type of activity being carried out on the data in the dbspace:
This is the situation where there will be few updates, or all columns are fixed and non-nullable in the tables. Here, you would set PCTFREE to a high value before loading the data; then lower it to a low value. The difference between the original value and the final value can then be used by insert activity.
In this situation, PCTFREE should be set to a high value. The space saved by PCTFREE will be used by the update activity only if the update increases the size of the row and the free space will accommodate the new row.
Read-only data is data that is loaded into a dbspace and then never modified or updated, only retrieved using query statements. In this situation, set PCTFREE to a low value or zero.
In this situation, set PCTFREE to a high value and then lower it. This would allow space for use by both update and insert activities.
| Note: | Updating refers to the replacement of a row of data into the same location in a page of a dbspace, unless the row can no longer fit because of an increase in the size of one or more columns. The replacement row is placed on the same page of the dbspace if there is still sufficient space available in the area set aside using PCTFREE. |
In situations where there is high insert activity, consider using a clustering index. The first index created on a table is always considered the clustering index. A clustering index determines the placement of rows in pages of a dbspace to minimize DASD I/Os when the table rows are accessed in the index sequence. For more information, see Clustering Rows of a Table on an Index.
| Note: | Clustering refers to the grouping or gathering of items; in the above case, the grouping of table rows is done according to the indexes. |
If an updated row no longer fits on its original page, its contents are moved to the next available page with enough room to accommodate it. Continual movement of row contents to new pages as a result of this overflow may lead to a decrease in performance as the database manager must make one additional page reference before locating a row's contents.
The database manager typically reserves more space than you specify. For an explanation of free space management design, see the DB2 Server for VSE & VM Diagnosis Guide and Reference manual. Calculate PCTFREE using the following formula:
PCTFREE = (FREEBYTES - AVGROWLEN) / 40
where FREEBYTES is the number of bytes you want reserved on each page, and AVGROWLEN is the average row length for tables in the dbspace. If you have modeled the tables to be stored in the dbspace, you can obtain a value for AVGROWLEN for each of the tables from SYSTEM.SYSCATALOG.
For normal processing, set PCTFREE somewhere between:
[AVGROWLEN / 40] and [50 - (AVGROWLEN / 40)].
Setting it below the lower limit would mean the unused bytes could not be used (the average row would not fit) and the space set aside for updates would be wasted, while setting it greater than the upper limit may restrict you unnecessarily to one row per page.
For more information on how the PCTFREE parameter determines actual reserved bytes, see Appendix A, Estimating Your Dbspace Requirements.
When you acquire a dbspace, you must reserve some portion of it for holding indexes on the tables in the dbspace. PCTINDEX reserves the amount of space in the directory to be formatted for this purpose. Under most circumstances, you should let this value default to 33 percent. With this default, there are approximately twice as many data pages for holding table rows as there are index pages for holding indexes on the tables. You can create or drop indexes at any time (these functions can be performed online); so do not constrain the potential indexing you might want to do by specifying a lower value for PCTINDEX. There are two cases when you might want to consider overriding the default:
Some data is used exclusively, or primarily, for read-only (SELECT) access. You can create a more than one index on such data to improve the performance of a wide variety of user queries. The indexes are created after the data is loaded and are referenced as required by a query. Because the data is not subject to update operations, you do not have to worry about the performance implications of index maintenance. Thus, you should consider specifying a high value for PCTINDEX. To do this, estimate the number of index pages that would be required for various indexes that might be created on these tables in the dbspace. See Estimating the Number of Index Pages.
This is data that is subject to frequent updates, and the performance requirements limit the amount of indexing you want to do on the tables. Determine the set of indexes you require for the data and set the PCTINDEX parameter accordingly.
You establish the PCTINDEX parameter with the ACQUIRE DBSPACE statement. You cannot change the PCTINDEX parameter with the ALTER DBSPACE statement; after you set it, the only way to change it is to move all the data in the current dbspace to another dbspace having the required PCTINDEX value (see Altering the Design of a Dbspace).
When you acquire a PUBLIC dbspace you can specify three levels of locking: DBSPACE, PAGE, or ROW. You can change the lock size later with the ALTER DBSPACE statement.
The lock size can be set for PUBLIC dbspaces only. (PRIVATE dbspaces are always locked at the DBSPACE level.)
The default lock size is PAGE. Select ROW if the dbspace is to contain a small table that will fit on a small number of pages, and it is expected that this table will be frequently updated by multiple users.
Locking the dbspace at the row level also causes indexes in it to be locked at the key level. (Usually indexes are locked at the page level.) Key-level locking for indexes, like row-level locking for tables, reduces contention but adds overhead.
Information about the dbspace parameters is maintained in the SYSTEM.SYSDBSPACES catalog table.
Use the following query to retrieve information about dbspace MYDB:
   SELECT DBSPACENO, DBSPACETYPE, POOL, NPAGES,
          NRHEADER, PCTINDX, FREEPCT, LOCKMODE
     FROM SYSTEM.SYSDBSPACES
     WHERE DBSPACENAME = 'MYDB'
To see how many header, data, and index pages are being used in a given dbspace, issue the SHOW DBSPACE operator statement from either the database console or from ISQL. (Its format is described in the DB2 Server for VSE & VM Operation manual.) This information may be helpful, especially before attempting to load large amounts of data into a dbspace.
To acquire a dbspace, it must have already been added to the database. When you issue the ACQUIRE DBSPACE statement, the database manager searches for a dbspace with the appropriate size (number of PAGES), storage pool assignment, and type (PUBLIC or PRIVATE). If one of the requested size cannot be found, the next largest suitable one will be used. (This could result in a very large dbspace being used to contain a small amount of data.) If no existing dbspace satisfies the requirements, then the ACQUIRE DBSPACE statement will fail, and you will have to add additional dbspaces to the database.
The SYSDBSPACES system catalog table contains information about dbspaces. You can issue an ISQL query to retrieve this information.
The following query yields information on the type and size of all available dbspaces (those that have been added but not yet acquired):
   SELECT DBSPACETYPE, NPAGES
     FROM SYSTEM.SYSDBSPACES
     WHERE DBSPACENAME=''
The value of DBSPACETYPE is 1 for PUBLIC dbspaces and 2 for PRIVATE ones.
Relational databases use tables to store information. This section explains how to create tables and how to define referential and unique constraints in the DB2 Server for VSE & VM environment.
Designing tables to be used by many applications is a critical task. Although you can add columns and use views to mask certain changes, generally you cannot change the design of a table after it has been implemented without disrupting applications. Table design is difficult because there are many ways to represent the same information, and often you have to decide between the conflicting objectives of logical design and physical design. (One example of such a conflict is normalization, discussed in Step 7: Normalize Your Tables.)
If you have DBA authority, you will probably want to keep the responsibility for creating tables, and then pass the authorization for their use on to the application developers. However, you can grant authority for creating tables to others; or, if some users want to use the application server with minimum assistance or control, you can acquire PRIVATE dbspaces for them and authorize them to create whatever data objects they need, including tables.
After designing a table, issue the CREATE TABLE statement. Creating a table involves:
To create a table, the connected user must have the proper authority (see Chapter 5, Providing Security). Whoever issues the CREATE TABLE statement has complete authority over the table.
When you create a table, a definition of it is recorded in the catalog; no application data is stored. (For a description of how to put data into the table, see Loading Data into Tables.)
Figure 17 shows the statement used to create the sample EMPLOYEE table.
Figure 17. Example of CREATE TABLE. A foreign key cannot be defined unless the corresponding primary key already exists.
  CREATE TABLE JOHN.EMPLOYEE
    (EMPNO     CHAR(6)     NOT NULL,
     FIRSTNME  VARCHAR(12) NOT NULL,
     MIDINIT   CHAR(1)     NOT NULL
     LASTNAME  VARCHAR(15) NOT NULL,
     WORKDEPT  CHAR(3),
     PHONENO   CHAR(4),
     HIREDATE  DATE,
     JOB       CHAR(8),
     EDLEVEL   SMALLINT    NOT NULL,
     SEX       CHAR(2),
     BIRTHDATE DATE,
     SALARY    DECIMAL(9,2),
     BONUS     DECIMAL(9,2),
     COMM      DECIMAL(9,2),
     PRIMARY KEY (EMPNO),
     FOREIGN KEY EMPFKEY (WORKDEPT)
       REFERENCES DEPARTMENT ON DELETE SET NULL)
   IN PUBLIC.SAMPLE
|
This example creates a table called EMPLOYEE, which has 14 columns, by a creator with the ID JOHN. The table uses the column EMPNO as the primary key, and the column WORKDEPT as a foreign key called EMPFKEY, which references WORKDEPT in the DEPARTMENT table. The delete rule is SET NULL, and the table resides in the "PUBLIC".SAMPLE dbspace.
A table name can be up to 18 characters long (18 bytes). Table names that are not explicitly qualified by the creator name in the CREATE TABLE statement are qualified by the database manager. For example, assume that a user with an ID of SMITH is entering SQL statements interactively. If SMITH creates a table named ABC, with no qualifier, the table name becomes SMITH.ABC. SMITH can own only one table, view, or synonym called ABC. A different user ID, JONES, can create another table, view, or synonym called ABC, which will become JONES.ABC.
If the DBCS option is enabled, you can use DBCS characters in table names (the 18-byte length restriction still applies). Enabling the DBCS option is discussed in the DB2 Server for VM System Administration and DB2 Server for VSE System Administration manuals.
You implement your database design primarily by choosing the columns that make up each table. Almost inevitably, there is some conflict between the theoretical design and the most practical implementation, as described in the following sections.
In Step 7: Normalize Your Tables normalization was discussed only from the viewpoint of logical database design, without considering performance. Consider the example there of the column that contains the addresses of warehouses. The column is first shown as part of a table that contains information about parts and warehouses; then, to further normalize the design, it is removed from that table and defined as part of a table that contains information only about warehouses. The other possible design (in which the column is part of both tables) was not considered.
Some applications might require information about both parts and warehouses, including the addresses of warehouses. With normalization, information can be retrieved by joining tables. The problem is that a join operation can be very time-consuming, even for only two tables, and as the number of tables increases the access costs can increase enormously, depending on the size of the tables and the available indexes. If indexes are not available, the join of many large tables can take hours. Furthermore, the number of tables that can be joined is at most 15 and, depending on the complexity of the statement, can be significantly less. Thus, an unnormalized design may be absolutely necessary.
Consider making both tables have a column that contains the addresses of warehouses. If this design makes join operations unnecessary, it could be a worthwhile redundancy. Warehouse addresses do not change often, and if one does change, DB2 Server for VSE & VM makes it easy to update all occurrences.
Rows are stored within pages. A single row cannot occupy more than one page, and you cannot create a table with a maximum row size that is greater than the page size. One exception is that columns of type LONG VARCHAR or LONG VARGRAPHIC can be longer than one page; therefore, the rows that contain them can occupy more than one page. There is no other absolute limit, but if you ignore row size in favor of implementing a good theoretical design, you may waste storage.
Table rows may be of fixed or varying lengths. Two considerations apply:
The disadvantage of varying-length rows is that if the row length is increased, the row may have to be repositioned. If the row is repositioned and there is not enough free space on the current page to accommodate the row, then the row will be moved to another page. In this case, whenever that moved row is accessed, an additional page reference is required.
Along with the bytes of actual data, each row has:
In addition, every data page has a 16-byte header.
This overhead affects the amount of data that can be stored on each page in your dbspace. In designing your table, consider your design needs while looking for ways to store your data as efficiently as possible.
Space is wasted in a dbspace if all its rows are slightly longer than half a page, because then only one row can fit in each page. If you can reduce the row lengths to just under half a page, you will need only half as many pages. Similar considerations apply to rows that are just over a third of a page, a quarter of a page, and so on.
It is particularly important to minimize the number of pages in a dbspace because if an index is not used, the database manager will read every active page of the dbspace.
For example, suppose you design a table to hold a large array of floating-point numbers. If you define each column as FLOAT and use the maximum number of columns (255), the row length is 2048 and only one row fits on each page. If you use 240 columns, two rows could fit on each page, and a page would contain 480 floating-point numbers, rather than only 255.
A column contains all occurrences of one of the entities in a table. (You can think of it as a field in a row.) In Figure 17, the lines immediately following the table name contain the names of the columns within the table. In the sample EMPLOYEE table, the HIREDATE column contains all the hire dates for all employees represented by EMPNO. You cannot redefine or overlap columns and, after you have implemented the design of your database, you usually cannot change a column definition without disrupting applications. Therefore, consider carefully the decisions you make about column definitions. (However, you can add columns to an existing table. See Altering the Design of a Table.)
For each column, you must specify a name and a data type.
For each column, you may specify:
Column names must be unique within a table, but you can use the same name in different tables. The maximum length is 18 bytes.
If the DBCS option is enabled, you can use DBCS characters in the column names. See the DB2 Server for VM System Administration or DB2 Server for VSE System Administration manual.
As mentioned under Step 3: Provide Column Definitions for Tables, some columns cannot have a meaningful value in every row.
A special value indicator, called the null value, represents an unknown or missing value. It should not be confused with a zero value, a blank, or an empty string: it is a special value interpreted by the database manager to mean that no data has been supplied.
Unless you specify otherwise, any column you define can contain null values, and rows can be created in the table without providing a value for the column. Avoid using nulls for columns that will be used as indexes. To disallow null values, use the NOT NULL clause, and provide a non-null value for that column whenever you store data. Columns that will be referenced in a primary key or unique constraint must be defined as NOT NULL.
If you add a column to an existing table, it contains no data and so cannot be defined as NOT NULL.
In the example in Figure 17, nulls are acceptable for certain columns and prohibited for others.
Before you decide whether to allow nulls for unknown values in a column, be aware of how nulls can affect the result of a query.
Nulls do not satisfy any condition in an SQL statement other than the special NULL predicate. Null values do not act like other values. For instance, if you try to determine whether a null value is larger or smaller than a given known value, you get an answer of UNKNOWN.
If either the left side or the subselect list of a quantified predicate is null, the quantified predicate is residual. Residual predicates require more processing because of the communication between the Relational Data System (RDS) and the Database Storage Subsystem (DBSS). Predicate processing is described in the DB2 Server for VSE & VM Performance Tuning Handbook manual.
If you allow nulls in a column with a field procedure, that field procedure is not invoked when you access a null value: the database manager returns the null value.
You must give a data type for each column of a table, to specify the type of data the column will contain and the length of the data field.
The first thing you must decide when defining a column is what kind of data the column will contain--string, numeric, or date/time. The decision is often obvious because only a string column can contain letters or special characters. If the data consists solely of digits, however, you have to decide whether to specify it as string or numeric data. And if the values represent dates, times, or timestamps, you will want to consider the data types DATE, TIME, and TIMESTAMP.
The data types for numbers are shown in Table 6.
For integer values, SMALLINT or INTEGER (depending on the range of the values) are preferable to DECIMAL or FLOAT.
For real numbers with a small precision and scale, DECIMAL is preferable to FLOAT.
For numeric data, use numeric rather than string columns for the following reasons:
The data types for strings are shown in Table 7.
If you want to use a field procedure with a column, the column must have a short string data type. You can also use string columns to specify binary (bit) data or character data for exchange with other application servers.
VARCHAR saves DASD space. The saving is at the cost of a 1-byte overhead for each value and the additional processing required for varying-length rows. Thus, CHAR is preferable to VARCHAR, unless the space saved by the use of VARCHAR is significant. The saving is not significant if the maximum length is small or the lengths of the values do not have a significant variation.
If you use VARCHAR, do not specify a maximum length greater than necessary. In particular, note the restrictions on columns of strings longer than 254 bytes; for example, they cannot be indexed.
The database manager will not use index-only access to retrieve the data if the index is created on a VARCHAR column. For information on index-only access, refer to the DB2 Server for VSE & VM Performance Tuning Handbook manual.
Do not use LONG VARCHAR unless you really want the maximum row length to be as large as possible, because there is a higher cost associated with accessing long fields.
In most cases, the content of the data intended for a column dictates the data type you choose. For example, the data type selected for the department name (DEPTNAME) of the DEPARTMENT table is VARCHAR(36). Because department names normally vary considerably in length, the choice of a varying-length data type seems appropriate. Choosing a data type of CHAR(36), for example, would result in much wasted space, because all department names, regardless of their length, would be assigned the same amount of space (36 bytes).
The foregoing considerations about CHAR, VARCHAR, and LONG VARCHAR columns apply in the same way to GRAPHIC, VARGRAPHIC, and LONG VARGRAPHIC columns. The one exception is that the length (n) of a GRAPHIC or VARGRAPHIC column is given as a number of double-byte characters; hence, the length in bytes is twice n.
The use of subtypes applies only to character data such as CHAR, VARCHAR, and LONG VARCHAR. A default subtype for character columns is set at installation time. You can override this default for any column in a table when the table is created (or when a column is added to an existing table).
Choose the SBCS subtype when the data in the column is single-byte character data and the default is not.
Choosing FOR MIXED DATA lets you store (and to have the column flagged as storing) both single- and double-byte characters. The database manager ensures the integrity of valid mixed data during truncation.
For columns that contain binary data that should not be modified when moved between different environments (such as from ASCII to EBCDIC), specify FOR BIT DATA.
| Note: | When specifying a subtype, you are also implicitly specifying the CCSID for the subtype. |
Default CCSID values for character and graphic data are specified during installation. To override the CCSID used for a column containing any of these data types, specify one of your own.
Each CCSID is associated with either graphic data or a specific subtype of character data. Query the SYSTEM.SYSCCSIDS system catalog table to determine the CCSID values for each of these.
If you compare data from two columns or move data between two columns having different CCSIDs, and if a conversion selection table exists, the data in one of the columns is converted to ensure a consistent comparison. Query the SYSTEM.SYSSTRINGS catalog table for a list of valid conversion selection tables. (In VM you can also look at the ARISSTR MACRO on the production minidisk for a list of valid conversion selection tables.) Consider your users' environments and needs when specifying a CCSID for a particular column. When you override the default CCSID for a column of data, you can minimize the amount of converting done on tables that are accessed primarily by users requiring different CCSIDs.
| Note: | Converting from one CCSID to another, then another, and then returning to the original CCSID, can result in the misinterpretation of data if there is not a one-to-one correspondence between the two sets of characters. |
See the DB2 Server for VM System Administration or DB2 Server for VSE System Administration manual for more information about specifying CCSIDs.
A field procedure (FIELDPROC) is a user-written exit routine used to encode and decode values in a character string. Field procedures can only be used on short character strings (CHAR, VARCHAR, GRAPHIC, and VARGRAPHIC).
A field procedure can be used to alter the sorting sequences of a short character string column. It is assigned to a column during execution of the CREATE TABLE or ALTER TABLE statement, and is called whenever values in the column are changed, inserted, or retrieved. To specify that a column use a field procedure, use the FIELDPROC option followed by the program name of the procedure and, optionally, a list of parameters.
For example, to specify a field procedure for the column LASTNAME of the EMPLOYEE sample table, change one line of Figure 17 to look like this:
LASTNAME VARCHAR(15) NOT NULL FIELDPROC MYPROG (4, 3, 7),
In the example, the name of the field procedure is chosen as MYPROG. The parameters 4, 3, and 7 are passed to the procedure when it is invoked by the CREATE TABLE or ALTER TABLE statement.
For more information about field procedures, see the DB2 Server for VM System Administration or DB2 Server for VSE System Administration manual.
The data types for dates, times, and timestamps are shown in Table 8.
Table 8. Date, Time, and Timestamp Data Types
| Data Type | Denotes a column of... |
|---|---|
| DATE | Dates. A date is a three-part value representing a year, month, and day in the range 0001-01-01 to 9999-12-31. |
| TIME | Times. A time is a three-part value representing a time of day in hours, minutes, and seconds, in the range 00.00.00 to 24.00.00. |
| TIMESTAMP | Timestamps. A timestamp is a seven-part value representing a date and time by year, month, day, hour, minute, second, and microsecond, in the range 0001-01-01-00.00.00.000000 to 9999-12-31-24.00.00.000000. |
For a detailed description of Date/Time characteristics, see the DB2 Server for VSE & VM SQL Reference manual.
Numbers representing dates and times can, of course, be stored in columns with numeric data types; if they include special characters as separators, they can be stored in string columns. But neither of these options provides the advantages of the DATE, TIME, and TIMESTAMP data types, as described below.
Date/time values are stored in a special internal format, which is
freely convertible on output or input to or from any of the formats in Table 9.
| Format Name | Abbreviation | Typical Date | Typical Time |
|---|---|---|---|
| International Standards Organization | ISO | 1992-12-25 | 13.30.05 |
| IBM USA standard | USA | 12/25/1992 | 1:30 PM |
| IBM European standard | EUR | 25.12.1992 | 13.30.05 |
| Japanese Industrial Standard (Christian Era) | JIS | 1992-12-25 | 13:30:05 |
You also have the option of supplying an exit routine to make conversions to and from any local standard. For instructions about writing and using a date or time exit routine, see the DB2 Server for VM System Administration or DB2 Server for VSE System Administration manual.
When loading date or time values from an outside source, the database manager accepts any of these formats, and convert valid input values to the internal format. For retrieval, there is a default format that you select at the time of installation. You can change the default at any time by updating the SYSOPTIONS catalog; you can override it for every statement in a program by a precompiler option, or for particular instances by the CHAR scalar function. For example, whatever your local default, the following statement displays employees' birth dates in IBM USA standard form:
SELECT EMPNO, CHAR(BIRTHDATE, USA) FROM EMPLOYEE
Date/time arithmetic involves intervals of time that are represented by numbers called durations. A duration is an interpretation of a number, not a data type.
A labeled duration is any number of years, months, days, hours, minutes, seconds, or microseconds. A date duration is a number of years, months, and days. A time duration is a number of hours, minutes, or seconds. A timestamp duration is a number of years, months, days, hours, minutes, seconds, and microseconds. For a further discussion of durations, see Date/Time Arithmetic, or the DB2 Server for VSE & VM SQL Reference manual.
The only arithmetic operators that can be applied to date/time values are addition and subtraction. If a date/time value is the operand of addition, the other operand must be a duration.
For example, the following statement lists employees who have been hired after the age of 40:
   SELECT * FROM EMPLOYEE
     WHERE HIREDATE > BIRTHDATE + 40 YEARS
This statement lists employees who have been hired in the last 3 months:
   SELECT * FROM EMPLOYEE
     WHERE HIREDATE > CURRENT DATE - 3 MONTHS
There are functions to extract the years, months, days, hours, minutes, seconds, and microseconds of dates, times, and timestamps. For example, this statement lists all employees who have a service anniversary on June 21:
   SELECT * FROM EMPLOYEE
     WHERE MONTH(HIREDATE) = 6 AND DAY(HIREDATE) = 21
There are also functions to convert dates, times, and timestamps to character or integer representations.
In the following example, 07/28/1971 is interpreted as a date because it is compared to a date; in other contexts (a SELECT list, for example) 07/28/1971 is merely a character string.
   SELECT * FROM EMPLOYEE
     WHERE HIREDATE = '07/28/1971'
All comparison operators are allowed. The statement below lists all employees hired after October 31, 1979. To show another of the recognized date formats, we have arbitrarily chosen to write the date in the IBM European standard.
   SELECT * FROM EMPLOYEE
     WHERE HIREDATE > '31.10.1979'
You can compare values of different types and lengths provided that both values are numeric, both are character strings, or both are graphic strings.
Date and time comparisons cannot be made with values of different types: a date can be compared only with a date, a time with a time, and a timestamp with a timestamp (or, in each case, with a valid string representation of a date, time, or timestamp).
If a column uses a field procedure, values to be compared to it are first encoded by the field procedure. If a column with a field procedure is compared to another column, both columns must have the same field procedure and data type.
Columns do not have to have the same CCSID to be compared. When two columns with differing CCSIDs are compared, and a conversion selection table exists, the data in one of the columns is converted to ensure a consistent comparison. For further information, refer to the DB2 Server for VSE & VM SQL Reference manual.
The primary key of a table, if one has been created, consists of one or more columns that uniquely identify each row in the table. In the example in Figure 17, the employee number is the primary key of the employee table, and the PRIMARY KEY clause identifies the column of employee numbers (EMPNO).
A table that is to be a parent of dependent tables must have a primary key--the foreign keys of the dependent tables refer to it. Otherwise, a primary key is optional. If you are defining referential constraints, read Considerations for Referential Integrity when Creating Tables before creating or altering any of the tables involved.
If you specify a primary key, a unique index is automatically defined on the same set of columns, in the same order as those columns. The primary key values must then be unique and cannot be null. Their uniqueness cannot depend upon trailing blanks in columns containing VARCHAR or VARGRAPHIC data. Automatic enforcement of these restrictions can be useful even if the table is not involved in referential constraints. If each row of your table does relate to a unique occurrence of some entity, then consider creating a primary key.
If the primary key is created on a VARCHAR or VARGRAPHIC column, index-only access is not used to retrieve the data. For information on index-only access, refer to the DB2 Server for VSE & VM Performance Tuning Handbook manual.
The unique constraints on a table ensure the uniqueness of values in columns making up each constraint. Although functionally similar to a unique index, a unique constraint can be defined when the table is created, deactivated, and then reactivated to enforce the uniqueness of values in its key. This simplifies administration when you load data or perform operations that could temporarily violate the unique constraint. For this reason, unique constraints are preferable to unique indexes, which must be individually and explicitly dropped and recreated to suspend or enforce uniqueness.
A unique constraint is also similar to a primary key in that:
It differs from a primary key in that:
For any table, you can define one primary key using the primary key clause, and any number of foreign keys using the referential constraint clauses. In a referential constraint, the table that has the foreign key definition is the dependent table and the table that is referenced by the foreign key is the parent.
The constraint-name identifies the key being specified.
The database manager generates a constraint-name if one is not provided; however, you should create your own for foreign keys. Constraint-names should be symbolic and indicate the parent and foreign key names, which will make working with the keys much easier. Working with keys is discussed in Altering Referential and Unique Constraints.
A referential constraint is defined by creating or altering tables to have a parent/dependent relationship between them. A referential constraint can span dbspaces. A referential structure is a set of tables that are related to each other by referential constraints. A dbspace may have more than one referential structure but that is generally not desirable.
When a primary key is defined, a unique index is created automatically to enforce its uniqueness. If you have not specified information such as index order and percent free space on the key definition, the index is created using default values.
When a primary key is defined by the CREATE TABLE statement, the CLUSTERING index is the one associated with the primary key. If you want to have this index on columns other than those comprising the primary key, create the table without a primary key, then create an index on the desired columns, and then use the ALTER TABLE statement to add the primary key.
If the primary key is dropped, either implicitly (when the table or dbspace is dropped) or explicitly (with the ALTER TABLE statement), the system-generated index is automatically dropped. You cannot use the DROP INDEX statement to explicitly drop an index that was created to support a primary key.
Use the ALTER TABLE ACTIVATE PRIMARY KEY statement to reorganize the primary key index if the primary key is active, or to recreate the index if the primary key is inactive. For more information about this statement, see Altering the Design of a Table.
A table is delete-connected to another table if deletion of rows from one table affects the other table. The implications are:
For further information on tables that are delete-connected through multiple paths, refer to the DB2 Server for VSE & VM SQL Reference manual.
For further information on referential integrity, refer to Elements of Referential Integrity.
There are no rules for the deletion of rows from dependent tables. The deletion rule specified in the referential constraint clause defines what action should be taken by the database manager when a row in the parent table is to be deleted. See DELETE Rules.
Insert rules always apply when primary and foreign keys are defined. See INSERT Rules.
Update rules always apply when primary and foreign keys are defined. See UPDATE Rules.
| Note: | If a table is a parent in one relationship and a dependent in another, integrity rules for DELETE, INSERT, or UPDATE must be satisfied for both relationships. |
To determine the delete rule of an existing foreign key, access the SYSKEYS catalog table as follows:
   SELECT KEYTYPE, KEYNAME, DELETERULE FROM SYSTEM.SYSKEYS
     WHERE TNAME='table-name'
When creating a table, you can specify the dbspace in which it is to reside. If you do not, it is put in the creator's PRIVATE dbspace. If the creator does not have a PRIVATE dbspace, then the CREATE TABLE statement fails.
If you specify the name of the dbspace but not the name of the owner, the database manager searches for a PRIVATE dbspace of the specified name that is owned by the creator of the table. If this does not exist, the database manager then looks for a PUBLIC dbspace with the specified name. If that does not exist, then the CREATE TABLE statement fails. Refer to the DB2 Server for VSE & VM SQL Reference manual for more information about the CREATE TABLE statement.
Table placement under the various possible default conditions is illustrated in Figure 18.
Figure 18. Default Placement of Tables in Dbspaces
 View figure.
Notes for Figure 18:
You can easily avoid confusion by fully qualifying both the table name and the dbspace name.
Some of your users may find that no single table contains all the data they need; rather, the data might be scattered among several tables. Or one table might contain more data than they want to see or are authorized to see. For those situations, you can create views. A view is an alternative way of describing data that exists in one or more tables.
You can create a view any time after creating the underlying tables. The owner of a set of tables implicitly has the authority to create a view on them, and someone with DBA authority can create a view for any owner on any set of tables.
Use the CREATE VIEW statement to define a view and give it a name. Unless you specifically list different column names after the view name, the column names of the view will be the same as those of the underlying table. ( Table 11 shows an example of this.) When creating different column names for your view, remember the naming conventions you established when designing the database.
As Table 11 illustrates, the information in the view is described by a SELECT statement. This statement can name other views as well as tables, and can use WHERE, WITH CHECK OPTION, GROUP BY, and HAVING clauses. It cannot use ORDER BY, name a host variable, or contain the UNION operator.
By specifying a WHERE clause in the subquery of a view definition, you can limit the rows addressed through a view. If an application (or user) deals with a specific set of rows in a table, you can create a view to limit the rows addressed to only those required. If a view is created using the WHERE and WITH CHECK OPTION clauses, all subsequent UPDATEs and INSERTs will prevent changes to rows that fall outside the set of rows defined by the view. Refer to the DB2 Server for VSE & VM SQL Reference manual for more information about creating views.
Some reasons you might want to use views are:
Some tables may have a large number of columns, not all of which are of interest to all users or are named or ordered appropriately. You can, in effect, create a smaller table for certain users by defining a view that contains only the columns of interest. You can rename columns and reorder the column sequence to tailor the view to the user's needs.
You can create a view containing only selected columns and rows from a table or tables. Users with the SELECT privilege on the view see only the information you describe. For example, a view could be defined that showed only the FIRSTNME, LASTNAME, WORKDEPT, and EDLEVEL columns for employees in Department D11.
For example, a program that uses an INSERT into T1 without a specified list of column names will cause an error after you add a column to table T1. The error is generated because the number of values being inserted into the table is different than the number of columns in the table. If T1 is a view, you will be protected from that error because adding a column to the table does not affect the view definition and, therefore, does not affect the program.
The example below illustrates creating a view on a single table, the DEPARTMENT table. Of the four columns in the table, only three are required for the view: DEPTNO, DEPTNAME, and MGRNO. The order of the columns in the SELECT clause is the order in which they appear in the view.
   CREATE VIEW VDEPT3 AS
     SELECT DEPTNO,DEPTNAME,MGRNO
     FROM DEPARTMENT
In this example, no column list follows the view name, VDEPT3. Hence, the columns of the view have the same names as those of the table on which it is based (DEPTNO, DEPTNAME, MGRNO). Table 10 shows the result of executing the following SQL statement:
SELECT * FROM VDEPT3
| DEPTNO | DEPTNAME | MGRNO |
|---|---|---|
| A00 | SPIFFY COMPUTER SERVICE DIV. | 000010 |
| B01 | PLANNING | 000020 |
| C01 | INFORMATION CENTER | 000030 |
| D01 | DEVELOPMENT CENTER | ? |
| D11 | MANUFACTURING SYSTEMS | 000060 |
| D21 | ADMINISTRATION SYSTEMS | 000070 |
| E01 | SUPPORT SERVICES | 000050 |
| E11 | OPERATIONS | 000090 |
| E21 | SOFTWARE SUPPORT | 000100 |
Name more than one table in the FROM clause to create a view that combines information from two or more tables. This operation is called a join, and is shown in the following example, which includes the manager's name (from the EMPLOYEE table) and information from the DEPARTMENT table.
   CREATE VIEW SMITH.VDEPTM  AS
     SELECT DEPTNO, MGRNO, LASTNAME, ADMRDEPT
     FROM DEPARTMENT, EMPLOYEE
     WHERE EMPLOYEE.EMPNO = DEPARTMENT.MGRNO
Table 11 shows the result of executing the following SQL statement:
SELECT * FROM SMITH.VDEPTM
| DEPTNO | MGRNO | LASTNAME | ADMRDEPT |
|---|---|---|---|
| A00 | 000010 | HAAS | A00 |
| B01 | 000020 | THOMPSON | A00 |
| C01 | 000030 | KWAN | A00 |
| D11 | 000060 | STERN | D01 |
| D21 | 000070 | PULASKI | D01 |
| E01 | 000050 | GEYER | A00 |
| E11 | 000090 | HENDERSON | E01 |
| E21 | 000100 | SPENSER | E01 |
Now, suppose you want to create a similar view that includes only the departments that report administratively to Department A00. Suppose also that you want a different set of column names. The appropriate CREATE statement is as follows:
   CREATE VIEW SMITH.VDEPTMA00
     (DEPT, MGR, NAME, REPORTTO)
     AS
     SELECT DEPTNO, MGRNO, LASTNAME, ADMRDEPT
     FROM EMPLOYEE, DEPARTMENT
     WHERE EMPLOYEE.EMPNO = DEPARTMENT.MGRNO
     AND ADMRDEPT = 'A00'
Table 12 shows the result of executing the following SQL statement:
SELECT * FROM SMITH.VDEPTMA00
Table 12. View Created with New Column Names
| DEPT | MGR | NAME | REPORTTO |
|---|---|---|---|
| A00 | 000010 | HAAS | A00 |
| B01 | 000020 | THOMPSON | A00 |
| C01 | 000030 | KWAN | A00 |
| E01 | 000050 | GEYER | A00 |
When designing views, consider the following restrictions:
In the above cases, you can retrieve data from the views by means of the SQL SELECT statement, but you cannot use INSERT, UPDATE, or DELETE statements.
For more detailed information about view restrictions, see the DB2 Server for VSE & VM SQL Reference manual.
You can make changes to a table through a view when the view does not
contain the same number of columns or the same number of rows as the table on
which it is based. Table 13 summarizes the restrictions on accessing views.
Table 13. Restrictions on View Access
When designing views, you should be aware of the view-processing techniques used by the database manager and the circumstances in which each is used. Two view-processing techniques are used: view merge and view materialization. This section describes the circumstances in which a view is materialized.
When a view is referenced in an SQL statement, the view definition is merged with the SQL statement and a new statement is created that references only base tables and columns and that contains only added or modified WHERE predicates, and an added or modified GROUP BY clause. The new statement is then processed. This process is view merge. Some view-referencing statements cannot be processed using the view merge technique. The database manager uses the view materialization technique to process these statements.
With view materialization, a temporary table is created internally and a view (that could not otherwise be accessed) is materialized into the table at run time. The database manager then performs the statement on the materialized view. A materialized view is read-only, because queries on the view are on a temporary table. Each view that is materialized in an SQL statement is materialized in a temporary dbspace.
Because view merge is more efficient than view materialization, view materialization is used only if view merge cannot be used.
A view is materialized if it is created with:
| Note: | If the SELECT list of the view definition statement contains a long field, the view cannot be materialized because of long-field restrictions. |
For information on determining if view materialization occurs, refer to the DB2 Server for VSE & VM Performance Tuning Handbook manual.
The purpose of nonunique indexes is to provide efficient access to data. Unique indexes have the additional purpose of ensuring that key values are unique.
Even when present, the index is not always used: the database manager selects an access path to the data based on a combination of factors. To see whether an index is used in processing a particular SQL statement, use the EXPLAIN statement. For information on using the EXPLAIN statement and on explanation tables, refer to the DB2 Server for VSE & VM Performance Tuning Handbook manual.
Indexes can improve performance of table access; however, this is at the expense of the DASD storage required for them, and the performance of INSERT, UPDATE, and DELETE operations. Thus, while you will want to create indexes on your tables, some judgement is advised. For information about the storage required by an index, see Estimating the Number of Index Pages.
To create an index on a table, use the SQL CREATE INDEX statement. You must have DBA authority or the INDEX privilege on the table. An index may be defined on 1 to 16 columns.
The columns identified in the CREATE INDEX statement build a key. An index key is a column or an ordered collection of columns on which an index is defined. A multicolumn key is a key built on two or more columns.
The usefulness of an index depends on its key. Columns that you use frequently in performing selection, join, projection, grouping, and ordering operations are good candidates for use as keys. See Estimating the Number of Index Pages for information on calculating the size of index keys. For columns with a field procedure, use the number of bytes in the encoded field, not the number in the decoded column.
For information about restrictions on key length, see the description of the CREATE INDEX statement in the DB2 Server for VSE & VM SQL Reference manual.
The ordering of the columns specified in the CREATE INDEX statement is important to the definition of the key sequence. The major order determinant columns must be specified first.
For example, an index on the PROJ_ACT table, defined over the PROJNO, ACTNO, and ACSTDATE columns sequences activity numbers within project numbers, and estimated activity start date within activity numbers, if the columns are specified in this order for the index.
For each column participating in the key, you can specify whether its order in the key sequence is ascending or descending. The default is ascending. When creating a unique index, the uniqueness of each value in the index key cannot depend upon trailing blanks. The database manager also ignores trailing blanks when sequencing indexes made up of VARCHAR or VARGRAPHIC values.
You can enter duplicate values in a key. If you do not want duplicate values, use CREATE UNIQUE INDEX.
For example, in the sample database, it is important that there be no duplicate activity keywords in the ACTIVITY table. Creating a unique index, as in the following example, prevents duplicates.
   CREATE UNIQUE INDEX XACT1
     ON ACTIVITY (ACTKWD)
The index name is XACT1 and the indexed column is ACTKWD.
If you are planning to use referential integrity or unique constraints, described in Creating Tables, it may be unnecessary to explicitly create unique indexes. When using the primary key or unique constraint clause, the database manager automatically creates a unique index on the table. However, you may want additional indexes for other columns and foreign keys.
The PCTFREE clause specifies how much space is to be reserved for future index entries, which allows index maintenance to take place without splitting of index pages. Its default is 10 percent, which is a good value for most purposes. If you expect much insert or update activity after the creation of the index, you might want to override the default by setting PCTFREE to a higher value. If you expect no insert or update activity after the creation of the index, you might want to override the default by setting PCTFREE to zero.
Usually, a low PCTFREE value, 5-10 percent, is a good choice when creating an index, as it provides enough room to accommodate a low level of maintenance. It also provides extra room at localized key ranges where high update activity is taking place by splitting a full index page into two half-empty pages when an insertion or update must go into that page.
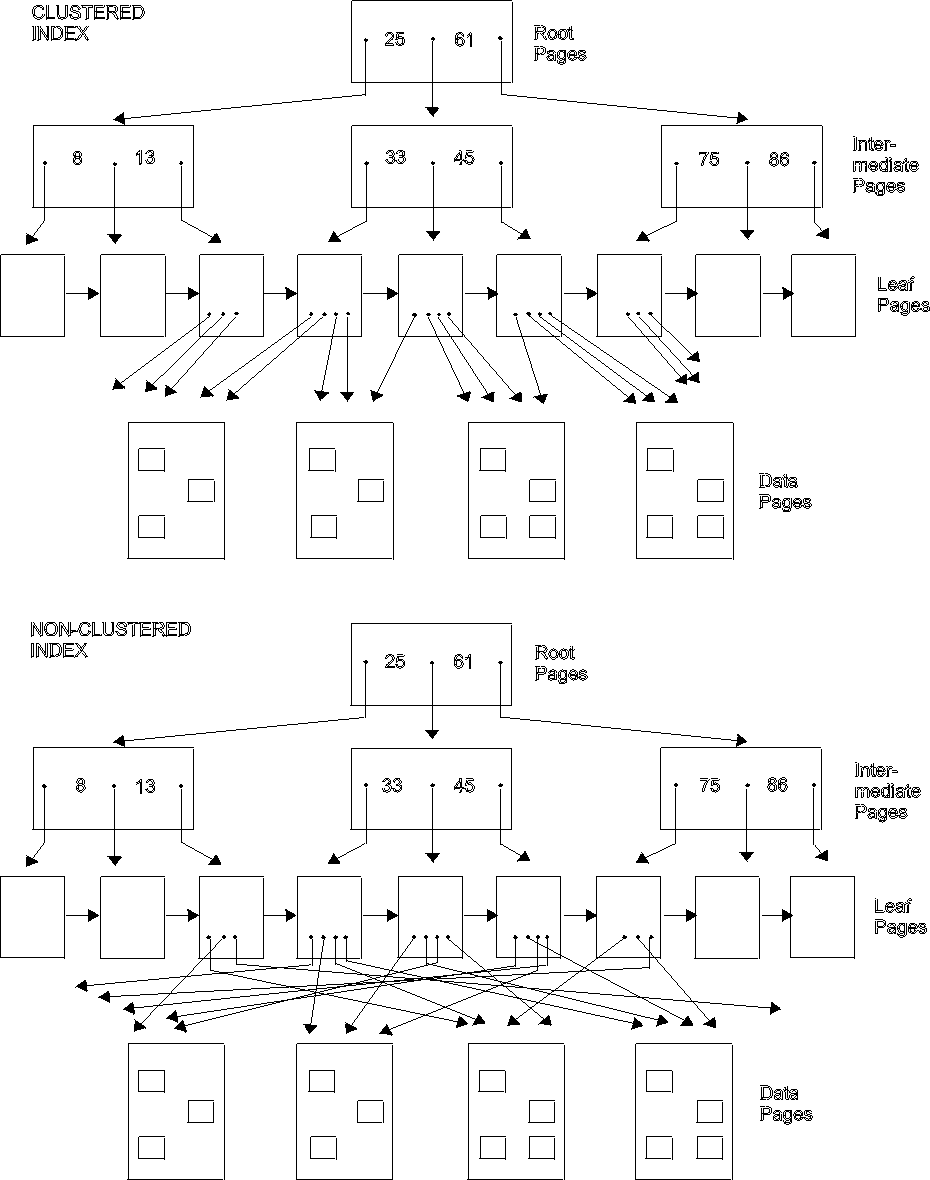
A CLUSTERING index is used by the database manager to determine placement of rows in pages of a dbspace. The first index created on a table is, by default, the CLUSTERING index. The database manager tries to place rows with the same or similar keys on the same dbspace page.
A CLUSTERED index is an index whose sequence of key values corresponds closely to the sequence in which the table rows are actually stored in the database. It can be effectively used to minimize DASD input/output whenever the table rows are accessed in the index sequence of a CLUSTERED index. A CLUSTERING index should always be made a CLUSTERED index. This is done by loading the table rows in the key sequence of the CLUSTERING index.
To establish a CLUSTERING index that also has the property of being a CLUSTERED index, do the following:
This establishes the initial clustering of rows with similar keys. For the load operation, set PCTFREE for the dbspace to a high enough value to allow space on pages for future clustered insertion of rows.
After loading the table, create the indexes on the table. The first index you create will be the CLUSTERING index. Any index having an order that matches the load sequence of the rows will be marked as a CLUSTERED index.
The CLUSTERING index will be a CLUSTERED index because you have loaded the table rows in the sequence of this index. In the SYSINDEXES catalog table, the CLUSTER column value for this index is F, indicating that it is the first index created by the table, and that it is currently a CLUSTERED index. If, after many INSERTs of new rows into the table, the order in which the rows are stored in the database no longer closely match the index key sequence, the CLUSTER column value is changed to W (the next time UPDATE STATISTICS is performed). This indicates that the index is the first index created on the table, and it is currently not a CLUSTERED index. You can reorganize the table. Refer to the DB2 Server for VSE & VM Performance Tuning Handbook manual for information on reorganizing tables. The database manager will continue to use this index to decide where new rows should be stored, because it is still the CLUSTERING index for the table.
One or more of the other indexes created on the table may also happen to have an index sequence that closely matches the sequence in which the table rows are stored. Although this is fortuitous and cannot be directly controlled by the user, the database manager will record these indexes as CLUSTERED by setting their CLUSTER column in SYSINDEXES to C. Such indexes can be exploited as efficient access paths by the database manager. When one of these indexes is no longer CLUSTERED, its CLUSTER column is changed to N the next time UPDATE STATISTICS is performed.
This is necessary to make the free space reserved during the load operation available for use on normal INSERT activity. On an INSERT or ISQL INPUT, the database manager attempts to place the inserted row on the same page as a row with the same or similar key.
You can define the key ordering of the CLUSTERING index to be any you wish. However, the primary considerations would be frequently used table orderings (that is, frequently used ORDER BYs) and joins.
If you cluster a table on an index that has a key ordering that matches the most common ORDER BY clauses for queries against the table, you can avoid internal sorting of the query results. A related consideration is the size of an ordered query result. Internal sorting of a small query result is not expensive. However, if you have a large, ordered query result (for a batch job or a comprehensive report), the internal sort could be quite time-consuming. You should consider clustering a table to support your most frequent, large sequential access orderings.
If you have a table that is frequently referenced by a join on a particular column (or set of columns), you may want to consider clustering it on an index on the join column(s). For example, between the DEPARTMENT and EMPLOYEE tables there are two likely join candidates (referential constraints are defined): one between the EMPNO column in EMPLOYEE and the MGRNO column in DEPARTMENT, and the other between the DEPTNO column in DEPARTMENT and the WORKDEPT column in EMPLOYEE. In this case you could choose to cluster both tables on either employee numbers or department numbers, depending on which join is expected more frequently.
| Note: | You can change the clustering that you initially define for a table. Refer to the DB2 Server for VSE & VM Performance Tuning Handbook manual for information on reorganizing tables. |
Figure 19 illustrates both clustered and nonclustered indexes.
Figure 19. Clustered and Nonclustered Indexes
 View figure.
Column updates require index updates. Define as few indexes as possible on a column that is updated frequently, because every change must be reflected in each index. For more information about potential problems with indexes and performance, refer to the DB2 Server for VSE & VM Performance Tuning Handbook manual.
A multicolumn key may be more useful than a key on a single column when the comparison is for equality. A single multicolumn index is more efficient when the comparison is for equality and the initial columns are provided. For example, if an index is composed of columns A, B, and C, a SELECT statement with a WHERE clause of the form WHERE A = value AND B = value may be processed more efficiently than if there are separate indexes on A and on B. Additional columns may also improve performance by allowing index-only access scanning. Refer to the DB2 Server for VSE & VM Performance Tuning Handbook manual for information on index-only access scanning.
Indexes are important tools for improving performance. Suggestions for using indexes effectively are in the DB2 Server for VSE & VM Performance Tuning Handbook manual.
An index cannot be defined over multiple tables. Furthermore, an index key cannot include any columns defined as long fields.
Avoid using VARCHAR or VARGRAPHIC columns in an index. Fixed-length indexes perform better than variable-length indexes. Data pages as well as index pages must be read when VARCHAR or VARGRAPHIC columns are included in an index. The variable-length fields have trailing blanks removed before being put into the index. This may result in the data page values differing from the index page values, and necessitates that both index and data pages be read when using the index as an access path for data retrieved.
| Note: | Long fields include the following data types: VARCHAR(n) with n>254, VARGRAPHIC(n) with n>127, LONG VARCHAR, or LONG VARGRAPHIC. |
It is good practice to create a unique index on the column or set of columns that uniquely define each record in the table (its key). A unique index can easily be created by specifying a primary key or a unique constraint when you create the table. A primary key can be used as an index even if automatic referential integrity is not being used. Using a unique constraint or primary key helps data integrity because the database manager enforces this uniqueness.
Consider creating additional indexes on other columns based on how often you expect the column to be used in search criteria. Once you have identified all the desired indexes, decide which column is apt to be used most often in search criteria. Then load the table in that column's sequence, thus making the column's corresponding index a CLUSTERED index.
If the table is to have a CLUSTERING index, be sure to create that index first after initial table loading. You should do this because the database manager tries to place inserted records so that the physical sequence of the table's records is the same as the sequence defined by the first index created on that table.
It is more efficient to first load a table and then create the indexes on it, rather than the other way around.
Usually, each table should have at least one index. Part of the decision of whether to create an index on a specific column should be based on the trade-off between the faster access achieved, versus the index maintenance processing that the database manager must do whenever that column is modified. A column is an ideal candidate for being indexed if it is likely to be a frequent search argument on SQL statements, but not likely to be changed. Avoid creating indexes on frequently updated columns.
Indexes can be created and dropped. If high query activity is anticipated, temporarily create indexes on the columns that are likely access paths for those queries.
The SQL/DS Version 2 Release 2 product introduced a new index structure for nonunique indexes. This format requires more space than in earlier releases, but it allows nonunique indexes to perform almost as well as unique ones.
The new format requires more space. The number of additional bytes required for each nonunique index in the new format is:
4 x (number of index pages) - 4
If you are migrating from Version 2 Release 1 or earlier, some of your dbspaces may not have room for indexes in the new format. Before deleting the old indexes, determine if there are sufficient index pages available to create the index in the new format. Nonunique indexes created before Version 2 Release 2 can coexist with the new type of nonunique index, so you do not have to drop and re-create indexes.
| Note: | You cannot migrate from Version 2 directly to Version 7. You must migrate to Version 3 first and then migrate from Version 3 to Version 7. |
The catalog tables contain information that can be helpful in designing your database. The DB2 Server for VSE & VM SQL Reference manual lists these tables and what is stored in them.
You can also use the catalog to verify the accuracy of your database definition process. After you have created the objects in your database, display selected information from the catalog to check that there were no errors in your CREATE statements, and to verify that you have the correct tables in each dbspace.
The information in the catalog is vital to normal database system operation. As the following examples show, you can retrieve catalog information, but changing it could have serious consequences. Thus, you cannot process INSERT or DELETE statements against the catalog, and you can update only a few of the columns in selected catalog tables.
To run the following examples, you need at least the SELECT privilege on the appropriate catalog tables. Be careful with your own examples: querying the catalog can result in a long dbspace scan.
The SYSTEM.SYSCATALOG table contains a row for each table and view in your database. For each, it tells you whether the object is a table or view, its name, who created it, what dbspace contains it, and other information. It also has a REMARKS column in which you can store your own information about the table in question. See The COMMENT ON Statement for information about how to do this.
Enter the following statement to display all the information for the project activity sample table:
   SELECT *
     FROM SYSTEM.SYSCATALOG
     WHERE TNAME = 'PROJ_ACT'
     AND CREATOR = 'SQLDBA'
The SYSTEM.SYSCOLUMNS table has one row for each column of each table and view. You can query it, for example, if you cannot remember a particular column name.
The following statement retrieves information about columns in the sample department table:
   SELECT CNAME, TNAME, COLTYPE, LENGTH, NULLS
     FROM SYSTEM.SYSCOLUMNS
     WHERE TNAME='DEPARTMENT'
     AND CREATOR = 'SQLDBA'
As shown in Table 14, for each column it displays:
Table 14. Retrieving Information about Columns from SYSCOLUMNS
| CNAME | TNAME | COLTYPE | LENGTH | NULLS |
|---|---|---|---|---|
| DEPTNO | DEPARTMENT | CHAR | 3 | N |
| DEPTNAME | DEPARTMENT | VARCHAR | 36 | N |
| MGRNO | DEPARTMENT | CHAR | 6 | Y |
| ADMRDEPT | DEPARTMENT | CHAR | 3 | N |
The SYSTEM.SYSINDEXES table contains a row for each index, including indexes on catalog tables.
The following query retrieves information about the index XEMPL2:
   SELECT *
     FROM SYSTEM.SYSINDEXES
     WHERE INAME = 'XEMPL2'
     AND ICREATOR = 'SQLDBA'
A table can have more than one index. The following query retrieves information about all the indexes of a table:
   SELECT *
     FROM SYSTEM.SYSINDEXES
     WHERE TNAME = 'EMPLOYEE'
     AND CREATOR = 'SQLDBA'
The SYSTEM.SYSVIEWS table contains a row for each view.
The following query retrieves information about the view SYSUSERLIST:
   SELECT *
     FROM SYSTEM.SYSVIEWS
     WHERE VIEWNAME = 'SYSUSERLIST'
     AND VCREATOR = 'SQLDBA'
The following 4 tables contain information about the privileges held over tables and views:
Contains information regarding grants of the UPDATE privilege on columns of tables or views.
Contains information about the privileges held by authorization IDs and packages on tables and views.
Records special privileges held by authorization IDs (for example, DBA, CONNECT authority).
Only users with DBA authority can access SYSUSERAUTH. Other users can access this information using a view called SYSUSERLIST, which contains all the columns of SYSUSERAUTH except the PASSWORD column.
Query these tables to learn who can access data in your application server. For example, the following query retrieves the names of all users who have been granted access to the SQLDBA.DEPARTMENT table, as well as any views on that table:
   SELECT GRANTEE
     FROM SYSTEM.SYSTABAUTH
     WHERE TTNAME = 'DEPARTMENT' AND GRANTEETYPE = ' '
     AND TCREATOR = 'SQLDBA'
GRANTEE is the name of the column that contains authorization IDs and package names for users of tables. TTNAME and TCREATOR specify the SQLDBA.DEPARTMENT table. The clause GRANTEETYPE = ' ' ensures that you retrieve the names only of users (not packages) that have authority to access the table.
After you create a table or view, you can provide explanatory information about it for future reference--for example, the purpose of the table, who uses it, and anything unusual about it. To do this, use the COMMENT ON statement. You can both store comments about the table or view as a whole, and include one for each column. A comment must not exceed 254 bytes.
Comments are especially useful if your names do not clearly indicate the contents of columns or tables.
Below are two examples of COMMENT ON:
   COMMENT ON TABLE SQLDBA.EMPLOYEE IS
     'Employee table. Each row in this table represents one
      employee of the company.'
   COMMENT ON COLUMN SQLDBA.PROJECT.PRSTDATE IS
     'Estimated project start date. The format is DATE.'
When you process a COMMENT ON statement, your comments are stored in the REMARKS column of SYSTEM.SYSCATALOG or SYSTEM.SYSCOLUMNS.
Any comment already present in the row is replaced by the new one. The following queries retrieve the comments added by the two COMMENT ON statements above:
   SELECT REMARKS
     FROM SYSTEM.SYSCATALOG
     WHERE TNAME = 'EMPLOYEE'
     AND CREATOR = 'SQLDBA'
   SELECT REMARKS
     FROM SYSTEM.SYSCOLUMNS
     WHERE CNAME = 'PRSTDATE' AND TNAME = 'PROJECT'
     AND CREATOR = 'SQLDBA'