Business Intelligence Tutorial
In this lesson, you will select a fact table and create
the Accounts and Time dimensions. Then you will create the Product,
Market, and Scenario dimensions.
Every model needs a fact table, which is the center of the star
schema. The fact table is composed of one or more relational tables
that contain facts, such as units sold or cost of goods, and foreign keys that
link the fact table to each dimension table. In this lesson, the fact
table will also be used as the Accounts dimension. The Accounts
dimension contains numeric data that you want to analyze and track over time,
such as sales or inventory; this data is also called variable
measures data and enables accounting intelligence during online
analytical processing.
To select the fact table:
- On the Select Fact Table page, notice the default value of
Accounts in the Name field. Do not change this
value. In this lesson, you will automatically create an Accounts
dimension using the fact table.
- In the Available Relational Tables field, click
TBC.FACT_TABLE.
- Click the right arrow button, and TBC.FACT_TABLE is
displayed in the Selected Relational Tables field. The
window looks like this:
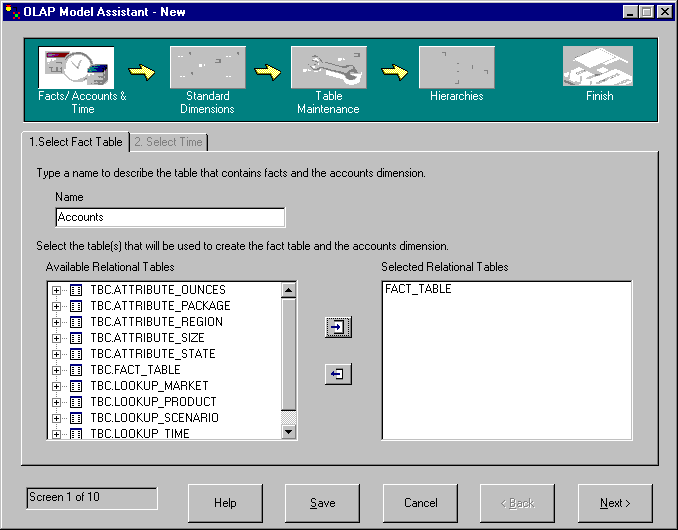
- Click Next and the Select Time page is displayed.
In this exercise, you will create a Time dimension, which
you use to describe how often you collect and update data. For example,
you can organize time into years, quarters, and months.
- On the Select Time page, you can accept the default value of
Time in the Name field.
- Click By Selecting Relational Tables, which activates the
Available Relational Tables field.
- Select the TBC.LOOKUP_TIME table and click the right
arrow button. The table is displayed in the Selected Relational
Tables field. The window looks like this:
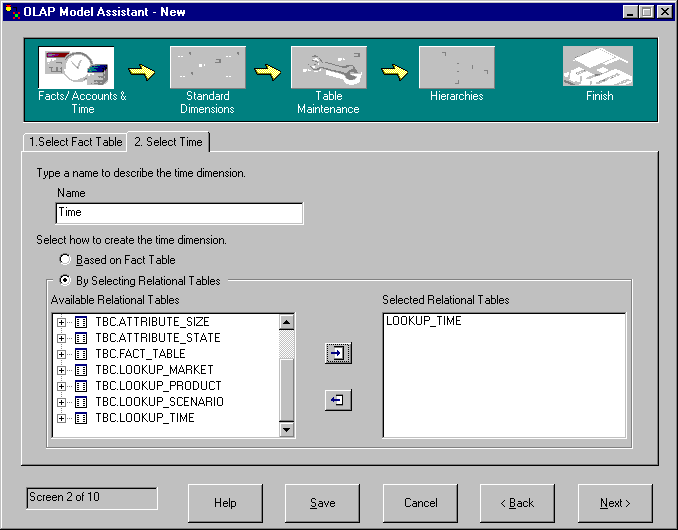
- Click Next and the Name Dimensions page is displayed.
In this exercise, you will create standard dimensions for
the model, and associate each standard dimension with a relational table that
contain the data for that dimension. The dimensions are:
- Scenario dimension
- Describes likely scenarios for analyzing data.
- Product dimension
- Describes the products in your business. In this tutorial, your
products are soft drinks.
- Market dimension
- Describes the markets in which you operate. For example, you can
organize your markets into regions and cities.
- On the Name Dimensions page, type Scenario in the
Name field and click Add to list. The dimension
is added to the Dimension List field.
- Follow the same process for the Product and Market dimensions. The
window now looks like this:
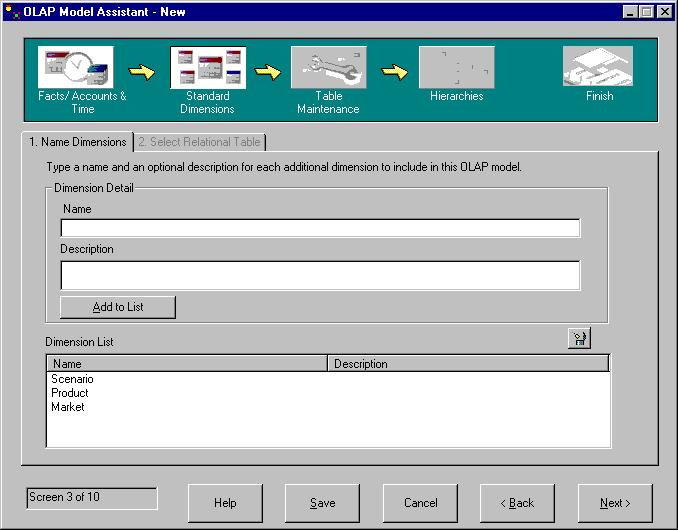
- Click Next and the Select Relational Tables page is
displayed.
On the Select Relational Tables page, you can associate one or more tables
with the dimensions you created. Each dimension must have at least one
table. The Accounts and Time dimensions are not listed because you have
already created them.
- In the Dimension List field, click the Scenario
dimension.
- Scroll down the Available Relational Tables list to the
TBC.LOOKUP_SCENARIO table. Select the table and click
the right arrow button next to the Primary Dimension Table field,
and the table is added to the field. The table is also added under the
Primary Table heading in the Dimension List
field.
If you wanted to associate additional tables for this dimension, you could
select the table and click the right arrow next to the Additional
Dimension Tables field. But for this lesson, do not add
additional tables.
- Follow the same process for the Product and Market dimensions. For
the Product dimension, use the TBC.LOOKUP_PRODUCT
table. For the Market dimension, use the
TBC.LOOKUP_MARKET table. The window looks like
this:
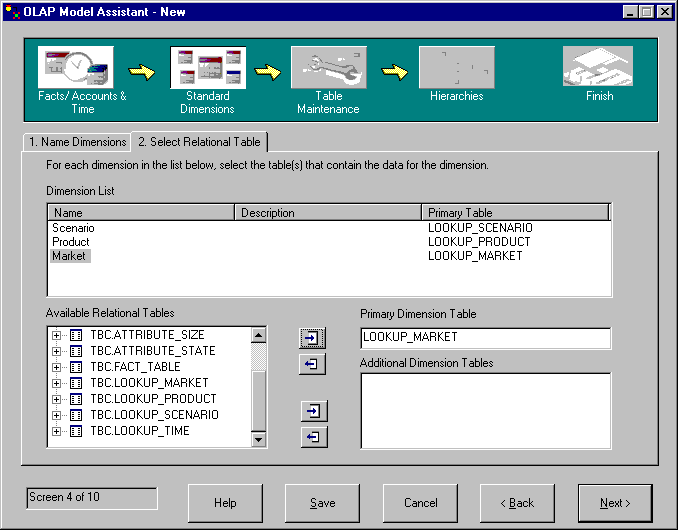
- Click Next and the Fact Table Joins page is displayed.
In this lesson, you selected a fact table and created the Accounts and
Time dimensions for your model. Then you created the Product, Market,
and Scenario dimensions.
[ Top of Page | Previous Page | Next Page ]