OLAP Spreadsheet Add-in User's Guide for 1-2-3
So far, you have seen how easy it is to
retrieve data and navigate through Hyperion Essbase Spreadsheet Add-in in an
ad hoc fashion. Hyperion Essbase also provides a query designer so that
you can define a database query for retrieving dimensions and database members
into the worksheet. Hyperion Essbase Query Designer (EQD) is a new
feature that replaces Retrieval Wizard, used to define queries in previous
versions of Hyperion Essbase Spreadsheet Add-in.
Before Hyperion Essbase actually retrieves data, Hyperion Essbase Query
Designer provides a series of panels so you can request the data that you want
to view in the worksheet. It is particularly helpful when you know
exactly which data you want to retrieve from the server. In addition,
you can save a query and use it again.
The Hyperion Essbase Query Designer window consists of the following
panels:
- The navigation panel provides access to the various features in Hyperion
Essbase Query Designer. You can display all the dimensions used in a
particular query and access the various properties of each dimension
member.
- The hint panel provides a brief description of the feature that is
selected from the navigation panel.
- The properties panel provides access to the following functions:
- Layout: Design the layout of the spreadsheet
report. To change the default layout, select a dimension tile and drag
it to one of the other dimension boxes. To access the member select
panel and to define a member for a query, double-click a dimension
tile.
- Member Select: Select members that you want to display in
the rows of the spreadsheet report. To select a member, right-click the
member, and select Add to Selection Rules. You can also double-click a
member to add it to the selection rules.
- Member Filter: Filter the member selection by attribute,
generation name, level name, pattern string, or UDA.
- Data Filter: Retrieve rows of data. The retrieval
is based on the ranking of the rows within certain columns. Use this
panel to access the data restriction panel.
- Data Restriction: Filter data by comparing it to a fixed
data value, a set of data values, or #Missing data values.
- Data Sort: Sort rows in ascending or descending
order. The sort is based on column data values.
- Messages and Confirmation: Turn on and turn off certain
messages from Hyperion Essbase Query Designer.
- Help: Access documentation about Hyperion Essbase Query
Designer.
To access any of the Hyperion Essbase Query Designer panels, select the
appropriate feature listed in the navigation panel.
As you create a query or make changes to an existing query, the changes are
reflected in the navigation panel. To view a dimension or a member of
an open query, click on the specific dimension or member in the query outline
that is displayed in the navigation panel. Selected members are
displayed in the member selection panel on the right.
You can also revise an existing query in the member selection panel.
For example, you can delete a member or add a member to the query by selecting
a member in the navigation panel and making the appropriate changes in the
properties panel.
| Note: | Files created in Retrieval Wizard can be opened in Hyperion Essbase Query
Designer. However, if a query contains more than two member filters per
selection rule or more than two data restrictions, the member filters may be
out of order. To ensure correct results, rearrange the member filters
in the navigation panel, if necessary. For complete information on
Hyperion Essbase Query Designer options, see the Hyperion Essbase Spreadsheet
Add-in online help.
|
Caution:
Manipulation of worksheets in VBA such as naming worksheets or moving
worksheets may not work when EQD is running.
To create a query using Hyperion Essbase Query Designer:
- Select Essbase > Query Designer.
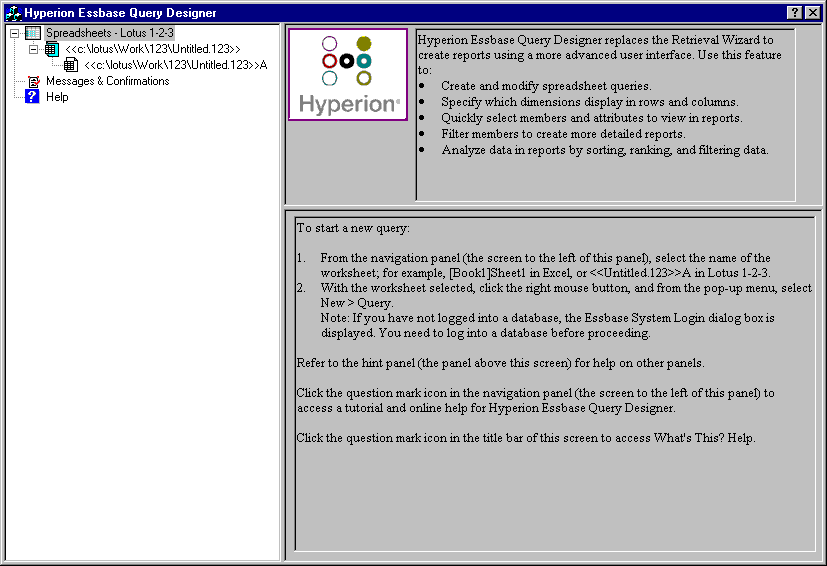
Hyperion Essbase displays the Hyperion Essbase Query Designer welcome
panel.
Figure 55. Hyperion Essbase Query Designer Displaying Welcome Panel
- To create a new query, select
<<c:\lotus\Work\123\Untitled.123>>A, right-click, and
select New > Query.
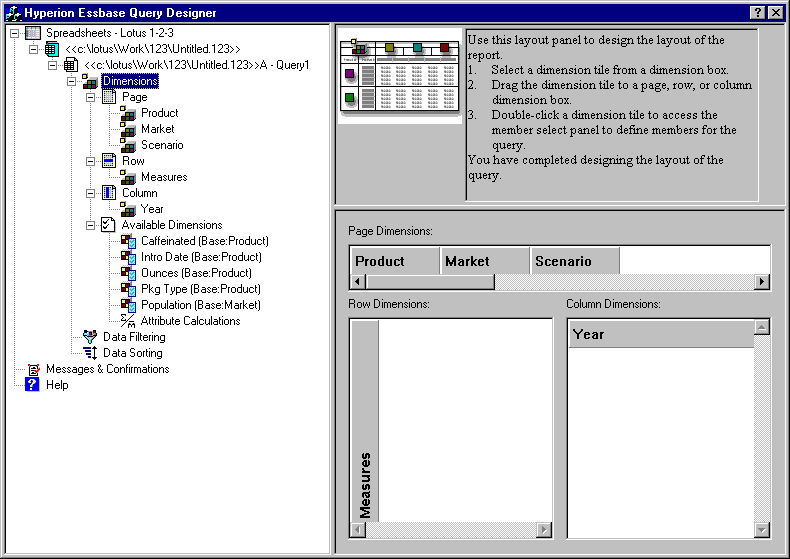
Hyperion Essbase displays the layout panel of Hyperion Essbase Query
Designer.
Figure 56. Hyperion Essbase Query Designer Displaying Layout Panel
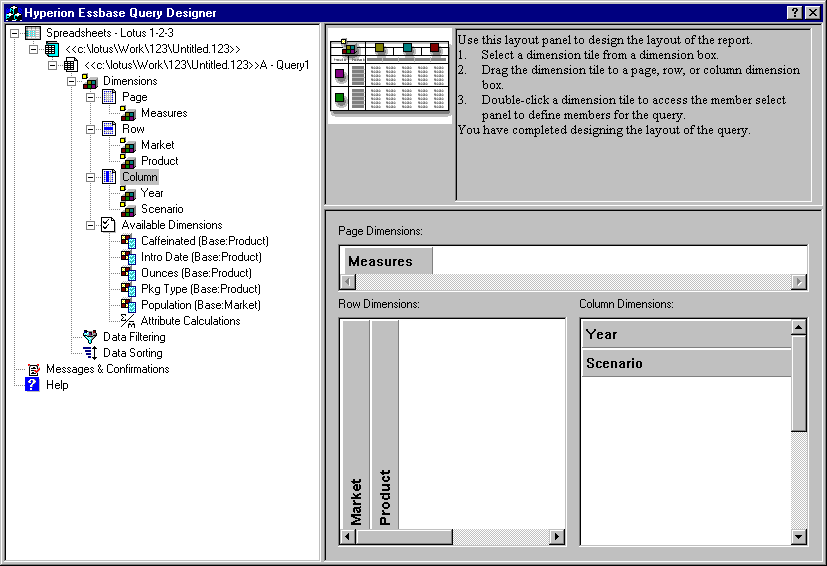
- Define the worksheet layout by dragging the dimension tiles as
follows:
- Drag Market and Product to the Row location.
- Drag Measures to the Page location.
- Drag Scenario below Year (in the Column location).
Figure 57. Changing the Worksheet Layout
- To select the Measures dimension in the navigation panel, click the
Measures icon. Alternatively, double-click the Measures tile in the
layout panel.
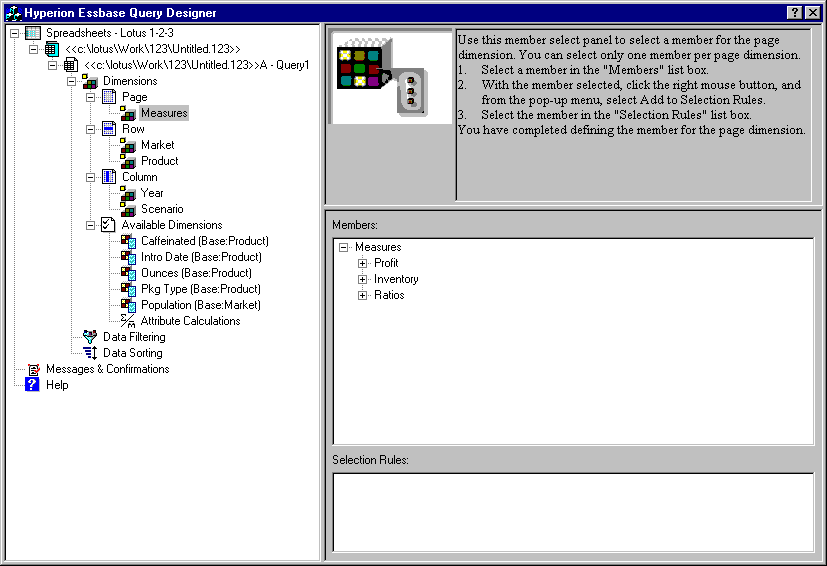
Hyperion Essbase displays the member select panel, where you can select a
member from the Measures dimension.
| Note: | You can select only one member from the dimension in the Page
location.
|
- Select Profit, right-click, and select Add to Selection Rules.
Alternatively, double-click Profit to add it to the selection rules.
Profit is displayed in the selection rules list.
Figure 58. Hyperion Essbase Query Designer Displaying the Member Select Panel
| Note: | In Hyperion Essbase Query Designer, after you make your selections, you do
not need to confirm them; for example, you do not have to click
OK. If you do not select members from any given dimension, Hyperion
Essbase uses the top member of the dimension.
|
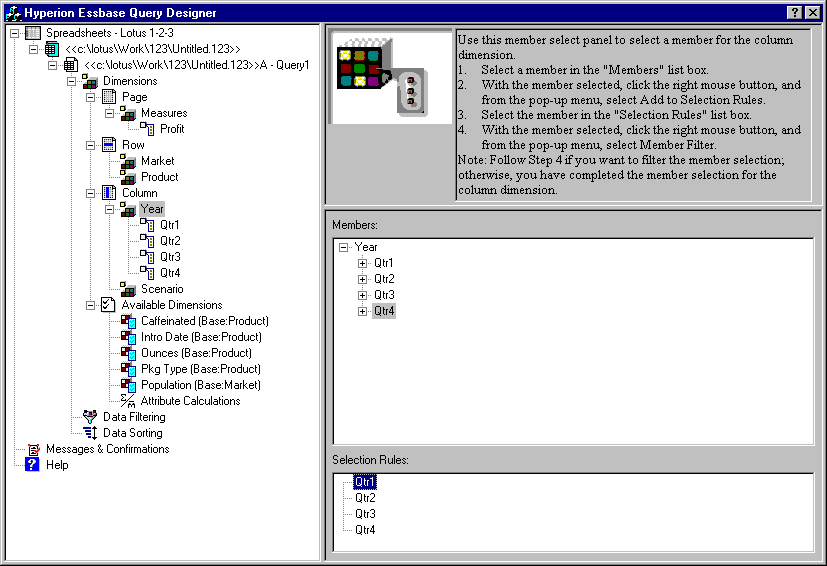
- To select members of the Year dimension, complete the following
actions:
- In the navigation panel, click the Year icon. Alternatively,
double-click the Year tile in the layout panel.
Hyperion Essbase displays the member select panel for the Year
dimension.
- Select Qtr1, right-click, and select Add to Selection Rules.
- Add Qtr2, Qtr3, and Qtr4 to the selection rules in the same manner.
Because Year is in a Column location, you can select one or more
members.
Figure 59. Adding Members to the Selection Rules
- To select members of the Scenario dimension, complete the following
actions:
- In the navigation panel, click Scenario. Alternatively,
double-click the Scenario tile in the layout panel.
The members of the Scenario dimension are displayed in the member select
panel.
- Select Actual, right-click, and select Add to Selection Rules.
Actual is added to the Selection Rules box.
- In the same manner, add Budget to the Selection Rules box.
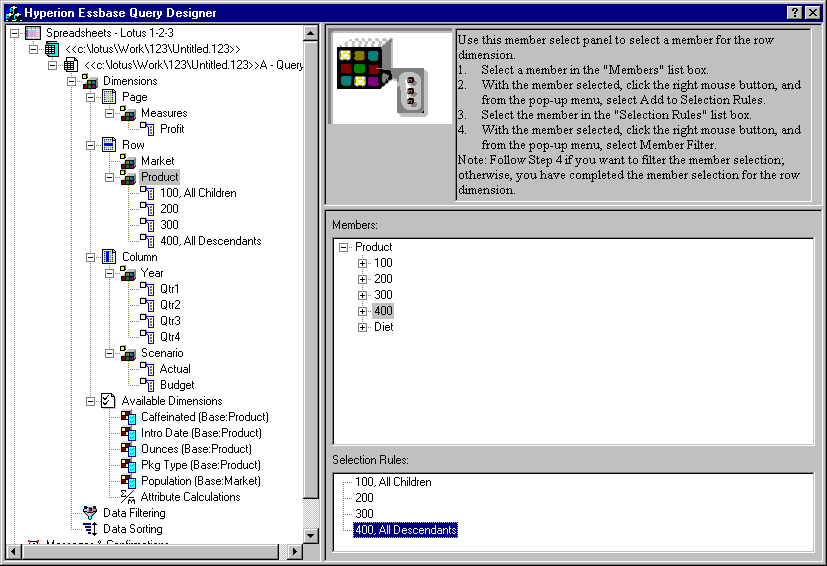
- To select members of the Product dimension, complete the following
actions:
- In the navigation panel, click Product. Alternatively, double-click
the Product tile in the layout panel.
The members of the Product dimension are displayed in the member select
panel.
- Select product code 100, right-click, and select Add to Selection
Rules.
- Repeat the process for product codes 200, 300, and 400.
- In the Selection Rules list box, select product code 100, right-click, and
then, from the popup menu, choose Select > Children.
This action selects all children of 100. Hyperion Essbase displays
All Children next to 100 in the Selection Rules list box.
- In the Selection Rules list box, select product code 400,
right-click, and choose Select > Descendants.
Hyperion Essbase displays All Descendants next to 400 in the Selection
Rules list box.
Figure 60. Selecting Members of Product
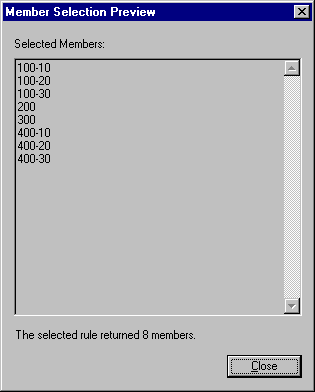
- To view the list of all product codes that will be retrieved into the
worksheet, select any of the entries in the Selection Rules list box (for
example, 200), right-click, and select Preview.
Hyperion Essbase displays the Member Selection Preview dialog
box.
Figure 61. Selected Members of Product Dimension
- Click Close to close the Member Selection Preview dialog
box.
- To select members of the Market dimension, complete the following
actions:
- In the navigation panel, click Market. Alternatively, double-click
the Market tile in the layout panel.
The members of the Market dimension are displayed in the member select
panel.
- In the Member list box, select East, right-click, and select
View by > Generation.
- To pick the second generation of the Market dimension, in the
Member list box, select Region, right-click, and select Add to
Selection Rules. Alternatively, double-click Region to add it to the
selection rules.
Region is displayed in the Selection Rules list box.
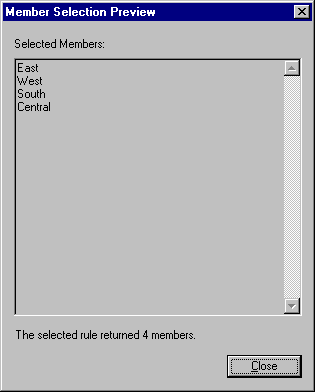
- To view the list of members that will be retrieved into the worksheet, in
the Selection Rules list box, select Region, right-click, and select
Preview.
Hyperion Essbase displays East, West, South, and Central in the Member
Selection Preview dialog box.
Figure 62. Generation Name Selection
- Click Close to close the Member Selection Preview dialog
box.
You have now defined a basic Hyperion Essbase query. The outline of
the query is displayed in the navigation panel.
- In the navigation panel, select
<<c:\lotus\Work\123\Untitled.123>>A - Query1, and then
right-click and select Save Query.
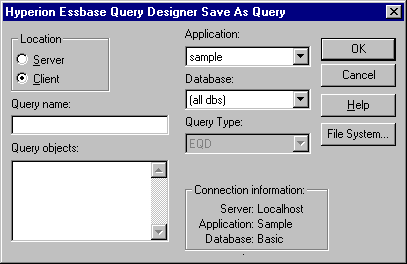
Hyperion Essbase displays the Hyperion Essbase Query Designer Save As
Query dialog box. You can save your query to the server or to
your own client machine. To save to the server, you must have a
security level of database designer or higher. Contact the Hyperion
Essbase system administrator for more information.
- Select Client.
Figure 63. Hyperion Essbase Query Designer Save As Query Dialog Box
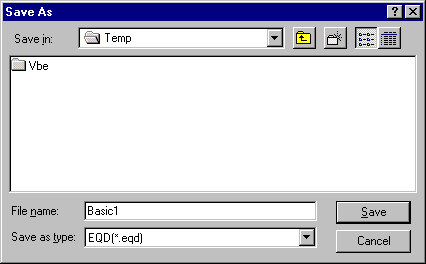
- Click the File System button.
Hyperion Essbase displays the Save As dialog box.
Figure 64. Save As Dialog Box
- Select a location, in the File nametext box, type
Basic1 and then click Save.
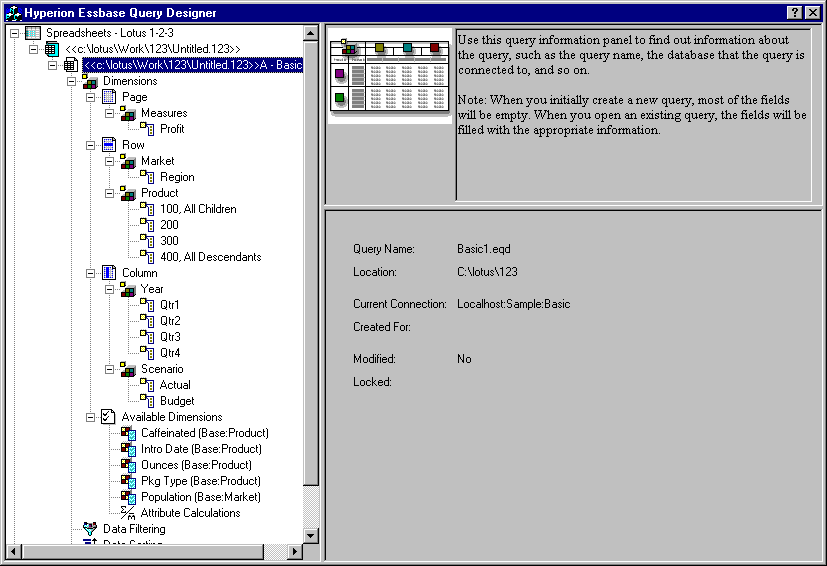
You will use the Basic1 query again in Chapter 3.
Figure 65. Hyperion Essbase Query Designer Displaying Query Information Panel
- In the navigation panel, select
<<c:\lotus\Work\123\Untitled.123>> A - Basic1, then
right-click, and select Apply Query.
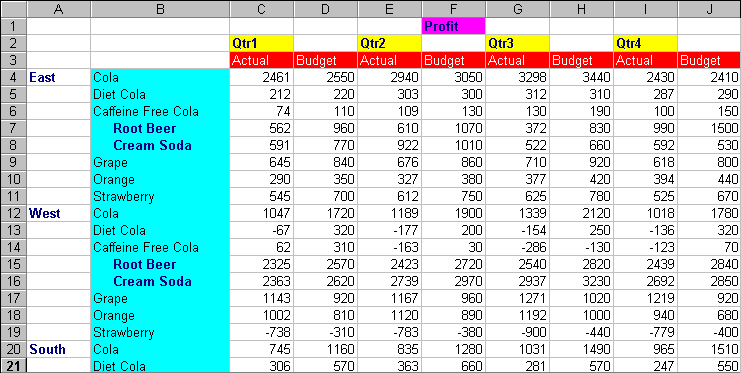
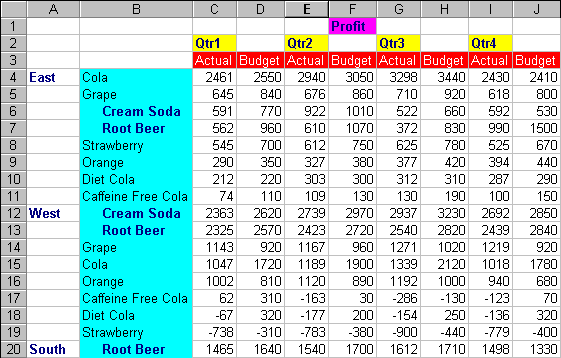
The result of the query is displayed in the worksheet.
Figure 66. Results of a Hyperion Essbase Query Designer Query
| Note: | In the Display tab under Essbase > Options, if you select UseUse
Styles and Use Sheet Options with Query Designer, the styles
you selected for dimension members will be applied to the initial query
results. If you do not select Use Sheet Options with Query Designer,
even if you have selected Use Styles, they will not be applied to the initial
query results. To apply styles, select Essbase > Retrieve. When
Hyperion Essbase returns the data to the worksheet, you are free to further
investigate the data by performing Zoom, Keep Only, Remove Only, and Pivot
operations.
|
You can delete a query only from the location where you saved that
query. For example, if you save a query in the
/essbase/client/sample directory, you can delete the query from
within the sample directory. You cannot delete the query
from within Hyperion Essbase Query Designer.
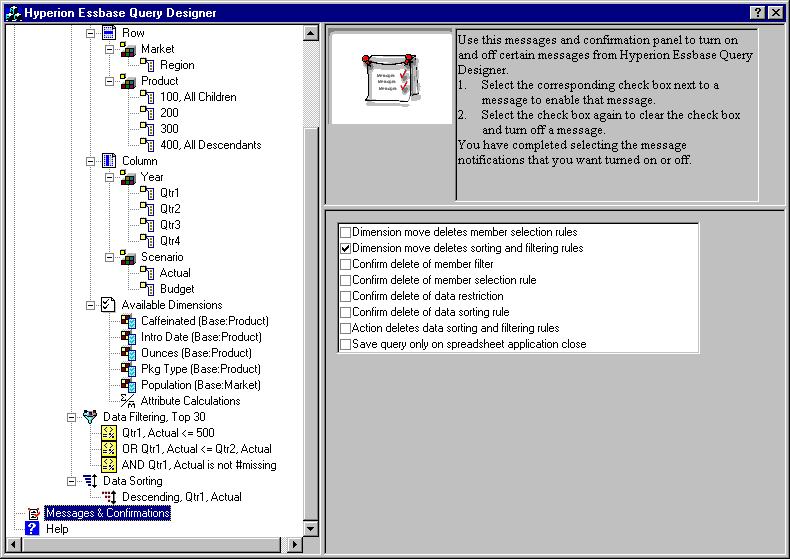
Hyperion Essbase Query Designer displays messages and confirmations about
certain actions, such as moves and deletes, in the messages and confirmations
panel.
To turn on or turn off messages and confirmations:
- Select the Messages and Confirmations icon in the navigation panel.
- To turn on (enable) a message, select the check box that is displayed next
to that message.
- To turn off (disable) a message, select the check box again (clear the
check box).
Figure 67. Messages and Confirmations Panel
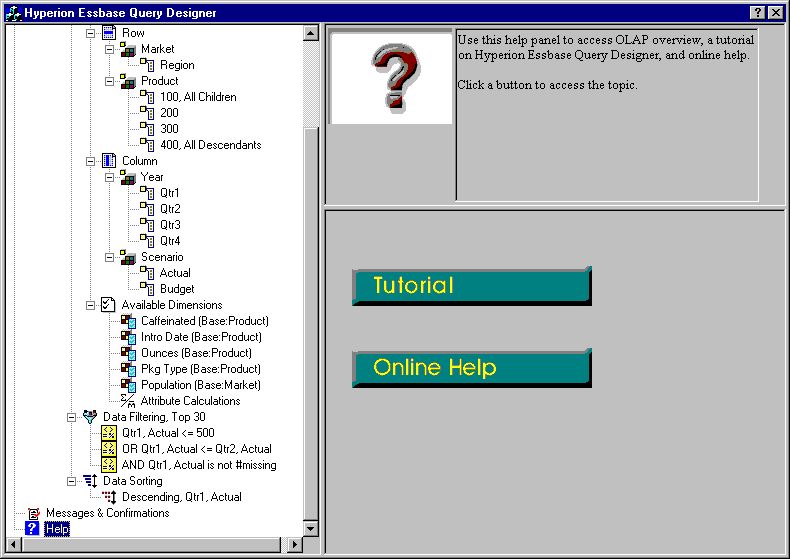
Access online help or the tutorial for Hyperion Essbase
Query Designer by using the help panel. To access the help panel, in
the navigation panel, select Help. For more information on a particular
topic, click the Online Help button in the properties panel. To access
the online tutorial, click the Tutorial button in the properties panel.
Figure 68. Hyperion Essbase Query Designer Help Panel
You can connect to several databases and create separate
queries on each database from Hyperion Essbase Query Designer.
To connect to multiple databases from Hyperion Essbase Query
Designer:
- Logon to Hyperion Essbase and connect to the server you want to
access.
- Select Essbase > Query Designer to open Hyperion Essbase Query
Designer.
- Select <<c:\lotus\Work\123\Untitled.123>>A,
right-click, and select Connect.
Hyperion Essbase displays the Essbase System Login dialog
box.
- Type your password, and click OK. Select Sample Basic, and click
OK.
- Select <<c:\lotus\Work\123\Untitled.123>>A,
right-click, and select New > Worksheet.
- Select the new worksheet,
<<c:\lotus\Work\123\Untitled.123>>B, right click, and
select Connect.
Hyperion Essbase displays the Essbase System Login dialog
box.
- Type your password, and click OK. Select Samppart Company, and
click OK.
| Note: | You are restricted to one connection per worksheet. The connection
information is displayed in the query information panel of the Hyperion
Essbase Query Designer only when you open an existing query or create a new
query.
|
- To create a new query based on Sample Basic, select
<<c:\lotus\Work\123\Untitled.123>>A, right click, and
select New > Query.
- To create a new query based on Samppart Company, select
<<c:\lotus\Work\123\Untitled.123>>B, right-click, and
select New > Query.
- To open an existing query, right click, and select Open Query.
You are now ready to proceed with the process of creating queries or
opening existing queries.
You can also apply any of the worksheet options you have
previously set from the Essbase Options dialog box to the results of a query
created in Hyperion Essbase Query Designer.
To enable Hyperion Essbase Query Designer to use your previously set
worksheet options:
- Select Essbase > Options.
- In the Essbase Options dialog box, select the Display tab.
- Select the Use Sheet Options with Query Designer check box, and select
OK.
- Select Essbase > Retrieve to refresh the worksheet.
Hyperion Essbase displays the results of the query you created in Hyperion
Essbase Query Designer and implements your previously set worksheet
options. For example, note that aliases, instead of the numeric codes,
are now displayed for the Product dimension.
Figure 69. Results of Query with Options Applied
- Select File > Close to close the worksheet. You do not need to save
the worksheet.
[ Top of Page | Previous Page | Next Page ]
