OLAP Spreadsheet Add-in User's Guide for Excel
The tutorial in A Basic Hyperion EssbaseTutorial describes how to perform basic data
retrieval and navigation tasks in Hyperion Essbase Spreadsheet Add-in.
This section walks you through performing the following advanced retrieval
tasks:
Remember that you can perform common data retrieval tasks in any of the
following ways:
- Selecting commands from the Essbase menu on the Excel menu bar
- Clicking the appropriate buttons on the Hyperion Essbase toolbar
- Double-clicking the primary or the right-mouse button in the appropriate
cell (for Retrieve, Zoom In, and Zoom Out commands only, and the Linked
Objects command, if you have enabled that option).
Despite the ease and speed with which you can navigate through large
Hyperion Essbase databases, it is not practical to use the capabilities of
Excel to filter and sort very large databases; however, Hyperion Essbase
OLAP Server includes powerful data filtering and sorting capabilities.
In A Basic Hyperion EssbaseTutorial, you learned to use Hyperion Essbase Query Designer to
define a dimensional layout and to select members to view. Hyperion
Essbase Query Designer also provides a powerful, yet easy-to-use tool to
define conditional retrievals.
To become familiar with the capabilities of Hyperion Essbase Query
Designer, work with the query, Basic1, that you saved in A Basic Hyperion EssbaseTutorial, and perform the following steps:
- Select Essbase > Query Designer.
Hyperion Essbase displays the query information panel of Hyperion Essbase
Query Designer.
- [Book1]Sheet1
- Right-click and select Open Query.
Hyperion Essbase displays the Open Query dialog box.
- From the location that you specified in A Basic Hyperion EssbaseTutorial", select the Basic1 file.
- Click OK.
The member selection, displayed in the properties panel, remains unaltered
from the last Hyperion Essbase Query Designer session.
- From the navigation panel, select Data Filtering.
Hyperion Essbase displays the data filter settings in the data filter
panel. The filter controls the number of data rows that are
retrieved. The number is based on the column criteria that you
define. You can define data filtering criteria on data values that
reside in one or more columns of the view.
Figure 90. Data Filter Panel
- The data filtering panel contains the following items:
- A check box for ranking so many of top rows or so many bottom rows of
data. You can select the highest or lowest rows. Your selection
is based on previously selected row dimension members. When using the
top or bottom criterion, you specify the number of rows, such as "top
10." The default is the top 25 rows.
- A Dimension being ranked list box to specify the dimension to which
ranking should be applied.
- A Column used for ranking list box to specify the data column on which
data values are based.
- A Data Restrictions box to specify standard data comparison operations,
such as greater than, less than, and equal to. You can apply the
comparison operator to data values in one or more data columns; you can
even apply criteria to compare values between two columns.
- Buttons for OR and AND operators. If you define more than one
column criterion, you can use these operators to link the criteria.
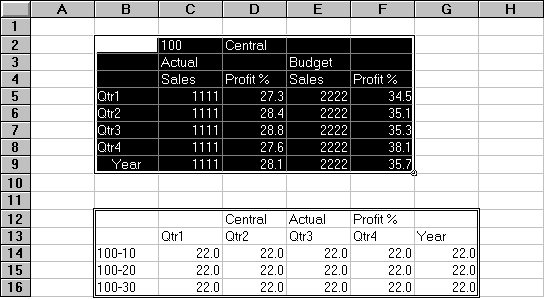
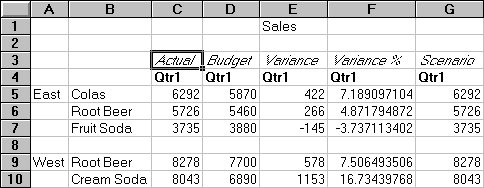
- Click the Top check box, and enter a value of 30 in the
Rows text box.
When you apply the query, Hyperion Essbase retrieves the top thirty rows of
the dimension.
- From the Dimension list box, select Product. Product is
the dimension to which ranking should be applied.
- From the Column list box, select Qtr1, Actual. Qtr1,
Actual is the column on which data values are based.
- In the navigation panel, select the Data Filtering icon.
Right-click and select Apply Query.
Your query results should look as shown below.
Figure 91. Data Filtering Query Results
You can further filter your data output by specifying data comparison
operations in the Data Restrictions box.
- In the navigation panel, select the Data Filtering icon.
The data filters that you specified are displayed in the properties
panel.
- In the Data Restrictions box, double-click.
The data restriction settings are displayed in the properties panel.
- Select the Value option and type 500 in the Value
box.
Observe that the is option in the Data list box
changed to =.
- Click the down arrow of the Data list box and select
<=.
- Select Qtr1, Actual in the Column list box.
- In the navigation panel, select the Data Filtering icon.
Right-click, and select Apply Query.
Notice that the query results now reflect only Actual and Budget data that
are less than or equal to 500.
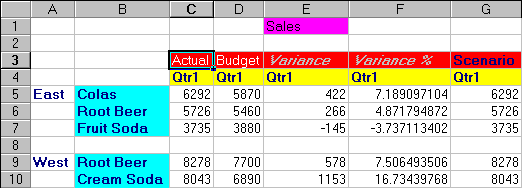
- In the navigation panel, select the Data Filtering icon to display the
data filter setting in the properties panel.
- In the Data Restrictions box, select Qtr1, Actual <= 500,
right-click and select New Data Restriction.
- In the Data box, click the down arrow and select <.
- In the data values list box, select Qtr2, Actual. Under
Combined With Other Restrictions, click the Or button.
- In the navigation panel, click the Data Filtering icon to access the data
filter panel.
- In the Data Restrictions box, double click to create a new data
restriction.
- In the Data box, click the down arrow and select Is Not.
- Click the button for the #Missing Value option.
This option instructs Hyperion Essbase to discard data that have #Missing
values.
- In the Column list box, select Qtr1, Actual. Under Combined
With Other Restrictions, select the And button.
The data restrictions should appear as follows:
Figure 92. Data Filtering
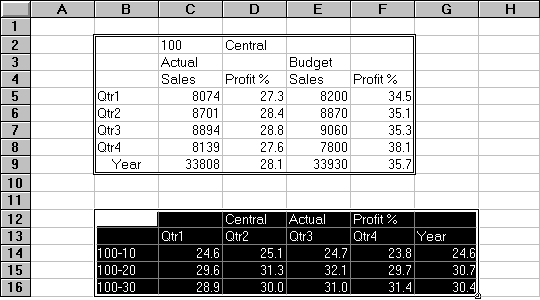
- Select the Data Filtering icon, right-click, and select Apply
Query.
Hyperion Essbase retrieves data for all the quarters. Notice that
the retrieved data for Qtr1, Actual is less than or equal to 500 or is less
than Qtr2, Actual. The results should appear as follows:
Figure 93. Data Filtering Results
| Note: | To delete all data restrictions, select the Data Filtering icon in the
navigation panel, right-click, and select Delete All Data Restrictions.
Alternatively, select any data restriction in the Data Restriction box,
right-click, and select Delete All Data Restrictions.
|
To delete a particular data restriction, select the data restriction in the
query outline, right-click, and select Delete Data Restriction.
Alternatively, select the data restriction in the Data Restriction box,
right-click, and select Delete Data Restriction.
Using the data sort panel, you can sort the output from
the Basic1 query in ascending or descending order.
- From the navigation panel, select the Data Sorting icon.
The data sorting settings are displayed in
the properties panel. You can specify data sorting criteria that affect
the order in which the selected rows are retrieved in the data sorting
panel.
The data sorting panel contains the following items:
- In the Column used for sort list box, double-click.
The selection defaults to Qtr1, Actual. The sort order defaults to
Ascending in the Ordering list box.
- Click Ascending. A down arrow is displayed next to
Ascending.
- Click the down arrow. Descending is displayed below
Ascending.
- In the Ordering list box, select Descending.
Figure 95. Specifying Data Sorting Order
- In the next row of the Column used for sort list box, double
click.
The selection defaults to Qtr1, Actual.
- Click the down arrow and select Qtr1, Budget.
Observe that the order in the Ordering list box has defaulted to
Ascending.
- In the navigation panel, under Data Sorting, select Ascending, Qtr1,
Budget. Right-click and select Delete Sorting Rule.
The Ascending, Qtr1, Budget sorting rule is deleted from the query.
- In the navigation panel, select the Data Sorting icon. Right-click
and select Apply Query.
Hyperion Essbase returns the results sorted in descending order for each
quarter, as shown below:
Figure 96. Result of Filtering and Sorting Data
| Note: | The values that you are ranking and sorting must be the same. For
example, you cannot specify Product in the Dimension being ranked box and
Market in the Dimension being sorted box. If you specify different
values, Hyperion Essbase Query Designer automatically changes both values to
the last specified value.
|
- To close the worksheet, select File > Close. You do not need to
save the worksheet.
When you retrieve data into a worksheet, the resulting report can be either
symmetric or asymmetric. Symmetric reports are
characterized by repeating identical groups of members. For example, Figure 96 shows a symmetric report that contains Actual and Budget
members nested below Year members (Qtr1, Qtr2, Qtr3, and Qtr4).
An asymmetric report is characterized by groups of nested members that
differ by at least one member. There can be a difference in the number
of members or in the names of members.
You can create asymmetric reports in one of the following ways:
- Enter member names into the worksheet in free-form retrieval mode.
- Use a drill action with the Within Selected Group option selected from the
Essbase Options dialog box (Zoom tab).
- Suppress rows that contain missing values, zero values, or underscore
characters during data retrievals.
If you retrieve data into an asymmetric report, Hyperion Essbase must
perform additional internal processing to maintain the asymmetric
layout. This processing may increase the retrieval time on large
reports. For more information regarding optimizing reports, see the
Hyperion Essbase Database Administrator's Guide, Volume II.
As part of the default Hyperion Essbase installation, Hyperion Essbase
provides a sample file, Asymm.xls, that illustrates how to
create asymmetric reports.
To view the sample file, Asymm.xls:
- Select File > Open.
- From the \essbase\client\sample directory, open the
Asymm.xls file.
Depending on how software is installed on your PC, the file may not be
available or may be located in a different directory. Contact the
Hyperion Essbase system administrator for more information.
Figure 97. Asymmetric Report
In Asymm.xls, row and column dimension groups are
asymmetric. Thus, the nested member groups from the Product dimension
differ in member content within respective markets. For example, Colas
and Fruit Soda are included in East but not in West. In addition,
Actual data is displayed for Qtr1, whereas Budget data is displayed for Qtr2,
Qtr3, and Qtr4. Also notice that the sample file displays styles for
members of the Scenario and Year dimensions.
- Leave the Asymm.xls file open for the next tutorial
task.
When you pivot a group of members in an asymmetric report, Hyperion Essbase
keeps only unique members from dimensions that are not involved in the
pivot.
To use the open Asymm.xls file to illustrate this
point:
- Using the right-mouse button, drag East to the cell below Qtr1.
Figure 98. Result of Pivoting in an Asymmetric Report
Hyperion Essbase combines the Product members into all unique
members. For example, Root Beer, which is displayed twice in Figure 97, is displayed only once in the current view.
Colas, which is displayed in only one market in Figure 97, now appears in East and West.
Hyperion Essbase also removes the blank line between Product row
groups. A pivot action always eliminates any rows or columns in which
all cells are empty.
- Close Asymm.xls without saving the changes.
In addition to providing flexible, ad hoc
retrievals, Hyperion Essbase supports retrieving data into formatted
worksheets. A worksheet can contain the following formats:
- Spaces between rows and columns
- Cell values that contain text or data that is not defined in the database
outline
- Member names in noncontiguous locations at the top of a worksheet
- Excel formulas (see also Preserving Formulas When Retrieving Data)
- Visual cues (styles)
After you format and save a worksheet, you may want to retrieve and
navigate through new data in the existing worksheet format. This
section provides the following information on working with formatted
worksheets:
Observe the following rules when retrieving data into a formatted
worksheet:
Rule 1
In the worksheet, no numeric cells can be located before the first Hyperion
Essbase data cell. For example, in Figure 99, the first Hyperion Essbase data cell is B6. Neither
any cell in rows 1 through 5 nor cell A6 can contain numeric values.
Also, these cells cannot contain formulas that resolve to numeric
values.
Rule 2
A cell that lies within a row or column of Hyperion Essbase data cannot
contain text or numeric values. For example, in Figure 99, the cells in columns B, C, D, and F and rows 6 through 9
and 11 through 14 cannot contain any nondata text or numbers, for such values
may be overwritten (or emptied) by the retrieved data. These cells can
contain formulas, however, if Formula Preservation options are used.
For more information on Formula Preservation options, see Preserving Formulas When Retrieving Data.
| Tip: | If you need to preserve text in a cell, define that text or value as an Excel
formula, and use the Formula Preservation options.
|
Rule 3
The Pivot command is not available when the Retain on Retrieval check box
is selected in the Essbase Options dialog box (Mode tab).
Rule 4
The Pivot command removes all cells that contain text other than database
member names.
As part of the default Hyperion Essbase installation,
Hyperion Essbase provides a sample file, P&l.xls, that
illustrates how to retrieve data into a formatted worksheet. The
P&l.xls sample file illustrates how to retrieve data
into a worksheet that contains formatted text, formulas, and protected
cells.
To view the P&l.xls worksheet:
- Select File > Open.
- From the \essbase\client\sample directory, open the
P&l.xls file.
Depending on how software is installed on your machine, the file may not be
available or may be located in a different directory. Contact the
Hyperion Essbase system administrator for more information.
Figure 99. A Sample Formatted Worksheet
- Select Essbase > Options and select the Display tab.
- In the Cells option group, make sure that Adjust
Columns is checked.
- Select the Mode tab.
- In the Formula Preservation group, select the Retain on
Retrieval check box to enable Formula Preservation mode.
| Note: | When Retain on Retrieval is enabled, there may be a slight delay in retrieval
time.
|
- Click OK.
By default, a Hyperion Essbase retrieval overwrites Excel formula with data
values in the retrieval area of a worksheet. The retrieval process also
eliminates formulas in cells outside the retrieval area. However, the
Retain on Retrieval option enables you to define retrievals that do
not overwrite formulas in any area of the worksheet.
- Select Essbase > Retrieve to update the worksheet with the latest data
values.
Hyperion Essbase determines that some text cells in the worksheet do not
correspond to database member names. When Hyperion Essbase is unable to
resolve text in the worksheet, the following message is displayed:
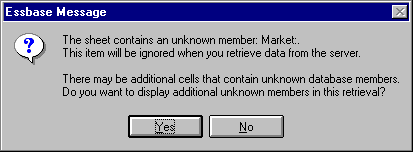
Figure 100. Hyperion Essbase Unknown Member Message
In this example, the first unknown member detected is Market: (in
cell A1). Hyperion Essbase does not recognize the colon (:) that
follows Market in the cell. If you click Yes, Hyperion Essbase displays
the next unknown member; if you click No, Hyperion Essbase continues with
the retrieval.
- Click No to close the dialog box and continue with the
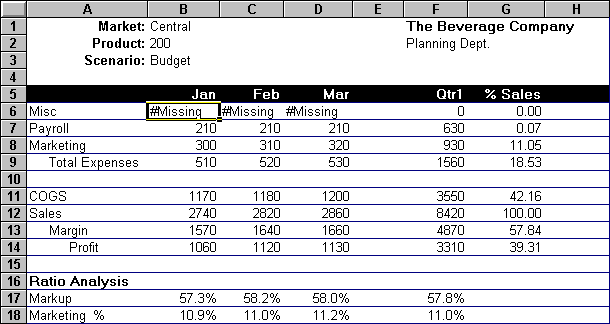
retrieval.
Hyperion Essbase retrieves new data but retains the formatting and formulas
in the worksheet.
Figure 101. Result of Retrieving on a Formatted Worksheet
- Close P&l.xls without saving it.
With the Pivot command, you can produce ad hoc reports in both formatted
and unformatted worksheets. However, a formatted worksheet may contain
labels and formulas that make the result of a pivot operation
ambiguous. The pivot is designed to compress and retain only the
database elements represented in the worksheet. The worksheet also
retains labels in areas that are not overwritten by pivoted data.
| Note: | Hyperion Essbase prevents pivot operations on worksheets that contain
formulas when Formula Preservation mode is active.
|
Inv.xls, a sample file installed as part of the Hyperion
Essbase installation process, illustrates how to pivot data in a
worksheet. It was saved with the Retain on Retrieval option disabled so
that you can pivot on its worksheets.
To view the Inv.xls worksheet:
- Select File > Open.
- From the \essbase\client\sample directory, open the
Inv.xls file.
Depending on how software is installed on your PC, the file may not be
available or may be located in a different directory. Contact the
Hyperion Essbase system administrator for more information.
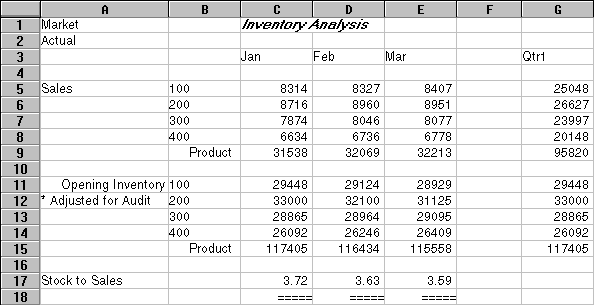
Figure 102. Formatted Worksheet Before Pivoting
- Select Essbase > Options and select the Global tab.
- In the Display Messages group, clear the Display Unknown
Memberscheck box to avoid seeing the Hyperion Essbase messages when
working with formatted worksheets.
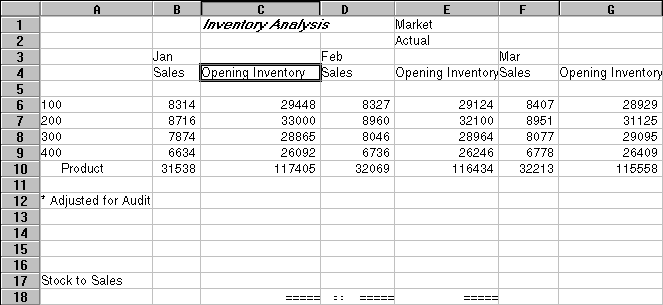
- Using the right-mouse button, drag Sales (in cell A5) to the cell nested
below Jan (C4).
Hyperion Essbase pivots the Sales member group so that it is nested below
the monthly members. However, during the pivot, Hyperion Essbase
retains only database elements. For example, all data for Stock to
Sales and Adjusted for Audit is deleted during the pivot.
Figure 103. Result of Pivoting on a Formatted Worksheet
- Close Inv.xls without saving it.
In Retrieving Data into Asymmetric Reports, you used the Retain on Retrieval option
to preserve formatting and formulas in an existing worksheet.
Collectively, the Formula Preservation options enables you to retain formulas
during data retrievals, keep and remove only operations, and drill
operations. In addition, Hyperion Essbase can replicate formulas for
additional members retrieved into the worksheet as part of a drilling
operation. This section steps you through using all of the Formula
Preservation options in a report that you create.
You must enable some options before you can enable other options.
Keep in mind the following guidelines and restrictions when using the Formula
Preservation options:
- On the Mode tab of the Essbase Options dialog box, you must have the
Advanced Interpretation option selected to enable Retain on Retrieval.
The Formula Preservation options do not work with free-form retrieval
mode.
- You must enable Retain on Retrieval to enable Retain on Keep and Remove
Only and Retain on Zooms.
- You must enable Retain on Zooms to enable Formula Fill.
- When you select the Retain on Retrieval check box, the Suppress #Missing
Rows and Zero Rows options on the Display tab become disabled.
Conversely, if you have either of the Display options selected, the Formula
Preservation options are automatically disabled.
- When you select the Retain on Zooms check box, the Remove Unselected
Groups option on the Zoom tab is disabled. When you enable the Remove
Unrelated Groups option, Retain on Zooms is automatically disabled.
- When Retain on Retrieval is enabled, there may be a slight delay in
retrieval time.
- As a general rule, insert a blank row as the last row in the formula range
to ensure that the cell range in the formula expands properly when you drill
down on members with Retain on Zooms enabled. For more information, see
the Hyperion Essbase Spreadsheet Add-in online help.
- Formula arrays are not supported in Hyperion Essbase Spreadsheet Add-in
when the preserve formula option is on. If you have formula arrays in
the worksheet, Hyperion Essbase does not preserve these types of
formulas.
To preserve formulas when retrieving or retaining data:
- To open a new worksheet, select File > New or click the

icon.
- Select Essbase > Retrieve.
- In cell A2, drill down (double-click) on Year.
- Press and hold the Alt key and, in cell E1, drill down (double-click) on
Scenario.
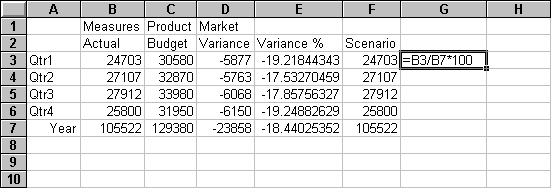
- Select cell G3 and enter the following formula in the cell:
=B3/B7*100
Figure 104. Entering an Excel Formula into a Cell
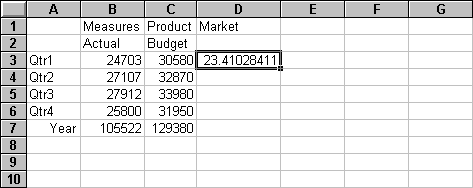
- Press Enter.
Excel calculates the formula that you entered in cell G3 and now reflects
Qtr1 as a percentage of Year.
Figure 105. Result of Excel Formula with Hyperion Essbase Data
- Select Essbase > Options and select the Mode tab.
- In the Formula Preservation area, select the check boxes for Retain on
Retrieval and Retain on Keep and Remove Only. Click OK.
- In cells D2, E2, and F2, respectively, select Variance, %Variance, and
Scenario.
- Select Essbase > Remove Only.
Hyperion Essbase removes the selected columns but retains the Excel formula
that you entered, keeping it with the retained dataset.
Figure 106. Result of Removing Columns with Retain on Keep or Remove Only Enabled
- Select Essbase > Options and select the Mode tab.
- In the Formula Preservation area, click the box for Retain on
Zooms and click OK.
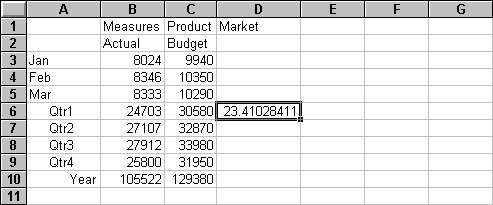
- In cell A3, drill down (double-click) on Qtr1.
Hyperion Essbase drills down on Qtr1 and moves the formula down with the
Qtr1 member.
Figure 107. Result of Drilling Down with Retain on Zooms Enabled
- Select Essbase > FlashBack.
- Select Essbase > Options and select the Mode tab.
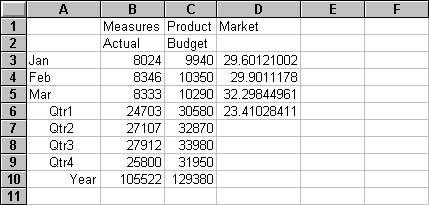
- In the Formula Preservation area, select the Formula Fillcheck
box. Click OK.
- In cell A3, drill down (double-click) on Qtr1.
Hyperion Essbase drills down on Qtr1 and replicates the formula for each
member of Qtr1 (Jan, Feb, and Mar). To view the replicated formulas,
click in cells D3, D4, D5, and D6 and look at the new syntax in the Excel
formula bar.
Figure 108. Result of Drilling Down with Formula Fill Enabled
- Before moving on with the tutorial, complete each of the following
actions:
- Select Essbase > Options and select the Mode tab.
- Clear all of the Formula Preservation options.
- Select File > Close to close the worksheet. You do not need to save
the worksheet.
In a typical Excel worksheet, you can select a range of cells by dragging
the mouse across the worksheet. You can also select a range of cells
and tell Hyperion Essbase to restrict the data retrieval to the selected range
in the worksheet. Retrieving a range of data is particularly useful in
the following situations:
- A worksheet contains multiple reports.
- A worksheet contains extraneous information that is not supported in a
formatted report retrieval.
- You need to retrieve only a small subset of values from the server, thus
dramatically decreasing retrieval time for large datasets.
- You need to retrieve data to an area of the worksheet other than the first
column.
As part of the default Hyperion Essbase installation, Hyperion Essbase
provides a sample file, Profit.xls, that illustrates how to
retrieve a range of data.
To view the Profit.xls file:
- Select File > Open.
- From the \essbase\client\sample directory, open the
Profit.xls file.
Depending on how software is installed on your PC, the file may not be
available or may be located in a different directory. Contact the
Hyperion Essbase system administrator for more information.
Profit.xls has already selected a range of cells (B2
through F9) for you.
Figure 109. Selected Range of Cells for Retrieval
- Select Essbase > Retrieve to update the selected range.
Figure 110. Figure 112. Result of Retrieving First Range of Data
Hyperion Essbase updates only the data in the selected range of
cells.
- Select cells B12 through G16.
Figure 111. Figure 113. Selecting Cells for Retrieval
- Select Essbase > Retrieve once again to update the selected range.
Hyperion Essbase updates the data in the selected range.
Figure 112. Result of Retrieving Second Range of Data
- Close Profit.xls without saving it.
The Hyperion Essbase cell retrieve function, EssCell, retrieves
a single database value into a worksheet cell. Enter an EssCell
function directly into a worksheet or select an EssCell function from the
Excel menu bar.
| Note: | You must be connected to a database to use EssCell.
|
EssCell retrieves data when you perform a Hyperion Essbase retrieval or
when you recalculate a worksheet through Excel. As part of the default
Hyperion Essbase installation, Hyperion Essbase provides a sample file,
Summary.xls. This file has EssCell functions already
set in cells B16 and B17.
To view the Summary.xls file:
- Select File > Open.
- From the \essbase\client\sample directory, open the
Summary.xls. file.
Depending on how software is installed on your PC, the file may not be
available or may be located in a different directory. Contact the
Hyperion Essbase system administrator for more information.
Figure 113. Worksheet Containing EssCell Functions
Cells B16 and B17 in Summary.xls contain the EssCell
function. If you select either of these cells, you can view the syntax
for the EssCell function in the Excel formula bar at the top of the
worksheet.
The EssCell function is defined in a cell as follows:
mbrList is one of the following:
- A null value. If the parameters of the function are
empty, Hyperion Essbase returns the data value from the top of each
dimension.
- A comma-delimited list of member names. Member names
must be enclosed in double quotes, with only one member per dimension
allowed. If you list no members from a particular dimension, the
function returns the data value from the top member of the unspecified
dimension. Furthermore, you can include aliases in the member list,
subject to the same rules as member names.
- An Excel cell reference. The reference must point to a
cell that contains a valid member name. Member names, such as 200 and
300-10, need to be formatted as text cells, rather than numeric cells.
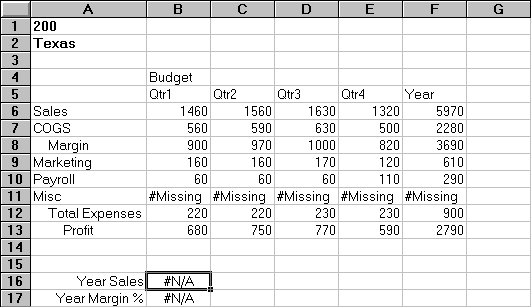
For example, the syntax for the EssCell function in cell B16 in the
Summary.xls file is the following:
| =EssCell("Sales", A1, A2, B4, F5)
|
When you open the worksheet, the values in these cells are #N/A. To
update the values with the data in your database, you must perform a retrieval
from Hyperion Essbase.
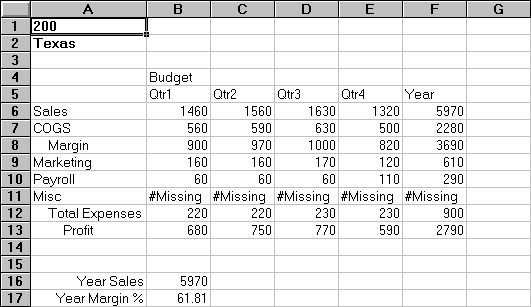
- Select Essbase > Retrieve.
Hyperion Essbase calculates the EssCell functions in cells B16 and
B17.
Figure 114. Retrieval on a Worksheet Containing the EssCell Function
Now update the EssCell functions to retrieve data for a different
state.
- Change the contents of cell A2 from Texas to Florida.
The values in cells B16 and B17 are updated as soon as you update the
cell. The update occurs because Excel has recalculated the worksheet
(if you have configured Excel to calculate changes automatically). The
remaining data cells do not change. To completely update the worksheet,
you must retrieve data from the server.
Figure 115. Updating the EssCell Function
| Note: | If the worksheet contains many EssCell functions, change Excel to manual
calculation mode. This change prevents the cell retrieve from
calculating until you retrieve data or calculate the worksheet
manually. For more information, see the Microsoft Excel
documentation.
|
- Select Essbase > Retrieve to update the report.
Hyperion Essbase returns an error message if EssCell is
unsuccessful. The following table lists messages that Hyperion Essbase
displays in the EssCell cell and explains the conditions that cause the
messages:
| Message
| Reason
|
| #N/A
| The worksheet is not connected to a database.
|
| #VALUE!
| A member name in the list or reference is invalid.
|
| #NAME?
| A text name in the function does not contain double quotation
marks.
|
- Close Summary.xls without saving it.
The sample file that you used for this tutorial task already had EssCell
functions defined. To enter your own EssCell function into a worksheet,
you do the following:
- From the Excel menu bar, select Insert > Function.
- From the Function Category list, select Essbase Add-in.
The Excel Function Wizard steps you through defining the EssCell
function.
|
| Note: | For more information on EssCell functions, see the Hyperion Essbase
Spreadsheet Add-in online help.
|
Dynamic calculation members are database members that are
excluded from the batch calculation process, thus shortening the regular
database calculation time. The Hyperion Essbase Application Designer
tags dynamic calculation members in the database outline so that Hyperion
Essbase knows not to calculate those members until a data retrieval requests
them. This process is referred to as dynamic calculation.
Dynamically calculating database members benefits the Hyperion Essbase server
in the following ways:
- Reduced disk usage
- Reduced database restructuring time
- Reduced time to back up the database
Database values that Hyperion Essbase calculates dynamically take slightly
longer to retrieve in Hyperion Essbase Spreadsheet Add-in because Hyperion
Essbase must perform calculations before retrieving data into the
worksheet. For more information on dynamic calculation, see the
Hyperion Essbase Database Administrator's Guide.
| Tip: | Enable the Navigate Without Data feature while you arrange the spreadsheet
report so that Hyperion Essbase does not dynamically calculate the database
when you are creating the report. For more information on the Navigate
Without Data feature, see Navigating Through the Worksheet Without Retrieving Data.
|
Because there may be a performance impact on retrieving data for dynamic
calculation members, define visual cues, or styles, for these members so that
you can identify them in Hyperion Essbase Spreadsheet Add-in.
To illustrate how to use Dynamic Calculation members, use the
Asymm.xls file.
To view the Asymn.xls file:
- Select File > Open.
- From the \essbase\client\sample directory, open the
Asymm.xls file.
- Drill up on Actual by double-clicking the right-mouse button in cell
C3.
- In cell C3, drill down on Scenario to display all members of
Scenario.
Hyperion Essbase displays only the Scenario members for Qtr1.
Figure 116. Displaying Scenario Members
- Select Essbase > Options and select the Style tab.
| Note: | You must be connected to the Sample Basic database to display the Style
tab. For more information on connecting to a database, see Connecting to a Database.
|
- In the Members group, scroll down until you see Dynamic
Calculations.
- Select the Dynamic Calculations check box and click the
Format button.
- In the Font style list, select Bold Italic.
- In the Color list, select Gray.
- Click OK and then select the Display tab.
- In the Cells option group, click Use Styles.
Click OK.
- Select Essbase > Retrieve.
Hyperion Essbase displays the data and applies all the visual cues, or
styles, that you set, including the newly set styles for dynamic calculation
members and the styles you set in A Basic Hyperion EssbaseTutorial. You can tell that the columns for Variance and
Variance% are dynamically calculated because Hyperion Essbase displays these
members in gray, bold, italicized font. (Variance and Variance% also
have a red background because that style was previously set for all members of
the Scenario dimension.)
Figure 117. Result of Retrieving Dynamic Calculation Members
| Note: | Occasionally, other styles you have set may override a style for dynamic
calculation members. For example, if a parent member is also a dynamic
calculation member, and if you have styles set for both parent and dynamic
calculations, the style for the parent member overrides the style for the
dynamic calculation member. In this case, you need to remove the style
for parent members in order to see the style for dynamic calculation
members. For more information on the precedence of styles, see Determining the Precedence of Overlapping Styles"Determining the Precedence of Overlapping
Styles" on page 88.
|
- Close the Asymm.xls file without saving it.
Dynamic Time Series members are predefined database members that
are used in dynamic, to-date reporting, such as year-to-date or month-to-date
values. Dynamic Time Series members do not appear as individual members
in the database outline; instead, they correspond to a generation name
that uses a key term for time, such as year, month, or day.
For example, in the Sample Basic database, a generation name called Quarter
was created for generation 2 in the Year dimension. Generation 2
includes the members for Qtr1, Qtr2, Qtr3, and Qtr4. When the
generation name Quarter was created, Hyperion Essbase created a Dynamic Time
Series member called Q-T-D, or quarter-to-date.
To take advantage of Dynamic Time Series in Hyperion Essbase Spreadsheet
Add-in, choose the latest time period for which you want data in a to-date
calculation. The calculated value of the Dynamic Time Series member is
derived when you define the latest time period to be reported. In the
Sample Basic database, for example, the level 0 members of the Year dimension
are the months of the year: Jan, Feb, Mar, and so on. If the
current month is August, and you want to know the sales data for the quarter
up to the current month, a quarter-to-date calculation gives you the sales
data for the months of July and August.
To illustrate the concept of Dynamic Time Series:
- To open a new worksheet, select File > New or click the New Worksheet
icon.
- Select Essbase > Options and select the Zoom tab.
- In the Zoom In option group, select Next Level.
- Clear the Within Selected Group check box and click OK.
- Select Essbase > Retrieve.
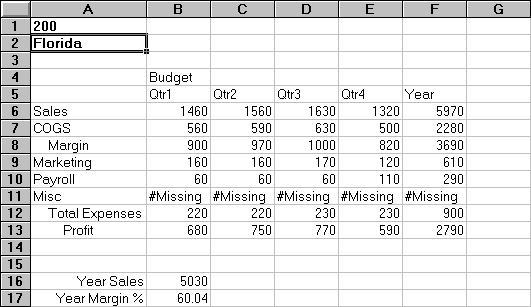
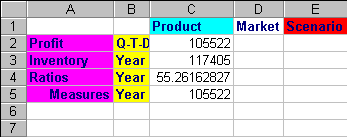
- In cell B1, drill down (double-click) on Measures.
- In cell B2, click Year.
- Type Q-T-D in cell B2 and press Enter to enter a predefined
Dynamic Time Series member (Q-T-D):
Figure 118. Entering a Dynamic Time Series Member into a Worksheet
| Note: | For a list of other possible Dynamic Time Series members, see the Hyperion
Essbase Spreadsheet Add-in online help.
|
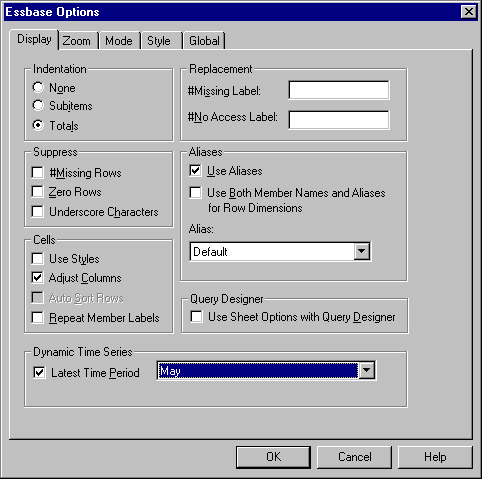
- Select Essbase > Options and select the Display tab.
- In the Dynamic Time Series area, select the Latest Time Period check
box.
- From the list box, select May. Click OK.
Figure 119. Specifying Latest Time Period in a Dynamic Time Series
| Note: | If you do not specify a latest time period, Hyperion Essbase uses the first
level 0 member (Jan) as the default.
|
- Select Essbase > Retrieve.
| Note: | The Retrieve & Lock, Zoom In, and Zoom Out commands are not supported
with Dynamic Time Series members.
|
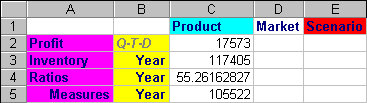
Hyperion Essbase displays data for the Q-T-D member. The data values
in the worksheet are the aggregated values for April and May, because May is
the month you specified as the latest month in the quarter-to-date Dynamic
Time Series.
Figure 120. Result of Specifying Latest Time Period in a Dynamic Time Series
- To close the worksheet, select File > Close. You do not need to
save the worksheet.
| Note: | You can also create a report like the one shown above by simply typing the
name of the Dynamic Time Series member followed by the name of latest time
period in parentheses: for example, Q-T-D (May). If you are using
free-form retrieval mode, you must enter the Dynamic Time Series member and
the latest time period in separate, adjacent cells. You can also select
a Dynamic Time Series member and a latest time period through Hyperion Essbase
Query Designer or through Member Selection.
|
| Note: | For more information on Dynamic Time Series, see the Hyperion Essbase
Spreadsheet Add-in online help.
|
The Hyperion Essbase application designer uses substitution variables to
define global variables to represent values that are specific to Hyperion
Essbase. For example, Latest can be a substitution variable
representing the latest time period in a Dynamic Time Series. Using
Hyperion Essbase Application Manager, Application Designer sets substitution
variables and their corresponding values for a specific application.
Hyperion Essbase stores these variables and their values on the Hyperion
Essbase server. You can take advantage of the predefined substitution
variables in Hyperion Essbase Spreadsheet Add-in during Dynamic Time Series
reporting.
For example, say the application designer sets a substitution variable on
the server for the current month. The variable is called CurMnth and
has a value of August. If you use the substitution variable in the
worksheet, a retrieval returns values for August, because August is set as the
current month on the server. If, at a later date, the application
designer changes the value of the CurMnth substitution variable to October, a
retrieval returns data for October.
The Sample Basic database you are using for this tutorial does not contain
predefined substitution variables. If the application designer had set
a substitution variable in the database you are using, you could enter a
substitution variable directly into a worksheet. For example, you could
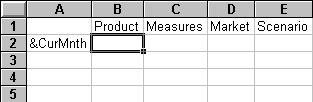
open a blank worksheet and type member names as follows:
Figure 121. Entering a Substitution Variable in a Worksheet
| Note: | Notice the substitution variable (CurMnth) in cell A2. When you enter
a substitution variable directly into a cell, you must precede it with an
ampersand (&).
|
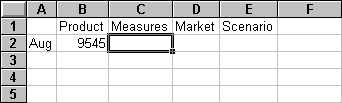
In this example, a retrieval produces the following results:
Figure 122. Result of Retrieval on a Substitution Variable
Hyperion Essbase queries the server for the value of the substitution
variable CurMnth, which is August. Data is returned only for
August.
| Note: | If you save a worksheet containing a substitution variable as a template,
make sure that you save the worksheet before you retrieve
data. For example, if you save the worksheet shown in Figure 122 as a template, each time you retrieve the template,
August rather than the substitution variable CurMnth is displayed.
|
So far, you have learned how to retrieve Hyperion Essbase data into a
worksheet through ad hoc retrieval, Hyperion Essbase Query Designer queries,
and Member Selection operations. In addition to these retrieval
methods, Hyperion Essbase supports free-form reporting.
Free-form reporting enables you to tell Hyperion Essbase specifically what you
want to retrieve by simply typing data into the worksheet. Free-form
reporting is especially useful when you are familiar with the dimensions and
members in the database outline.
Hyperion Essbase provides two different retrieval modes for free-form
reporting:
- Advanced Interpretation
- Free-Form
In both retrieval modes, enter member names directly into the
worksheet. The following sections describe the similarities and
differences between the two modes.
The Hyperion Essbase server contains an
advanced spreadsheet interpretation engine that scans a worksheet and
interprets its content when fulfilling retrieval requests. When you
construct a report by entering names directly into a worksheet in Advanced
Interpretation retrieval mode, Hyperion Essbase interprets the member names
and creates a default view that is based on the location of the labels.
Keep in mind the following guidelines when you are working in Advanced
Interpretation mode:
- Precede all member names that consist of numbers with a single quotation
mark. For example, for Product dimension member 100, type '100 in
the worksheet.
- If you define a report that does not contain all of the database
dimensions, you may need to enter a dummy value, such as 0, in the first data
cell. Hyperion Essbase overwrites this value with the contents of the
database cell upon retrieval. Be sure to use a numeric value as the
dummy value.
To construct a free-form report in Advanced Interpretation retrieval
mode:
- To open a new worksheet, select File > New or click the
icon.
- Select Essbase > Options and select the Mode tab.
- In the Retrieval option group, select Advanced
Interpretation(the default setting) and click OK.
- Enter member names and data as in the following illustration.
| Note: | If a member name consists of a number, such as 100, you must precede the
member name with a single quotation mark (for example, '100). This
rule also applies to member names with spaces between words.
|
Figure 123. Creating a New Free-Form Report
- Select Essbase > Retrieve or double-click in a data cell.
Hyperion Essbase retrieves data for the members you entered into the
free-form report and implements the Use Aliasesoption that you set
in the Essbase Options dialog box in the beginning of this
chapter.
Figure 124. Retrieving Data into a Free-Form Report
Now define a free-form report that does not contain all of the dimensions
from the database. In Advanced Interpretation mode, you may need to
enter a dummy data value, such as 0, into the first Hyperion Essbase data cell
to tell Hyperion Essbase where the data starts in the worksheet. Be
sure to use a numeric value as the dummy value.
For example:
- Select Essbase > FlashBack.
- Delete cells A1, B1, and C1.
- In cell B4, type 0 in cell B4 to provide Hyperion Essbase with a data cell
reference point.
Figure 125. Defining a Free-Form Report Without All Dimensions
- Select Essbase > Retrieve.
Hyperion Essbase adds the dimensions that were omitted from the free-form
report to the worksheet and retrieves data.
Figure 126. Retrieval in a Free-Form Report Without all Dimensions
- Select File > Close to close the worksheet. You do not need to save
the worksheet.
Similar to Advanced Interpretation mode, Free-Form mode enables you to
enter member names into any location in a worksheet and then interprets the
contents of the worksheet when fulfilling the retrieval request. In
addition, with Free-Form mode, you can use Hyperion Essbase report script
commands to retrieve data into a worksheet.
Report script commands are most useful for defining member references that
can bring back the most current member information dynamically. For
example, if you need to create a report that shows every product, including
the products added since the last retrieval, standard retrieval mode reflects
changes only when you zoom in on the product. If you use the report
script command <IDESCENDANTS, Hyperion Essbase retrieves all
descendants of a specified member, including the specified member. For
more information on the syntax of report script commands and on guidelines for
developing reports, see the online Technical Reference and the Hyperion Essbase Database Administrator's Guide.
Keep in mind the following guidelines when working in Free-Form retrieval
mode:
- You must precede all member names that consist of numbers with a single
quotation mark. For example, for the Product dimension member 100, you
need to type '100 in the worksheet.
- You cannot cancel a retrieve in Free-Form mode.
- You cannot apply Hyperion Essbase styles in Free-Form mode.
- Hyperion Essbase removes blank rows and columns on any retrieval
action.
- Do not use Report Writer formatting commands, such as {BRACKETS},
{DECIMAL}, and {EUROPEAN} in Free-Form mode, because they are incompatible
with Excel's formatting features.
- When you are in Free-Form mode, an Auto Sort Rows option is enabled in the
Display tab of the Essbase Options dialog box. If you select this
feature, Hyperion Essbase retrieves data in symmetric rows. The rows
are sorted according to the order specified in the database outline.
- Not all Formula Preservation and Modes options (Essbase Options dialog
box, Mode tab) are available in Free-Form mode.
- To use Dynamic Time Series in Free-Form mode, do not put the Dynamic Time
Series member and the latest time period (for example, Q-T-D (Feb)) in the
same cell. You need to type the Dynamic Time Series member, Q-T-D in
one cell, and the latest time period within parentheses, (Feb), in a separate,
adjacent cell.
To construct a free-form report in Free-Form retrieval mode:
- To open a new worksheet, select File > New or click the
icon.
- Select Essbase > Options and select the Mode tab.
- In the Retrieval option group, select Free Form.
- Select the Display tab.
- In the Cells option group, select Auto Sort Rows. Click
OK.
- Enter the member names into the worksheet as shown in Figure 127:
Figure 127. Typing Member Names In a Free-Form Report
- Select Essbase > Retrieve.
Hyperion Essbase retrieves data for the members and creates a default view
according to the location of the labels. Note that three members were
pivoted from row groups to column groups.
Figure 128. Result of Retrieving in Free-Form Retrieval Mode
- Select File > Close to close the worksheet. You do not need to save
the worksheet.
Now create a report by entering member names and a report script
command:
- To open a new worksheet, select File > New or click the
icon.
- Enter the member names into the blank worksheet as shown in Figure
3-46.
Figure 129. Typing Member Names in a Free-Form Report
- In cell A3, type <IDESCENDANTS Product.
Press Enter.
Figure 130. Typing a Report Script Command in a Free-Form Report
- Select Essbase > Retrieve.
Hyperion Essbase retrieves data into the worksheet for all descendants of
Product and for the members you entered in the worksheet.
Figure 131. Result of a Retrieve with a Report Script Command
| Note: | When Hyperion Essbase completes the retrieval, the report script command is
overwritten by the data it returns. You can use FlashBack to restore
the previous view in Free-Form mode.
|
- Select File > Close to close the worksheet. You do not need to save
the worksheet.
Hyperion Essbase enables you to retrieve data selectively
by specifying attributes that are associated with a base dimension. For
example, in the Sample Basic database, the Product base dimension is
associated with attributes such as packaging and size. You can enter an
attribute name into the worksheet to retrieve data that is associated with
that attribute.
To use attributes in a free-form report:
- To open a new worksheet, select File > New or click the
icon.
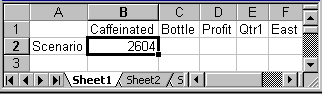
- Enter member names as shown in the Figure 132.
Caffeinated is an attribute dimension associated with the Product base
dimension. Bottle is a level 0 member of the Pkg_Type attribute
dimension. The Pkg_Type dimension is associated with the Product base
dimension. A level 0 member is the lowest level member in a
dimension.
Figure 132. Using Attributes in Free-Form Reports
- Click in any empty cell and select Essbase > Retrieve or double-click in
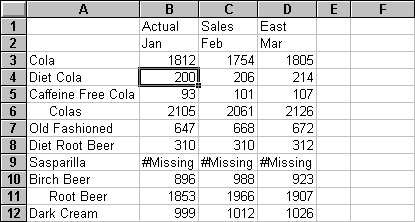
an empty data cell.
Hyperion Essbase retrieves information on profits for the first quarter of
the year for all members of the Product base dimension that are associated
with both the level 0 attribute members of the Caffeinated attribute dimension
(Caffeinated_True and Caffeinated_False) and the level 0 member Bottle of the
Pkg_Type attribute dimension. The results should appear as shown
below:
Figure 133. Result of Using Attributes in Free-Form Reports
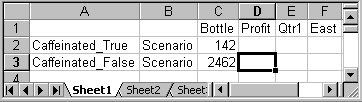
- You can drill down to data on the level 0 attribute members of the
Caffeinated attribute dimension. The results should appear as shown
below:
Figure 134. Drilling Down on Attributes in Free-Form Reports
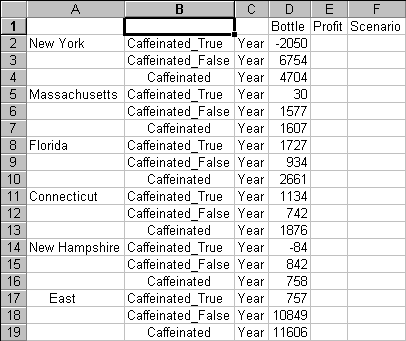
- To drill down further for data on profits for the first quarter for all
members of the East base dimension, double-click on cell E1. The
results should appear as shown below:
Figure 135. Result of Drilling Down on East
In addition to entering database member names into a free-form report, you
can enter generation or level names directly into a worksheet to retrieve
specific members. The Hyperion Essbase application designer defines
generation and level names for database dimensions in the database
outline. You have two options for discovering what generation and level
names are defined in the database:
- View generation and level names in the Essbase Member Selection dialog box
or through Hyperion Essbase Query Designer.
- Contact the Hyperion Essbase application designer to see what generation
and level names are defined in the database outline.
To enter generation and level names directly into a free-form report:
- To open a new worksheet, select File > New or click the
icon.
- Select Essbase > Options and select the Mode tab.
- In the Retrieval option group, select Advanced
Interpretation. Click OK.
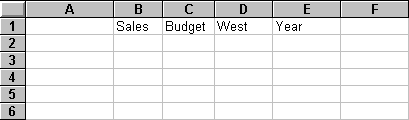
- Enter member names as shown in Figure 136:
Figure 136. Entering Member Names in a Free-Form Report
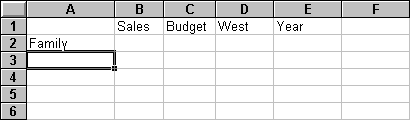
- Enter a generation name as shown in Figure 137:
Family is a generation name in the Product dimension. The name is
already defined in the Sample Basic database.
Figure 137. Entering a Generation Name in a Free-Form Report
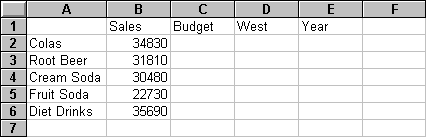
- Select Essbase > Retrieve.
Hyperion Essbase retrieves data for the member and generation names that
you entered. The Family generation name expands to its individual
members.
Figure 138. Result of Free-Form Retrieval with Generation Name
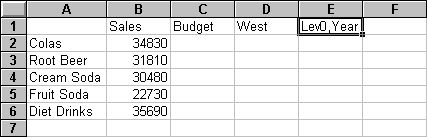
- Change Year to a level name (Lev0,Year) as shown in the following
illustration.
Figure 139. Entering a Level Name in a Free-Form Report
| Note: | Be sure not to insert a space between the comma after 0 and the word
Year. Generation and level names that are entered directly into a
worksheet must be precise.
|
- Select Essbase > Retrieve.
Hyperion Essbase retrieves data for the level 0 members of the Year
dimension, which are the individual months (Jan, Feb, Mar, and so
forth).
Figure 140. Result of Free-Form Retrieval with Level Name
- Select File > Close to close the worksheet. You do not need to save
the worksheet.
[ Top of Page | Previous Page | Next Page ]