OLAP Spreadsheet Add-in User's Guide for Excel
After you retrieve data into the worksheet, you may want to
manipulate the data in various ways. For example, you may want to move
rows and columns to different positions in the worksheet, or you may want to
tell Hyperion Essbase to suppress or retain specific data during data
retrievals.
To help you manipulate worksheet data, this section steps you through the
following procedures:
With the Pivot command, you can change the orientation of
worksheet data. Use the Pivot command to do any of the following:
- Move a row group to a column group
- Move a column group to a row group
- Change the order of row groups
- Change the order of column groups
You can execute the Pivot command in two ways:
- Select the member cell that you want to pivot, and select Essbase >
Pivot. This method applies only to moving a row group to a column group
or a column group to a row group.
- Click in the center of the member cell that you want to pivot, press and
hold the secondary mouse button, and drag the group to the desired
location. This method applies to swapping row and column groups and to
changing the order within groups.
To pivot Year data from a row group to a column group:
- To open a new worksheet, select File > New or click the

icon.
| Note: | You should already be connected to the Sample Basic database. If you
are not connected, follow the steps in Connecting to a Database.
|
- Select Essbase > Retrieve.
- Drill down (double-click) on Measures and Product (in cells B1 and C1,
respectively).
- Press and hold the Alt key, and, in cell E1, drill down (double-click) on
Scenario.
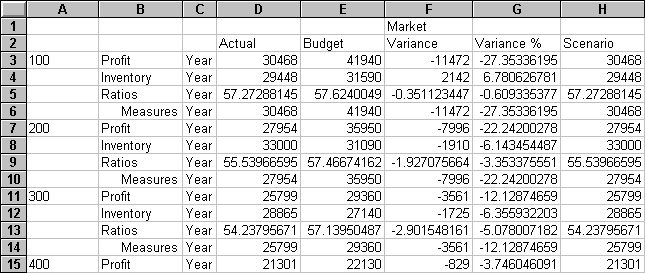
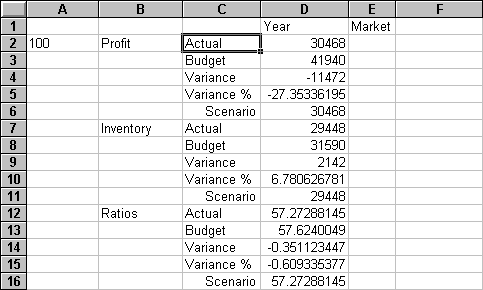
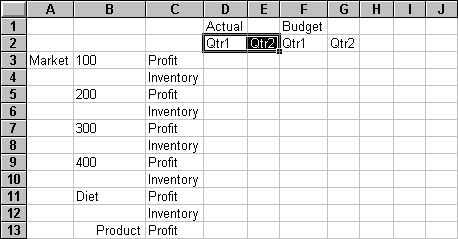
Figure 27. View Before Pivoting
- In cell C3, select Year and select Essbase > Pivot.
Figure 28. Result of Pivoting a Row Group to a Column Group
Hyperion Essbase pivots the Year dimension to a column group next to Market
(above the Scenario members).
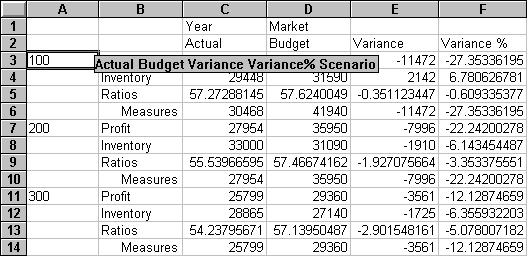
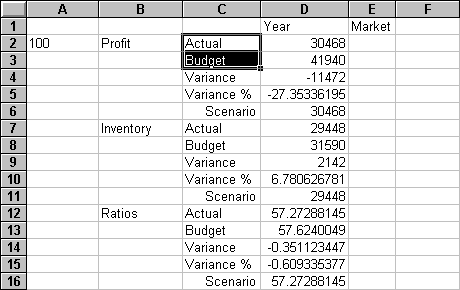
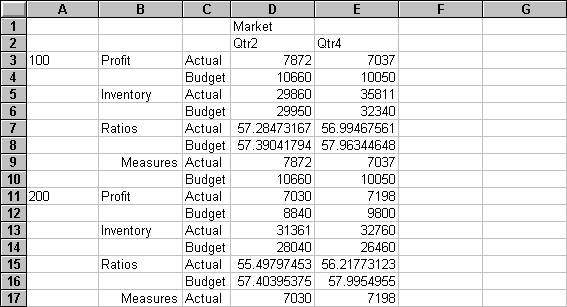
- As another example, in cell C2, select Actual.
- Right click and drag Actual to product 100 in cell A3.
Figure 29. Pivoting a Column Group to a Row Group
| Note: | The member label box that is displayed under the cursor during the pivot
operation displays the names of the members that you are pivoting. The
orientation of the member label box, however, does not determine
the orientation of the pivot result. Hyperion Essbase determines the
data orientation by the location of the destination cell.
|
Hyperion Essbase pivots the Scenario members (Actual, Budget, Variance, and
Variance%) from a column group to a row group that is displayed to the left of
the Product members.
Figure 30. Result of Pivoting a Column Group to a Row Group
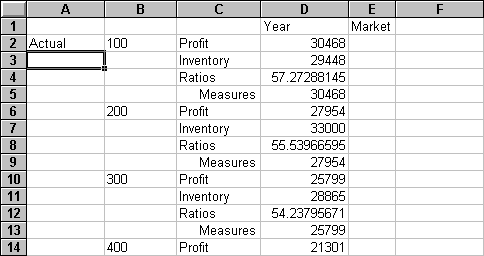
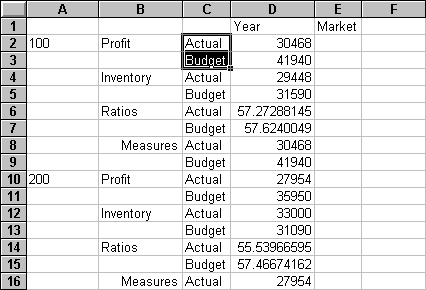
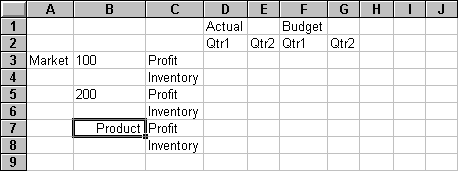
To transpose the order of row groups:
- In cell A2, select Actual.
- Right-click and drag Actual to Profit (cell C2).
Figure 31. Pivoting the Order of Row Groups
The pivot changes the order of the row groups.
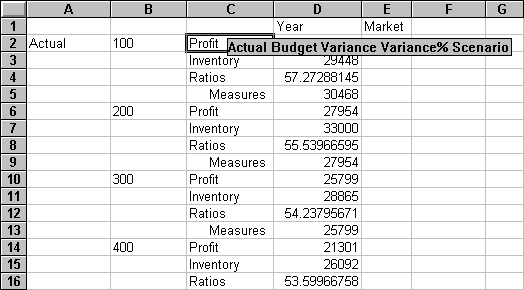
Figure 32. Result of Pivoting the Order of Row Groups
In this example, notice that both the source cell and the destination cell
are now members. Whenever the source cell and the destination cell are
members of different row groups, Hyperion Essbase exchanges the member
groups. You must select a destination cell that contains a member name
to exchange row members. You can also exchange column members by
choosing a destination cell in another column that contains a member
name.
The Keep Only command retains only selected member rows or columns and
removes all other data from the worksheet view. This command provides a
powerful way to remove dimensional slices without having to delete individual
cells.
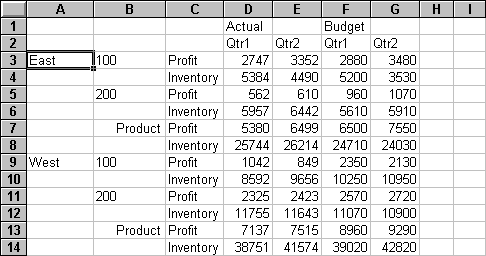
To keep only Actual and Budget data in the current worksheet:
- In cell C2, select Actual and, in cell C3, select Budget.
Figure 33. Selecting Members for the Keep Only Command
- Select Essbase > Keep Only.
Hyperion Essbase removes the Variance, Variance%, and Scenario rows from
the worksheet and retains only Actual and Budget data.
Figure 34. Result of Retaining a Data Subset (Adjacent Cells)
Occasionally, the data that you want to remove from the worksheet does not
lie in an adjacent range of cells.
To select and retain nonadjacent cells.
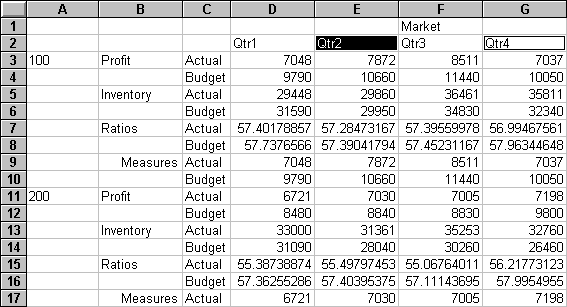
- Press and hold the Alt key, and, in cell D1, zoom in (double-click) on
Year.
- Select Qtr2 (in cell E2).
- Press and hold the Ctrl key and select Qtr4 (in cell G2).
Figure 35. Selecting Nonadjacent Members for the Keep Only Command
- Select Essbase > Keep Only.
Hyperion Essbase retains only Qtr2 and Qtr4 data and deletes the other Year
members.
Figure 36. Result of Retaining a Data Subset (Nonadjacent Cells)
The Remove Only command is the counterpart to the Keep Only command.
With Remove Only, you can remove selected member rows or columns and retain
all other data in the worksheet view.
To remove a data subset from the current worksheet view:
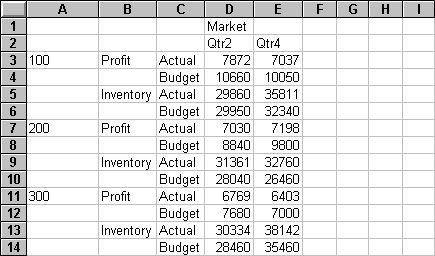
- In cell B7, select Ratios.
- Press and hold Ctrl, and, in cell B9, select Measures.
- Select Essbase > Remove Only.
Hyperion Essbase removes data for Ratios and Measures but retains data for
Profit and Inventory.
Figure 37. Result of Removing a Data Subset
With the Navigate Without Data feature,
you can perform navigational operations, such as pivot, zoom in, zoom out,
keep only, and remove only, without retrieving any data into the
worksheet.
This feature is especially useful when dealing with dynamic calculation
members, which are usually specified by the application designer. By
activating Navigate Without Data, you are effectively telling Hyperion Essbase
not to dynamically calculate values (that is, calculate the
database at retrieval time) while you are creating the spreadsheet
report. Dynamic calculation is discussed in more detail in Retrieving Dynamic Calculation Members"Retrieving Dynamic Calculation Members" on
page 169.
To navigate through the worksheet without retrieving data:
- Select Essbase > Navigate Without Data.
Hyperion Essbase displays a check mark next to the menu item.
| Note: | You can also enable Navigate Without Data by selecting the appropriate option
in the Essbase Options dialog box (Global Tab) or by clicking the Navigate
Without Data button on the Essbase toolbar.
|
- In cell D2, double-click the secondary mouse button to drill up on
Qtr2.
Hyperion Essbase shows the collapsed Year dimension but withholds
retrieving any data that is changed as a result of drilling up. The
cells where data would normally be displayed are blank.
Figure 38. Result of Zooming Out (Navigate Without Data Enabled)
- In cell D2, drill down (double-click) on Year by pressing and holding the
Alt key.
Hyperion Essbase drills down without retrieving data.
- In Cell C3, select Actual and select Essbase > Pivot.
Hyperion Essbase executes the pivot but does not retrieve data.
| Note: | You get the same result by pivoting any of the other Scenario members.
|
Figure 39. Result of Pivoting (Navigate Without Data Enabled)
- In cell G1, click the secondary mouse button on Market and drag Market to
product 100 (cell A4).
Hyperion Essbase executes the pivot without retrieving data.
Figure 40. Result of Pivoting (Navigate Without Data Enabled)
Navigating without data also works with the Keep Only and Remove Only
commands.
To navigate without data when using the Keep Only or Remove Only
command:
- Select Qtr1 (cell D2) and Qtr2 (cell E2) and select Essbase > Keep
Only.
Hyperion Essbase retains only the selected members and does not retrieve
data.
Figure 41. Result of Keep Only (Navigate Without Data Enabled)
- Select products 300 (cell B7), 400 (cell B9), and Diet (cell B11) and
select Essbase > Remove Only.
Hyperion Essbase executes the Remove Only command without actually querying
the database for information.
Figure 42. Result of Remove Only (Navigate Without Data Enabled)
To turn off Navigate Without Data when you are ready to retrieve
data:
- Select Essbase > Navigate Without Data.
Hyperion Essbase removes the check mark next to the menu item.
| Note: | You can also disable Navigate Without Data by clearing the appropriate option
in the Essbase Options dialog box (Global Tab) or by clicking the Navigate
Without Data button on the Essbase toolbar.
|
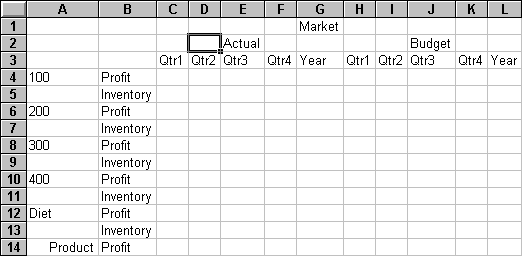
- In cell A3, drill down (double-click) on Market.
Hyperion Essbase drills down on the Market dimension and also retrieves
data into the worksheet.
Figure 43. Result of Drilling down (Navigate Without Data Disabled)
| Note: | If you want to retrieve data without changing the current worksheet view, you
can also retrieve data by simply double-clicking in any data cell or by
selecting Essbase > Retrieve (after disabling Navigate Without Data).
|
Several types of data can be returned to a worksheet
view:
- Numeric data values
- #NoAccess strings, which are displayed when you do not have the proper
security access to view a data value
- #Missing strings, which indicate that no data exists for that member
intersection
- Zero data values
A missing value is not the same as a zero value that is loaded into the
Hyperion Essbase database. When data does not exist for a data cell in
Hyperion Essbase, a value of #Missing is returned to the worksheet. If
any cell in a row contains a value, that row is not suppressed on a
retrieval.
With Hyperion Essbase, you can suppress missing and zero values from the
display in the worksheet. In addition, you can tell Hyperion Essbase to
suppress underscore characters that are in some member names.
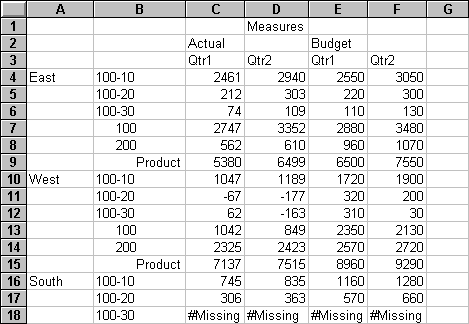
To suppress rows that contain missing values from displaying in the
worksheet:
- In cell C3, double-click the secondary mouse button to drill up on
Profit.
- Pivot Measures (in cell C3) to Actual (in cell D1).
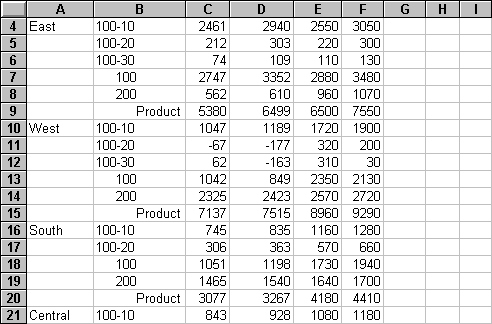
- In cell B4, drill down (double-click) on product 100.
Notice that, in the South, the product 100-30 row contains all
missing values, indicating that this product is not sold in the South.
You may need to scroll down the worksheet to see this row.
Figure 44. Worksheet View Displaying Missing Data Values
- Select Essbase > Options, and select the Display tab.
- In the Suppress option group, click the #Missing Rows check box and click
OK.
| Note: | The Suppress #Missing Rows and Zero Rows options are not available when any
of the Formula Preservation options are selected in the Essbase Options dialog
box. For more information on Formula Preservation, see Preserving Formulas When Retrieving Data"Preserving Formulas When Retrieving Data" on page
158.
|
- Select Essbase > Retrieve to update the worksheet.
| Note: | After you change a worksheet option in the Essbase Options dialog box, you
must perform a retrieval or drill operation to have the new setting take
effect.
|
Hyperion Essbase suppresses product 100-30 from the South member
group.
Figure 45. Result of Suppressing Missing Data Values
- Select File > Close to close the worksheet. You do not need to save
the worksheet.
| Note: | After you enable the Suppress #Missing Rows feature in the Essbase Options
dialog box, any missing values suppressed during a data retrieval are not
retrieved again by simply disabling the feature. If you disable the
feature in the Essbase Options dialog box, missing values are retrieved
from only that point on. For example, in the tutorial task
described above, Hyperion Essbase could not go back and return the missing
values for product 100-30. To return these missing values to the
worksheet, you disable the Suppress #Missing Rows feature, drill up on a
Product member, and then drill down again.
|
You can also suppress zeros and underscore characters as described in the
task above by clicking the appropriate options in the Suppress option group in
the Essbase Options dialog box (Display tab).
In addition to suppressing specific values and characters during retrieval,
Hyperion Essbase enables you to define a label for missing values (#Missing)
or for data you do not have access to (#NoAccess). If you define a
replacement label for these values, Hyperion Essbase displays the replacement
labels instead of the default labels. For more information on defining
replacement labels for the #Missing and #NoAccess labels, see the Hyperion
Essbase Spreadsheet Add-in online help.
[ Top of Page | Previous Page | Next Page ]