This chapter describes the steps for setting up and starting replication. It does not include specifics about operating the Capture and Apply programs for each operating system. See Operations for such specifics.
To set up the replication environment, you will complete the following general steps:
You can use either the DB2 Control Center or the DB2 DataJoiner Replication Administration (DJRA) tool to define sources and targets for replication, to set the schedule for updating the targets, to specify the enhancements to the target data, and to define any triggers that initiate replication. You can use the DB2 Control Center to administer replication only when your source and target tables are in DB2 Universal Database databases (for any operating-system environment), but you can use DJRA to administer replication when your source and target tables are in DB2 Universal Database databases (for any operating-system environment) or in supported non-IBM databases.
The administration tasks described in this chapter set up the control information that both the Capture and Apply programs use to capture changed data and replicate it to the target tables, in the proper format, and at the appropriate interval.
When setting up the replication environment, you can use the DB2 Control Center to manage the source and target table definitions and the control tables. Use the following high-level steps to administer your replication objects:
After you create the control tables and define the replication sources and targets, you need to configure and run the Capture and Apply programs to begin replicating data.
You can access your replication sources and targets through the Control Center. There are three containers in the Control Center for organizing the objects that you use to set up and maintain your replication environment:
Each object also has a menu for the actions that can be performed with the object.
If you are connecting to a DB2 for MVS/ESA, DB2 for VSE, DB2 for VM, or DB2 for AS/400 server from the Control Center, you must configure connectivity to the remote database, catalog the remote databases, and bind packages to the remote databases.
To bind the database:
DB2 CONNECT TO dbname USER userid USING password
DB2 BIND @DDCSxxx.LST ISOLATION CS BLOCKING ALL SQLERROR CONTINUE
Where CS specifies the cursor stability isolation level, and xxx specifies the platform name: MVS, VSE, VM, or AS/400.
If the user ID and password are different than the local logon ID and password for the Control Center workstation, you must explicitly connect to the database server using the Connect menu choice from the pop-up menu for your remote database object.
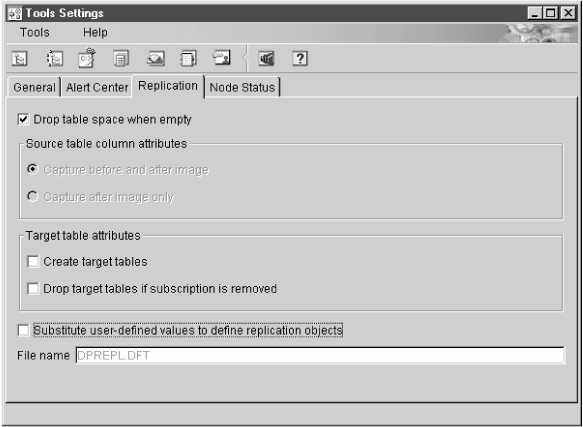
The Tools Settings notebook contains default preferences for the DB2 Universal Database administration tools. You can set replication default values on the Replication page of the notebook, as shown in Figure 19. These default values are used for all replication activities administered by the Control Center.
Figure 19. The Replication Page of the Tools Settings Notebook. Use this page to specify default preferences for replication.
|
You can customize CD table names, index names, and tablespace names while defining replication sources or subscription sets. You can edit the template file DPREPL.DFT, found in the working directory for the Control Center (\sqllib\bin or \sqllib\java), to change these names. See the instructions in the file for syntax and examples.
You specify that you want to use this file from the Replication page of the Tools Settings notebook. See Figure 19.
When you use the DB2 DataJoiner Replication Administration (DJRA) tool to perform replication administration tasks, DJRA connects to the source, target, or control server to create and update the control information and target tables on the server (depending on the operation performed). The client workstation where DJRA is located must be authorized and able to connect to all source, target, and control servers that are managed by DJRA.
DJRA provides objects and actions that define and manage source and target table definitions. Working through DB2 DataJoiner, DJRA creates:
The Apply program reads from and writes to DB2 DataJoiner nicknames, which eliminates the need to connect explicitly to non-IBM databases.
If the source database is a DB2 database, the Capture program for that database captures the changes, therefore, the Capture triggers and DB2 DataJoiner are not involved. If the target database is a DB2 database, the Apply program writes the changed data to the DB2 target database directly and DB2 DataJoiner is not involved.
DJRA, working with DB2 DataJoiner, the Capture program, Capture triggers, and the Apply program, replicates relational data from a variety of sources to a variety of targets. The databases that DJRA supports as sources or targets are:
For DB2 source, target, or control servers, DB2 DataJoiner's distributed database connection services (DDCS) or the DB2 Connect product provides connectivity. For non-IBM sources and targets, DJRA uses DB2 DataJoiner to connect to the non-IBM servers.
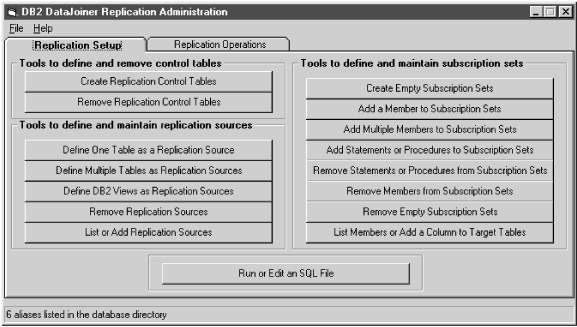
DJRA provides a user interface that is divided into areas that deal with control tables, replication sources, subscription sets, and the running or editing of SQL (see Figure 20).
Using this interface, you can perform the following administration tasks:
You can also customize the logic for most of the administration tasks listed above.
Figure 20. The DJRA primary window
 |
When you install DB2 UDB on a Windows system, the DB2 setup program copies the DJRA setup program (djra.exe) to the \sqllib\djra directory. DJRA also comes with DB2 DataJoiner V2; when you install DataJoiner on Windows NT, you can also optoinally install DJRA. In addition, you can download DJRA from the Web. 24 When you install DJRA, if you do not already have Object Rexx installed, DJRA will install it, otherwise DJRA will use your existing copy.
DJRA runs in the following environments:
To install DJRA:
You can specify your preferences for:
To set preferences, select File -> Preferences from the menu on the DJRA primary window. You can change the preferences at any time.
On the Connection page of the Preferences notebook, you see a list of databases that are currently cataloged on your system.
Restriction: If you are using Microsoft SQL Server in your replication environment, do not use an alias user ID. Microsoft SQL Server will reject the alias user ID.
You can customize DJRA staging tables, indexes, predicates, and so on by selecting the appropriate Edit Logic button from the following windows:
Recommendation: If the source table is a non-IBM table, do not change the owner for the CCD table.
You can also select the Edit Logic button from the Define Multiple Tables as Replication Sources window. In this case, add a three-digit number to the end of the CD_TABLE (or CCD_TABLE) parameter value; DJRA automatically increments this number to ensure that each table has a unique name.
You can specify where table spaces are created by changing the default directory (C:\). Be sure to add a backslash (\) after the directory name.
Select the Edit Create Table Logic button to specify the table space or segment in which to create target tables.
You can specify where table spaces are created by changing the default directory (C:\). Be sure to add a backslash (\) after the directory name.
You can also select the Edit Predicate Logic or Edit Create Table Logic button from the Add Multiple Members to Subscription Sets window.
Normally, the replication control tables are created in one of the following ways:
See comments within the file for tailoring the SQL for a specific database platform. You need to customize the DPCNTL file for the following definitions:
If you use this option, you cannot customize the replication control tables without dropping the existing control tables and customizing them. If you are running OS/390, VSE/ESA, or VM/ESA, you must customize the replication control tables.
When you create customized control tables, you must customize the CREATE TABLE statements in the DPCNTL files. There is one DPCNTL file for each operating system environment; these files are located in the sqllib\samples\repl\ directory. The file names are:
If, after creating customized control tables, you need to drop them, you must customize the DROP TABLE statements in the DPNCNTL files. There is a DPNCNTL file for each operating system environment located in the sqllib\samples\repl\ directory. The files names are:
To customize the SQL for creating or dropping control tables:
db2 -tf dpcntl.platform_name

db2 -tf dpncntl.platform_name
You must create control tables at each DB2 (and DataJoiner) system involved in replication. 25 When you complete this step, DJRA places a register table, a pruning control table, and a register synchronization control table at the database source (and for non-IBM sources, creates nicknames for these tables in DB2 DataJoiner).
From the DJRA primary window, click the Create Replication Control Tables. The fields you complete to create a control table are:
Specify (None) if you want the control tables to be created in the DataJoiner database rather than in the remote server database.
When the procedure completes successfully, save the file by selecting File->Save. You can now edit the generated SQL, if necessary, according to the guidelines listed in Customizing and running replication SQL files. When you are ready, run the SQL by selecting File->Run. You must save the generated SQL before you can run the SQL. You must run the SQL for generating control tables before you generate and run SQL to create replication sources or subscription sets.
From the DB2 Control Center, you have the option to run a replication task immediately or save the generated SQL file to run at a later time. From DJRA, you can run or edit SQL files from the main window. The SQL files can be customized for large scale replication actions such as defining subscription sets, or customized for an application beyond implementations supported by either the Control Center or DJRA.
You might want to save and customize the SQL files to:
If you save the definitions of a large replication subscription set in an SQL file, you can rerun the definitions as necessary.
When editing generated SQL, be careful not to change special markers that DJRA places within the SQL. For example, :ENDOFTRIGGER: or :ENDOFPROCEDURE: is part of a comment that is necessary for DJRA to run successfully. Altering create trigger blocks can result in incorrect SQL that ends in error when run. If you add lines to the end of the file, be sure to add an extra newline (CRLF) to the end of the file.
The DJRA Run SQL push button is intended to be used for SQL generated by DJRA. SQL that you generate outside DJRA might not run successfully if you use DJRA to start it. Likewise, you might not be able to run SQL generated by DJRA at a DB2 command line.
Recommendation: Run DJRA-generated SQL from DJRA.
Because DB2 DataPropagator is table driven, security for all replication objects depends on the database security. The database administrator who defines replication sources and subscription sets also defines security for them. Additionally, the Capture program must be authorized to access the source database and the Apply program must be authorized to access the control, source, and target databases.
When you define replication sources and subscription sets, the DB2 Control Center and DJRA create many tables. Depending on the operating system, they might also create table spaces or dbspaces. Because all of these actions require a high level of database privilege, you should plan to have at least one user ID that acts as the replication administrator and has the authority to create objects, bind plans, and run generated SQL for each of the source databases.
The user ID that runs the Capture program must be able to access the DB2 system catalog, be able to access and update all replication control tables, and have execute privileges on the Capture program packages. The user ID that runs the Capture program can be the same as the administrator user ID, but this is not a requirement.
For OS/390, the user ID that runs the Capture program should have either SYSADM authority or have the following authorizations:
For VM and VSE, the user ID that runs the Capture program must have DBA authority. For all other operating systems, the user ID that runs the Capture program must have either DBADM or SYSADM authority.
The user ID that runs the Apply program must be a valid logon ID for the source, control, and target servers, and for the workstation where the Control Center or DJRA is installed. The user ID that runs the Apply program must be able to access the source tables, access and update all replication control tables, and update the target tables. This user ID must also have execute privileges on the Apply program packages. The user ID that runs the Apply program can be the same as the administrator user ID, but this is not a requirement. With the proper authorization, any user ID can run any Apply program instance.
An Apply program might require a password file to connect to the source or target server. For more information about authorization requirements for the Apply program, see the Capture and Apply chapter for your operating system in Operations.
To define a replication source using the DB2 Control Center:
Click the Tables folder for the source database to show all tables. Right-click on a table object to show the pop-up menu and select Define as replication source.
You can define replication sources using the Quick or Custom choices. Quick allows you to define a replication source using default values. Custom allows you to customize the defaults, such as specifying that certain columns should not be captured.
After you define the replication source, an object is created in the Replication Sources folder. The source table can now be defined in a subscription set.
To define a replication source using DJRA:
Click Define One Table as a Replication Source or Define Multiple Tables as Replication Sources, then fill in the required information, such as source server, source table names, and source columns.
For information about Capture triggers, see Capture triggers for non-IBM sources. For data restrictions when defining replication sources and subscription sets, see General restrictions for replication.
The Capture program does not recognize new DB2 replication sources until you issue either the reinit command or stop and restart the Capture program. The Capture program does not begin capturing changes for a replication source until a subscription set is created for that replication source and the subscription-set members have been fully refreshed.
To define a replication source for update-anywhere replication using the DB2 Control Center:
Define a custom replication source and use the following selections:
Attention: Conflicting updates between the source table and the replica will not be detected. This option is not recommended for update-anywhere replication.
When you select this option, the DB2 Control Center also selects the Define as Source and Capture before image check boxes for every column.
Even if you specify enhanced conflict detection, when the Apply program runs in an occasionally-connected environment (started with the asnsat command, or with the COPYONCE keyword), the Apply program uses standard conflict detection.
To define a replication source for update-anywhere replication using DJRA:
Select the conflict detection level (described above) when you define a table as a replication source, and select the replica target structure when you add the member to the subscription set.
When to use update anywhere:
To reduce the risks of conflicts and costs of rejected conflicting transactions, use update-anywhere replication under the following conditions:
For update-anywhere replication, update conflicts can occur when:
The Apply program detects update conflicts, after they occur, during the subscription cycle. The source table is considered the primary table. That is, it can receive updates from replica tables, but if there is a conflict, the source table wins and the replica tables' conflicting transactions are rejected. The Apply program detects direct row conflicts by comparing the key values in the CD tables with the source and target tables. If it finds any that match, it marks the replica transaction as rejected in the UOW table and rolls back the replica transaction.
The Apply program cannot detect read dependencies. If, for example, an application reads information that is subsequently removed (by a DELETE statement or by a rolled back transaction), the Apply program cannot detect the dependency.
DB2 DataPropagator provides three levels of conflict detection: no detection, standard detection, and enhanced detection. Each level has a numerical value which is stored in the CONFLICT_LEVEL column of the register control table. You must decide, based on your tolerance for lost or rejected transactions and performance requirements, which type of detection to use. See Defining replication sources for update-anywhere replication for more information about the levels of conflict detection and how to specify them.
Restriction: Although you set the conflict-detection level for individual replication sources, the Apply program uses the highest conflict-detection level of any subscription-set member as the level for all members of the set.
Use the rejection codes provided in the UOW table to identify the before and after row values in the CD table for each rejected transaction. Because the ASNDONE exit routine runs at the end of each subscription cycle, you can add code to the routine to handle any rejected transactions. See Using the ASNDONE exit routine for more information on the ASNDONE exit routine. Alternatively, because the change data rows and UOW control table rows for rejected transactions are exempt from normal pruning (they are, however, subject to RETENTION_LIMIT pruning), you could handle the rejected transactions as a batch by using a program that scans the UOW table.
You can define replication sources that are views of other tables. After defining each replication source table included in the view, you can create a view replication source. The view replication source is then available for replication to a target table.
You cannot use the DB2 Control Center to define an existing view as a replication source; use DJRA instead. You can use the DB2 Control Center to define a new view as a replication source.
To define a view using the DB2 Control Center:
USERID.VIEW_NAME AS SELECT A.COL1, A.COL2, B.COL6, B.COL5
Do not type the words CREATE VIEW. This part of the statement is automatically supplied during processing.
TABLEA A, TABLEB B
Do not type the word FROM. This part of the statement is automatically supplied during processing.
A.COL1=B.COL1
Do not type word WHERE. This part of the statement is automatically supplied during processing.
To define a view as a replication source using DJRA:
Click Define DB2 Views as Replication Sources and fill in the required information, such as source server, source view qualifier, and source view name. You cannot define a join as a replication source using DJRA, but you can define a view for the join and use DJRA to define the view as a replication source.
Generally, the Capture program captures an update to a source table as an UPDATE statement. However, for the following conditions, you must instruct the Capture program to capture updates as DELETE and INSERT statements (that is, you must enable logical-partitioning-key support):
Because the values for the target-table primary key come from the changes captured on the source server, which reflect the new key values, these values cannot be used to find the existing target table row (it doesn't exist yet). Converting the UPDATE to a DELETE and INSERT pair ensures that the target table reflects the changes made at the source server.
In this case, the column included in the predicate need not be a primary-key column. If a subscription set is defined with a predicate based on a specific column value (for example, WHERE DEPT = 'J35'), and you change that column (for example, to DEPT='FFK'), the captured change will not be selected for replication because it does not meet the predicate criteria. That is, your new FFK department will not be replicated because your subscription is based on department J35. Converting the UPDATE to a DELETE and INSERT pair ensures that the target-table row is deleted.
Enabling logical-partitioning-key support ensures that target rows are moved from one node to another when the source column for the logical-partitioning key is changed and replicated. The move is accomplished by a DELETE at the old node and an INSERT at the new node.
You can capture updates as updates or as delete/insert pairs for both DB2 and non-DB2 sources.
By default, when you update the primary keys of either the source or target tables, the Capture program captures the changed row for the update. The Apply program then attempts to update the row in the target table with the new key value. This new key value is not found in the target table, so the Apply program converts this update to an insert. In this case, the old row with the old key value remains in the table (and is unnecessary). When you enable replication logical-partitioning-key support, the Capture program captures the change as separate DELETE and INSERT statements: delete the old row and insert the new row.
For DATALINK columns defined as ON UNLINK DELETE, the unlink is ignored because a DELETE and INSERT pair is handled within the same transaction. The external file is not deleted, but is updated.
Each captured UPDATE is converted to two rows in the CD table for all columns, non-key columns as well as key columns. You might need to adjust the space allocation for the CD table to accommodate this increase in captured data.
When you use the DB2 Control Center to define the source table, select the Changed data for partitioned key columns captured as delete and insert check box on the Define as Replication Source window to specify that the Capture program should capture updates as DELETE and INSERT statements.
When you use DJRA to define the source table, select the Updates as delete/insert pairs radio button from either the Define One Table as a Replication Source window or the Define Multiple Tables as Replication Sources window.
Recommendation: Use DJRA to define CCD tables. The DB2 Control Center does create CCD tables, but does not allow you to define them directly.
To define a CCD table using DJRA, select CCD as the Target structure from the Add Member to a Subscription Set window, then click the Setup pushbutton. Select the type of CCD table you want from the Staging (CCD) table property selection for target server window. This window prompts you for all valid combinations of CCD tables.
For noncomplete CCD tables, you can include one or more of the UOW table columns; these columns are useful for auditing and include Apply qualifiers, authorization IDs, UOW ID, and so on.
If you are using a CCD table to stage replication (for example, in a three-tier replication environment), complete the following steps:
The Apply program that owns the subscription set populates the CCD table based on the subscription-set definition.
From the DJRA Staging (CCD) table property selection for target server window, select the Register as external replication source checkbox after selecting a complete CCD table. See Defining replication sources for more information.
This new set is the Apply program that applies changes from the CCD table to the target tables. Usually, you use a different Apply qualifier than the one used to populate the CCD, but you can use the same one.
Select the source table depending on the type of CCD table you are using:
Restrictions: To register an internal CCD table, the source server must be colocated with the target server. You can only register one internal CCD for each source table.
For more information about CCD tables, see Staging data.
To define a replication subscription set using the DB2 Control Center:
If you specify that the Apply program should create the target table, and that table will contain DATALINK columns, these columns will have the default level of link control (none). If you want these columns to have a different level of link control, edit the generated SQL to modify the CREATE TABLE statement and specify a new level of link control, then run the modified SQL.
To define a replication subscription set using DJRA:
When you add members to a subscription set, you can specify which primary key to use for the target table. You can specify that DJRA should generate the target primary key from the source primary key and source table indexes, or you can specify the particular columns for the key, or you can specify the source primary key.
After you create subscription sets for a non-IBM source server, the Apply program connects to the DB2 DataJoiner database that is associated with the non-IBM server and accesses (through nicknames) the information in the register control table and the staging table on the non-IBM source server (see Figure 21).
Figure 21. DB2 DataJoiner in action. In a scenario where the source table is a non-IBM table (the dark arrows), DB2 DataJoiner nicknames give the Apply program access to the non-IBM source server and to changes made to the non-IBM source table (through the staging table). In a scenario where the source table is a DB2 table (the light arrows), DB2 DataJoiner nicknames give the Apply program access to the non-IBM target tables.
 |
If you defined an event to start the Apply program, you must populate the event table. See Event timing for more information about this task. To begin replicating data to the target tables, start the Capture program at the source server, then start the Apply program using the name of the control server that you specified in the Control Center Subscription Information window or the DJRA Add a Member to Subscription Sets window (or Add Multiple Members to Subscription Sets window).
To define a subscription set for update-anywhere replication using the DB2 Control Center, define a subscription set and use the following selections:
Make the primary key the same as the source-table primary key to prevent conflicts. Do not use before-image columns as primary-key columns for the target table.
Important: For existing target tables, you must select the primary-key columns.
To define a replication subscription for update-anywhere replication using DJRA, select the replica target structure when you add the member to the subscription set.
You can specify a target-table type if you do not want to accept the default target type of user copy.
To specify a target-table type using the DB2 Control Center:
To specify a target-table type using DJRA:
Click Add a Member to Subscription Sets or Add Multiple Members to Subscription Sets. Fill in the required information for the subscription-set member. You can specify the target-table type from the Table structure drop-down list. The available types include the same as those described for the DB2 Control Center, plus choices for CCD table types.
For some applications, the target table does not need all of the rows or columns that exist in the source table. You can define the target table to be a column or row subset of the source table using the Control Center or DJRA. For more information on subsetting, see Subsetting columns and rows.
Restriction: Replica target tables must contain the same columns as the source table: you cannot create subsets for them; you cannot add columns; and you cannot rename columns.
To define the target-table columns using the DB2 Control Center:
If you want to specify a column as a primary-key column for the target table, select the Primary Key check boxes next to the column names.
Attention: For the following target-table types you must select one or more columns as part of a primary key: user copy, point-in-time, replica, and condensed staging tables. If you do not select columns for the primary key, DB2 uses the primary-key definition of the source table. However, if the source table does not have a primary-key definition, the Apply program issues an error message.
If you want to rename a column, select the column name and type over the existing column name. A column name can have up to 17 characters and can be an ordinary or delimited identifier.
If you want to change a column definition for the target table, click Change to open the Change Column window. From this window, you can:
The expression can contain up to 254 characters and can be any valid SQL expression. This expression can contain ordinary or delimited identifiers. Columns used in the expression must be valid after-image columns from the source table. These column names are listed in the Available columns box.
See the DB2 SQL Reference for information on valid SQL expressions. Invalid SQL expressions cause an SQL error when the Apply program processes the subscription.
If you want to remove a column from the target table, clear the Subscribe check box next to the column name.
If you want to create a new computed column or use aggregation for the target table:
To define the target-table columns using DJRA:
Click the Selected columns radio button from the Add a Member to Subscription Sets window. Then select the columns you want replicated to the target table.
To define the target-table rows using the DB2 Control Center:
To specify which rows are copied to the target table, type an SQL predicate in the WHERE field. The predicate can contain ordinary or delimited identifiers. See the DB2 SQL Reference for more information about WHERE clauses.
Row Predicate Restrictions:
The Apply program issues error messages if you do not provide the dummy WHERE clause in this situation.
The following examples show WHERE clauses that you can use to filter rows of the target table. These examples are very general and designed for you to use as a model.
To copy only the rows that contain a specific value, such as MGR for employees that are managers, use a WHERE clause like:
EMPLOYEE = 'MGR'
To copy only the rows within a range, such as employee numbers between 5000 and 7000 to the target table, use a WHERE clause like:
EMPID BETWEEN 5000 AND 7000
To support aggregation, use a WHERE clause like:
1=1
To define the target-table rows using DJRA:
Add a WHERE clause in the Where clause field of the Add a Member to Subscription Sets window.
DB2 DataPropagator allows you to use a previously-defined DB2 table as the target table in a subscription set. That is, you can define a subscription-set member to be a target table that is defined outside of the DB2 Control Center or DJRA. This type of target table is known as a user-defined target table.
Restrictions:
To define a subscription with a user-defined target table:
From the DB2 Control Center, in the Define Subscription window:
If you want to select an alternate table type, see Choosing a target-table type. If you want to modify the target-table columns to match the user-defined target table, or subselect the rows or use an aggregate expression, see Defining the target-table structure: columns and rows.
DJRA tolerates existing target tables, and checks that the columns in the target table match those defined for the subscription-set member.
DB2 DataPropagator does not check for inconsistencies between the subscription definition and a user-defined target table. You must:
You can define SQL statements or stored procedures to be run before or after the Apply program copies the data from the source to the target table. For example, you can prune the Apply trail control table each day to remove older entries.
To specify SQL statements or stored procedures for the subscription set using the DB2 Control Center:
Use the SQL window to add or remove SQL statements or stored procedures that run at the target or source server either before or after the replication subscription is processed. The statements are processed in the order that they appear in the list.
Enter valid 5-byte SQLSTATE values in the SQLSTATE field and click Add. The value is added to the Acceptable SQLSTATE values box. You can add up to 10 values.
To specify SQL statements or stored procedures for the subscription using DJRA:
Select a statement number from the Statement number spin box, and enter valid 5-byte SQLSTATE values in the Acceptable SQLSTATE values field.
You can implement replication in an System/390 data-sharing environment. In a data-sharing environment, you run one Capture program for each source data-sharing group and one or more Apply programs for each target data-sharing group.
The Capture program can read the data-sharing logs for all supported vresions of DB2 for OS/390. That is, you can run different versions of DB2 in a data-sharing environment, for example during version-to-version migration, and have one Capture program continue to capture transaction-consistent data. However, this mixed-version environment is not recommended for long-term use, either for replication or for DB2. See the DB2 for OS/390 Administration Guide for information about data sharing with mixed versions of DB2.
To specify how many minutes worth of change data DB2 DataPropagator can replicate during a subscription cycle, use the Data Blocking page of the Subscription Timing notebook in the DB2 Control Center, or set the Blocking factor in the Create Empty Subscription Sets window in DJRA. The number of minutes that you specify determines the size of the data block. See Data blocking for large volumes of changes for more information about how to determine this value.
DB2 DataPropagator saves this value in the MAX_SYNCH_MINUTES column of the subscription set control table. To change this value, execute the following SQL statement:
UPDATE ASN.IBMSNAP_SUBS_SET
SET MAX_SYNCH_MINUTES=new_val
WHERE APPLY_QUAL=ApplyQual AND SET_NAME=name AND WHOS_ON_FIRST=val
where new_val is the new blocking factor value, ApplyQual is the current Apply qualifier, name is the current subscription-set name, and val is either F or S.
How up to date do you want target tables to be? How out of date can they be without disrupting the application programs that use them? The answers to these questions reveal your data currency requirements. You can control how often the Apply program processes subscriptions and thereby control the currency of the data. You can set an interval (or relative timing) schedule for the Apply program, or define an event trigger that the Apply program uses to start processing a subscription set.
You define subscription timing with the Subscription Timing notebook in the DB2 Control Center or from the Subscription set timing field on the Create Empty Subscription Sets window in DJRA. You can control the timing using time-based or event-based scheduling, or you can use these timing options together. For example, you can set an interval of one day, and also specify an event that triggers the subscription cycle. For update-anywhere replication, you can also specify different timing for source-to-replica and replica-to-source replication.
Recommendation: When moving from a test environment to a production environment, set a mid-range timing value (such as 2 hours) and tune your system from there (to a more frequent or less frequent interval, as appropriate).
The simplest method of controlling subscription timing is to use interval timing. You determine a specific start time, date, and interval. The interval can be specific (from one minute to one year) or continuous, but time intervals are approximate. The Apply program begins processing a subscription set as soon as it can, based on its workload and the availability of resources. If you specify continuous timing, the Apply program replicates data as frequently as it can.
Choosing a timing interval does not guarantee that the frequency of replication will be exactly at that interval. Before specifying an interval, you should determine whether it is possible to refresh all tables in the subscription set within that interval: determine the amount of data that the Apply program is likely to select for each interval and estimate the time that it will take to copy the data.
You can set and change the interval using the DB2 Control Center, DJRA, or by executing SQL statements against the subscription-set control table.
To replicate data using event timing, specify an event name when you define the subscription set in the DB2 Control Center or DJRA. You must also populate (using an application program or the DB2 Command Center) the subscription events table with a timestamp for the event name. When the Apply program detects the event, it begins replication (either change-data capture or full refresh).
The subscription events table has three columns, as shown in Table 6.
Table 6. The subscription events table
| EVENT_NAME | EVENT_TIME | END_OF_PERIOD |
|---|---|---|
| END_OF_DAY | 2000-05-01-17.00.00.000000 | 2000-05-01-15.00.00.000000 |
EVENT_NAME is the name of the event that you specify while defining the subscription set. EVENT_TIME is the timestamp for when the Apply program begins processing the subscription set. END_OF_PERIOD is an optional value that indicates that updates that occur after the specified time should be deferred until a future time. Set EVENT_TIME using the clock at the control server, and set END_OF_PERIOD using the clock at the source server. This distinction is important if the two servers are in different time zones.
In Table 6, for the event named END_OF_DAY, the timestamp value (2000-05-01-17.00.00.000000) is the time when the Apply program is to begin processing the replication subscription. The END_OF_PERIOD timestamp value (2000-05-01-15.00.00.000000) is the time after which updates are not replicated and will be replicated on the next day's cycle. That is, the event replicates all outstanding updates made before three o'clock, and defers all subsequent updates.
Your application programs must post events to the subscription events table to tie your application programs to subscription activity. When you post an entry using CURRENT TIMESTAMP plus one minute for EVENT_TIME, you trigger the event named by EVENT_NAME. Any subscription set tied to this event becomes eligible to run in one minute. You can post events in advance, such as next week, next year, or every Saturday. If the Apply program is running, it starts at approximately the time that you specify. If the Apply program is stopped at the time that you specify, when it restarts, it checks the subscription events table and begins processing the subscription set for the posted event.
Any event that occurs prior to the most recent time the Apply program processed the subscription set (as specified by the value in the LASTRUN column of the subscription-set control table), is considered to be an expired event and is ignored. Therefore, if the Apply program is running, you should post events that are slightly in the future to avoid posting an expired event.
You can change subscription-set timing while both the Capture program and Apply program are running by modifying values in the subscription set table. For example, to change the interval value, execute the following SQL statement:
UPDATE ASN.IBMSNAP_SUBS_SET
SET INTERVAL_MINUTES=new_val
WHERE APPLY_QUAL=ApplyQual AND SET_NAME=name AND WHOS_ON_FIRST=val
where new_val is the new interval value, ApplyQual is the current Apply qualifier, name is the current subscription-set name, and val is either F or S.
To change a subscription set to use event timing rather than interval timing, execute the following SQL statements:
UPDATE ASN.IBMSNAP_SUBS_SET
SET REFRESH_TIMING='E', EVENT_NAME='END_OF_DAY'
WHERE APPLY_QUAL=ApplyQual AND SET_NAME=name

INSERT INTO ASN.IBMSNAP_SUBS_EVENT
(EVENT_NAME, EVENT_TIME)
VALUES ('END_OF_DAY', 'timestamp')
where new_val is the new interval value, ApplyQual is the current Apply qualifier, name is the current subscription-set name, val is either F or S, and timestamp is the timestamp for when the Apply program should begin processing the subscription set. If you already have an event named END_OF_DAY, you do not need the INSERT statement shown above, but you might need to modify the EVENT_TIME.
See Subscription set table and Subscription events table for more information about these control tables.
When planning and defining a subscription set, you need to be aware of the following rules and constraints:
If you maintain your own CCD table, you must update three columns in the register control table: CCD_OLD_SYNCHPOINT, SYNCHPOINT, and SYNCHTIME:
Before a full refresh of the CCD table, set CCD_OLD_SYNCHPOINT to NULL.
After a full refresh of the CCD table, set the CCD_OLD_SYNCHPOINT to a value greater than the previous value of SYNCHPOINT. If SYNCHPOINT has no previous value (in the case of the initial load), set the CCD_OLD_SYNCHPOINT to X'00000000000000000000'.
Set the SYNCHPOINT for the CCD table to MAX(IBMSNAP_COMMITSEQ) whenever you commit new changes to the CCD table. Be sure also to set SYNCHTIME accordingly.
DJRA guides you through the process of creating an offline load of a table or database. The following procedure does not maintain the additional control information required for loading external CCD tables, so for these tables you must use the manual procedure.
To perform an offline load using DJRA:
When you define tables, replication sources, or subscription sets on one system (a test system, for example), and you need to copy the replication environment to another system (a production system, for example), you can use the DJRA promote functions. These functions reverse engineer your tables, replication sources, or subscription sets, to create script files with appropriate data definition language (DDL) and data manipulation language (DML). Table 7 shows the three promote functions.
For example, use the promote functions to define subscription sets for
remote DB2 Personal Edition target databases. After you define a model
target system in your test environment, you can create subscription-set
scripts (and modify which Apply qualifier is used and so on) for your DB2
Personal Edition systems, which are not otherwise supported from a central
control point.
Table 7. Promote functions provided by DJRA
| Promote function | Description |
|---|---|
| Promote registration | This function promotes source tables and views from a source server. |
| Promote table | This function promotes tables, table spaces, and indexes. It does
not promote constraints defined for a table.
This function is fully supported for DB2 UDB V5 and later, but for the IBM Common Server you can promote only tables, not table spaces. |
| Promote subscription | This function promotes subscriptions: subscription sets,
subscription-set members, subscription columns, subscription prune control,
and subscription statements. It enables you to create a new
subscription set from an existing one.
From the Promote Subscriptions window in DJRA, you can change your subscriptions (before promoting them) by setting new values for any of the following fields: Apply Qualifier, Set Name, Source server, Source alias, Target server, Target alias, Control server, and Control alias. |
This section describes setting the Capture program generally. See the appropriate chapter for your operating system environment (in Operations) for specific information about setting up the Capture program.
To control the performance of the Capture program, you can specify the following tuning parameters in the tuning parameters table:
For AS/400, you can keep the size of tables smaller by reorganizing them using the RGZPFM command.
Recommendation: Set a high value for the lag limit to ensure the Capture program does not shut itself down unnecessarily.
If the database does not have or support an archive log, and the Capture program shuts itself down, you should perform a cold start of the Capture program.
If the Apply program is not running at the same time as the Capture program, you can set the commit interval no higher than the DB2 timeout interval.
For AS/400, this value has a different meaning: it is the number of seconds between the time that an application program updates a source table and the time that the corresponding update in the CD table is written to disk. The commit interval can range from 30 to 600 seconds, and the default is 180. If the value is too small, overall system performance can be degraded.
For AS/400, you can override this value by specifying a value for the wait-time subparameter of the CLNUPITV keyword of the STRDPRCAP command. If you specify *NO on the start-clean-up subparameter of the CLNUPITV keyword, the prune interval value is ignored.
For AS/400, if you start up the Capture program daily, *NO allows you to defer pruning (for example, to the weekend). During the week, you can use CLNUPITV (*DPRVSN *NO) on the STDPRCAP command. On weekends, you can use CLNUPITV (*DPRVSN *IMMED), which is the default.
Important: When you manually prune the CD table, do not delete the most recent row. Always keep at least one row in the table.
To specify the tuning parameters, do one of the following tasks:
UPDATE TABLE ASN.IBMSNAP_CCPPARMS
SET RETENTION_LIMIT=number_of_minutes,
LAG_LIMIT=number_of_minutes,
COMMIT_INTERVAL=number_of_seconds,
PRUNE_INTERVAL=number_of_seconds
If you need to change the values and refresh the tuning parameters while the Capture program is running, enter the reinit command after changing the table values. For AS/400, enter the INZDPRCAP command; for more information about the INZDPRCAP command, see Reinitializing Capture for AS/400.
For information on the structure of the tuning parameters table, see Table structures.
The following actions cause the Capture program to terminate while it is running. Stop the Capture program if you want to perform any of the following tasks:
Other Capture program restrictions include:
This section describes setting the Apply program generally. See the appropriate chapter in Operations for your operating system environment for specific information about setting up the Apply program.
The Apply program can call the ASNLOAD exit routine whenever it performs a full refresh of a target table. Specify the LOADX parameter to cause the Apply program to call this routine.
You can use the ASNLOAD routine as shipped with the Apply program, or you can modify it. As shipped, the routine uses the DB2 EXPORT utility to export data from the source table and uses the DB2 LOAD utility to fully refresh the target table. You can modify the ASNLOAD routine to call any IBM or vendor utility. See the prolog section of the sample program (ASNLOAD.SMP) in the \sqllib\samples\repl directory for information about how to modify this exit routine.
You must use the ASNLOAD routine to fully refresh tables with referential integrity constraints in order to bypass referential integrity checking.
If your source servers are password protected, you must modify the ASNLOAD routine to provide the password file. However, if the password is administered by DB2 Universal Database Satellite Edition, the ASNLOAD routine does not require a password file, and you can use the IBM-supplied routine.
If your source tables include DATALINK columns, the Apply program does not call the ASNDLCOPY exit routine. If you want external files (pointed to by the DATALINK values) to be copied during a full refresh, you must modify the ASNLOAD routine to call the ASNDLCOPY routine for these columns.
See Refreshing target tables with the ASNLOAD exit routine for AS/400 for information about using the ASNLOAD routine in an AS/400 environment.
When you run the ASNLOAD routine, it generates the following files:
This file contains the data exported from the source.
This file contains error, warning, or informational messages issued by the EXPORT APIs.
This file contains error, warning, or informational messages issued by the LOAD APIs.
When you run the ASNLOAD routine, it generates the following files:
This file contains the data exported from the source.
This file contains error, warning, or informational messages issued by the EXPORT APIs.
This file contains error, warning, or informational messages issued by the LOAD APIs.
If an error occurs while the Apply program calls the ASNLOAD routine, or if the routine returns a nonzero return code, the Apply program issues a message, stops processing the current subscription set, and processes the next subscription set.
You can use the ASNLOAD routine only to refresh point-in-time and user copy tables. Target tables have the following restrictions for the ASNLOAD routine:
The Apply program can optionally call the ASNDONE exit routine after subscription processing completes, regardless of success or failure. You can modify this routine as necessary; for example, the routine can examine the UOW table to discover rejected transactions and initiate further actions, such as issuing a message or generating an alert. Another use for this exit routine is to deactivate a subscription set that fails (status = -1), and thus avoid retry by the Apply program until the failure is fixed.
See the prolog section of the sample program (ASNDONE.SMP) in the
\sqllib\samples\repl directory for information about how to modify this exit
routine. For AS/400, the following table indicates where you can find
the source code for this routine:
| Compiler language | Library name | Source file name | Member name |
|---|---|---|---|
| C | QDPR | QCSRC | ASNDONE |
| COBOL | QDPR | QCBLLESRC | ASNDONE |
| RPG | QDPR | QRPGLESRC | ASNDONE |
See Using the ASNDONE exit routine for AS/400 for more information about using the ASNDONE exit routine in an AS/400 environment.
To use the ASNDONE exit routine:
The parameters that the Apply program passes to the ASNDONE exit routine are:
If a subscription set contains DATALINK columns, the Apply program calls the ASNDLCOPY exit routine during processing for a subscription-set member to copy the external file. You can modify this routine as necessary, for example, to change the file transfer protocol.
Restrictions: The Apply program does not call the ASNDLCOPY routine if the target table is a CCD table. Also, if you want external files (pointed to by DATALINK values) to be copied during a full refresh, you must modify the ASNLOAD routine to call the ASNDLCOPY routine for these columns.
See the prolog section of the sample program (ASNDLCOPY.SMP) in the \sqllib\samples\repl directory for information about how to set up and modify this exit routine. For AS/400, you can find the sample program in library QDPR, source file QCSRC, member ASNDLCOPY.
To use the ASNDLCOPY exit routine:
When the ASNDLCOPY routine completes, it should return a return code to the Apply program. A nonzero return code tells the Apply program that replication failed for one or more of the files; in this case, the Apply program issues a message, skips the current subscription set, and processes the next subscription set. A zero return code tells the Apply program that replication was successful.
Because the Apply program calls the ASNDONE exit routine after subscription processing completes, regardless of success or failure, you can use the routine to perform any necessary clean up if the ASNDLCOPY routine fails to replicate any external files.
The ASNDLCOPY routine creates two files: a log file and a trace file (if trace is enabled). The log file has the following name:
ASNDLApplyQualSetNameSrcSrvrTgtSrvr.LOG
where ApplyQual is the Apply qualifier, SetName is the subscription-set name, SrcSrvr is the source-server name, and TgtSrvr is the target-server name. The log file contains all messages generated by the ASNDLCOPY routine. The trace file has the following name:
ASNDLApplyQualSetNameSrcSrvrTgtSrvr.TRC
The trace file contains any trace information generated by the ASNDLCOPY routine.
The parameters that the Apply program passes to the ASNDLCOPY exit routine are:
The input data file contains a list of link references captured from the source table. The format for this file is:
length source_link_reference new_link_indicator
The fields are:
Use the newline character to indicate the end of the input line.
Sample input file:
35 HTTP://S1.CDE.COM/data/yy/file1.avi Y
35 HTTP://S2.CDE.COM/data/qq/file2.avi N
The result file contains transformed link references that are valid for the target system. The format for this file is:
length target_link_reference
where length is the length of the target link reference, target_link_reference is the reference to the target link in URL format. If a source file cannot be replicated, the ASNDLCOPY routine should set length to 0 in the result file and set target_link_reference to blanks to ensure that no link is established in the target table.
Sample result file:
35 HTTP://T1.XYZ.COM/data/yy/file1.avi
35 HTTP://T2.XYZ.COM/data/zz/file2.avi
The trace option can be either yes or no, to specify whether you want tracing.
The ASNDLCOPY routine requires two configuration files: ASNDLUSER and ASNDLSRVMAP. The ASNDLUSER file contains the server address (URL format), input port number, output port number, login user ID, and password. The first port number is for the source FTP or file-copy daemon that the ASNDLCOPY routine will connect to for retrieving files and the second port number is for the target FTP or file-copy daemon for sending files. These port numbers can be the same.
Sample ASNDLUSER file:
S1.CDE.COM 21 21 userA xxyyzz
T1.XYZ.COM 21 24 userB xkxkxk
The ASNDLSRVMAP file contains the server mappings for link references and an optional directory path map. If you don't specify a directory path map, or if the path mapping cannot be found, the same path name will be used.
Sample ASNDLSRVMAP file:
HTTP://S1.CDE.COM HTTP://T1.XYZ.COM
HTTP://S2.CDE.COM HTTP://T2.XYZ.COM /data/qq /data/zz
All fields for a given entry must appear on the same line.
The ASNDLCOPYD file-copy daemon extracts files for the ASNDLCOPY exit routine. It is similar to a standard FTP daemon, but provides the following functions for DATALINK replication:
Recommendation: Use the ASNDLCOPYD file-copy daemon to replicate a DATALINK column that is defined with the "read permission DB" attribute. Whereas standard FTP requires superuser access, the ASNDLCOPYD daemon does not require such access.
You can configure the ASNDLCOPYD file-copy daemon to allow only certain users to log in, and for each user, you can allow access to a subset of directories. See the prolog section of the sample program (ASNDLCOPYD.SMP) in the \sqllib\samples\repl directory for information about how to set up and modify this program. For AS/400, you can find the sample program in library QDPR, source file QCSRC, member ASNDLCOPYD. If you need to add or change user logins, use the ASNDLCOPYD_CMD tool.
You pass the following parameters to the file-copy daemon:
To use the ASNDLCOPYD file-copy daemon:
The ASNDLCOPYD daemon must run with root (administrator) authority.
The ASNDLCOPYD file-copy daemon creates a log file for all the messages generated by the ASNDLCOPYD program. This log file has the following name: ASNDLCOPYDYYYYMMDDHHMMSS.LOG, where YYYYMMDDHHMMSS is the time that the daemon started running.
Install DB2 DataJoiner by following the steps described in the DB2 DataJoiner Planning, Installation, and Configuration Guide. The Apply program is automatically installed when you install DataJoiner. After you install DataJoiner:
For AIX, identify the Apply user ID as a local client to DataJoiner.
If DJRA accesses DataJoiner for AIX, set the DB2CODEPAGE environment variable from your DJRA workstation. The value that you set is based on your country code. For example, if your country code is US, you would:
You must create one DataJoiner database for each non-IBM replication source server. You can support many non-IBM replication target servers with one DataJoiner database. The DataJoiner databases that you set up reside on one DataJoiner instance. You must define server and user mappings for each DataJoiner database that requires access to a source or target.
For every non-IBM source, use the COLLATE USING parameter within the CREATE DATABASE command. Use IDENTITY.
For Windows NT, you can automatically start your DataJoiner instance and DB2 security service:
For more information, see DB2 DataJoiner Planning, Installation, and Configuration Guide.