Version recovery using the BACKUP command in conjunction with the RESTORE command puts the database in a state that has been previously saved. You use this recovery method with non-recoverable databases (that is, databases for which you do not have archived logs). You can also use this method with recoverable databases by using the WITHOUT ROLLING FORWARD option.
In this section, planning considerations and how to invoke the specific utilities or commands to carry out the method are reviewed. Then, any concepts or related issues that allow effective use of this method are presented.
The following topics provide additional information:
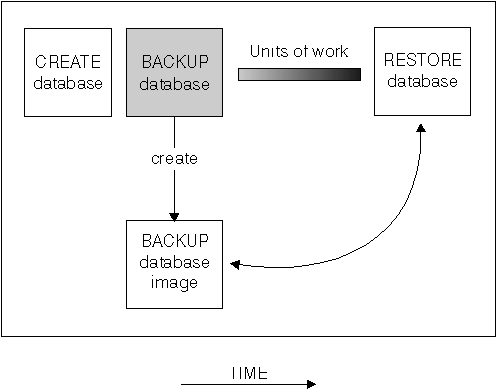
To make a backup copy of the database, you use the BACKUP command or the Control Center. Within the Control Center, you select the database to be backed up and then select the backup action.
Figure 53. Creating a Database Image
|
In a partitioned database system, you back up database partitions individually using the BACKUP DATABASE command. The operation is local to the database partition server where you issue the command. You can, however, issue db2_all from one of the database partition servers in the instance to submit the BACKUP command on a list of servers, which you identify by their node number. If you do this, you must back up the catalog node first, then back up the other database partitions. You can also use the Control Center to backup database partitions.
In a partitioned database system, you can use the LIST NODES command to determine the list of nodes (database partition servers) that have user tables on them. Because this recovery method does not support roll-forward recovery, regularly back up the database on this list of nodes.
In a distributed request system, the BACKUP and RESTORE commands apply to the distributed request database and the metadata stored within that database catalog (wrappers, servers, nicknames, etc.). Data source objects (tables and views) are not backed-up or restored unless those objects are stored in the distributed request database.
You must keep in mind the recovery method to be used. The following sections provide requirements and other considerations that apply to this task:
| Note: | In the following sections when we discuss "pages" we are referring to those particular to the backup and restore utilities. These pages are always 4 KB in size and should not be confused with the multiple page sizes allowed for database data. |
Your planning considerations should include:
Under OS/2, you can also back up to diskette or to a user exit.
bufferpages <= ST_MAX_BUFFERS * ST_BUFFER_BLOCKS / 4where bufferpages is the value of either backbufsz or restbufsz. ST_MAX_BUFFERS and ST_BUFFER_BLOCKS are defined in the Linux kernel under drivers/scsi directory.
Under UNIX-based operating systems and Windows NT, native tape support is available.
| Note: | If you use a variable block size with your tape devices, ensure that the DB2 buffer size is either less than or equal to the maximum variable block size that the device is configured for. Otherwise, the backup will succeed but the resulting image is not guaranteed to be recoverable. |
If you have tables that contain DATALINK columns, also see Backup Utility Considerations.
To use tape devices, DB2 users on SCO UnixWare 7 must specify BUFFER to be 16. The default value of BUFFER is 1024 pages. If BUFFER is set to zero, the database manager configuration parameter backbufsz must be set to 16.
When you back up your table space or database, you must correctly set your block size and your buffer size. This is particularly true when you are using a variable block size (for example, on AIX when the block size has been set to zero).
There is a restriction on the number of FIXED block sizes that can be used when backing up. This restriction exists because DB2 writes out the back up image header as a 4 KB block. The only fixed block sizes DB2 supports are 512, 1024, 2048, and 4096 bytes. If you are using a fixed block size, you can specify any buffer size for the backup. However, you may find that your back up will not complete successfully if the fixed block size is not one of those mentioned here.
If your database data is large, using the fixed block sizes mentioned above will mean you back up will take a long time. You may want to consider using a variable block size.
When using a variable block size, you must also specify a buffer size in the BACKUP command that is less than, or equal to, the maximum limit for the tape device you are using. The buffer size must be equal to the maximum block size limit of the device being used if you would like the best performance.
You should be aware that restoring from a back up image where the block size is variable may return an error. If this happens, you might need to rewrite the image using an appropriate block size. An example of doing this in AIX follows:
   tcl -b 0 -Bn -f /dev/rmt0 read > backup_filename.file
   dd if=backup_filename.file of=/dev/rmt0/ obs=4096 conv=sync
This dumps the backup image to a file called "backup_filenam.file" The "dd" command then dumps the image back onto the tape using a block size of 4096.
The complication with this method of correction occurs if the image is too large to dump to a file. One possible solution with such a large image, is to use the "dd" command to dump the image from one tape device to another. This will work as long as the image does not span more than one tape. When using two tape devices, the "dd" command is:
dd if=/dev/rmt1 of=/dev/rmt0 obs=4096
If using two tape devices is not possible, you may be able to dump the image to a raw device using the "dd" command, and then dump the image from the raw device to tape. The difficulty using this method is that the "dd" command must keep track of the number of blocks dumped to the raw device. The number of blocks dumped needs to be specified when the image is moved back to tape. When the "dd" command is used to dump the image from the raw device to tape, the command dumps the entire size of the raw device to tape. The "dd" command cannot tell how much of the raw device is used to hold the image.
When using the BACKUP command you will need to know the maximum block size
limit for the tape device you are using. Here are some examples:
| Device | Attachment | Block Size Limit | DB2 Buffer Size Limit (in 4 KB pages) |
|---|---|---|---|
| 8 mm | scsi | 131 072 | 32 |
| 3420 | s370 | 65 536 | 16 |
| 3480 | s370 | 65 536 | 16 |
| 3490 | s370 | 65 536 | 16 |
| 3490E | s370 | 65 536 | 16 |
| 7332 (4 mm)* | scsi | 262 144 | 64 |
| 3490e | scsi | 262 144 | 64 |
| 3590** | scsi | 2 097 152 | 512 |
| 3570 (magstar MP) | 262 144 | 64 |
Notes:
The following considerations are useful when running the BACKUP command:
Using this parameter can dramatically reduce the amount of time required to complete the backup. The PARALLELISM parameter defines the number of processes or threads that are started to read data from the database. Each process or thread is assigned to back up a specific table space. When it completes backing up the table space, it requests another. You should note, however, that each process or thread requires both memory and CPU overhead: for a heavily loaded system, you should leave the PARALLELISM parameter at its default value of 1.
If you use multiple buffers and I/O channels, you should use at least twice as many buffers as channels to ensure that the channels do not have to wait for data. The size of the buffers used will also contribute to the performance of the backup operation. The ideal backup buffer size should be a multiple of the extent size for the table space(s).
If you have multiple table spaces with different extent sizes, specify a value that is a multiple of the largest extent size.
You may specify the number of pages to use for each backup buffer when you invoke the BACKUP command. The minimum number of pages is 16. If you do not specify the number of pages, each buffer will be allocated based on the database manager configuration parameter backbufsz. If there is not enough memory available to allocate the buffer, an error will be returned.
See Chapter 32, Configuring DB2 for more information on this configuration parameter.
See Appendix B, Planning Database Migration, for information about migrating a database.
If an error occurs during a backup process and the open container cannot be closed, other backup processes to the same target drive may receive access errors. To correct any access errors, you must completely exit the backup process that caused the error and disconnect from the target device.
Backup images are created at the target specified when you call the BACKUP command:
The recovery history file is updated automatically with summary information whenever you carry out a backup or restore of a full database. This file can be a useful tracking mechanism for restore activity within a database. This file is created in the same directory as the database configuration file. For more information on the recovery history file, see Recovery History File Information.
In UNIX-based environments, the file name(s) created on disk will consist of a concatenation of the following information, separated by periods; on other platforms a four-level subdirectory tree is used:
In UNIX-based operating systems, the format would appear as:
Database alias.Type.Instance name.NODEnnnn
.CATNnnnn.timestamp.number
On other operating systems, the format would appear as:
Database alias.Type\Instance name.NODEnnn
\CATNnnn\yyyymmdd\hhmmss.number
For example in UNIX-based environments, a database named STAFF on the DB201 instance may be backed up on disk to a file named:
STAFF.0.DB201.NODE0000.CATN0000.19950922120112.001
For tape-directed output, file names are not created; however, the above information is stored in the backup header for later verification purposes.
Notes:
There is a backup utility to display information regarding the backup images that exist. The name of this utility is db2ckbkp and it allows you to:
You must have read permissions on the backup images you specify when using this utility.
To simply verify the existence of a backup image, you can use the utility as follows:
db2ckbkp STAFF.0.DB201.NODE0000.CATNOOOO.19950922120112.001
The output from this utility is similar to:
   [1] Buffers processed:  ##

   Image Verification Complete - successful.
Refer to the Command Reference for additional information on this utility.
The following sections provide requirements and other considerations that apply to the RESTORE command:
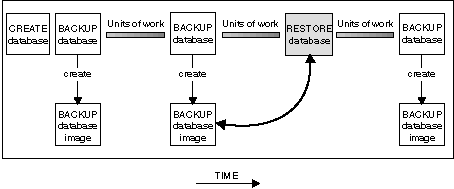
Figure 54. Restoring a Database Using a Backup Image
 |
You should consider the following:
If the option is specified and the DB2 Data Links Manager containing the DATALINK data is not available, all table spaces containing tables with DATALINK values on the unavailable server are placed in the RESTORE PENDING state. These table spaces must be restored again when the Data Links server becomes available.
If you have tables that contain DATALINK columns, see both Restore and Rollforward Utility Considerations and Restoring Databases from an offline Backup without Rolling Forward.
The following considerations are useful when running the RESTORE command:
You may specify the number of pages to use for each restore buffer when you invoke the RESTORE command. The value you specify must be a multiple of the number of pages that you specified for the backup buffer. The minimum number of pages is 16. If you do not specify the number of pages, each buffer will be allocated based on the database manager configuration parameter restbufsz. If there is not enough memory available to allocate the buffer, an error will be returned.
See Chapter 32, Configuring DB2 for more information on this configuration parameter.
You can also specify a partial timestamp. For example, assume that you have two different backups with the timestamps 19971001010101 and 19971002010101. If you specify 19971002 for TAKEN AT, the 19971002010101 backup is used.
If TAKEN AT is not specified, there must only be one backup on the source media.
If you use TSM and do not specify the TAKEN AT parameter, TSM retrieves the latest backup copy.
Under OS/2, the backup copy of the database could also be located on diskette or through a user exit.
Under supported Windows operating systems, the backup copy of the database could also be located on diskette.
During a backup of a database, a record is kept of all the table space containers in use by the table spaces that are backed up. During a RESTORE, all containers listed in the backup are checked to see if they currently exist and are accessible. If one or more of the containers is inaccessible because of a media failure (or for any other reason), the RESTORE will fail. In order to allow a restore in such a case, the redirecting of table space containers is supported during the RESTORE. This support includes adding, changing, or removing of table space containers.
There are cases in which you want to restore even though the containers listed in the backup do not exist on the system. An example of such a case is where you wish to recover from a disaster on a system other than that from which the backup was taken. The new system may not have the necessary containers defined. In order to allow a RESTORE in this case, the redirecting of table space containers at the time of the RESTORE to alternate containers is supported.
In both situations, this type of RESTORE is commonly referred to as a redirected restore.
You can redefine table space containers through the restore task from within the Control Center. You can also use the REDIRECT parameter of the RESTORE command to specify the redirection. If you are using the Control Center, one way of performing a redirected restore is to use the Containers page of the Restore Database notebook. This page provides function that you can use to add new containers, change the path of an existing container, or remove a container. If, during the process of the restore database operation an invalid container path is detected, the Control Center will prompt you to either change the container path, or remove the container.
Notes:
You may restore a backup copy of a full database backup to an existing database. To restore to an existing database, you must have SYSADM, SYSCTRL, or SYSMAINT authority. The backup image may differ from the existing database in its alias name, its database name, or its database seed.
A database seed is a unique identifier of a database that remains constant for the life of the database. This seed is assigned by the database manager when the database is first created. The seed is unchanged following a restore of a backup even if the backup has a different database seed. DB2 always uses the seed from the backup.
When restoring to an existing database, the restore task performs the following functions:
As an alternative to restoring a database to a database that already exists, you may create a new database and then restore the backup of the data. To restore to a new database, you must have SYSADM or SYSCTRL authority.
| Note: | The code pages of the backup and the target database must match. If they do not, first create the new database specifying the correct code page, then restore it. |
When you restore to a new database, the RESTORE command will perform the following functions: