Step
 of 11:
Deploy the Credential Mapper Servlet
The way in which you deploy the CMS
depends on your Web application server. In this scenario, the administrator
uses WebSphere Application Server V5 on a Windows platform to deploy the CMS.
He takes the following steps:
- Click Start
> Programs > IBM WebSphere > Application Server v5.0 > Administrative Console
to open the Administrative Console.
- In the left navigation field,
click Applications > Install New Application.
- Select Local
path and browse to the amcms.war file.
- Specify the content root in the
Context Root field. The context root is combined
with the defined servlet name (CredMapper) to compose the full URL that users
type to access the servlet. For example, if the context root is /wel , then
the URL is https://host:port/wel/CredMapper, where host is the name
of the host, port is the port number, and CredMapper is the
name of the CMS. Click Next.

- Check the Generate
Default Bindings box. By choosing this option, you can jump directly
to the Summary step and deploy the WAR file. Click Next.
- Scroll down and click the Step
4 Summary link.
- Scroll down and click Finish.
- In the left navigation field,
click Applications > Enterprise Applications.
- Scroll through the applications
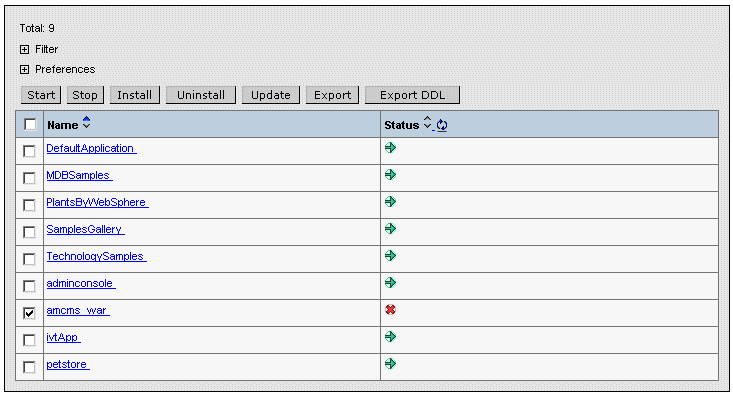
and check the checkbox beside amcms_war, which is your application name. Notice
that the status is Stop until you start it in the next step.

- Save the application and click
Start at the top to start the application. Once
the application starts, the status will change from the Stop icon
( ) to the Start icon (
 ).
).
- Test to make sure that the WAR
file installed correctly by pointing a browser to http://server_name:9080/wel/CredMapper,
where server_name is the name of the host server. Port 9080 is the
default WebSphere port. If you deployed the servlet correctly, your browser
request will return XML code.
If this fails, try stopping and restarting the application again.
Back
to top
Click Next
to create your HTML file using the Deployment Wizard.


