Performing a Rebase Operation
The following sections cover the following tasks:
Preparing Your Development View
Listing Checkouts
This task involves searching for files that are still checked out so that you can check them in.
Listing Checkouts on Windows
To search for checkouts from the ClearCase Explorer:
- In the Folders pane, select the top level folder that contains the checkouts.
- Right-click and select Find Checkouts to open the Find Criteria dialog box.
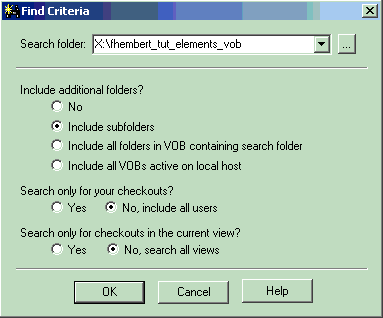
The Search folder lists the folder you selected in Step 1.
The Include options let you narrow or widen the scope of the search. By default, the option to include subfolders is selected.
The search option lets you widen the search to include checkouts from other users (select No, include other users) and all views (select No, include all view).
- Click OK to view the search results in the Find Checkouts dialog box.
If any checkouts are found, the Find Checkouts dialog box identifies the following (from left to right):
- The name of the file and its full path
- The username of the individual who checked out the files
- The view tag from which the files were checked out
- If the file was checked out reserved or unreserved
- The the name of the branch and version number of the files’ predecessors
- Work or activity performed
- If in a MultiSite environment, the Master Replica of Branch (not visible on the illustration)
- The checkout comments, if they were entered at checkout time (not visible on the illustration)
Listing Checkouts on UNIX
The lscheckout command lists any outstanding checkouts. The command has more parameters than shown in this section, but the command as shown corresponds to the options selected using Find Checkouts from the ClearCase Explorer.
At a system prompt, type this command:
cleartool lscheckout -cview -me -avobs
-cview restricts the list to checkouts made in the current view.
-me restricts the listing to your checkouts only.
-avobs includes checkouts in all mounted VOBs
System response is similar to the following:
\jdoe_denali\mck\rel1\xyz.c, where
- \jdoe_denali is the current view
- \mck and \rel1 are directories under source control
- xyz.c is the name of the checked-out file
Listing Content Differences
After your find outstanding checkouts, you need to investigate the differences. To do so, you use Compare with previous version option. This option is available from the Tools menu in the Find Checkouts dialog box or from the shortcut menu.
Note: When you attempt to compare nontext files such as binary and graphic files, an error message informs you can only use the compare option on text files.
Listing Content Differences on Windows
To compare with the previous version from the Find Checkouts dialog box:
- Select a file in the Find Checkouts dialog box
- Right-click and select Compare with previous version to start the Diff Merge tool.
The Diff Merge tool lists the current and previous versions of the selected file.
Listing Content Differences on UNIX
To display differences between the checked-out version and its predecessor, use the diff command:
cleartool diff -predecessor filename
For example, cleartool diff -predecessor xyz.c
Listing Checkin Comments
Listing Checkin Comments on Windows
The Find Checkouts dialog box lists the checkin comments in the Comments field.
Listing Checkin Comments on UNIX
To display the checkin comments, use the lshistory command:
cleartool lshistory filename
For example, cleartool lshistory xyz.c
Checking Files In
Any checked-out files must be checked in, or the checkout canceled.
Checking Files In on Windows
You use Tools > Check In to check in a file or Tools > Cancel checkout to cancel a checkout in the Find Checkouts dialog box, or from the shortcut menu.
To check in the file from the Find Checkouts dialog box:
- Select a file.
- Right-click and select either Check In or Cancel checkout from the shortcut menu.
- When checking in, add or replace the checkin command and click OK. When canceling a checkout, deselect the keep option if you do not want to keep a private copy of the file, and then click OK.
Checking Files In on UNIX
The cleartool checkin command checks in a file. The command format is:
cleartool checkin filename
The cleartool uncheckout command cancels the checkout. The command format is:
cleartool uncheckout filename
Starting the Rebase Operation
After preparing your development stream as outlined in the preceding section, you can start the rebase operation.
The rebase operation involves the following tasks:
- Selecting the recommended baseline.
- Merge operations; this may require to stop and resume the rebase operation to enable you to perform test builds in your work area.
The following guides you through a rebase operation.
Starting a Rebase Operation on Windows
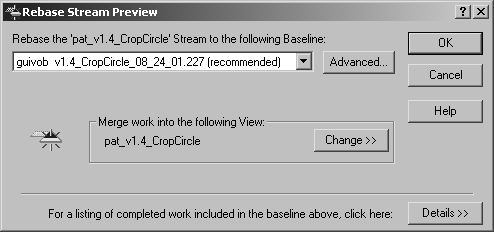
In the ClearCase Explorer, right-click the root directory of the development view and click Rebase Stream to open the Rebase Stream Preview dialog box (Figure 5).
The Rebase Preview Dialog Box (Windows)
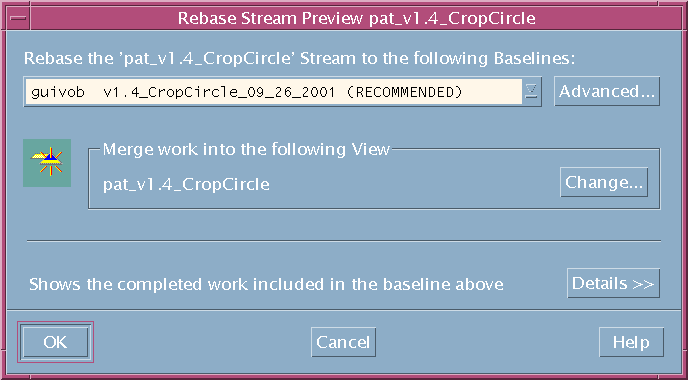
Starting a Rebase Operation on UNIX
At a system prompt, type:
cleartool rebase -graphical
See Figure 6.
The Rebase Preview Dialog Box (UNIX)
By default, the dialog box presents the recommended baseline.
It is important to verify that the dialog box displays your development view under Merge work into the following view. If you attached multiple views to your development stream, use the Change button to choose one view for the rebase operation.
Clicking the Details button will show the list of activities in the baseline.
Rebasing Your Development Work Area
In rebasing your work area to the recommended baseline, ClearCase changes your development stream configuration to select the new recommended baseline. The stream continues to select any undelivered activities created in the development stream.
For snapshot development views, ClearCase starts an update operation to copy the versions of the new baseline into your view. If other snapshot views are attached to your development stream, you must update these also so that they contain the changes in the stream.
For dynamic development views, ClearCase shows the versions of the new baseline without requiring an update operation.
Merging Versions
If another team member modified and delivered a version of the same file, you must perform a merge operation when you rebase to a baseline that contains the delivered version.
As it does in a deliver operation, ClearCase merges all nonconflicting differences.
For conflicting differences, ClearCase will prompt you to start the Merge Manager to resolve the conflicts. For information on merging, go to the Merging Your Work module.
Testing
After all merge conflicts are resolved, you need to verify that any undelivered work in your work area builds correctly with the element versions resulting from the new baseline.
Testing your undelivered work will undoubtedly involve checking files in and out, and performing several builds until no build errors are reported.
Completing the Rebase Operation
Completing a rebase operation consists of two tasks:
- Checking in any merge results, and
- Completing the rebase operation. This is accomplished by clicking the Complete button in the Merge Manager (Windows) or the clearmrgman (UNIX) windows.