Adding Files to Source Control
Before you can check out a file, you must first add it to ClearCase source control.
Follow the instructions for the platform of interest to you:
Adding Files to Source Control on Windows
To add a file to source control in the ClearCase Explorer, do the following:
- In the Browser pane, select the private file that you want to add to source control.
- Right-click and select Add to source control from the shortcut menu.
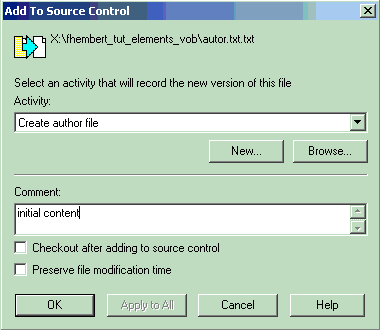
- Type an activity and a comment, and click OK.
Try It!
Note: To have a file to use for learning to check in and out, the exercise includes creating a small text file named author.txt.
ClearCase users create the author.txt file in the VOB your-username_tut_elements_vob.vbs.
ClearCase LT users create the author.txt file in the VOB cclt_tutorial_sources.vbs.
- Use your favorite text editor, and create a text file and type in your name.
- Save the file using the name author.txt in the your-username_tut_elements_vob folder. Then close the editor.
- Refresh your view (press F5) to see the file you created listed.
- To add the author.txt file to source control, right-click the file and select Add to source control from the shortcut menu.
- ClearCase users only. As activity, type: author file. As comment, type: initial content.
- Make sure the option Check out after adding to source control is not selected, to enable you to practice checking out later. Then, click OK.
- Go to the ClearCase Explorer and press F5 to update the contents of your view. ClearCase has added the author.txt file to source control.

Adding Files to Source Control on UNIX
Before you can create a new element, or add an existing element to source control, you must check out all parent directories of the element using the cleartool checkout command. To retain the parent directory of the view-private file that is being created as a new element, you use the -mkpath option in the cleartool checkout command.
You add a file to source control by using the mkelem command. This command creates one or more new elements. By default, this command will check out the element to your view.
If the element already exists as a view-private file, use the -checkin option to create the new element using the view-private file. To preserve the modification time of the file being checked in, use the -ptime option. If you omit the -ptime option, the modification time of the new version is set to the checkin time.
For example, to add a view-private file named foo.c to source control that is located in the bin directory, you would do the following:
- Checkout the bin directory:
cleartool checkout -mkpath bin
- Add foo.c to source control and retain the file’s modification time:
cleartool mkelem -checkin -ptime foo.c
You should not forget to check in the parent directories when you are done, using the cleartool checkin command!
Try It!
Note: To have a file to use for learning to check in and out, you will first create one in /var/tmp/your-username_tut_elements_vob.
- Navigate to the VOB /var/tmp/your-username_tut_elements_vob.
- Use your favorite text editor, and create a text file containing your name.
- Save the file using the name author.txt. Then close the editor.
- Check out the parent directory of the author.txt file by typing this command at a system prompt:
cleartool checkout your-usename_tut_elements_vob
- To add the view-private file author.txt to source control under, type this command:
cleartool mkelem -ci -ptime -co “initial content” author.txt
Optional. Review the reference page for the cleartool mkelem command and display it in a Web browser by typing this command: cleartool man -gra mkelem