Configuring SQL Server for RequisitePro
Microsoft, Windows, Windows NT, and SQL Server are either registered trademarks or trademarks of Microsoft Corporation in the United States and/or other countries.
Rational, the Rational logo, Requisite, and RequisitePro are trademarks or registered trademarks of Rational Software Corporation in the United States and in other countries.
All other names are used for identification purposes only and are trademarks or registered trademarks of their respective companies.
Copyright © 1998-2000 Rational Software Corporation. All Rights Reserved.
Contents

Purpose
Introduction
Prerequisites
- Required Software
- SQL Server Database Administration
- Platform Compatibility
Creating a SQL Server Database for RequisitePro
- Schema Creation Scripts
- Installing and Copying the RequisitePro Scripts
- Running Schema Creation Scripts
- Default Login and User
Creating a Project in SQL Server
Upgrading Projects in SQL Server
Upgrading Projects in SQL Server
Purpose

This document provides information about configuring Rational RequisitePro for use with Microsoft SQL Server. The section includes:
- database management information for setting up a SQL Server schema to accommodate RequisitePro projects
- a procedure for creating a RequisitePro project in the SQL Server database
This document is intended for use by SQL Server database administrators, system administrators, and RequisitePro project administrators.
Introduction

RequisitePro offers the capability of using Microsoft SQL Server, as well as Microsoft Access and Oracle, for your RequisitePro project database. The use of SQL Server offers significant power and expandability to your organization's implementation of RequisitePro.
To create and access RequisitePro projects in the SQL Server database, follow the instructions in this section for enabling your SQL Server database compatibility. RequisitePro supports multiple projects within a single SQL Server schema. Refer to the procedure Creating a Project in SQL Server for instructions on adding an SQL Server database project within RequisitePro. Use the same schema name for each of your RequisitePro projects.
Prerequisites

This document assumes that you have SQL Server, Version 7.0, installed on your LAN. Refer to the SQL Server documentation for all questions regarding that product.
Note: If you have an existing RequisitePro database in SQL Server, and your SQL Server software has been upgraded to version 7.0 from a previous version, then you must run the following stored procedure in SQL Server to set the database compatibility level to SQL Server 7.0:
sp_dbcmptlevel <database name>, 70
sp_dbcmptlevel RequisitePro, 70
The above procedure is required to prevent SQL Server Syntax Errors in RequisitePro.
The following installation and configuration tasks need to be accomplished prior to performing the RequisitePro/SQL Server integration outlined in this document.
Required Software

SQL Server Database Administration

Prior to configuring your access to SQL Server from RequisitePro, the database administrator must establish the following:
- SQL Server machine name (TCP/IP Host Name)
- SQL Server default database for RequisitePro projects, such as "RequisitePro"
- a user ID for logging on to the SQL Server database, such as "ReqPro"
- a user password for logging on to the SQL Server database, such as "reqpro"
Note: Database names that contain spaces are not supported for use with RequisitePro projects.
The following sections provide instructions for configuring the last three of these items.
Platform Compatibility

RequisitePro database implementation is compatible with all Microsoft SQL Server-supported platforms.
Creating a SQL Server Database for RequisitePro

Use the following instructions to create a SQL Server database and schema for RequisitePro projects. The initial database size is based on the following approximations for your use of RequisitePro:
- 25 projects
- 250 documents (10 per project)
- 125 document types (5 per project)
- 125 requirement types (5 per project)
- 1,250 user-defined attributes (10 per requirement type)
- 125 user groups (5 per project)
- 100 users
- 12,500 requirements (500 per project)
- 12,500 discussions (500 per project)
To create a database in SQL Server 7.0, do the following:
- Enter a name for the RequisitePro database. The database has an .MDF extension. The recommended database name is "RequisitePro."
Note: If you use a different database name, you will need to modify the database configuration scripts to reflect the actual name.
- Set the initial size of the database to 150 MB.
- Set the initial size of the transaction log file (.LDF) to one third the size of the database (in this case, 50 MB).
Schema Creation Scripts

The scripts listed below are used for creating a RequisitePro schema within your SQL Server database.
- Login and User. Creates a default RequisitePro login and user. For more information refer to the section below, "Default Login and User."
- Tables and Indexes. Creates the tables and indexes required by RequisitePro.
- Triggers. Creates triggers that enforce cascading deletes.
- Initial Data. Inserts data required by RequisitePro when it first runs.
Installing and Copying the RequisitePro Scripts

Note: The schema creation scripts are included on your Rational Windows Solutions media in the following location:
CD-ROM:\\RequisitePro\database\SQLserver\To manually copy the scripts from the CD, go directly to step 6 below; to install the scripts using the Rational Software Setup installation program, begin at step 1.
To install the RequisitePro SQL Server database creation scripts:
- Run the Rational Software Setup program, which is included on your Rational Solutions for Windows CD.
- At the screen "Choose Product to Install," select the Rational RequisitePro product.
- At the screen "Setup Configuration," select the Custom/Full installation option.
- At the screen "Choose Features," under Rational RequisitePro, select the SQL Server Setup option.
- Complete the installation program. By default, the scripts are installed at the following location on your local machine:
C:\Program Files\Rational\RequisitePro\database\sqlserver - Copy the scripts to a subdirectory on your SQL Server database server. We suggest that you create a "sql" directory below the home directory on the server.
Running Schema Creation Scripts

The scripts listed below are used for creating a RequisitePro schema within your SQL Server database. Run the scripts in the sequence presented below. Run the scripts individually using the SQL Server Query Analyzer. Be sure to select the RequisitePro database in the DB drop-down list when running the scripts.
Default Login and User

The schema creation scripts, described above, create default user information for accessing and creating projects in SQL Server. The user name also establishes the ownership and name of the schema (by default, "reqpro"). The default user permissions are required for use with RequisitePro.
Note: If you modify the login and user.sql script to use a different login and user name, you will need to modify subsequent scripts.
Note: Do not use Non-English characters when entering the password for the schema.
The scripts create the following default user information:
|
User |
Login |
Password |
|
ReqPro |
ReqPro |
reqpro |
The ReqPro user is assigned the following statement permissions in SQL Server:
|
User |
Statement Permissions |
|
ReqPro |
Create Default, Create Procedure, Create Rule, Create Table, Create View |
As the owner of the RequisitePro database objects, the ReqPro user is automatically assigned the following database permissions in SQL Server:
|
User |
Database Permissions |
|
ReqPro |
Select, Insert, Update, Delete, DRI on all Tables and Views |
Creating a Project in SQL Server

Note: To convert a project from an existing Microsoft Access database to an Oracle database, use the Database Type Conversion Wizard. Open the Database Type Conversion Wizard in Windows Explorer. The executable, rqdatatransportwiz.exe, is located in the directory: \Program Files\Rational\RequisitePro\bin\
Perform the following steps to create a RequisitePro project that uses the SQL Server for the project database.
In order to configure access to SQL Server from RequisitePro, the database administrator must provide you with the following information:
- SQL Server machine name (TCP/IP Host Name)
- SQL Server default database for RequisitePro projects, such as "RequisitePro"
- a user ID for logging on to the SQL Server database, such as "ReqPro"
- a user password for logging on to the SQL Server database, such as "reqpro"
- Start RequisitePro. In RequisitePro on the Project menu, click New. The Create RequisitePro Project dialog box appears.
- Select a project template.
Note: The details in the lower part of the dialog box provide an explanation as you select each template.
- Click Create. The Rational RequisitePro Project Properties dialog box appears.
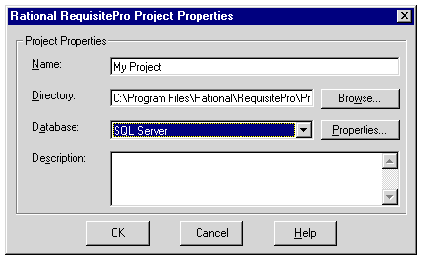
- Enter a project name and directory location.
- At the Database field, select SQL Server from the drop-down list.
- Click the Properties button. The Database Properties dialog box appears.
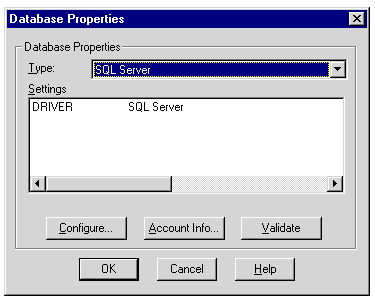
- At the Database Properties dialog box, click the Configure button. The "Create a New Data Source to SQL Server" dialog box appears.
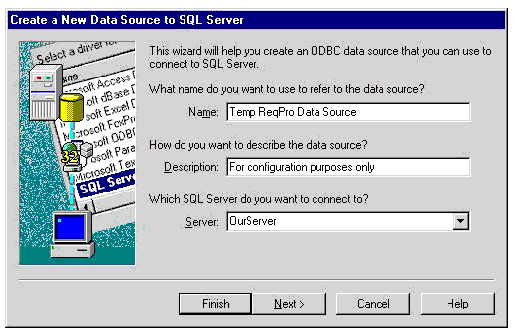
- Do not modify the data source Name or Description fields. In the Server field, type the name of the SQL Server, supplied by your database administrator.
- Click Next. The second data source screen appears.
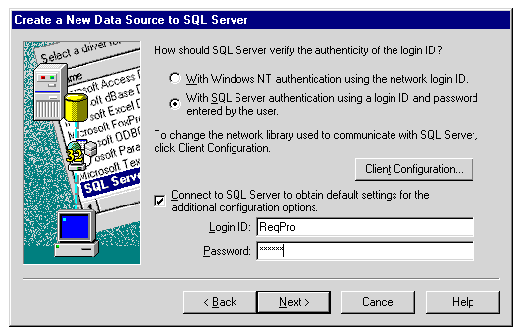
- Select the option With SQL Server authentication using a login ID and password entered by the user.
Note: RequisitePro does not support Windows NT authentication.
- Be sure the check box Connect to SQL Server to obtain default settings for the additional configuration options is checked.
- Type the login ID and password supplied by your database administrator, such as "ReqPro" and "reqpro." Click Next.
- Click the check box Change the default database to and select a database name supplied by your database administrator, such as "RequisitePro." Click Next.
- Click Next to accept the default language, character, and regional settings. The use of log files, shown on the following screen, is optional.
Note: Do not select the check box Change the language of SQL Server system messages to... Selecting this check box prevents users from opening the project after its initial creation.
- Click Finish. The ODBC Microsoft SQL Server Setup dialog box appears.
- Click the Test Data Source button. The SQL Server ODBC Data Source Test dialog box appears.
- Click OK. The ODBC Microsoft SQL Server Setup dialog box appears.
- Click OK. You return to the Database Properties dialog box.
- At the Database Properties dialog box, click the Account Info button. The Database Account Info dialog box appears.
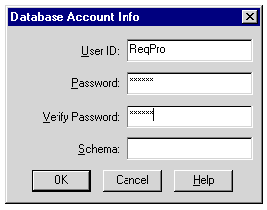
- Type the User ID and Password, supplied by your database administrator for accessing the SQL Server database, such as "ReqPro" and "reqpro."
- Retype your password in the Verify Password field.
- In the Schema field, type the user name of the owner of the RequisitePro database tables, supplied by your database administrator, such as "ReqPro."
- Click OK to close the Database Account Info dialog box. Click OK to close the Database Properties dialog box.
- Finish creating your project, then click OK to close the Project dialog box.
Upgrading Projects in SQL Server

Upgrading Projects In SQL Server
If you have SQL Server 2000 installed and you are running the Database Upgrade Wizard, you may receive an error message informing you that you lack permissions to perform an action. This occurs because SQL Server 2000 allows only server administrators to drop and add system messages (specifically to execute the sp_dropmessage and sp_addmessage stored procedures). To complete the upgrade, your DBA will need to assign the RequisitePro user (e.g. reqpro) to the ServerAdmin role. When the DBA has completed this task, run the Database Upgrade Wizard again and you should not receive the error message. Remove the user from the ServerAdmin role when the upgrade has been completed.
Archiving and Baselining an SQL Server Project

Refer to the topics "Archiving enterprise database projects" and "Baselining projects with Unified Change Management" in the RequisitePro online help. These help topics are also available in Let's Go RequisitePro. Click the Project Administration Tips icon and select the appropriate link.