

|
The supported server platforms and required software versions for the Web server are listed in Table 6.
Operating System Platform | Web Server Software | FrontPage Server Extensions / Office Server Extensions |
|---|---|---|
Windows NT 4.0 | IIS 4.0 | 3.0.2.1105 (ships on FrontPage 98 CD) |
Windows NT 4.0 | IIS 4.0 | 3.0.2.1706 (ships on Windows NT 4.0 Option Pack CD) |
Windows NT 4.0 or Windows 2000 | IIS 4.0 or IIS 5.0 | 4.0.2.2717 (ships with Office 2000) |
Windows 2000 | IIS 5.0 | 4.0.2.3xxx (ships with Windows 2000) |
We recommend that IIS be the only Web server on the host and that the default port (80) be used. Check for other Web server software before proceeding to install IIS.
Note that if IIS version 2.0 or version 3.0 is installed, you must uninstall it before you install IIS version 4.0 from the Windows NT 4.0 Option Pack.
If you are using a Windows 2000 server and have taken all the defaults for the Windows 2000 server installation, IIS 5.0 and FrontPage 2000 Server Extensions are installed on your server. If you have not performed a default Windows 2000 server installation, use the Windows 2000 Control Panel to add the required components.
If you are using Windows NT 4.0 server, you need to install IIS 4.0 and either FrontPage Server Extensions or Office Server Extensions.
When installing IIS 4.0 from the Windows NT 4.0 Option Pack on Windows NT 4.0 or IIS 5.0 from the Windows 2000 Control Panel, the following components are required for the FrontPage/InterDev integrations. All other components are optional.
Internet Information Server (when you select this component, you will also have to select a number of other components, like Windows NT Option Pack common files, on which this component depends)
Internet Service Manager
FrontPage Server Extensions (if you plan to install OSE later, installing FPSE at this time is optional)
Windows Scripting Host
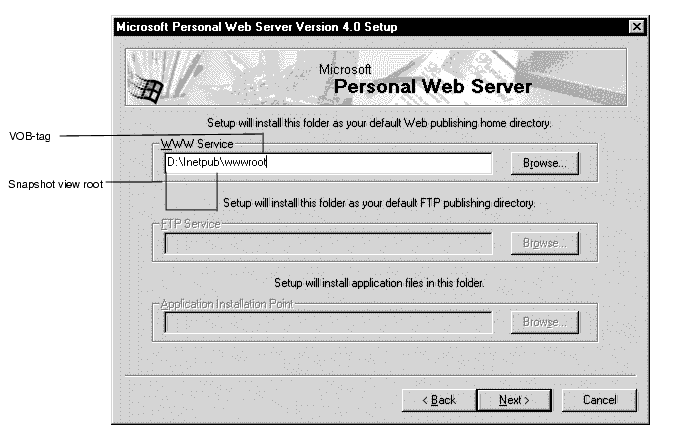
When you install IIS, a screen similar to Figure 31 appears. The default Web alias directory determines the VOB-tag of the Web content VOB that will be created in Step 4. (See Step 4: Run the Web Authoring Integration Configuration Wizard.) You need to choose the VOB-tag you want this Web server to access. By default, this is \wwwroot as shown in Figure 36. If this VOB-tag is already registered in this machine's ClearCase registry or if you want another name (for example, wwwroot_<host>, or a descriptive name, \sales_Webs) you must change the default now. The remainder of this pathname becomes a snapshot view root when the Web Authoring Integration Configuration Wizard is run, as shown in Figure 31.
Figure 31 Setting Up the Root Web in the IIS Installation
n
After IIS is installed, you may need to run Internet Service Manager to add IIS operators and enable Basic Authentication. If you use a local VOB and view on the Web server that you are setting up, you do not need to enable Basic Authentication.
If Office 2000 was installed on the Windows NT 4.0 server before IIS 4.0 was installed, the FPSE will not be installed on the Web server even though you chose to install FPSE from the Windows NT 4.0 Option Pack. In this case, we recommend that you install OSE after the Windows NT 4.0 Option Pack to upgrade to version 4.0 server extensions.
If FPSE were installed in Step 1: Install IIS, it is not necessary to reinstall. If version 3 FPSE were installed by a previous Option Pack install, you can upgrade to OSE, but it is not necessary.
If FPSE were not installed in Step 1: Install IIS, install FPSE version 3.0 (from NT Option Pack) or version 4.0 (from Office 2000 CD3, Office Server Extensions (OSE), or Windows 2000). The FPSE are installed when you install Windows NT 4.0 Option Pack on Windows NT 4.0 Server and Windows 2000 Server.
Install ClearCase LT (server or client) software on the computer. It includes a Web Authoring Integration Configuration Wizard that is used in the Step 4.
Run the Web Authoring Integration Configuration Wizard and follow the instructions. To start the wizard:
For ClearCase LT client, click Start > Programs > Rational ClearCase LT Client > Integrations > Web Authoring Integration Configuration.
For ClearCase LT server, click Start > Programs > Rational ClearCase LT Server > Integrations > Web Authoring Integration Configuration.
Online help is available for each wizard screen. When running the wizard, always specify Server Mode Configuration. Specify Local Mode Configuration only if you plan to install FrontPage 2000 client on the Web server.
If you have previously installed SourceSafe on your Web server, the wizard displays a Replace SourceSafe screen. To use the integration, you must click Yes. Doing so does not disable any part of SourceSafe except for the SourceSafe COM API.
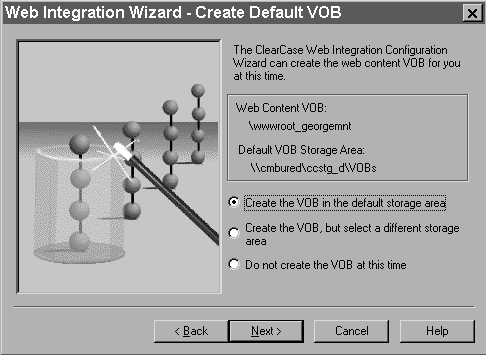
After the Web Authoring Integration Configuration Wizard checks the versions of IIS and server extensions on the Web server, you are prompted to create a content area VOB. You can accept the default VOB storage location, as in Figure 32, or use the wizard to select another VOB storage location.
Figure 32 Setting Up the VOB Storage for the Integration

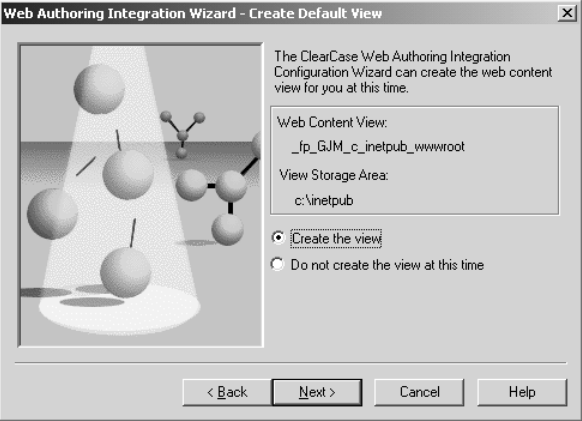
The wizard then prompts you to create a content area view, as in Figure 33.
Figure 33 Setting Up the View Storage for the Integration

We recommend that you put the VOB on the Web server, which improves performance and avoids the use of basic authentication.
If you decide to use an existing VOB (on UNIX or Windows NT) as the Web content VOB, it must be created and registered with the expected VOB-tag as described in Step 1: Install IIS. If this VOB is created before the wizard is run, the wizard shows the existing VOB-tag and skips the VOB creation step.
Any VOB accessed through the integration has the same trigger restrictions that ClearCase Web client access imposes, that is, interactive triggers fail.
The integration can only use views that are created either by the wizard or in FrontPage 2000 (with ClearCase > Create Snapshot View). The integration uses views that have a different hijacked-file detection mechanism than do standard views. This is necessary because FrontPage and InterDev rewrite files frequently. Attempts to use views created in any other way will fail. The integration does not support UCM-enabled views.
The Web Authoring Integration Configuration Wizard maintains a log file at ccase-home-dir\var\log\webintegration_log. You can review this log in the event of unexpected behavior or errors.
|
Feedback on the documentation in this site? We welcome any comments!
Copyright © 2001 by Rational Software Corporation. All rights reserved. |