

|
The following sections present a series of merge scenarios that require work on one branch of an element to be incorporated into another branch. Each scenario shows the version tree of an element that requires a merge and indicates the appropriate command to perform the merge.
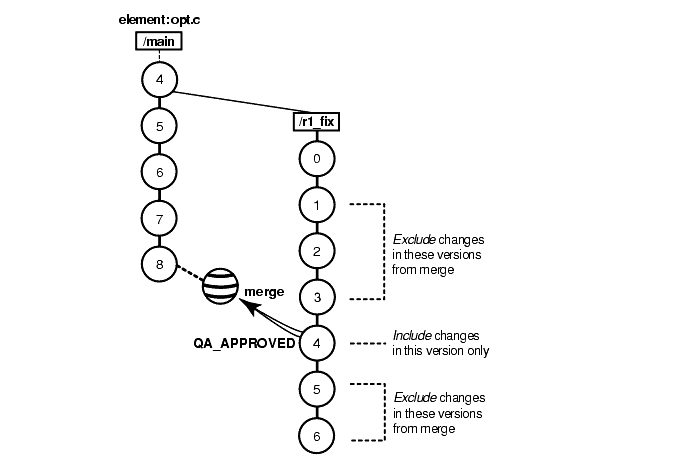
In this scenario, you want to incorporate the changes in version \main\r1_fix\4 into new development. To perform the merge, you specify which versions on the r1_fix branch to include. See Figure 46.
Figure 46 Selective Merge from a Subbranch

In a view configured with the default config spec, enter these commands to perform the selective merge:
Z:\avob> cleartool checkout opt.c
Z:\avob> cleartool merge -to opt.c -insert -version \main\r1_fix\4
You can also specify a range of consecutive versions to be merged. For example, this command merges only the changes in versions \main\r1_fix\2 through \main\r1_fix\4:
Z:\avob> cleartool merge -to opt.c -insert -version \main\r1_fix\2 \main\r1_fix\4
No merge arrow is created for a selective merge.
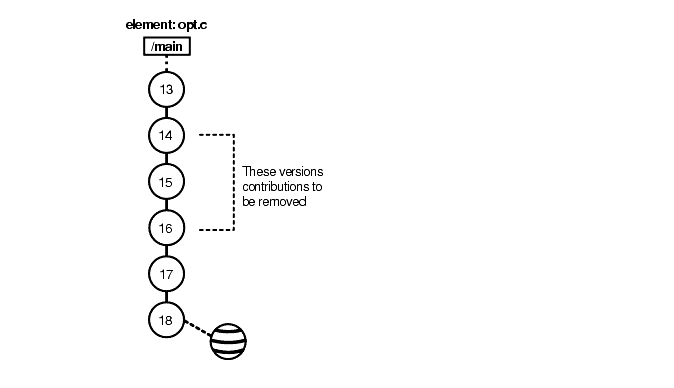
A new feature, implemented in versions 14 through 16 on the main branch, will not be included in the product. You must remove the changes made in those versions. See Figure 47.
Figure 47 Removing the Contributions of Some Versions

Enter these commands to perform this subtractive merge:
Z:\avob> cleartool checkout opt.c
Z:\avob> cleartool merge -to opt.c -delete -version \main\14 \main\16
No merge arrow is created for a subtractive merge.
Your team has been working on a branch. Now, your job is to merge all the changes into the main branch.
The findmerge command can handle most common cases easily. It can accommodate the following schemes for isolating the project's work.
The standard approach to parallel development isolates all project work on the same branch. More precisely, all new versions of source files are created on like-named branches of their respective elements (that is, on branches that are instances of the same branch type). This makes it possible for a single findmerge command to locate and incorporate all the changes. Suppose the common branch is named gopher. You can enter these commands in a view configured with the default config spec:
Z:\avob> cd root-of-source-tree
Z:\avob> cleartool findmerge . -fversion ...\gopher\LATEST -merge -graphical
The -merge -graphical syntax causes the merge to take place automatically whenever possible, and to start the graphical merge utility if an element's merge requires user interaction. If the project has made changes in several VOBs, you can perform all the merges at once by specifying several pathnames, or by using the -avobs option to findmerge.
Some projects are organized so that all changes are made in a single view (typically, a shared view). For such projects, use the -ftag option to findmerge. Suppose the project's work has been done in a view whose view-tag is goph_vu. These commands perform the merge:
Z:\avob> cd root-of-source-tree
Z:\avob> cleartool findmerge . -ftag goph_vu -merge -graphical
NOTE: Working in a single shared view is not recommended because doing so can degrade system performance.
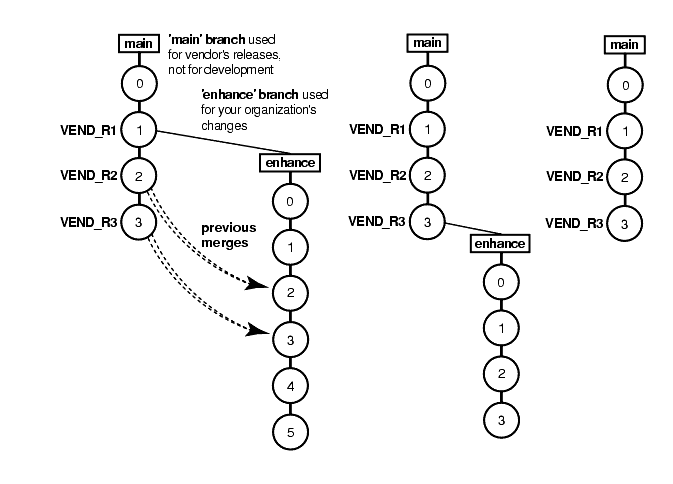
Your team has been using an externally supplied source-code product, maintaining the sources in a VOB. The successive versions supplied by the vendor are checked in to the main branch and labeled VEND_R1, VEND_R2, and VEND_R3. Your team's fixes and enhancements are created on subbranch enhance. The views that your team works in are configured to branch from the VEND_R3 baseline:
element * CHECKEDOUT
element * ...\enhance\LATEST
element * VEND_R3 -mkbranch enhance
element * \main\LATEST -mkbranch enhance
The version trees in Figure 48 show various likely cases:
An element that your team started changing at Release 1 (enhance branch created at the version labeled VEND_R1)
An element that your team started changing at Release 3
An element that your team has never changed
Figure 48 Merging a New Release of an Entire Source Tree

Release 4 has arrived, and you need to integrate this release with your team's changes.
To prepare for the merge, add the new release to the main branch and label the versions VEND_R4. Merging the source trees involves merging from the version labeled VEND_R4 to the most recent version on the enhance branch; if an element has no enhance branch, nothing is merged.
This procedure accomplishes the integration:
Load the vendor's Release 4 media into a standard directory tree:
C:\> cd %TMP%
C:\> xcopy drive\path options
The directory tree created is mathlib_4.0.
As the VOB owner, run clearexport_ffile, to create a datafile containing descriptions of the new versions.
C:\> cd \mathlib_4.0
C:\mathlib_4.0> clearexport_ffile
. (lots of output)
.
In a view configured with the default config spec, start clearimport on the file clearexport_ffile created. This creates Release 4 versions on the main branches of elements (and creates new elements as needed).
C:\mathlib_4.0> net use z: \\view\mainline
The command completed successfully.
C:\mathlib_4.0> z:
Z:\> cd \vob_proj\mathlib
Z:\vob_proj\mathlib> clearimport %TMP%\mathlib_4.0\cvt_data
Label the new versions:
Z:\vob_proj> cleartool mklbtype -c "Release 4 of MathLib sources" VEND_R4
Created label type "VEND_R4".
Z:\vob_proj> cleartool mklabel -recurse VEND_R4 \vob_proj\mathlib
. (lots of output)
.
Set to a view that is configured with your team's config spec and selects the versions on the enhance branch:
Z:\vob_proj> net use y: \\view\enh_vu
The command completed successfully.
Z:\vob_proj> y:
Y:\vob_proj>
Merge from the VEND_R4 configuration to your view:
Y:\vob_proj> cleartool findmerge -nback \vob_proj\mathlib -fver VEND_R4 -merge ^ -graphical
The -merge -graphical syntax instructs findmerge to merge automatically if possible, but if not, start the graphical merge tool.
Verify the merges, and check in the modified elements.
You have now established Release 4 as the new baseline. Developers on your team can update their view configurations as follows:
|
element * CHECKEDOUT | |
|
element * VEND_R4 -mkbranch enhance | (change from VEND_R3 to VEND_R4) |
Elements that have been active continue to evolve on their enhance branches. When elements are revised for the first time, their enhance branches are created at the VEND_R4 version.
One of the most powerful features of ClearCase is versioning of directories. Each version of a directory element catalogs a set of file elements and directory elements. In a development project, directories change are as often as files do. Merging the changes to another branch is as easy merging files.
Take a closer look at the source tree scenario from the previous section. Suppose you find that the vendor has made several changes in directory M:\view1\vob_proj\mathlib\src:
File elements Makefile, getcwd.c, and fork3.c have been revised.
File elements readln.c and get.c have been deleted.
A new file element, newpaths.c, has been created.
When you use findmerge to merge the changes made in the VEND_R4 sources to the enhance branch, the changes to both the files and the directory are handled automatically. The following findmerge excerpt shows the directory merge activity:
If you have changes to merge from both files and directories, it may be a good idea to run findmerge twice: first to merge directories, and again to merge files. Using the -print option to a findmerge command does not report everything that is merged, because findmerge does not see new files or subdirectories in the merge-from version of a directory until after the directories are merged. To report every merge that takes place, use findmerge to merge the directories only, and then use findmerge -print to get information about the file merges needed. Afterward, you can cancel the directory merges by using the uncheckout command on the directories.
|
Feedback on the documentation in this site? We welcome any comments!
Copyright © 2001 by Rational Software Corporation. All rights reserved. |