

|

ClearCase provides several tools to help you track the progress of your project. This section describes how to use those tools.
The ClearCase Component Tree Browser is a GUI that displays the baseline history of a component. You can use it to compare the contents of two baselines. To start the Component Tree Browser:
Start the Project Explorer, and navigate to the component whose baseline history you want to see.
Right-click the component to display its shortcut menu. Select Browse Baselines.
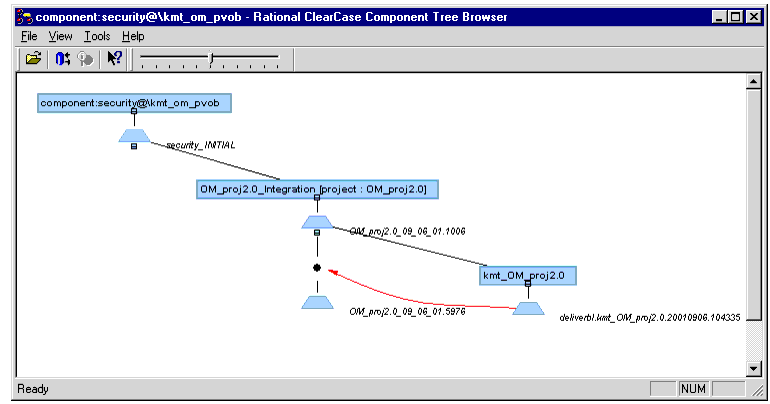
The Component Tree Browser opens, as shown in Figure 32.
Figure 32 ClearCase Component Tree Browser

The Component Tree Browser shows the lines of development for the component and each stream that uses the component. In Figure 32, security_INITIAL is the initial baseline that was created when the project manager created the security component.OM_proj2.0_09_06_01.1006 is the first baseline that the integrator created after creating the component. It is the foundation baseline for the integration stream and the development stream named kmt_OM_proj2.0.
The deliverbl.kmt_OM_proj2.0.n entry is a baseline that ClearCase creates in the development stream during deliver operations. The integration arrow from the development stream to the integration stream represents a deliver operation. The OM_proj2.0_09_06_01.5976 baseline includes the work from the deliver operation.
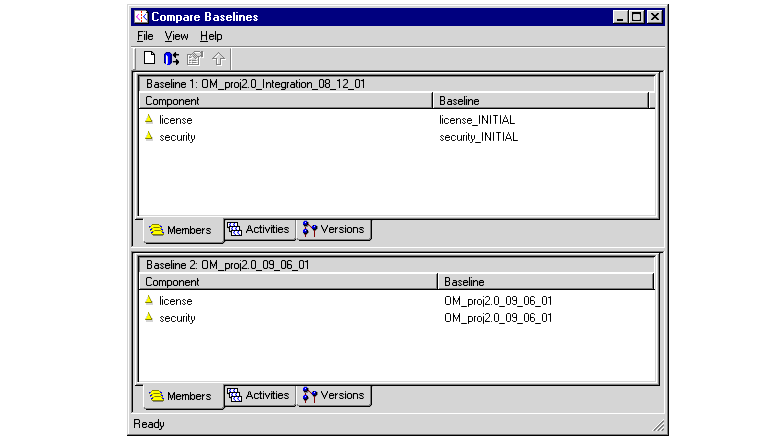
To compare two baselines, select a baseline by clicking its icon. Then click Tools > Compare > with Another Baseline. Click the second baseline's icon. The Compare Baselines window opens, as shown in Figure 33. Alternatively, you can click Tools > Compare > with Previous Baseline to compare a baseline with its immediate predecessor.

The Compare Baselines window in Figure 33 shows the results of a comparison of two composite baselines named OM_proj2.0_Integration_08_12_01 and OM_proj2.0_09_06_01. The Members tab shows the baselines that contribute to each composite baseline.
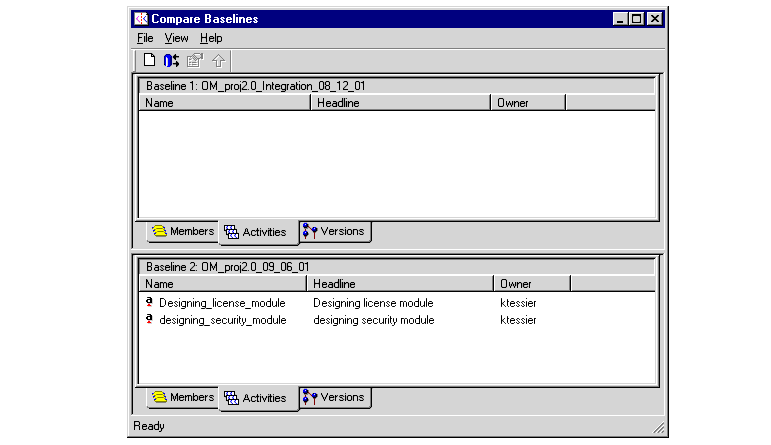
To see the activities included in each baseline, click Activities. In Figure 34, the first baseline contains no activities because its member baselines are the initial baselines of the license and security components.
To see the change sets associated with the activities, click Versions.
Figure 34 Comparing Baselines by Activity

If you use the UCM-ClearQuest integration, you can use ClearQuest queries to retrieve information about the state of your project. When you create or upgrade a ClearQuest user database to use a UCM-enabled schema, the integration installs six queries in two subfolders of the Public Queries folder in the user database's workspace. These queries make it easy for developers to see which activities are assigned to them and for project managers to see which activities are active in a particular project. Table 3 lists and describes the queries.
Query | Description |
|---|---|
ActiveForProject | For one or more specified projects, selects all activities in an active state type. |
ActiveForStream | For one or more specified streams, selects all activities in an active state type. |
ActiveForUser | For one or more specified developers, selects all assigned activities in an active state type. |
MyToDoList | Selects all activities in an active or ready state type assigned to the developer running the query. |
UCMProjects | Selects all projects linked to the ClearQuest user database. |
UCMCustomQuery1 | This query is not intended to be used directly by users; the integration uses it. When a developer checks out or checks in a file, or adds a file to source control and is prompted to select an activity, the integration calls this query to display the list of activities available in the stream associated with the developer's view. You can customize this query on a per-developer basis by copying the query from the Public Queries folder to the developer's Personal Queries folder and using the Query editor. |
You can also create your own queries by clicking Query > New Query within the ClearQuest client. In the Choose a record type dialog box that opens, select All_UCM_Activities if you want the query to search all UCM-enabled record types.
The ClearCase Reports applications (Report Builder and Report Viewer) allow you to generate and view reports specific to your project environment. Use the Report Builder to select and define a report's parameters. Use the Report Viewer to see the report output.
PRODUCT NOTE: To start the ClearCase Report Builder:
In ClearCase, click Start > Programs > Rational ClearCase Administration > ClearCase Report Builder.
In ClearCase LT, click Start > Programs > Rational ClearCase LT Server > ClearCase Report Builder.
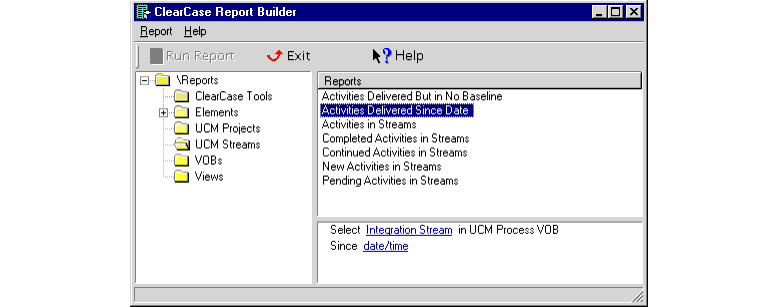
The ClearCase Report Builder categorizes its reports based on object types, such as UCM projects and streams. When you select a category in the left pane, the Report Builder lists the reports available for that category in the upper right pane. When you select a report, the Report Builder prompts you for parameters in the lower right pane. For example, in Figure 35, with the Activities Delivered Since Date report selected, the Report Builder prompts for the name of an integration stream and a date.
For details on using the Report Builder and the Report Viewer, see their online help.
ClearCase Reports includes a set of hooks into the Report Builder and Report Viewer applications. These hooks, known as report procedures, implement all the operations necessary to generate and view a specific report. The ClearCase Reports Programming Interface allows you to customize report procedures. For details on doing so, see Appendix C, Customizing ClearCase Reports.
Figure 35 ClearCase Report Builder

|
Feedback on the documentation in this site? We welcome any comments!
Copyright © 2001 by Rational Software Corporation. All rights reserved. |