

|
The predefined UCM schemas let you use the UCM-ClearQuest integration right away, but you may prefer to design a custom schema to track your project's activities and change requests, or you may prefer to use a different predefined schema. To enable a schema to work with UCM:
Ensure that the schema does not contain a record type named UCM_Project, which is a reserved name used by the UCM-ClearQuest integration.
In the ClearQuest Designer, click Package > Package Wizard to start the Package Wizard.
Although it is not necessary, you may want to use the Package Wizard to apply the BaseCMActivity package to your schema. The BaseCMActivity package adds the BaseCMActivity record type to your schema. The BaseCMActivity record type is a lightweight activity record type. You may want to use the BaseCMActivity record type as a starting point and then modify it to include additional fields, states, and so on. If you want to rename the BaseCMActivity record type, be sure to do so before you create any records of that type.
Apply the UnifiedChangeManagement package to the schema. Select UnifiedChangeManagement, and click Next.
In the second page of the wizard, select your schema. Click Next.
The third page of the wizard prompts you to specify the schema's record types. Select the check boxes of the record types that you want to enable. Click Next. All selected record types must meet the requirements listed in Requirements for Enabling Custom Record Types.
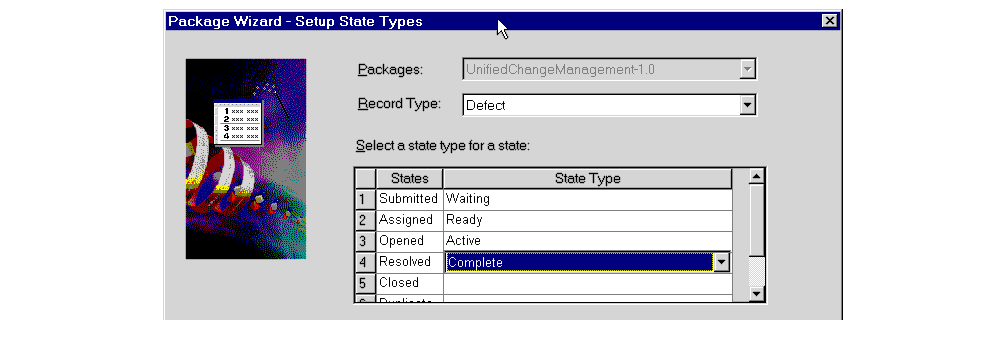
In the fourth page of the wizard, you must assign state types to the states for each record type that you choose to enable. For each state, click in the adjacent state type cell to display the list of available state types, as shown in Figure 22, and select one. To enable another record type, click the arrow in the Record Type list to see the available record types. See Setting State Types for a description of the four state types, and the rules for setting them.
When you are finished, click Finish to check out the schema.
NOTE: In some cases,the Setup State Types page of the wizard does not appear. If that happens, assign state types to the states by clicking Package > Setup State Types.
Figure 22 Assigning State Types to a Record Type's States

Before you can check in your schema, you must set default actions for the states of each enabled record type. Default actions are state transition actions that ClearQuest takes when a developer begins to work on an activity or delivers an activity. In the ClearQuest Designer workspace, navigate to the record type's state transition matrix, as shown in Figure 23.
Figure 23 Navigating to Record Type's State Transition Matrix

Double-click State Transition Matrix to display the matrix. Right-click the state column heading, and select Properties from its shortcut menu. Click the Default Action tab. Select the default action. See State Transition Default Action Requirements for Record Types for default action requirements. Before you can set default actions, you may need to add some actions to the record type. To do so, double-click Actions to display the Actions grid, and then click Edit > Add Action.
Validate the schema changes by clicking File > Validate. Fix any errors that ClearQuest displays, and then check in the schema by clicking File > Check In.
In the ClearQuest Designer workspace, navigate to the record type's Behaviors. Double-click Behaviors to display the Behaviors grid. Verify that the Headline field is set to Mandatory for all states. Verify that the Owner field is set to Mandatory for all Active state types.
Validate the schema changes by clicking File > Validate. Fix any errors that ClearQuest displays, and then check in the schema by clicking File > Check In.
Upgrade the user database so that it is associated with the UCM-enabled version of the schema by clicking Database > Upgrade Database. Alternatively, create a new user database that is based on the UCM-enabled version of the schema.
Before you can apply the UnifiedChangeManagement package to a custom record type, the record type must meet the following requirements:
It contains a field named Headline defined as a SHORT_STRING, and a field named Owner defined as a REFERENCE to the ClearQuest-supplied users record type. The Headline field must be at least 120 characters long.
It does not contain fields with these names:
ucm_vob_object
ucm_stream
ucm_stream_object
ucm_view
It contains an action named Modify of type Modify.
The integration uses a state transition model to help you monitor the progress of activities. To implement this model, the integration adds state types to UCM-enabled schemas. Table 2 lists and describes the four state types. You must assign each state to a state type. You must have at least one state definition of state type Waiting, one of state type Ready, one of state type Active, and one of state type Complete.
State type | Description |
|---|---|
Waiting | The activity is not ready to be worked on, either because it has not been assigned or it has not satisfied a dependency. |
Ready | The activity is ready to be worked on. It has been assigned, and all dependencies have been satisfied. |
Active | The developer has started work on the activity but has not completed it. |
Complete | The developer has either worked on and completed the activity, or not worked on and abandoned the activity. |
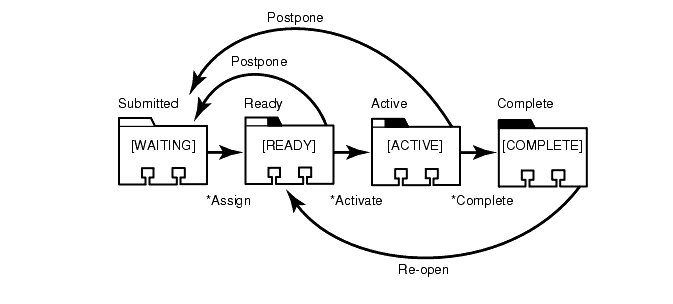
Record types can include numerous state definitions. However, UCM-enabled record types must have at least one path of transitions among state types as follows: Waiting to Ready to Active to Complete. The transition from one state to the next must be made by a default action.
For example, Figure 24 shows the actions and default actions between the states defined in the UCM-enabled BaseCMActivity record type included in the predefined UCM schema. The default actions are identified with an asterisk (*). The state types are in uppercase letters enclosed in brackets. The states appear immediately above their state types.
Figure 24 State Transitions of UCM-enabled BaseCMActivity Record Type

In addition to this single path requirement, states must adhere to the following rules:
All Waiting type states must have a default action that transitions to another Waiting type state or to either a Ready or Active type state.
If a Ready type state has an action that transitions directly to a Waiting type state, that Waiting type state must have a default action that transitions directly to that Ready type state.
All Ready type states must have a default action that transitions to another Ready type state or to an Active type state.
All Ready type states must have at least one action that transitions directly to a Waiting type state.
For the BaseCMActivity record type, its initial state must be a Waiting type.
|
Feedback on the documentation in this site? We welcome any comments!
Copyright © 2001 by Rational Software Corporation. All rights reserved. |