Spreadsheet Add-in User's Guide for Excel


Creating Multiple Worksheets from Data

One frequent requirement of budgeting and planning applications is to send worksheets to various functional areas of an organization. After the worksheets have been distributed, the recipients can review the contents, make modifications, and send updates back to the distributor. Using the Essbase Cascade feature, you can create multiple worksheet files based on a single database view. You can specify at what level of detail you want to replicate the worksheets to tailor the information to each recipient's needs.

The Sample Basic database contains data for beverage products sold in different states across the U.S. For example, assume that you want all product managers to review and respond to a proposed budget and to return their changes to the finance department. We must create a worksheet for each combination of budget and P&L data to distribute to the product managers for their respective products.

To create this set of worksheets:

  1. Select File > Open.
  2. From the \Essbase\client\sample directory, open the P&l.xls file. This file contains the data that you need to replicate for each worksheet.
  3. Select Essbase > Retrieve.

    Notice that the retrieval uses the Use Aliases option, which is already set for this file in the Essbase Options dialog box. In this example, product 200 changes to Root Beer, which is its preassigned alias.

  4. Select Central (in cell B1) and Root Beer (in cell B2) as the members to be represented in the resulting worksheets.
  5. Select Essbase > Cascade.

    Essbase displays the Essbase Cascade Options dialog box.

  6. Click the Cascade Information tab.

    The Cascade Information page contains the list of members that you selected and the options for specifying the level at which the selected members are retrieved into the cascaded worksheets.

    Note:
    For more information on each option, see the Essbase Spreadsheet Add-in online help.
  7. Select Central in the Member list box, and select Same level in the Choose Level for Selected Member option group.
  8. Select Root Beer in the Member list box, and select Next level (the default setting).

    Figure 162. Cascade Information Tab


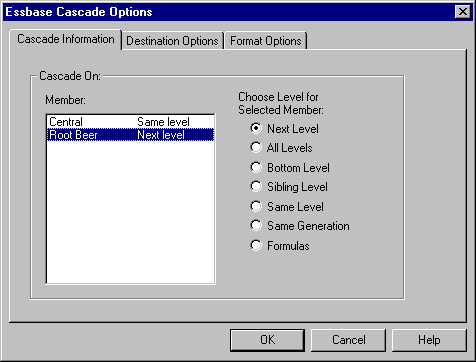
    The replicated, or cascaded, spreadsheet reports now provide data for members at the same level as Central (East, West, and South) and for members at the level below Root Beer (Old Fashioned, Diet Root Beer, Sarsaparilla, and Birch Beer).

  9. Click the Destination Options tab.
  10. In the Destination Directory text box, enter C:\temp as the name of the directory where you want the cascaded worksheets to be stored.

    You can also click Browse to select a destination directory from the Browse dialog box.

  11. In the Destination Types option group, select Separate Workbooks (the default setting) to create separate Excel files for each cascaded worksheet.

    You can also tell Essbase to create only one workbook with separate worksheets for each cascaded report, or you can send the cascaded reports to the printer.

  12. In the File Information option group, click Overwrite Existing Files (the default setting). This option tells Essbase to overwrite any cascaded worksheets with the same file name.

    You can also select Open Created Files to open each cascaded file in Excel as it is created.

    Caution:
    Depending on the number of replicated worksheets that you want to create, the Cascade command can create more worksheets than can be stored in the memory of your computer. Therefore, the Open Created Files option should not be used when you are replicating large numbers of worksheets.

  13. In the Naming Information option group, enter BUD in the Prefix text box.

    Figure 163. Destination Options Tab


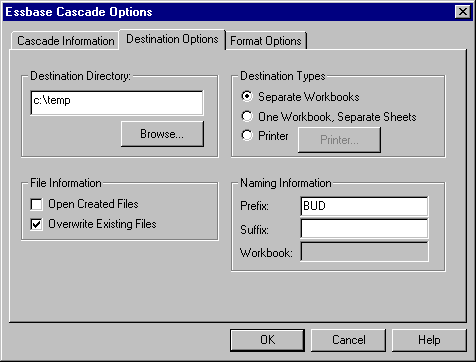
    When you assign a prefix or suffix in the Naming Information option group, the worksheet files that are generated as a result of executing the Cascade command are named with the prefix or suffix that you specify. The default is to generate worksheet names that are numbered 1 through n, where n is the total number of worksheets created. The syntax for the file names is PrefixnSuffix.xls. If you do not specify a prefix or suffix, Essbase creates the worksheets 1.xls, 2.xls, and so on. If you are creating a single workbook, the same naming convention is used for the worksheet tab names within the workbook.

    Caution:
    Do not specify a prefix and suffix combination that leaves no characters free for Essbase to create unique file names. If file names are duplicated, Essbase overwrites the duplicate file name with the last cascaded worksheet.

  14. Click the Format Options tab.
  15. To copy the formatting of the source worksheet into each cascaded worksheet, select the Copy Formatting check box.
    Note:
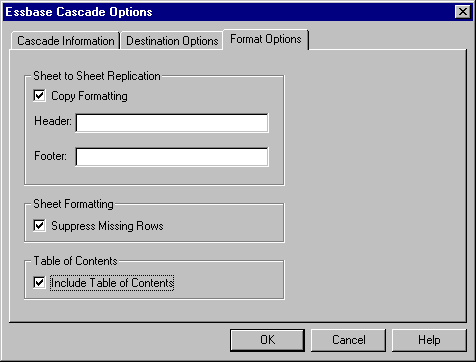
    Copy formatting copies only the visual cues set using Essbase and the cell formatting that you set using the worksheet. It does not copy formulas, column formatting, worksheet formatting, or graphs.

    In the Header and Footer text boxes, specify a header or footer name to be used for all of the cascaded worksheets.

  16. In the Sheet Formatting group, select the Suppress Missing Rows check box so that rows containing only #Missing values are not replicated.
  17. In the Table of Contents group, select the Include Table of Contents check box to create a text file that lists all replicated worksheets, their creation dates, and their member content.

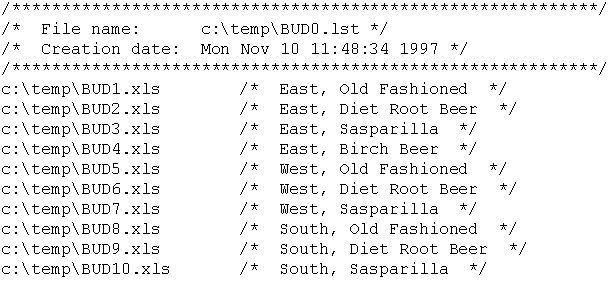
    By default, Essbase names the Table of Contents file with the extension .lst.

    Figure 164. Format Options Tab


  18. Click OK to create the cascaded worksheets.

    Essbase rapidly creates the cascaded worksheets (nine total worksheets in this example). As each worksheet is created, it is automatically saved, closed, and logged in the Table of Contents. Each individual file is saved in the directory that you specified, named Bud1.xls through Bud9.xls. When the Cascade is completed, Essbase returns you to the original worksheet view (that is, the source file).

  19. Using a text editing application, open the Table of Contents file from the destination directory that you specified earlier. This file is named BUD0.LST and contains a list of all cascaded worksheets.

    Figure 165. Table of Contents File for Cascaded Worksheets


  20. Select File > Close to close the worksheet.

    You do not need to save the worksheet.

Note:
You can create multiple worksheet files based on the attributes of a product. Type in the attribute names in the top row of the worksheet. Select the attribute names and select Essbase > Cascade. Proceed as described in the above example.


[ Top of Page | Previous Page | Next Page | Table of Contents | Index ]