The previous sections contain installation instructions for simple environments; generally, with one or more databases in a single VM or VSE system, or in a single VM/VSE Guest Sharing environment.
This section will consider more complex installations, with multiple databases in multiple operating systems on multiple processors.
A complete installation of Data Restore, as described in previous sections, is needed on every independent system which has a DB2 Server for VSE & VM server installed. Some installation steps must be repeated for every additional server on the same system. If you do not do these steps for a server, Data Restore cannot be used with that server.
If you want to be able to perform Data Restore functions against more than one server on the same system at the same time, you will need to repeat some other steps. This requires that you have one set of work areas (i.e. a userid with minidisk space under VM or a set of VSAM work files under VSE) per simultaneous use of Data Restore.
Installations which use VSE Guest Sharing and also have servers running under the same VSE system must install Data Restore on both the VM and the VSE systems.
In general:
The following table (Table 5) summarizes which installation steps you must perform and which
ones you may need to repeat, depending on your environment and operational
needs. Remember that "Step 3.6 Define Default Values for Data Restore Parameters" is optional.
Table 5. Installation Steps Summary
| Step Description: | Do Once per System? | Do Once per Server? | Repeat if Simultaneous Usage or Multiple Defaults are needed? |
|---|---|---|---|
| VM: |
|
|
|
| Step 1. Define the VM Resources | Yes |
| 1 3 |
| Step 3.1 Load Data Restore from Tape | Yes |
|
|
| Step 3.4 Create the Data Restore Modules | Yes |
|
|
| Step 2. Define the Database Manager Resources |
| Yes |
|
| Step 3.2 Create the Database Environment |
| Yes |
|
| Step 3.3 Load the Data Restore Packages |
| Yes |
|
| Step 3.6 Define Default Values for Data Restore Parameters | Yes |
| 3 |
| VSE: |
|
|
|
| Step 1. Define the Library to be Installed | Yes |
| 2 3 |
| Step 2. Restore the Data Restore Distribution Library | Yes |
|
|
| Step 3.4 Link-edit the Data Restore PRDI | Yes |
|
|
| Step 3.1 Acquire the Required Dbspaces |
| Yes |
|
| Step 3.2 Create the Required Tables |
| Yes |
|
| Step 3.3 Reload the Data Restore Packages |
| Yes |
|
| Step 3.5 Define the VSAM Files for Data Restore | Yes |
| Yes 2 |
| Step 3.6 Define Default Values for Data Restore Parameters | Yes |
| 3 |
Notes on Table 5:
For VSE: If you want different defaults to apply, you must set up a separate sublibrary for each set of defaults desired. As you can override all defaults using control statements, it is normally not worthwhile to set up multiple sublibraries just to have different sets of defaults. This also requires JCL changes to set the correct library search chain. Note that "Step 3.4 Link-edit the Data Restore PRDI" must be repeated, as the phases must be recreated before the defaults become active.
For both: If you decide to use multiple defaults minidisks or sublibraries, you must reinstall from the distribution tape or copy from the initial minidisk/sublibrary, redefine the defaults, and then regenerate the CMS modules or re-linkedit the VSE phases. Finally, you must set up the extra work minidisk space or VSAM files.
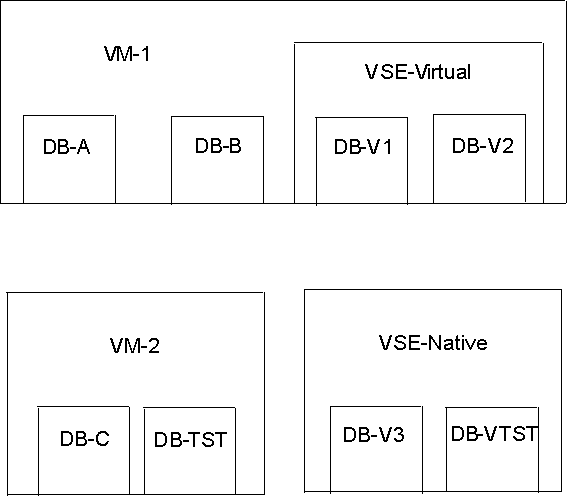
Consider the following complex example, as shown in Figure 45. In this environment, it is assumed that the VSE-Virtual system can access the VM databases via Guest Sharing.
Figure 45. A Complex Environment
The recommended sequence for installing Data Restore on all servers is as follows:
This would complete the install of Data Restore on all systems and in all servers. No extra steps are needed because of Guest Sharing access because servers also exist on the VSE-Virtual system.
If you have a Guest VSE system which accesses VM servers via VSE Guest Sharing, but does not also have DB2 Server for VSE databases, you need to define a sublibrary and install Data Restore into it, as described in Step 4. Define the VSE Resources and Step 5. Complete the VSE Installation Process.
If simultaneous usage of Data Restore is required against multiple databases on the same system, you need to repeat some other steps. See the notes under Table 5.
The Data Restore feature must have READ and WRITE access to the server's database disks (i.e. the directory, log, and dbextent minidisks). If you have multiple servers, this applies to these disks on all servers which are to be used with Data Restore.
The following possible scenarios are considered:
In this case, you must authorize the Data Restore userid to have WRITE access to all the databases disks, for each database userid.
In this case, you must set the READPW and WRITEPW parameters to the correct passwords in the control file. These are described in "OPTIONS and CONTROL Statements".
You must put LINK statements into the VM Directory entry for the Data Restore userid for all minidisks for the servers, using the same addresses as used by the dbname SQLFDEF Q file of the server. If you have multiple servers with identical addresses, this will not work, and you will need to set up multiple Data Restore userids so they can each have one or more sets of LINK commands in the VM Directory.
This is effectively the same case as the previous one.