OLAP Spreadsheet Add-in User's Guide for 1-2-3
Now that you are more familiar with the Hyperion Essbase environment, you
can connect to the Hyperion Essbase server and start using Hyperion Essbase
and Hyperion Essbase Spreadsheet Add-in. The following section guides
you through a typical Hyperion Essbase session where you connect to a database
and retrieve data in various ways.
This section outlines the following basic retrieval tasks:
| Note: | Make sure that you followed the steps in Setting Hyperion Essbase Options. If the settings in the Hyperion Essbase Options
dialog box are different from the settings previously illustrated, the
worksheet view will differ from the illustrations shown in this
chapter.
|
Remember that you can perform common data retrieval tasks by doing any of
the following:
- Selecting commands from the Essbase menu on the Lotus1-2-3 menu bar
- Clicking the appropriate buttons on the Hyperion Essbase toolbar
- Double-clicking the primary or the secondary mouse button in the
appropriate cell (for Retrieve, Zoom In, and Zoom Out commands)
To access Hyperion Essbase data, you must first connect to a database on
the server. This tutorial assumes that you have the appropriate
privileges to connect to a server, an application, and a database.
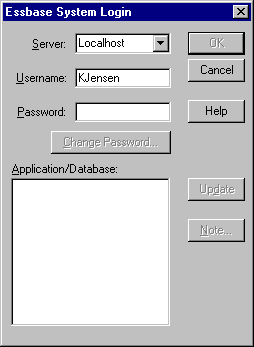
- Select Essbase > Connect
Hyperion Essbase displays the Essbase System Login dialog
box.
Figure 13. Essbase System Login Dialog Box
| Note: | To complete the steps that follow, you need to know the name of the Hyperion
Essbase server, your username, and your password. If you do not have
this information, contact the Hyperion Essbase system administrator.
|
- From the Server list box, select the server that you want to
access. (If the server name that you want does not appear in the list,
you can type in the name of the server you want to access.)
- Press Tab to move to the Username text box; type your
username in the text box.
- Press Tab to move to the Password text box; type your
password in the text box.
| Note: | You can change your password when you are connected to a server. To
change your password, see Changing a Password.
|
- To connect to the server, click OK.
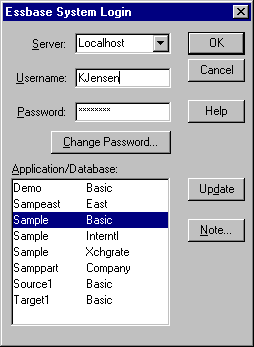
Hyperion Essbase displays a list of available application/database pairs in
the Application/Databaselist box. A Hyperion Essbase server
allows simultaneous access to multiple applications. An application can
contain multiple databases. Only the databases to which you have
security access are shown in the list.
For this tutorial, you use the Sample Basic database. If the Sample
Basic database was installed as part of the Hyperion Essbase installation, it
is shown in the list. If Sample Basic is not shown in the
Application/Database list box, ask the Hyperion Essbase system
administrator to install it.
Figure 14. Available Application and Database Pairs
- In the Application/Database list box, double-click Sample
Basic. You can also select Sample Basic from the list box and click
OK.
If the application is not already running, Hyperion Essbase automatically
starts it. There may be a brief pause as the application loads.
The time required to start an application depends on the number of databases,
the sizes of the databases, and the sizes of the indexes of the databases
contained within the application.
You can change your password only if you are connected to a server.
| Note: | Remember, tasks that you should not perform as part of the
tutorial are shown in gray boxes.
|
|
To change your password:
- In the Essbase System Login dialog box, select the Change
Password button.
- In the Change Password dialog box in the New
Passwordtext box, type your new password.
- In the Confirm Password text box, type the password
again.
- The passwords must be identical.
- Click OK to change your password.
- Click OK again to close the Essbase System Login dialog
box.
|
Each time you retrieve information from a Hyperion Essbase server, the
following actions occur:
- Hyperion Essbase Spreadsheet Add-in requests data from the server.
- The server processes the request and prepares the data.
- The server transmits the data to Hyperion Essbase Spreadsheet
Add-in.
- Lotus 1-2-3 receives the data from Hyperion Essbase and organizes it in a
worksheet.
To help you monitor these operations, Hyperion Essbase uses three custom
cursors.
Table 1. Hyperion Essbase Custom Cursor
| This cursor:
| Is displayed when:
|

| Hyperion Essbase requests information from the server.
|

| The server is processing the request.
|

| The server returns the data.
|
| Note: | Small retrieval actions display the cursors very quickly; you may not
notice changes in the direction of the arrow when retrieving small amounts of
data.
|
To retrieve data into an empty worksheet:
- Open a new worksheet by selecting File > New or by clicking the

button.
| Note: | You should be connected to the Sample Basic database. If you are not
connected, follow the steps in Connecting to a Database.
|
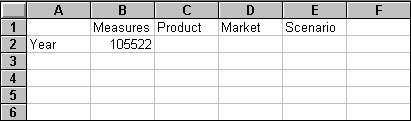
- Select Essbase > Retrieve.
Hyperion Essbase retrieves data into the Lotus 1-2-3 worksheet.
Figure 15. Initial Data Retrieval from Sample Basic
Because you clicked the Enable Double-Clicking box in the Essbase
Options dialog box (Global Tab), you can double-click in an
empty cell to retrieve data. You can also click the Retrieve button on
the Hyperion Essbase toolbar.
When you retrieve data into an empty worksheet, Hyperion Essbase returns
data from the top levels of each database dimension. The top level is
used as a starting point to navigate, or drill down, into levels of detailed
data. In the Sample Basic database, the following five dimensions are
retrieved: Measures, Product, Market, Scenario, and Year.
For the remainder of tasks in this tutorial, you can retrieve data by
double-clicking in a data cell, selecting Essbase > Retrieve, or by clicking
the Retrieve button on the Hyperion Essbase toolbar.
Occasionally, you may want to cancel a retrieval request. For
instance, you may want to stop a request if a retrieval is taking longer than
expected or if you mistakenly double-click.
Because Hyperion Essbase returns data so quickly to the worksheet, you may
not be able to cancel a retrieval before the retrieval is complete. The
cancel feature is most useful when you need to stop a large retrieval
request.
To cancel data retrievals, press the Esc key during a retrieval
action.
| Note: | You can cancel a retrieval only while Hyperion Essbase is
processing in Hyperion Essbase Spreadsheet Add-in. You cannot cancel a
retrieval when Hyperion Essbase is processing from the server.
|
The FlashBack command restores the previous database view. A
database view is simply what you see in the worksheet after a retrieval or
navigation operation. FlashBack is similar to the Lotus 1-2-3 Edit >
Undocommand, which reverses the last action. The FlashBack command uses
the memory of your machine to store the current view before processing a
Hyperion Essbase retrieval request. You can use FlashBack to undo only
the most recent operation. FlashBack cannot undo multiple
operations.
Throughout this tutorial, you should follow all steps in the order that
they are presented. If you make a mistake or find yourself out of step
with the tutorial, you can use the FlashBack command from the Essbase menu or
toolbar to undo the last command and return to the previous database
view. If you want to start the tutorial over from the beginning, select
the entire worksheet and select Edit > Clear > All. Then press Enter or
click OK to empty the worksheet and start again.
You can disable FlashBack during normal operations to conserve memory on
your local machine. Do not disable FlashBack for this tutorial.
|
To disable Flashback:
- Select Essbase > Options and click the Global tab.
- Clear the Enable FlashBack check box.
|
With Hyperion Essbase, you can drill down to various levels of
multidimensional data in the worksheet. For example, if you want to
view data for a specific quarter or month rather than an aggregate data value
for the whole year, you can drill down on the Year dimension to see more
detailed data.
You have three options for drilling down on a member:
- Select the member and select Essbase > Zoom In.
- Select the member and double-click the primary mouse button.
- Select the member and click the Zoom In button on the Hyperion Essbase
toolbar.
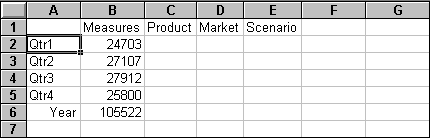
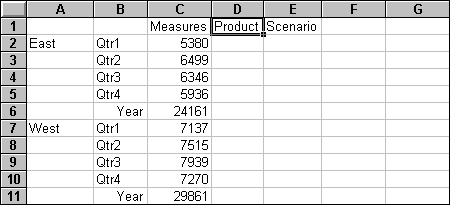
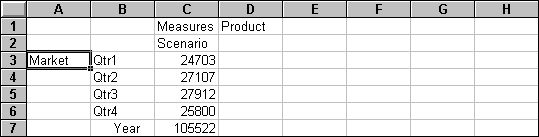
To drill down to lower levels of the Year dimension:
- On Year in cell A2, double-click the primary mouse button.
The drill-down action retrieves data for the level below (the children of)
Year: Qtr1, Qtr2, Qtr3, and Qtr4.
Figure 16. Result of Drilling Down on the Year Dimension
| Note: | For a discussion of the relationships among Hyperion Essbase database
members, see Database Outlines"Database Outlines" on page 29.
|
With Hyperion Essbase, you can retrieve members into grouped, or nested,
columns or rows. Row groups containing more than one level of data are
nested within single-member row groups. For example, a row group
containing Qtr1, Qtr2, Qtr3, and Qtr4 may be nested within a single-member row
for a specific region, such as East (see the following illustration).
Drilling down to lower levels of database members is one way to retrieve data
into nested groups.
- In cell D1, double-click to drill down on Market and create nested groups
of rows down the worksheet.
Figure 17. Result of Drilling Down on the Market Dimension (Nested Rows)
Because worksheets can accommodate more rows than columns, Hyperion Essbase
is preset to retrieve data into rows when you drill down on a member.
You can change this default behavior and display the results of a drill-down
across columns. Drilling across columns applies only to the top-level
member of a dimension (for example, Market or Scenario).
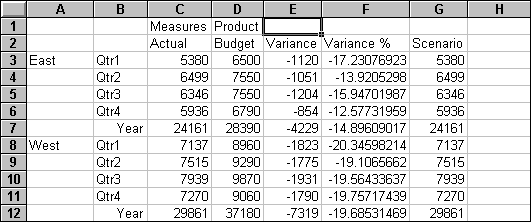
Follow these steps to drill down on Scenario and retrieve its respective
members into columns rather than rows:
- Press and hold the Alt key.
- Double-click Scenario (in cell E1).
- Release the Alt key.
Hyperion Essbase displays the data in columns across the worksheet.
Figure 18. Result of Drilling-Down on the Scenario Dimension (Nested Columns)
You can use the Hyperion Essbase attribute feature to retrieve and analyze
in terms of characteristics, or attributes, of dimensions. For example,
you can analyze product profitability based on size or packaging.
Attribute dimensions are associated with base dimensions.
You can use an attribute dimension to drill down on the base dimension with
which it is associated. In the Sample Basic database, the Product base
dimension is associated with several attribute dimensions, such as
Caffeinated, Ounces, and Pkg_Type. Each attribute dimension consists of
level 0 attribute members. Level 0 attribute members are the lowest
level attributes that are associated with members of a base dimension.
The Pkg_Type attribute dimension, for instance, has two level 0 members,
Bottle and Can.
You can extract information on all products sold in a can by entering
manually the name Can in the worksheet. You can also use Hyperion
Essbase Query Designer or the Essbase Member Selection dialog box to select
the attribute and display it in the worksheet.
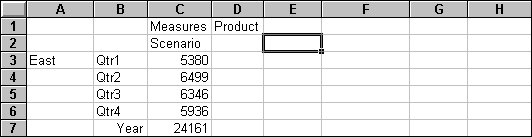
Open a worksheet, connect to the Sample Basic database, and select Essbase
> Retrieve. Select Product and replace it with Can by typing Can
manually. Click anywhere outside of cell C1 and select Essbase >
Retrieve again. The result is displayed below:
Figure 19. An Attribute Member in a Report
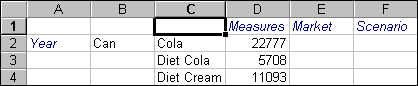
Drill down to all products sold in a can by double-clicking Can in cell
C1. Cola, Diet Cola, and Diet Cream are the members of Product that
have the Can attribute. The result is displayed below:
Figure 20. Result of Drilling Down on an Attribute Member
The following is a description of the general behavior of Hyperion Essbase
Spreadsheet Add-in when you drill down on a level 0 attribute member:
- If the level 0 attribute member is in a column, a drill-down pivots the
attribute to the innermost row of the worksheet.
- If the level 0 attribute member is in a row, a drill-down does not change
the position of the attribute in the worksheet.
- A drill-down on a level 0 attribute member displays the associated base
members to the right of the level 0 attribute.
- If there is more than one level 0 attribute member in a worksheet, a
drill-down on one attribute displays other attributes to the left of the level
0 attribute member. Level 0 attribute members in columns pivot to rows,
and level 0 attribute members already in rows remain in rows.
- A drill-down on non-level 0 attribute members is the same as the current
drill- down behavior for other types of members.
The drill-down behavior for non-level 0 attribute members is the same as
the current drill-down behavior for other types of members. See the
Hyperion Essbase Spreadsheet Add-in online help for examples of drilling down
on level 0 attribute members. For more information on attributes, refer
to the Hyperion Essbase Database Administrator's Guide, Volume 1.
With Hyperion Essbase, you can drill up to higher levels in the
multidimensional database outline by collapsing the current member
tree. For example, if you previously drilled down on a dimension, such
as Scenario, to view data for Actual and Budget, you may need to drill up to
view aggregate data for the Scenario dimension.
You have three options for drilling up on a member:
- Select the member and select Essbase > Zoom Out.
- Select the member and double-click the secondary mouse button.
- Select the member and click the Zoom Out button on the Hyperion Essbase
toolbar.
To drill up on the Scenario dimension in the current worksheet:
- On any member of the Scenario dimension (that is, cell C2, D2, E2, F2, or
G2), double-click the secondary mouse button.
Hyperion Essbase collapses the members of the Scenario dimension.
Figure 21. Result of Drilling Up On the Scenario Dimension
- In cell A3, double-click the secondary mouse button to drill up on
East.
Hyperion Essbase collapses East, West, South, and Central into the single
Market dimension and keeps the dimension in the A column.
Figure 22. Result of Drilling Up On East
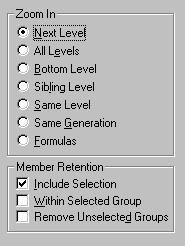
You can customize the behavior of the Zoom In and Zoom Out
commands in the Hyperion Essbase Options dialog box. The following
steps illustrate some drill-down and drill-up techniques.
To retrieve all members of a dimension with a single drill-down
operation:
- Select Essbase > Options and select the Zoom tab.
Hyperion Essbase displays the Zoom Tab.
Figure 23. Zoom In and Member Retention Option Settings
The Zoom In option group contains items that enable you to
customize drilling behavior. You can specify which members are returned
to the worksheet during a drill-down operation. For example, if you
select Bottom Level, Hyperion Essbase retrieves data for the lowest level of
members in a dimension. With this option, a drill-down on Year
retrieves Jan, Feb, Mar, Apr, May, Jun, Jul, Aug, Sep, Oct, Nov, and
Dec.
The Member Retention option group contains items that enable you
to customize drilling retention characteristics. The default selection,
Include Selection, retains the selected member along with the other members
retrieved as a result of a drill down. For example, if you drill down
on Qtr1, Hyperion Essbase retrieves data for Jan, Feb, and Mar, as well as for
Qtr1. When this option is disabled, Hyperion Essbase retrieves data
only for Jan, Feb, and Mar; Qtr1 is eliminated.
| Note: | For more information on the Zoom In and Member Retention option groups, see
the Hyperion Essbase Spreadsheet Add-in online help.
|
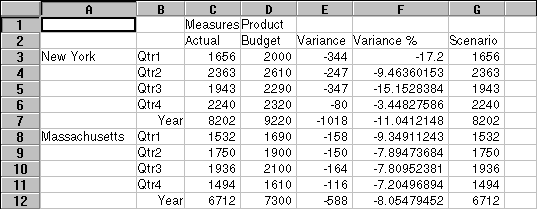
- In the Zoom In option group, select the All Levels
option and click OK to save the setting.
- In cell A3, drill down (double-click) on Market.
- In cell C2, drill down (double-click) on Scenario.
Hyperion Essbase retrieves all members of Market and Scenario. For
the Market dimension, Hyperion Essbase drilled down two levels to get to the
bottom-most members, which are individual states. The Scenario
dimension has only one member level, so the members of Scenario would also be
retrieved if you selected Next Level in the Zoom In option
group.
Figure 24. Result of Drilling Down to All Member Levels
- Select Essbase > Options and select the Zoom tab.
- Return the Zoom In option setting to Next Level.
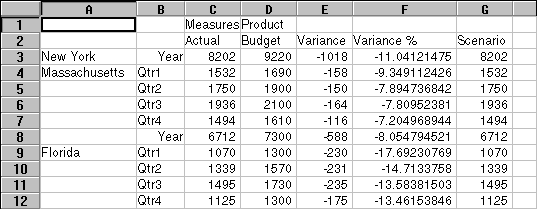
If you want to drill up on only one quarter of the year, select Within
Selected Group in the Member Retention option group.
To drill up only on Qtr1:
- In the Member Retention option group on the Zoom
Tab, click the Within Selected Group check box and click OK.
Make sure that Include Selection is also still checked.
- To drill up on Qtr 1 (in cell B3), double-click the secondary mouse
button.
Notice that drilling up to the Year dimension affects only New York.
All other states show data for all four quarters.
Figure 25. Result of Drilling Up Within a Selected Group
- Before moving on with the tutorial, disable the Within Selected
Group option:
- Select Essbase > Options and select the Zoom tab.
- In the Member Retention option group, clear the Within
Selected Group check box.
- Select File > Close to close the worksheet. You do not need to save
the worksheet.
[ Top of Page | Previous Page | Next Page ]