
Performing a Thin-installation is a straightforward process. To set up this type of environment, you need to perform the following steps:
You need to install a DB2 Administration Client or DB2 Connect Personal Edition on the workstation that will act as the code server for the Thin-Client or Thin-Connect target workstations. A DB2 Thin-Client can only load code from a DB2 Thin-Client Code Server and a DB2 Thin-Connect workstation can only load code from a DB2 Thin-Connect Code Server.
| Note: | When you are installing your DB2 Client, make sure you perform a Custom installation. From the Select Components window you can select the components you want to install. You must select the Thin Client Code Server to install the files needed to setup the thin client. |
To install a DB2 Administration Client, see Installing DB2 Clients. To install DB2 Connect Personal Edition, refer to your Quick Beginnings book.
This step describes how to setup a Windows NT and Windows
2000 code server (referred throughout this section as Windows code server) to
service Windows 9x Thin-Client workstations.
|
| If you are not planning on supporting a mix of Windows NT, Windows 2000, and Windows 9x Thin-workstations in your environment, you can skip this step. |
A code server can only provide code for Thin-workstations that belong to the same family of operating systems. This means that a Windows NT or Windows 2000 code server could not support a Windows 9x-based Thin-workstation and vice-versa.
If you have deployed a heterogeneous configuration of Windows 32-bit operating systems in your enterprise, you can set up your code server to support both Windows NT or Windows 2000-based and Windows 9x-based Thin-workstations by performing the following steps:
| Note: | The example that follows will assume that you are configuring a Windows NT-based code server to service Windows 9x Thin-workstations. |
To have a Windows code server service a Thin-workstation on a Windows 9x machine, perform the following steps:
xcopy c:\sqllib\*.* d:\sqllib9x /s /e
where:
where:
You now have two code bases on your code server. If you are going to create a Thin-workstation on a Windows NT or Windows 2000 machine, use the Windows NT or Windows 2000 code base (for example, c:\sqllib) in the remaining steps. If you are going to create a Thin-workstation on a Windows 9x machine and have the code served by a Windows NT or Windows 2000 code server, use the Windows 9x code base (for example, d:\sqllib9x) in the remaining steps.
| Note: | If you are logged onto a Windows 9x Thin Client workstation that is running code off of a Windows NT or Windows 2000 code server. You must ensure that the user account that you are logged on to the Windows 9x workstation is locally defined on the Windows NT or Windows 2000 code server. |
In order for the Thin-workstations to load the required code from the code server, each of the target Thin-workstations must be able to read the directory where the DB2 Client or DB2 Connect Personal Edition code is installed. To make the code directory available to all Thin-workstations in READ mode, perform the following steps:
| Note: | If you are setting up a Windows 9x-based code server, you do not need to specify this type of access when you set up a share. By default, everyone is granted read access. |
When you installed the code server, you performed an interactive installation. In this installation, you have to manually respond to prompts from the setup program in order to install your product. Your responses provided the information needed to install the DB2 product and configure its environment. During a distributed installation, this information is provided in the form of keywords and values in a response file. For this reason, a distributed installation is often referred to as a unattended installation or even a silent installation. For a detailed description of a distributed installation and how to perform this installation for a target Thin-workstation, see An Introduction to Distributed Installation.
For a DB2 Thin-Client or DB2 Thin-Connect installation, there is a ready-to-use response file called db2thin.rsp, which you can use to install either Thin-workstation. The default settings for the most common installation type are provided in this file. You can find this response file in the c:\sqllib\thnsetup directory, where c: represents the drive where you installed your DB2 product.
A response file contains:
In a response file, the asterisk (*) acts like a comment. Any line that is prefixed with an asterisk will be ignored during the installation. If you do not specify a keyword, or it is commented out, a default value will be used. To enable a parameter, remove the asterisk.
For example, let's assume that you want to install support for ODBC. The default entry for this keyword in the response file is:
*COMP =ODBC_SUPPORT
To install this component, you would remove the asterisk from this line so it would look like:
COMP =ODBC_SUPPORT
For some keywords, you have to set values. To enable these keywords, remove the asterisk as usual, but make sure that you also replace the contents to the right of the equals sign with the value you want for that parameter.
For example,
*DB2.DIAGLEVEL = 0 - 4
would be:
DB2.DIAGLEVEL = 4
if you wanted to set this parameter to 4.
The following is a section of the db2thin.rsp sample response file:
   * Required Global DB2 Registry Variable
   * -------------------------------------
	DB2INSTPROF                   = C:\CFG

   * General Options
   * ---------------
   *TYPE                          = 0,1,2  (0=compact, 1=typical, 2=custom)
   *COMP                          = ODBC_SUPPORT
   *COMP                          = CONTROL_CENTER
   *COMP                          = EVENT_ANALYZER
   *COMP                          = WEB_ADMINISTRATION
   *COMP                          = QUERYMONITOR
   *COMP                          = TRACKER
   *COMP                          = QUERYADMIN
   *COMP                          = CLIENT_CONFIGURATION_ASSISTANT
   *COMP                          = COMMAND_CENTER
   *COMP                          = DOCUMENTATION
   *CREATE_ICONS                  = YES or NO (default=YES)
   *REBOOT                        = YES or NO
For more information, see Available Sample Response Files for detailed descriptions about these parameters.
For example, set the following:
   DB2INSTPROF                   = C:\CFG
 	   TYPE                          = 1
   REBOOT							     = YES
Once you have finished editing this file, save it as a different name so you can maintain the integrity of the sample. Call this file test.rsp and save it in the same directory that you shared in the previous step (c:\sqllib).
The code server must be accessible before you can setup the target workstation to act as a Thin-workstation. You may choose to map a network drive to access the thnsetup directory which is under the shared directory that you created on the code server.
\\computer_name\share_name
where:
If you are running Windows NT or Windows 2000, you may also specify user information in the Connect as Input field. The format is
domain\username
where
| Note: | On a Windows 9x workstation, you must be logged on to the workstation as a valid user with shared directory access to the code server. |
If you are planning on having a DB2 for Windows NT or Windows 2000 code server service a Windows 9x Thin-workstation (or vice-versa), make sure that you enter the share name for the directory that you created for this purpose.
To finish this setup, you need to run the
thnsetup command. This command will set up the DB2 Thin-Client or
DB2-Thin Connect workstation and the required links to the code server.
The thnsetup command can be entered with the following
parameters:
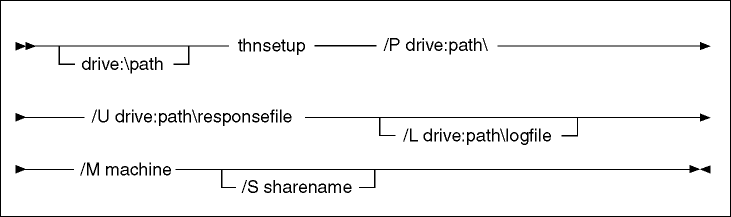
where:
| Note: | If you have not already mapped a persistent network drive to the code server as described in Step 5. Make the Code Server Accessible to the Target Thin-Workstation., then this parameter should be the drive letter which will be used to represent the network drive. |
For example, to create a Thin-workstation where the shared NTCODESERVER directory on a code server called myserver is mapped locally to the x: drive, and the response file is called test.rsp and is located in the same directory as the code server, enter the following command:
x:\thnsetup\thnsetup /P x:\ /U x:\thnsetup\test.rsp
When the thnsetup command completes, check the messages in the log file. Since we set the machine to reboot once the setup of the Thin-workstation completes, if your machine did not reboot, you know you have encountered an error.