The Performance Monitor provides information about the state of DB2 Universal Database and the data that it controls. It is a graphical utility that can be customized for your database environment. You can define thresholds or zones that trigger warnings or alarms when the values being collected by the Performance Monitor are not within acceptable ranges.
You can monitor DB2 objects such as instances, databases, tables, table spaces, and connections by selecting the object in the Object Tree pane or in the Contents pane and clicking the right mouse button. From there, you can choose to start monitoring activity.
When an object is being monitored, the color of the icon appears green, yellow, or red to indicate the status of the monitor. The colors represent the severity of the problems as defined by the thresholds which you have set. Green signifies that the monitor is running and everything is fine. Yellow is a warning and signifies that the monitor is reaching the thresholds that you have set. Red indicates an alarm and that the monitor has reached the threshold. You can use the predefined monitors that are included with DB2 or you can create your own monitors.
To see what information the Performance Monitor is collecting, click the right mouse button on the object and select Show Monitor Activity in the pop-up window.
Use the information from the Performance Monitor to:
The Performance monitor lets you analyze trends by creating a visual presentation of database information such as disk activity, buffer pool usage, amount of prefetch, lock usage, and record blocking at specific intervals.
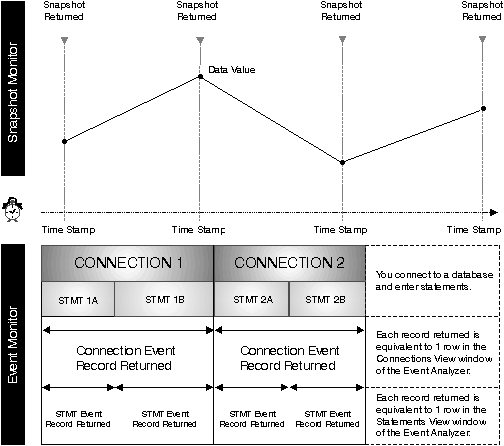
You use the tool when you need to monitor an existing problem or when you want to observe the performance of your system. It lets you take a snapshot of database activity and performance data at a point in time. These snapshots are used for comparison over time. Each point on the graph represents a data value. The steps for taking snapshots are provided in Monitoring Performance at a Point in Time. This information can help you to identify and analyze potential problems, or identify exception conditions which are based on thresholds that you set. Use the performance tool if you need to know the performance of the database manager and its database applications at a single point in time and look at trends over time. Use it also to get a visual overview of what elements are in a state of alarm. This helps you to identify which parameters may need tuning. You can then look closely at the parameters that have been set for that element and change it to improve performance.
In contrast to taking a point in time snapshot, an event monitor collects information on database activities over a period of time. This collected information provides a good summary of the activity for a particular database event, for example, a database connection or an SQL statement. Event monitoring records the state of the database at the time specific events occur. It allows you to obtain a trace of the activity on the database. Event monitor records are stored and then analyzed after the data has been captured. Use the event monitor when you need to know how long a transaction took or, for example, how much CPU an SQL statement used. You then use the Event Analyzer to read the data recorded from the event monitor.
For each database connection, there is one connection event record produced. For each statement run in that connect, a statement record is produced. Each connection event record maps to one row in the Connections View window of the Event Analyzer. This window shows information for each application that connected during the monitored period, including:
Each statement event record maps to one row in the Statements View window in the Event Analyzer.
The Performance Monitor and the Event Analyzer provide the following benefits:
Figure 47 illustrates how the monitors work together.
Figure 47. Comparison: Getting Snapshots and monitoring Events. (Event monitor, Event Analyzer)
|
Before you start monitoring and tuning your database, you should do the following
Some of the visible effects are, for example:
The next section describes how to take snapshots and how to use the Alert Center to keep track of any performance-related problems.
If you want to do complex data collection and analyze the data to pinpoint potential problems, use the Performance Monitor to take snapshots of your system and watch performance data change over time.
The tools lets you:
The following types of information are captured:
Taking snapshots at predefined intervals provides a picture of the current state of the activity in the database manager and its applications. This information can be used to:
Performance information is available for the following database objects:
For each, a variety of performance variables can be monitored. The Performance Variable Reference Help, available from the Help menu of any Snapshot Monitor window, provides a description of all the performance variables. These variables are organized into categories. By default, all performance variables are monitored, but the categories can be turned on and off through the administration tools. The following categories have been set on by default:
From the Control Center, you can only capture snapshots from one instance of a database manager at a time. This means that the API that is used to get snapshot information is issued only once for all monitored database objects in a database manager. This decreases the overhead on a database manager.
For detailed information on how to generate snapshots, see the online help.
The DB2 Performance Monitor contains a set of predefined monitors, which you can use as they are or which you can copy and modify to meet your requirements. They provide a comprehensive set of performance calculations. You cannot change the name, equation, or text description of an IBM-supplied performance monitor; however, you can change the threshold values and the alert actions. Use the predefined monitors to learn about performance monitoring and to create your own monitors by copying a predefined monitor and adding or removing performance variables from your copy.
The Predefined Monitors that are supplied with DB2 are:
For examples of how to use a predefined monitor, see the online help provided for performance monitoring.
To see a list of available monitors, from the Control Center, click the right mouse button on the Systems folder, and select List Monitors from the pop-up menu. The List Monitors window opens. It lists the monitors that are stored on the JDBC server to which you are currently connected. For each monitor, you see the name of the monitor, a description, the status, whether it is the default monitor, and who created the monitor. The status of the monitors indicates the status of the monitors on the local system, and not on the JDBC server. The Default for level indicates the default monitor at the instance, database, table, table space or connections level. For the predefined monitors, the Created by column contains NULLID. The right side of the window contains pushbuttons which allow you to perform various tasks on the monitors. See Running the Control Center as a Java Applet for more information on the JDBC server.
You can choose which monitor is started as the default monitor for an object.
Once you have started a performance monitor, you can click on the Alert Center button on the toolbar to see the status of any objects that you are monitoring and which are in a state of alert because they have reached any of their threshold values. They appear only for the period of time during which the threshold is exceeded.
If you want to keep a close watch on the objects being monitored, you can keep the Alert Center open or you can keep the Show Monitor window open on the summary page and look for any red or yellow entries. You can also modify the Control Center settings so the Alert Center opens automatically if a new warning or alarm is added to it. From the Alerts Center, you can also temporarily suspend the alerts while monitoring continues.
You can set the Alert Center to open automatically to display any monitored objects that are in a state of alarm or warning (that is, their thresholds have been exceeded). You can change this default from the Tools Settings window.
If you see an object in the Alert Center, click the right mouse button on the object and select Performance Monitor --> Show Monitor to view the performance details for that database object.
See the online help available from the Help menu of any Performance Monitor window for instructions on how to analyze the data.
The Event Analyzer is another DB2 performance tool. Use this tool when you want diagnostic information for an event that has taken place. You use the Event Analyzer in conjunction with an event monitor. For example, you can use an event monitor to trace database activity, such as connections, transactions, statements, and deadlocks, while a database is active. An event monitor can also record cumulative performance data that is logged when an application disconnects from the database. After the event monitor has created the event monitor file, you look at your performance information using the Event Analyzer.
The event monitor tools let you perform the following:
The Event Analyzer lets you view the data generated by an event monitor for the following event types:
You can create an event monitor for the following event types and then use the Event Analyzer to view the collected information: however, use the db2evmon executable (described in the Command Reference and the System Monitor Guide and Reference) to view data generated for the:
To analyze event data using an event monitor and the Event Analyzer, follow the steps below. They represent only one example of how to create an event monitor for connection and statement events. To create an event monitor:
This forces the event monitor to write the trace file. If the monitor is not turned off, information is only written to disk when the buffer is full or all connections end. From the Event Monitors window, you can view the resultant event data by clicking the right mouse button on the event monitor you created, and selecting View Event Monitor Files from the pop-up menu. The Monitored Periods View window opens.
To access the event data from the Event Analyzer:
| Note: | If data files are stored remotely, you must FTP the files to your local machine in order to view them. Depending on file size, this transfer could take some time. Files can be transferred to any local path. It is not necessary to choose the same path that was used when they were created. |
The online help for the event monitor and the Event Analyzer provide detailed instructions for creating event monitors and viewing the resultant event data.