IBM WebSphere Studio Application Developer Integration Edition 5.0.1
Run-time Updates
Installation Instructions
WebSphere Studio Application Developer Integration Edition consists of a set
of tools to build applications running on an application server. To test those
applications, it includes a run-time test environment that simulates an
application server within the product. At the beginning of this cumulative fix,
some prerequisites were made to modify the run-time test environment. They were
necessary for the fixes designed for the tools to be effective.
In addition, you can also optionally update the run-time environment to
match the current level of your standalone WebSphere application server.
Although it is not necessary or recommended to update the run-time test
environment just to match the application server level, some users may choose
to match the application server level they deploy their applications to.
You begin your update by unzipping and installing the WebSphere Application
Server (WSAS) Enterprise 5.0.2 run-time fix pack, which is a prerequisite. Then
you install some fixes and make modifications so that your old configurations
will work in the new Enterprise server 5.0.2 run time.
Prerequisites
- Get the WSAS Enterprise 5.0.2 run-time fix pack from the WSAS Enterprise
Support site. Launch your browser to the
WSAS Enterprise Support site. Beneath Download, click Version 5.0 Fix
Pack 2 (5.0.2). Follow the instructions to download the fix pack.
- Get the WSAS base 5.0.2 run-time fix pack from WSAS Support site. Launch
your browser to the
WSAS Support site. Beneath Download, click Version 5.0 Fix Pack 2
(5.0.2). Follow the instructions to download the fix pack.
- Get the JVM hangs during profiling interim fix from WSAS Support site.
Launch your browser to the
WSAS Support site. Click All Updates. Click PQ80207; 5.0.2: PQ79105 is
incorrectly packaged. Download either PQ80207_linux_i386 for Linux or
PQ80207_win for Windows.
Set up the WSAS Enterprise ASV 5.0.2 and PME 5.0.2 PTFs
-
Close WebSphere Studio if open.
-
Using a file manager, open the following folder:
WSinstalldir\Runtime Updates
-
Create two folders in Runtime Updates: ASV PTF2 and PME PTF2.
-
Unzip was50_fp2_win.zip to the ASV PTF2 folder. These files
will update the base WSAS run-time environment.
-
Unzip was50_pme_fp2_win.zip to the PME PTF2 folder. These files
will update the WSAS Enterprise run-time environment.
-
Using a file manager, create the following folder:
WSinstalldir\Runtime Updates\PQ80207
-
Place the downloaded JVM hangs during profiling interim fix there; that is
place the PQ80207...jar file there. Do not unzip.
Installing the PTF to the base WSAS Enterprise run-time environment
Note: If you plan to install embedded messaging with WebSphere Studio
and have not yet installed it, do so before continuing. Otherwise, if you
install embedded messaging with WebSphere Studio after updating to 5.0.2, then
you will need to repeat the following steps again to complete the installation.
-
Open a command window.
On Windows, change the path to:
WSinstalldir\runtimes\ee_v5\bin
Run setupCmdLine.bat.
On Linux, execute this command:
export JAVA_HOME=/opt/IBM/WebSphereStudio/runtimes/ee_v5/java
-
In the same command window, change the path to:
WSinstalldir\Runtime Updates\ASV PTF2
Run updateWizard.bat (or updateWizard.sh on Linux).
The Update Installation wizard opens. Select a language such as
English and click Next.
-
On the following page, select Specify product information. Click
Browse beside the Installation directory field. A folder dialog
opens. Navigate to:
WSinstalldir\runtimes
Select ee_v5 from the folders listed. Click Open (or OK
on Linux). The path is entered in the Installation directory
field. It should be:
WSinstalldir\runtimes\ee_v5
Click Next.
-
The following page lists what can be installed. Select Install fix packs.
Click Next.
-
The following page requests where the fix packs are located. Check that the
Fix pack directory field is:
WSinstalldir\Runtime Updates\ASV PTF2\fixpacks
Click Next.
-
On the following page, the fix pack available for installation is listed.
Click Next.
-
The external components linked to the update are listed. You should keep the
IBM HTTP Server update selection disabled. If you installed embedded
messaging in WebSphere Studio Application Developer Integration Edition 5.0
then you should select Embedded Messaging and specify the correct
install path. If you did not install embedded messaging then you should clear
the Embedded Messaging check box. Click Next.
-
The following page summarizes the installation, listing the fix pack, the
product, and the directory to be updated. Click Next.
Note: Expect an installation time of fifteen minutes or longer.
-
A final page confirms a successful installation. Click Finish. Close
the command window.
Installing the PTF unique to the WSAS Enterprise run-time environment
-
Open a command window.
On Windows, change the path to:
WSinstalldir\runtimes\ee_v5\bin
Run setupCmdLine.bat.
On Linux, execute this command:
export JAVA_HOME=/opt/IBM/WebSphereStudio/runtimes/ee_v5/java
-
In the same command window, change the path to:
WSinstalldir\Runtime Updates\PME PTF2
Run updateWizard.bat (or updateWizard.sh on Linux).
The Update Installation wizard opens. Click Next.
-
On the following page, select Specify product information. Click
Browse beside the Installation directory field. A folder dialog
opens. Navigate to:
WSinstalldir\runtimes
Select ee_v5 from the folders listed. Click Open (or OK
on Linux). The path is entered in the Installation directory field. It
should be:
WSinstalldir\runtimes\ee_v5
Click Next.
-
The following page lists what can be installed. Select Install fix packs.
Click Next.
-
The following page requests where the fix packs are located. Check that the
Fix pack directory field is:
WSinstalldir\Runtime Updates\PME PTF2\fixpacks
Click Next.
-
The fix pack available for installation is listed. Click Next.
-
The following page summarizes the installation, listing the fix pack, the
product, and the directory to be updated. Click Next.
-
A final page confirms a successful installation. Click Finish. Close
the command window.
Note: If you previously installed PQ79105 in Interim Fix 006, uninstall it
before proceeding.
-
Open a command window.
On Windows, change the path to:
WSinstalldir\runtimes\ee_v5\bin
Run setupCmdLine.bat.
On Linux, execute this command:
export JAVA_HOME=/opt/IBM/WebSphereStudio/runtimes/ee_v5/java
-
In the same command window, change the path to:
WSinstalldir\Runtime Updates\PME PTF2
Run updateWizard.bat (or updateWizard.sh on Linux).
The Update Installation wizard opens. Click Next.
-
On the following page, select Specify product information. Initially,
a product not found message will occur because the installer is assuming this
is a standalone server. It is not an error. Click Browse beside the
Installation directory field. A folder dialog opens. Navigate to:
WSinstalldir\runtimes
Select ee_v5 from the folders listed. Click Open (or OK
on Linux). The path is entered in the Installation directory field. It
should be:
WSinstalldir\runtimes\ee_v5
Click Next.
-
The following page lists what can be installed. Select Install fixes.
(Note: install fixes not install fix packs.) Click Next.
-
The following page requests where the fix packs are located. Check that the
Fix pack directory field is:
WSinstalldir\Runtime Updates\PQ76593
Click Next.
-
The fixes available for installation are listed. Check PQ76593 and
click Next.
-
The following page summarizes the installation, listing the fix pack, the
product, and the directory to be updated. Click Next.
-
A final page confirms a successful installation. Select the run again button.
-
Run the wizard again for the interim fix to prevent the JVM from hanging
during profiling. The path to the interim fix WSinstalldir\Runtime
Updates\PQ80207, where you placed the downloaded JAR file earlier. The
fix number is PQ80207.
User Instructions
This update lets you test applications on the WSAS Enterprise 5.0.2 run
time. You can take advantage of the fixes added to the 5.0.2 run time. New
enhancements for the WSAS Enterprise 5.0.2 run time, such as JMS over SOAP,
however, cannot be exploited.
The WSAS Enterprise 5.0.2 run time addressed some security issues from the
previous version. These changes mean you must make a minor change to your
existing Enterprise server configurations by completing the following
steps:
-
Launch WebSphere Studio.
-
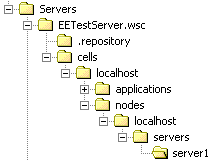
In your workspace locate your Enterprise server configuration, it is a folder
with a wsc file extension. For example, in the structure below, it is
EETestServer.wsc. Navigate to the following path:
/cells/localhost/nodes/localhost/servers/server1
-
Edit the resources.xml file and delete the following name/value pair:
authDataAlias="BPEAuthDataAliasCloudscape"

Verification
In this section, you will verify that the update for the run-time
environment was installed.
-
Create and launch a new enterprise server instance. For example, create an
enterprise server instance called EETestServer. Next, select the Servers
tab in the Servers view of the Business Integration
perspective. Right-click EETestServer. From the pop-up menu, select
Start. The Console view opens as the server starts.
-
In the first line of the console output, you should see the following text to
indicate the update to 5.0.2:
WebSphere Platform 5.0 [BASE 5.0.2 ptf ... ] [PME 5.0.2 ptf...]
-
You can alternately use the administrative console for verification. To
enable it, follow these steps:
-
In the Servers view, select the Server Configuration tab.
Right-click your new server instance and from the pop-up menu, select
Open. Click the Configuration tab. Select Enable
administration console and save and close your server configuration.
-
Select the Servers tab and right-click your server. From the pop-up
menu, select Start. Once started, select the server again and from
the pop-up menu, select Run Administrative console. The console will
launch in the internal browser of the workbench. You will be asked for a
login userid. If you have never created one, enter a new one, such as IBM,
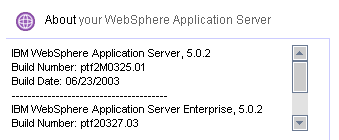
and click OK. In the About your WebSphere Application Server
section of the console, a 5.0.2 indicates a successful installation.

Instance list in new Web client
After applying this update, you will notice that the default instance list
in the Web client is empty. It is empty because a more precise query in the
updated client checks for authentication of a userID. If security is not
enabled for the test environment's application server instance, the query
returns an empty result set and so the instance list is empty.
If you want to see the instance list, enable security on the test
environment server. Another way to see the instance list is to create a
customizable list. With a customizable list, you can create a query that will
explicitly use UNAUTHENTICATED as userID for starting the process. A user
defined list, however, can not be saved because an unauthenticated user does
not have the authority required by the WebSphere Process Choreographer to save
lists.
If your processes use compensation
If your processes use compensation, then perform these additional steps:
-
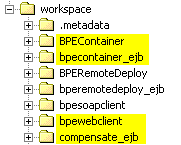
In the Business Integration perspective, select the J2EE Hierarchy view.
Remove the BPEContainer, bpecontainer_ejb, compensate_ejb, and bpewebclient
folders (shown in the following figure) from your workspace, as well as any
references to them.

-
Create a new Enterprise server configuration. Creating the configuration will
import a new set of these projects. Afterwards, delete the new configuration
as it was only created temporarily to import the projects. Add the
BPEContainer application to the Enterprise server configuration you want to
run, if it has not been added already.
Upgrading to the new process Web client
The WSAS Enterprise 5.0.2 run-time fix pack introduces a new version of the
process Web client. The user interface of the new process Web client differs
from the old version, but it is functionally similar. To avoid potential
problems, you must upgrade to the new version of the process Web client by
completing the following steps:
- Open the Import wizard and navigate to the following directory:
ee_v5\installableApps
- Import the processportal.ear file. Your EAR file name and the portal name
must be different.
- Add the processportal.ear file to your Enterprise server configuration.
You will see some errors, which you can ignore. At build time, your processes
will work as normal.
If you turn on security
If you choose to turn on security, you may encounter authorization problems
when invoking the process Web client or when working with workflows.
If you encounter authorization problems when invoking the process Web
client, check the settings for the WebClientUser role by completing the
following steps:
- In the Workbench, open the Server perspective.
- In the Navigator view, expand the processportal application
project and the META-INF folder.
- Double-click the application.xml file to open it in the Deployment
Descriptor Editor.
- Click the Security tab.
- Ensure that WebClientUser is selected.
- Ensure that the All authenticated users checkbox is selected.
- Save the changes and close the application.xml file.
- Start the UTE server.
- Launch the process Web client and specify a valid user ID and password
when prompted.
If you encounter authorization problems when working with workflows,
complete the following steps:
- Edit the following file:
Installdir\workspace\BPEContainer\META-INF\ibm-application-bnd.xmi
- Add a Group as the Process Administrators by adding the line shown in
bold text below:
<?xml version="1.0" encoding="UTF-8"?>
<com.ibm.ejs.models.base.bindings.applicationbnd:ApplicationBinding
xmi:version="2.0" xmlns:xmi="http://www.omg.org/XMI"
xmlns:com.ibm.ejs.models.base.bindings.applicationbnd="applicationbnd.xmi"
xmlns:com.ibm.ejs.models.base.bindings.commonbnd="commonbnd.xmi" xmi:id="ApplicationBinding_1058277522344">
<authorizationTable xmi:id="AuthorizationTable_1058277522344">
<authorizations xmi:id="RoleAssignment_1058277522344">
<role href="META-INF/application.xml#SecurityRole_1058277522344"/>
<groups xmi:id="Group_1058277522344" name="Administrators"/>
</authorizations>
<authorizations xmi:id="RoleAssignment_1058277522345">
<specialSubjects xmi:type="com.ibm.ejs.models.base.bindings.applicationbnd:AllAuthenticatedUsers"
xmi:id="AllAuthenticatedUsers_1058277522344" name="AllAuthenticatedUsers"/>
<role href="META-INF/application.xml#SecurityRole_1058277522345"/>
</authorizations>
<authorizations xmi:id="RoleAssignment_1058277522346">
<specialSubjects xmi:type="com.ibm.ejs.models.base.bindings.applicationbnd:AllAuthenticatedUsers"
xmi:id="AllAuthenticatedUsers_1058277522344" name="AllAuthenticatedUsers"/>
<role href="META-INF/application.xml#SecurityRole_1058277522346"/>
</authorizations>
</authorizationTable>
<application href="META-INF/application.xml#Application_ID"/>
<runAsMap xmi:id="RunAsMap_1058277522344">
<runAsBindings xmi:id="RunAsBinding_1058277522344">
<authData xmi:type="com.ibm.ejs.models.base.bindings.commonbnd:BasicAuthData"
xmi:id="BasicAuthData_1058277522344" userId="admin" password="{xor}PjsyNjE="/>
<securityRole href="META-INF/application.xml#SecurityRole_1058277522346"/>
</runAsBindings>
</runAsMap>
</com.ibm.ejs.models.base.bindings.applicationbnd:ApplicationBinding>
- In the line that you added, modify the number following Group_.
The number must match the number that follows SecurityRole_ in the
previous line.
- In the line that you added, modify the name Administrators to
reflect a group that is defined on your PC.
Updating the WSAS run-time test environment to 5.0.2
Previously, you updated the WSAS Enterprise run-time to 5.0.2. The WSAS
Enterprise run time is used when you create a server instance with a server
type called EE Test Environment. However, some users also will need to
update the WSAS run-time environment to 5.0.2. The WSAS run time is used when
you create a server instance with a server type called Test Environment.
If you have created and use server instances with a Test Environment server
type, then follow these instructions to update that run time to 5.0.2 too.
To update the WSAS run-time environment to 5.0.2, follow these
update instructions.
In addition, add the the fix to prevent the JVM from hanging during
profiling, as shown earlier in the final step of
Install fixes to add Staff support and prevent the JVM from hanging during
profiling to the WSASE 5.0.2 run-time environment. Since you are applying
to the WSAS run-time environment, not the WSAS Enterprise environment run-time,
replace ee_v5 with base_v5 when applying the fix.
© Copyright International
Business Machines Corporation, 2000, 2004.
All rights reserved.
![]()


