
IBM WebSphere Application Server Toolkit Fix Pack 6.0.2.2
Installation instructions
This document describes how to install Fix Pack 6.0.2.2 for IBM® WebSphere® Application Server Toolkit v6.0 directly from the IBM update site. Installation is performed using the Update Manager capability built into the product. You also have the option of downloading a ZIP file that you can install locally from your machine or from a departmental server.
Important: There are known issues that can cause problems during or after applying the fix. To ensure a proper installation:
- Follow the instructions below carefully.
- If you have disabled any plug-ins either through Update Manager or by modifying plugin.xml files, re-enable them prior to installing the fix.
Note:All screen captures in this document are taken from a Windows® installation. Screens will look slightly different on Linux®.
It is recommended that you install directly from the IBM server; However, a version of the fix is available for download for users who meet the following criteria:
- Have slow or unstable Internet connections and would like use a download manager with resume capability.
- Have trouble accessing the live IBM server from behind firewalls.
- Would rather download the fixes and install at a later time.
- Are site administrators for a group of developers who do not have direct access to the Internet.
Download the ZIP file
Once you have downloaded the file, unzip it and refer to wsast60/fixpack6022/update/install.html for install instructions.
- Log on to your system with a user ID that has write permission to the installation location and start WebSphere Application Server Toolkit 6.0. (This is typically an ID with Administrator authority on Windows, and root authority on Linux).
Note for those installing on Linux: Some files that can not be accessed by non-root users may be written into the workspace during the update process.
- Open the Install/Update wizard by clicking on Help > Software Updates > Find and Install....
- In the Install/Update wizard, click on search for updates of the currently installed features and then click Next to continue.
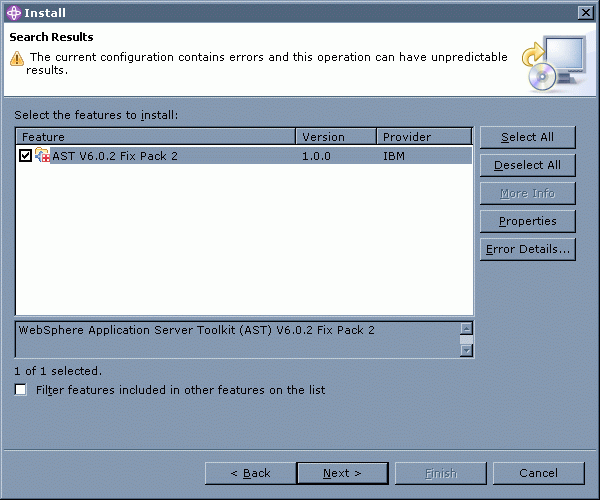
- Select AST V6.0.2 Fix Pack 2 then click Next to continue.
Important Do not select any other features to install except AST V6.0.2 Fix Pack 2. Please see this document for more information.
- Once you have read and accepted the license agreement, click Next.
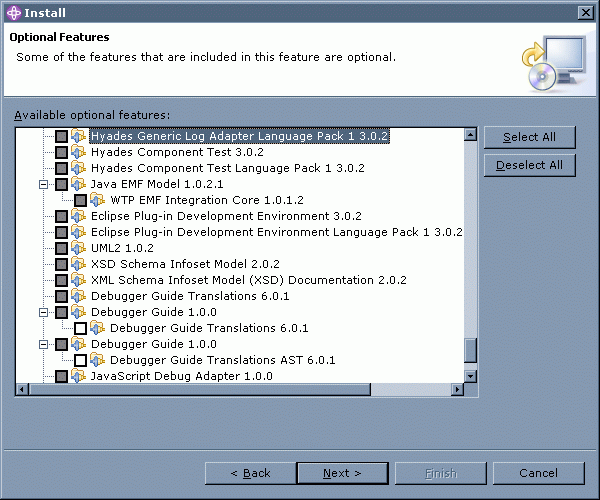
- The Optional Features page opens. Click Next to continue.
Important: Do not modify the selections. Changing the default choices may result in errors.
- Click Finish on the final screen of the Install wizard to begin the installation.
- If you are warned that you are about to install an unsigned feature, click Install to continue.
- When the installation is complete you will be asked whether you want to restart the WebSphere Application Server Toolkit workbench. Click Yes to complete this installation. (This action will not reboot your machine.)
Linux Motif only: If the product does not restart automatically, start the product manually and continue.
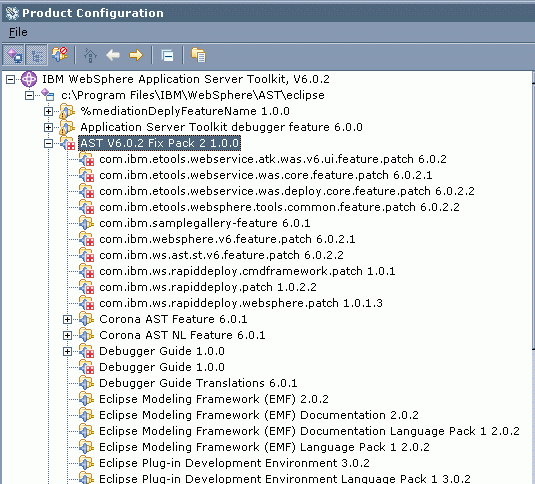
- To confirm that the installation was successful, open the Product Configuration by clicking on Help > Software Updates > Manage Configuration... and expand the features to verify that the AST V6.0.2 Fix Pack 2 is now installed, as shown below:
- Your installation is now complete.
© Copyright International Business Machines Corporation, 2000, 2006.
All rights reserved.