
When creating a HTML file using the Configuration server-based model in the Deployment Wizard, the next window after the Configuration Model window is the Logon Type window.
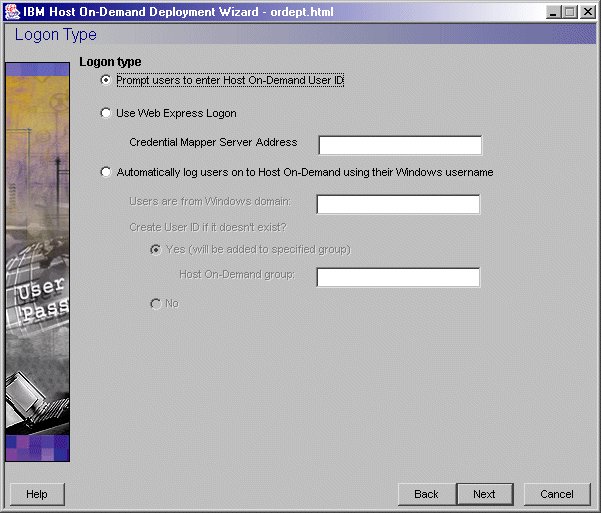
On this window, you are presented with the following three options:
|
Note that you must have your user profiles already set up on your Host On-Demand configuration server. If you do not have your user profiles set up and you attempt to launch the HTML file, you will get the following error message:
|
Type the full URL of the credential mapper server, for example, https://server_name/junction/cm/CredMapper, where
- server_name is the
name of the authentication server
- junction is the name of the junction point (optional)
- cm is the credential mapper servlet space
- CredMapper is the servlet name
Selecting this option also requires that you add an additional Vault HCM plug-in and all of its parameters to your web.xml file. For example, take the following steps:
A. Use WebSphere Application Server's Application Assembly Tool to update the following INIT parameter with the new Vault credential mapper name CMPIConfigServer_:
Code example:
<init-param>

      <param-name>CMPICredentialMappers</param-name>

      <param-value>CMPIDCASPlugin, CMPIVaultPlugin, CMPIConfigServer_</param-value>


      </init-param>
Add the parameter name for the new parameter value specified above, and change the AUTH type to AuthType_ConfigServer:
Code example:
<init-param>

      <param-name>CMPIConfigServer_</param-name>

      <param-value>com.ibm.eNetwork.security.sso.cms.CMPIVault,

      AuthType_ConfigServer, *</param-value>

      </init-param>
B. Prepend the remaining Vault parameters* with the new credential mapper name CMPIConfigServer_, for example, CMPIConfigServer_CMPI_VAULT_DB_ADDRESS. You do not need to prepend these two parameters, however:
CMPI_VAULT_DB_HOSTADDR_COL_NAME
CMPI_VAULT_DB_HOSTAPP_COL_NAME
C. In your Vault HCM database, create a table with the following three columns:
NETWORKID
HODID
PASSWORD
Be sure that the NETWORKID column contains the network IDs, the HODID column contains the Host On-Demand user IDs, and the PASSWORD column contains the Host On-Demand passwords. Since you did not add parameters in your XML file for HOSTADDRESS and APPLICATIONID, you do not need to add the columns for these in your Vault credential database.
**********
* IMPORTANT: When using the Configuration server-based model and
a network security application such as Tivoli Access Manager, you may be
accessing your Host On-Demand pages via a URL such as https://server_name/junction_name/HOD/myhodpage.html,
where server_name is the name of the machine running Tivoli Access Manager
and junction_name is the junction that you create to point to your Host
On-Demand server machine and your HTTP server's port number. If this is
the case, Host On-Demand will try to contact the Host On-Demand Service
Manager to get your user, group, and session information at the server_name
rather than at the junction_name.
To remedy this situation, edit the config.properties file found in the HOD
directory of your Host On-Demand install directory (\Program Files\IBM\HostOnDemand\HOD\config.properties)
by adding this line at the end of the file content:
ConfigServer=myhodserver.ibm.com
where myhodserver
is the machine you are pointing to with the junction_name.